Quantcast
Channel: How To's | Everything Tech - Appuals.com
Viewing all 4543 articles
Browse latest View live

BEST FIX: Steps to Fix Mail Error 0x8007054e in Windows 10

$
0
0

Windows 10 is a major change in the world of Operating Systems and it has been in the news for a while. It’s elegant GUI and performance has been a major reason for its popularity among the computer users all over the world.

A number of users have reported an error 0x800054e while trying to setup their account on Mail and Calendar apps. It also states, “Something went wrong, we’re sorry but we weren’t able to do that”. Windows Store had a lot of bugs and it also lacked features in Windows 8 but Microsoft took a step ahead and enhanced its user experience to an extent. Windows 10 has a number of built-in apps that are pretty useful in certain ways. The Mail and Calendar apps are one of them that are used a lot by the Windows 10 users. Unfortunately, these two apps are more controversial when talking about accessibility. Both of these apps have a lot of bugs and these cannot be used at certain occasions. So, I will be mentioning some fixes for this problem in Windows 10.

0x8007054e-1

Reason Behind the Windows 10 Mail & Calendar 0x8007054e Error:

Windows Mail and Calendar apps account information is stored inside a folder on your Local Disk. For some reasons, this folder can get corrupted causing the problem in saving the account information.

Solutions to Fix the Windows 10 Mail & Calendar 0x8007054e Error:  

There are a number of solutions but I will be mentioning only those that are specifically related to this issue. So, stay tuned and check the solutions below.

Method # 1: Fixing the Accounts Information Folder

This method is proved to be the best of all as by following it properly, you can get your Mail and Calendar apps back to their working state. Follow the steps below.

At first, close your Mail and Calendar apps on your computer.

After closing the apps, you need to navigate to a folder inside your Local Drive C (in case Windows 10 is installed there). For this purpose, you are required to Show Hidden Files on your PC.

To show the hidden files, navigate to the View tab present at the top of your Windows Explorer. Inside the View tab, you need to check the box labeled as Hidden Items. Now, Windows will show the hidden files on your Local Drives.

0x8007054e-2

Now, navigate to C:\Users\Your Username\AppData\Local and find the Comms folder inside that directory. Rename or Delete this folder to delete the account information stored for the problematic apps.

Note: If you are getting an error, “The action cannot be completed” while trying to rename or delete the folder, close all the apps running on your PC or you can also restart it to try again.

0x8007054e-3

After deleting the Comms folder, reopen the Mail or Calendar app and you will be prompted to setup your account as you never did it before. So, just add your account and start using the apps normally.

0x8007054e-4

Method # 2: Reinstalling Mail and Calendar Apps

If the above mentioned method is not working in your case, then the last resort is to reinstall Mail and Calendar apps inside Windows 10. But, there is an issue with Windows native apps that they cannot be uninstalled normally as compared to other apps. So, you can follow along for the sake of removing these apps from PC. You can install them from Windows Store thereafter.

Open PowerShell app by searching in the Cortana and right click over it to open it as an administrator.

0x8007054e-5

Copy the following line of code from below and type/paste it inside PowerShell followed by the Enter

Note: You would get an error if you don’t run it as administrator.

Get-appxprovisionedpackage –online | where-object {$_.packagename –like “*windowscommunicationsapps*”} | remove-appxprovisionedpackage –online

Now, restart your PC and download the Mail and Calendar apps from Windows Store. Run these apps to check if the problem still persists.

The post BEST FIX: Steps to Fix Mail Error 0x8007054e in Windows 10 appeared first on Appuals.com.


BEST FIX: High CPU Usage by RuntimeBroker.exe on Windows 10

$
0
0

RuntimeBroker.exe is the medium process through which access to (Universal) / (Metro Apps) is granted. This means, that the process RuntimeBroker.exe runs the apps as the name suggests, on behalf of other apps. Some users have experienced issues with it where the process is consuming almost all or too much of the CPU which causes the system to go slow. We can disable it via Registry Editor and also via a setting that is constantly using RuntimeBroker.exe to make calls to Windows Update Settings from within the Updates.  Since this is a work around; we’ll still need to wait for Microsoft to release a patch or update for a permanent solution in future; when this happens, it will automatically push and apply the update provided that your Windows Updates are turned on.

Note: Disabling RuntimeBroker.exe will prevent the store apps from running. Users have also reported weird behavior when they have disabled RuntimeBroker.exe; so i would suggest you attempt the two other methods first and if they don’t help then disable RuntimeBroker. The two other methods are listed below. (Method 2 & Method 3)

Disabling RuntimeBroker.exe To Stop High CPU Usage via Registry Editor

Hold the Windows Key and Press R, to open Run Dialog. In the Run Dialog that opens up type regedit and Click OK

Windows-key-R

This will open Registry Editor. In Registry Editor navigate to the following path:

[HKEY_LOCAL_MACHINE\SYSTEM\CurrentControlSet\Services\TimeBroker] “Start”=dword:00000003

Double click the registry called “Start” and change 3 to 4.

4 is for disable, 3 is for manual and 2 is for automatic. We need to set it to 4 to disable it. After this the RuntimeBroker.exe will stop; since it’s disabled.

runtimebroker1

You can go one step further and disable the updates from “more then one place” to further restrict the process.

[METHOD 2] Click Start and type check for updates, then choose Advanced Options. Then click Choose How Updates Are Delivered, then Disable the switch for “Updates from more then one place

[METHOD 3] Some users have also reported success by disabling Notifications which can be done in “Settings -> System -> Notifications

The post BEST FIX: High CPU Usage by RuntimeBroker.exe on Windows 10 appeared first on Appuals.com.

BEST FIX: GWXUX has stopped working

$
0
0

GWXUX.exe is an applicated part of Windows 10 (Update Program) and is installed by an automatic Windows Update referenced as KB3035583. There have been no announcements, or explanations from Microsoft as to why they’ve pushed this updated but it is supposed to install pop-ups and invite you to download Windows 10. This update can be uninstalled from the Windows Updates list via Control Panel. When an unauthorized program shows you unwanted pop-ups; it is then called as a PUP (Potentially Unwanted Program)

There is also a Microsoft thread about the (GWXUX stopping) issue where other people have reported having the same. Check it out by Clicking Here

Now you also have a choice of running the troubleshooter if you want to keep the GWXUX (update). 

Fix GWXUX.exe has stopped working via Troubleshooter

First step is to click the Start button located on the lower left corner; when the start menu shows up (type Troubleshooting) in the search prompt under it and click the first result that says Troubleshooting.

gwxux has stopped wroking

Then choose Fix Problems with Windows Updates, then click Next and wait for it to detect problems. If it tells you to run it as administrator; do it. Follow the procedure on screen if it finds any issues; if not then close it. If it did not  pick any issues then you will need to do the second method below which would uninstall GWXUX.exe

Fix GWXUX.exe has stopped working by Uninstalling it

Click Start and type Control Panel. Choose Control Panel and in the search bar on the top right type Windows Updates then choose View Installed Updates from under Programs and Features.

gwxux has stopped working

From the list of installed updates; locate KB3035583 then double click on it to uninstall it. Once done; your PC should restart. I recommend setting updates to manual to avoid getting such updates.

The post BEST FIX: GWXUX has stopped working appeared first on Appuals.com.

BEST FIX: Steps to Fix Error 0x800CCC92

$
0
0

Error 0x800CCC92 is the hexadecimal form of the error. It’s a common error code which is related to Windows Live Mail and Outlook. When the error comes up, it usually means that either the e-mail application could not connect to the host or the host address is not reachable or the e-mail server has rejected the login. This all points to one major cause and that is “connectivity” with your e-mail server.

The best possible fix is custom to your circumstances and needs to be troubleshooted. In this guide; i will walk you through a mixture of steps that has proven to be helpful for me.

Fix Error 0x800ccc92 on Windows Live Mail and Outlook

The first thing we need to ensure is that the e-mail’s web-server is working and that it allows you to login to your account via the webmail. If you don’t know what your webmail address is; simply do a quick Google Search this way “hotmail login”, “gmail login”, “yahoo login” “comcast login”, which will return the most relevant search (99% of the times the first result is the correct one), click on it and try to login to your e-mail account. If it works; we can proceed further but if it does not work then there is an issue either with the username or the password which needs to be addressed  before moving further.  Usually, the username is correct but the password is incorrect; you can reset it via the webmail there is a small button under the box where you type your password that indicates password reset.

After you’ve successfully logged in or successfully resetted your password run a system file scan (see here)The steps on the link are done on a Windows 10 system but they are the same for Windows 7/Vista and 8.

If the password was reset and you were getting password prompts; then update the password – if it still wont work, then With the correct username and password; next step is to make sure that the e-mail server settings are correct, i.e pop, smtp, imap etc.. You can also get this from a quick google search or by speaking to your ISP if your e-mail is from the ISP.

Once you get it; re-add your account.

For Windows Live Mail: see steps here

For Outlook: see steps here

I would suggest removing the old account first before re-adding the new one.

The post BEST FIX: Steps to Fix Error 0x800CCC92 appeared first on Appuals.com.

FIX: Windows has blocked this software because it can’t verify the publisher

$
0
0

Error “Windows has blocked this software because it can’t verify the publisher” comes up when your security settings cannot verify the publisher of the content. Even though, i do not like Explorer because it does this un-necessarily but as i understand you and many of my clients like Internet Explorer and are used to it. Internet Explorer has been replaced with Edge in Windows 10. Since the earlier versions of Windows (before 10) were heavily dependent on Internet Explorer for most-functions, any corruption on it causes affects other areas of the system. I will walk you  through the steps in this guide to address the issue; but if and when you make up your mind about changing browsers, switch to “Google Chrome” – it is fast,  reliable and secure with most features built-in to it unlike Internet Explorer; which is linked to allow other programs to change its features.

Steps to Fix Windows has blocked this software because it can’t verify the publisher

Open Internet Explorer and Press the Alt key while you’re on Internet Explorer for the menu to appear (on the top) and then choose Tools. From Tools choose Internet Options and then Click the Security Tab – Custom Level button.

inetcpl

From the Custom Level settings pane; make the following changes

Under ActiveX ensure the following are set to enabled

  1. Run ActiveX and plug-ins – Enabled
  2. Download Signed ActiveX Control – Enabled
  3. Script ActiveX controls marked as safe for scripting – Enabled

Set the following to Prompt

  1. Download unsigned ActiveX Control – Prompt
  2. Initialize and script ActiveX controls not mark as safe – Prompt
  3. Click OK / Apply and OK again.

The post FIX: Windows has blocked this software because it can’t verify the publisher appeared first on Appuals.com.

BEST FIX: CMD Application Error on Windows 10 (0xc0000142)

$
0
0

CMD stands for command (and .exe is for executable). It is a DOS like prompt on your system that is used to perform various tasks and is an essential component of Windows 10 and it’s predecessors. The error 0xc0000142 [The application was unable to start correctly (0xc0000142). Click OK to close the application] for (CMD) is usually caused by an interrupting program most commonly your (antivirus,  antirootkit or geforce update etc) application being corrupt or in need of a repair. This can also be caused by corrupted system files.

Since we don’t know which program is it exactly that is causing the cmd pop-ups; it will be useless to try and diagnose each program, therefore it would be best to apply the general steps listed here to diagnose this, this won’t have any adverse affect on your system and it will continue to function normally.

cmd error 0xc0000142

Troubleshooting CMD – Application Error (0xc0000142)

The first method is to do a clean boot, what it would do is disable non windows services and startup programs. You can re-enable them if needed. This will also improve the performance by disabling un-wanted start-up programs that are not used. They can be re-enabled by repeating the steps and checking the ones that have been disabled.

For Windows Vista and 7 View Steps

For Windows 10 View Steps

After the clean boot; restart the system and test to see if issue is gone or if it still exists. If it exists then do a system file scan. You can do this by going to command prompt and running sfc /scannow

If the issue is still not resolved, then go to Control Panel -> Programs and Features -> Uninstall a Program and take a look at the list of recently installed programs, sort them by date to filter out which ones were recently installed that triggered the error and uninstall them.

The post BEST FIX: CMD Application Error on Windows 10 (0xc0000142) appeared first on Appuals.com.

BEST FIX: Fix Mail Sync Error 0x80072726 and 0x8007274

$
0
0

There have been quite a few complaints of the Windows 8/8.1 and 10 Mail app not being able to sync with Email accounts and not being able to send or receive any Emails, greeting the user with an error message along the lines of We’re having a problem downloading messages. Try again later. Error code 0x8007274c and 0x80072726. The average computer user certainly needs to be able to send and receive Emails, and seeing as though the Mail app is a pretty handy Email client at the disposal of all Windows 8/8.1 and 10 users, this issue is of the utmost urgency.

The following are the various methods that you can use to fix any issues involving Email syncing/sending/receiving problems in relation to error code 0x8007274c and 0x80072726.

Method 1: Disable the third-party firewall that you are using

The most common culprit behind error code 0x8007274c and 0x80072726 are third-party firewall applications, such as BitDefender and AVG, that do not allow the Mail app to communicate with the internet through the firewall, thus inhibiting the application’s ability to sync, receive and send Emails. Simply disabling any third-party firewall programs (or completely uninstalling them, for that matter) and using the default Windows Firewall instead will turn the Mail app back to normal. With no third-party firewall standing between it and the World Wide Web, the Mail app will easily be able to sync with any and all Email accounts and retrieve and send Emails.

Most of the third-party applications can be easily disabled by right clicking on the application (firewall/antivirus’s) icon in the lower right corner where the clock is and choosing “Temporarily Disable AVG Protection” or similar if using other third party application. You can also refer to steps at the bottom to only allow the svchost.exe process.

If you don’t want to disable it then you can proceed with the methods below to add it as an exception; since there are a lot of anti-virus and 3rd party applications; i’m going to list the steps for the most common ones used.

0x800CCC67

Allow the svchost.exe process to communicate (Windows Firewall)

In the event that you are receiving error code 0x8007274c and 0x80072726 while you are not using a third-party firewall program and the only firewall protecting your computer is Windows Firewall, disabling your firewall is the exact opposite of the right move. Disabling Windows Firewall can leave your computer extremely vulnerable, so try the following instead:

Click on the Start button located in the lower left corner and type Windows Firewall. then choose it from the list of results.

0x8007274c-1

Then choose “Allow on an app or feature through windows firewall” located in the left pane.

0x8007274c-2

From the window which opens up; choose Allow Another App and locate the two svchost.exe files and add it.

Add the following

C:\Windows\System32\svchost.exe

C:\Windows\SYSWOW64\svchost.exe

After it has been added, in the list of firewalls you will see a new app with name “Host Process for Windows Service”.  Make sure it matches the image below.

0x8007274c-3

Click OK to exit out and test. If you are using a third party firewall then choose the method that best fits your (AV program from below) and perform the  instructions.

Allowing the svchost.exe in Windows Defender

From the lower left corner Click Start and type Windows Defender. Click and choose Windows  Defender from the list. Scroll down until you see Exclusions, click and add exclusion. Under Processes, choose “Exclude a exe, com or str proces” and exclude the following:

C:\Windows\System32\svchost.exe

C:\Windows\SYSWOW64\svchost.exe

Adding svchost.exe in BitDefender

If you are using BitDefender then open it, choose Protections -> Firewall. Locate and click on Adapters, and add the network you’re on to trusted.

Adding svchost.exe in AVG

If you’re running AVG then you need to add the TCP Ports in the AVG Firewall which are 993 and 465. This is done via the Firewall feature in AVG.  AVG has the instructions listed here

The post BEST FIX: Fix Mail Sync Error 0x80072726 and 0x8007274 appeared first on Appuals.com.

BEST GUIDE: Customize Windows 10 Start Menu via Group Policy (Domain)

$
0
0

Windows 10 brings with it a ton of cool features that are specifically designed for the comfort and ease of domain administrators all over the world. With Windows 10, domain administrators can make a wide variety of changes to every single one of the computers on their domain by simply making the changes they want to their own computer. One of the aspects that domain administrators can control for their entire network is the Start Menu of every single computer connected to the network.

Using Group Policy, domain administrators can create a special Start Menu layout that is applied to all the computers of all the users on the domain and provides the administrator with the ability to control what applications are pinned onto the Start Menu, the arrangement of the Menu tiles and the size of the Menu tiles. This option is exclusively available on the Education and Enterprise versions of Windows 10 and, once enabled, takes away the domain’s other users’ ability to tinker around with and edit the Start Menu and the apps and tiles on it in any way.

The following is everything you need to do to create a customized Start Menu layout for your entire domain using Group Policy:

Customize the Start Menu on your computer and give it the layout that you want applied to all of the computers on your network. This includes pinning and unpinning applications from the Start Menu, rearranging tiles, resizing tiles and creating app groups.

Next, export the Start Menu layout that you have created to an .xml file so that you can move it a storage space that is shared by all of the computers on your network. To do so, first open the Start Menu, type in powershell and open the program named Windows PowerShell.

customize start menu in windows 10-1

In the Command Prompt, type in the command export-startlayout –path <path><file name>.xml, replacing <path> with the path you want the file to be saved in and <file name> with the name you want the .xml file to saved with. The final command will be something like export-startlayout –path \\FileServer\StartMenuLayouts\Layout1xml. When selecting the path for the file to be saved in, make sure that the path you choose can be accessed by all of the computers on the network.

Once you have exported the layout to an .xml file, you can move onto actually applying it to all of the computers on the network using Group Policy. To do so, first open the Start Menu, type edit group policy into the Search box and click on the program named edit group policy.

In the left pane, expand User Configuration or Computer Configuration.

Expand Administrative Templates and then click on Start Menu and Taskbar.

In the right pane under Settings, right click on Start Layout and click on Edit.

customize start menu in windows 10-2

When the Start Layout policy settings show up, click on Enabled to apply the Start Menu layout through Group Policy and then paste the path (which should be accessible to all users on the network) where the .xml file for your Start Menu layout is stored under Start Layout File.

customize start menu in windows 10-3

Click on Apply and then click on OK, and the Start Menu layout you have created will be applied to all users on the network.

customize start menu in windows 10-4

If you wish to update the Start Menu layout you have created at any time, simply create a new layout and replace the old .xml file with a newer, updated .xml file using the export-startlayout command in Windows PowerShell. Once you do so, Group Policy will import and apply the updated Start Menu layout the next time any of the users of the domain log on.

The post BEST GUIDE: Customize Windows 10 Start Menu via Group Policy (Domain) appeared first on Appuals.com.


BEST FIX: Windows 10 will not connect to WIFI Automatically

$
0
0

Many Windows 10 users from all across the globe are complaining of their Windows 10 computers not connecting to saved WiFi networks automatically even though they have made sure that the Connect automatically option for those networks has been enabled. Such users have reported that their computers only connect to WiFi networks they already remember and should connect automatically to when they either manually connect to them from their computer’s WiFi menu or, in some cases, press the hardware WiFi button on their laptop.

This issue may be caused by either a simple glitch or, in most cases, a system upgrade that causes the computer in question to start turning its WiFi adapter off, and thus requiring it to be woken up following every shutdown or restart, in order to save power. Thankfully enough, there are some things that you can do to get rid of this problem. The following are the two most effective solutions that can be used to fix a Windows 10 computer that fails to connect to WiFi networks it remembers automatically:

Forget your WiFi network and then reconnect to it

If a simple glitch or bug is causing your computer to not connect to a saved WiFi network automatically, the following is bound to work for you:

Click on the WiFi icon in the taskbar.

windows 10 wifi 1

Click on Manage WiFi settings.

windows 10 wifi 2

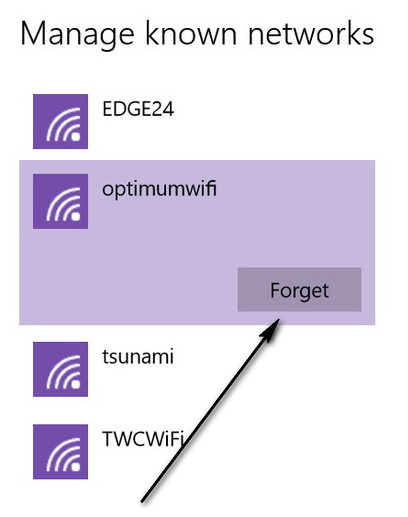
Under the Manage known networks section, click on the saved WiFi network that your computer isn’t connecting automatically to, and then click on Forget.

windows 10 wifi 3

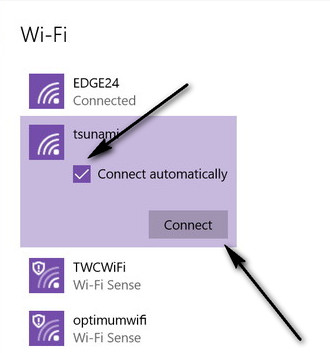
Restart your computer. Click on the WiFi icon in the taskbar and click on your WiFi network from the list of available networks.

windows 10 wifi 4

Make sure that you check the Connect automatically. Click on Connect.

windows 10 wifi 5

Enter the security code for the network. Once your computer connects to the network, its memory should be refreshed and it should connect to the network automatically even after shutdowns and restarts.

Stop your computer from turning its WiFi adapter off to save power

If your computer has not been connecting automatically to WiFi networks it remembers after a system upgrade to Windows 10 or any of its builds, you would be better off trying the following:

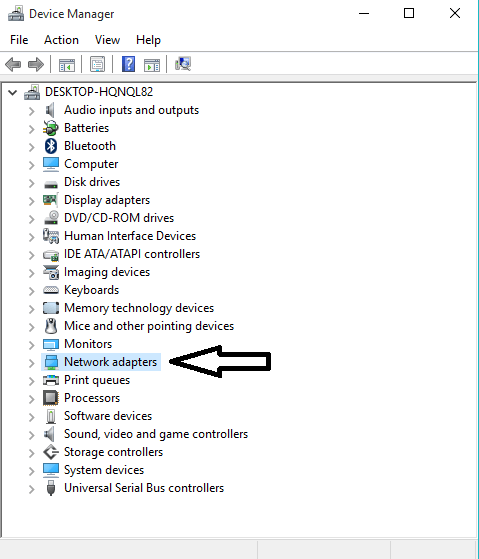
Right click on the Start button and, in the menu that appears, click on Device manager.

windows 10 wifi 6

Double click on the Network adapters section to expand it.

windows 10 wifi 7

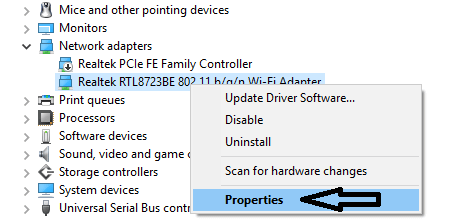
Figure out which of the adapters in the list that appears is your computer’s WiFi adapter and then right click on it. From the right click menu, click on Properties.

windows 10 wifi 8

In the dialog that appears, click on the Power management tab to navigate to it. Uncheck the Allow this computer to turn off this device to save power. Click on OK.

windows 10 wifi 9

Once the change is saved, your computer should start connecting automatically to WiFi networks that it remembers as soon as it wakes up from a shutdown, a restart or a simple sleep.

The post BEST FIX: Windows 10 will not connect to WIFI Automatically appeared first on Appuals.com.

BEST FIX: “something went wrong” while creating account on Windows 10

$
0
0

The average Windows 10 user may be faced with an error saying “Something went wrong. Please try again later” when they try to create a new user account on their Windows 10 computer from the Control Panel. This is especially the case with Windows 10 users who have recently upgraded from a previous version of Windows. The thing is, whenever a Windows 10 user creates a new user account, the OS tries to connect to Microsoft servers as users can only create new user accounts with Microsoft IDs on Windows 10 by default.

The “Something went wrong” error shows up when Windows 10’s attempts to communicate with Microsoft servers fail, and the following are some of the most effective methods that can be used to resolve this issue:

Set the date, time and time zone on your computer

Windows 10 may be having trouble communicating with Microsoft servers because the time, data and/or time zone on your computer is not right. If that is the case, simply setting the right time, date and time zone on your computer should fix the problem.

Allow your computer to use SSL and TSL

In many cases, allowing their computer to use SSL and TSL protocols enabled their Operating System to connect to the internet or, more specifically, the Microsoft servers and consequently got rid of the “Something went wrong” error for many a Windows 10 user.

Open the Control Panel. Navigate to Internet Options. Click on and head over to the advanced, Scroll to the very bottom of the checklist. Check the boxes beside the Use SSL 2.0, Use SSL 3.0, Use TSL 1.0, Use TSL 1.1 and Use TSL 1.2

something went wrong-1

Click on Apply, and then click on OK.

something went wrong-2

something went wrong-3

Try creating a new user account after implementing these changes, and you should no longer receive the “Something went wrong” error message.

Create a new user account through the Command Prompt

While creating a new user account through the Command Prompt will not actually solve the “Something went wrong” error when creating a new user account, it will, however, allow the user to successfully create a new user account which, unlike their old one, will not suffer from the “Something went wrong” issue.

Open the Start Menu. Type cmd into the Search bar, right click on the program named Command Prompt that appears and select Run as administrator.

something went wrong-4

Type in the command net user (desired account name) (desired account password) /add.

something went wrong-5

Press the Enter. Next, to turn the newly created account into an Administrator, type in the command net localgroup administrators (name of newly created account) /add.

something went wrong-6

Press the Enter. As soon as the last command is executed, a new Administrator account will have been created on your Windows 10 computer, and this user account will not be affected by the “Something went wrong” issue that the account you were previously using was.

The post BEST FIX: “something went wrong” while creating account on Windows 10 appeared first on Appuals.com.

How To Remove a Sim Card From a Samsung Galaxy Note 4

$
0
0

Unlike most high-end Smartphones today, the Samsung Galaxy Note 4’s back cover can be removed, exposing the device’s battery and the housing for the SIM card. This means that, if you need to do so for whatever reason, you can easily remove a SIM card from a Galaxy Note 4 through its back cover. The following are all of the steps you need to follow in order to insert a SIM card into or remove a SIM card from a Samsung Galaxy Note 4:

There is a divot on the back of every Samsung Galaxy Note 4 located at the left of the rear-facing camera. This divot can be used to peel off the device’s back cover. Wedge a fingernail or thin plastic opening tool into the crevice and, once fastened, pry and peel open the device’s rear cover. Be extremely careful when going through this step as the Samsung Galaxy Note 4’s back cover is almost paper-thin and, while it is quite flexible, is only capable of withstanding a limited amount of bending.

remove sim card from note 4-1

remove sim card from note 4-2

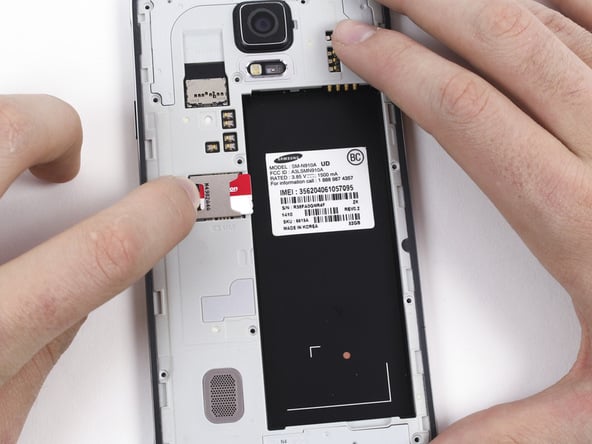
Removing the back cover of the Note 4 will expose the device’s insides. In order to get to the device’s SIM card jack, you will have to go through another obstacle – the battery. The Note 4’s battery, when intact, blocks the entrance of the SIM card jack, making it impossible for you to insert or remove a SIM card without first removing the battery. Wedge a fingernail or a tiny opening tool into the crevice located in the bottom right corner of the battery compartment and lift the battery upward to remove it from the device.

remove sim card from note 4-3

When the SIM card jack is fully exposed, simply push the SIM card slightly out of the jack from the jack’s rear end and then pull it out the rest of the way from the jack’s front end.

remove sim card from note 4-4 remove sim card from note 4-5

If you wish to reassemble the Galaxy Note 4, simply follow the instructions listed above in reverse order.

The post How To Remove a Sim Card From a Samsung Galaxy Note 4 appeared first on Appuals.com.

How the Microsoft Lumia 950 and 950 XL’s Iris Scanner Works

$
0
0

Windows 10 launched approximately 3 months ago, and it would only be fitting for Smartphones running Windows Phone 10, the former’s Mobile counterpart, to be released soon after. On the 6th of October, Microsoft unveiled a wide array of devices running on the mobile version of the Windows 10 OS to the world, and among these Smartphones were the Nokia Lumia 950 and 950 XL.

The Microsoft Lumia 950 and 950 XL, with specifications such as 3 gigabytes of RAM, large batteries, large Quad HD screens and impressive primary and secondary cameras, are truly monsters among beasts. However, it is not the specifications of these two devices that set them apart from ALL of the Smartphones in the market right now – it is the fact that they are two of the very first Smartphones to come with iris scanning technology. Yes, both the Microsoft Lumia 950 and 950 XL are capable of scanning the human iris and allow users to secure their phones with an iris scan.

Before the how of the Lumia 950 and 950 XL’s iris scanning technology can be explained, the medium that the technology uses needs to be described. Located on the front of the Lumia 950 and 950 XL, along with a front-facing camera, is an infrared camera designed to allow the phones to capture better images of the human iris in low-light conditions and another camera designed specifically to take pictures of your eyes. This hardware, combined with technology known as “asymmetric key cryptography” that is most commonly used in smart cards, communicates and cooperates with a Windows feature known as Windows Hello which was initially available on the PC version of Windows 10 to allow users to gain access to their phones by having their irises scanned instead of entering a password or a PIN.

In order to set up an iris scan as your phone lock, you are first asked by the Windows Phone 10 OS to set up a PIN lock as a fallback plan that you can use whenever an iris scan fails for whatever reason. Next, you get your phone acquainted with your iris to actually set the screen lock up.

After the screen lock has been set up, the Lumia 950 and 950 XL initiate and iris scan whenever an attempt to unlock them is made. The Lumia 950 and 950 XL first use their infrared cameras to light up the user’s eyes, and the camera that has been embedded specifically for capturing pictures of users’ eyes then snaps a picture of the user’s eyes. A mathematical calculation then turns your biometric information into a hash, which is then checked by the device to see if it matches the hash it has stored from when you initially set the lock up. If the two hashes appear to be the same, you will be granted access to the phone, otherwise access will be denied. All in all, this entire process takes but 2 seconds to be executed and completed.

Part of the technology used to create the Lumia 950 and 950 XL’s iris scanner is inspired by Microsoft’s Kinect sensor which accompanies the infamous Xbox gaming console. Microsoft has made it privacy its top priority with Windows Hello and its new iris scanning technology, which is why Windows Hello does not store any captured pictures of your face or iris locally or anywhere on the internet. In addition, Microsoft’s iris scanning technology also boasts superiority over the “Face unlock” technology, which can be easily defeated using a picture of the user, that was introduced not too long ago. A person can absolutely not gain access to a Windows Phone through Microsoft Hello if they are using a picture of the user to try and get past the iris scan. In addition, to top it all off, Microsoft Hello and Microsoft’s new iris scanning technology can also go as far as to successfully scan your iris while you are wearing normal (transparent) glasses.

Lastly, Microsoft did not hype its new iris scanning technology to a significant degree, which could mean that Microsoft is, at this moment, only testing the waters for its latest breakthrough in Smartphone security. It is certainly possible that, if the populous grows fond of Microsoft’s iris scanning technology, we will be seeing this new iris scanning technology integrated into a lot more Smartphones pretty soon.

The post How the Microsoft Lumia 950 and 950 XL’s Iris Scanner Works appeared first on Appuals.com.

BEST FIX: Steps to fix error 0x80048bf5 in Windows 10 Mail App

$
0
0

The Windows 10 Mail app, along with the Windows 10 Calendar app and the Windows 10 People app, is considered to be one of the most sub-par parts of Windows 10 and has been buggy and broken throughout the many Windows 10 builds that have been released. Even though Microsoft has managed to fix some of the many problems that users of the Windows 10 Mail app have faced. However, some problems, such as the error message that states “We’re having a problem sending messages. Make sure you have a connection and your account info is correct and try again” and greets the user with error code 0x80048bf5, have not officially been fixed.

Thankfully, there are a few solutions that have proven to work for the majority of users who have suffered from error code 0x80048bf5 in the past. The following are the three most effective methods that you can use to combat error code 0x80048bf5:

Method 1: Disable any and all third-party firewall programs

The Mail app may be having trouble making a connection with the World Wide Web because a third-party firewall app is standing between it and a stable connection to the internet. If that is the case, simply disabling (or uninstalling) any and all third-party firewall applications on your computer will allow the Mail app to get through to the internet, effectively getting rid of error code 0x80048bf5. If it starts to work after disabling/uninstalling the third-party antivirus; then you can re-install it again (since that would reset the settings of the firewall).

Method 2: Rename the Comms folder on your computer

For some users who were experiencing problems such as error code 0x80048bf5 with the Windows 10 Mail app, renaming the Comms folder in the AppData section on their computer did the trick.

Close the Mail. Open File Explorer and go to C > Users > (Your Username) > AppData > Local.

OR type %appdata% in the run dialog (windows key + r)

0x80048bf5-1

0x80048bf5-2

Then click the Local folder. Look for a folder titled Comms.

Change the name of the folder to anything other than Comms – for example, Comms_old.

0x80048bf5-3

Open the Mail app, and as soon as it opens, the app will create a new Comms folder, and this should get rid of error code 0x80048bf5.

Method 3: Uninstall and then reinstall the Mail app

If all else fails, uninstalling the Mail app entirely and then reinstalling it from the Store may just be able to free your computer and Mail app from the grip of error code 0x80048bf5.

To uninstall the Mail app, first open Windows PowerShell in Administrator mode. To do so, open the Start Menu, type powershell into the Search bar, right click on the program named Windows PowerShell, and click on Run as administrator.

powershell as administrator1

When Windows PowerShell fires up, type in the following command:

Get-appxprovisionedpackage –online | where-object {$_.packagename –like “*windowscommunicationsapps*”} | remove-appxprovisionedpackage –online

0x80048bf5-4

Press the Enter. Close Windows PowerShell and open the old Store app (the one with the green tile), not the new Store app (the beta one). Using the Store app, reinstall the Mail. Restart your computer.

Once your computer boots up, set up and use the Mail app, and error code 0x80048bf5 should be no more.

The post BEST FIX: Steps to fix error 0x80048bf5 in Windows 10 Mail App appeared first on Appuals.com.

BEST GUIDE: Replace Samsung Galaxy Note 4 Battery

$
0
0

Innumerable customers of all Smartphone manufacturers from Apple to HTC and everything in between have been constantly complaining about the fact that almost all of today’s high-end Smartphones do not grant the user access to the device’s battery. A non user-replaceable battery not only means that a person cannot simply remove the device’s battery to turn it off in the event that it freezes but also means that they can’t swipe it out for a fresh one if it’s running low on juice. However, Samsung has managed to continuously make sure that even the most high-end of its devices have user-replaceable batteries, and the Samsung Galaxy Note 4 is living proof of that.

The Galaxy Note 4’s battery is, indeed, user-replaceable, and the following are the steps you need to follow to remove a Note 4’s battery. If you don’t have the replacement battery, you can get it cheap from Amazon for $17 by Clicking Here

First of all, in order to gain access to the Galaxy Note 4’s user-replaceable battery, you will have to take off the device’s back cover. In order to do so, first insert one of your fingernails or a relatively small plastic opening tool into the recess in the back cover that is located to the left of the Note 4’s rear camera. Make sure that whatever you have inserted into the divot is fully secured, and then peel off the Note 4’s back cover. When prying off the device’s back cover, you need to be extremely careful and gentle as the Note 4’s extremely thin back cover is highly flexible but also really fragile at the same time.

battery-2 battery-1

Removing the Note 4’s back cover will give you access to everything that’s under its rear hood, and that includes the fairly large compartment on the right side of the Note 4’s rear that houses its battery. To remove the battery from the device’s body, inset your fingernail or an opening tool into the divot that is located in the bottom right corner of the battery compartment, and then lift the battery upward to remove it from the device.

battery-3

Once you are done tearing down the device and removing its battery, all you need to do in order to reassemble the device is to follow the steps above in reverse order.

The post BEST GUIDE: Replace Samsung Galaxy Note 4 Battery appeared first on Appuals.com.

BEST GUIDE: Scan Barcodes and QR Codes on Windows 10 Mobile

$
0
0

Any person who has used Windows Phone 8.1 and tinkered around with it even a little bit would know that a nifty feature the Operating System had to offer was QR code and barcode scanning. By simply launching the camera, navigating to available lenses and select Bing Vision, a Smartphone running Windows Phone 8.1 could be turned into a QR code and barcode scanner.

Unfortunately, Windows Phone 10, as advanced and better as it may be, does not come with this feature. Windows Phone 10 is still in early stages of development and release, but even though that is the case, the chances of QR code and barcode scanning making the cut and being added as features to the OS are bleak at best. Fortunately, however, anyone who wants to can certainly turn their Windows Phone 10 Smartphone into a QR code and barcode scanner using third-party apps.

There are more barcode and QR code scanning apps, both free and paid, on the Windows Phone Store than you could possibly decide between, so let’s make it a bit easier for you. The following are the two QR code and barcode scanning apps – one free, and the other paid – that are definitely worth your time (and money) and should be uses to scan barcodes and QR codes on a Windows 10 phone:

QR Scanner RS (Free)

QR Scanner RS is ideal for any and all Windows Phone 10 users looking to simply scan a few QR codes and/or barcodes every now and then. Even though QR Scanner RS should have come with nothing but basic QR code and barcode scanning capabilities considering its $0 price tag, the developer decided to do users a huge favor by packing more features into QR Scanner RS than any other free QR code and barcode scanning app on the Store. Not only does the app let users scan QR codes, links and barcodes, it even lets them fiddle around with and adjust camera settings and choose their preferred search provider from a wide list of presets or designate their own custom search provider.

qr codes

For a free app, QR Scanner RS has A LOT to offer, and the app doesn’t even have any advertisements. Since that is the case, if you happen to use the app and like it, there is absolutely no reason for you to not do the people behind the app a favor and donate $0.99 to them to show your support and appreciation. Also, giving the app a decent rating and review of the Windows Phone Store is a pretty good idea.

You can download QR Scanner RS here.

QR Scanner+ (Costs $1.99)

Many would wonder exactly why they should pay a couple of bucks for an app that is designed to simply enable their phone to scan QR codes and barcodes. However, you should rest assured as QR Scanner+ is definitely capable of making it worth your while (and your purchase). For starters, QR Scanner+ takes QR code and barcode scanning to an entirely new level and brings with it an unprecedentedly large set of settings and toggles and adjustments that the user can make, and not to mention its ability to perform scans at lightning-fast speeds through the Rapid Scan feature.

If that wasn’t enough, QR Scanner+ is capable of scanning much more than QR codes and barcodes – from URLs, vCards, meCards, bizCards, vEvents, geo-locations and e-mail addresses to phone numbers, text messages, simple text and even SEPA credit transfers (Giro code), there is definitely a lot that QR Scanner+ can do. In addition, to top it all off, QR Scanner+ not only works on Windows Phone 8.1 and Windows Phone 10 but also works on tablets and computers too. If you are not convinced of the benefits, integrity and competence of QR Scanner+ even after reading all that, the folks behind the app even offer a completely free 7-day trial that you can use to get merely a taste of what QR Scanner+ has to offer.

QR Scanner+ can be downloaded here.

The post BEST GUIDE: Scan Barcodes and QR Codes on Windows 10 Mobile appeared first on Appuals.com.


BEST FIX: Steps to Fix White Boxes/Squares on Desktop Shortcuts

$
0
0

Some Windows 7 users may be baffled when they turn their computer on one day only to see that all of the shortcut arrows that are usually located on the bottom left of shortcut icons have been replaced with ugly white boxes. This situation looks like the image below:

Having their shortcut arrows replaced by ugly white boxes is more common among Windows 7 users than you would think. This problem, in almost all cases, is caused when a user, or a program that they use, intentionally or unintentionally corrupts or deletes the .ico (icon) file for the shortcut arrow that all Windows users know and love. Fortunately, there is a highly effective and fairly quick fix for this problem – simply remove the shortcut arrows altogether. While removing the shortcut arrows from shortcut icons will mean that you will no longer be able to differentiate between an actual program and a shortcut to that program, it is worth it as doing so will get rid of those ugly white blobs that your beautiful shortcut arrows have been replaced with.

shortcut arrow fix-1

The following are some of the easiest methods that you can use to remove shortcut arrows from your computer in order to get rid of the ugly white boxes that they have been replaced with:

Method 1: Remove the shortcut arrows using Winaero Tweaker

Download Winaero Tweaker by going here and clicking on Download Winaero Tweaker above the Donate

Install Winaero Tweaker. Open Winaero Tweaker and click on Shortcut Arrow under Appearance in the left pane.

shortcut arrow fix-2

In the right pane, click on the small circle beside the No arrow option, and then click on Change shortcut arrow.

shortcut arrow fix-3

Restart your computer and the ugly white boxes where the shortcut arrow used to be will have disappeared.

It should be noted that Winaero Tweaker can also be used to replace the ugly white boxes with a custom shortcut arrow by clicking on Custom in Step 4 and then specifying the path to the .ico file for the custom shortcut arrows. In order to do so, you will also have to download custom shortcut arrows.

Method 2: Remove the shortcut arrows using the Registry Editor

Press the Windows Logo key and R at the same time to open a Run

In the Run dialog, type regedit and click on OK.

shortcut arrow fix-5

In the Registry Editor, navigate to

HKEY_LOCAL_MACHINE\SOFTWARE\Microsoft\Windows\CurrentVersion\Explorer\Shell Icons.

If there isn’t a folder named Shell Icons under Explorer, click on Explorer, click on Edit in the toolbar, hover over New and click on Key. Name the new Key Shell Icons and press the Enter. Click on Shell Icons.

shortcut arrow fix-6

In the right pane, right click on an empty area, hover over New and then click on String Value.

shortcut arrow fix-7

Name the new String Value 29 and press the Enter

shortcut arrow fix-8

Double click on the new String Value named 29 to modify it.

Paste %windir%\System32\shell32.dll,-50 into the Value Data bar and click on OK.

shortcut arrow fix-9

Restart your computer, and once it boots up, those annoying white boxes will have disappeared.

Method 3: Get rid of the shortcut arrows using a .reg file

Using a .reg file is the same thing as Method 2, except this method will save you a lot of time and will also do all the fiddling around with your computer’s registry, something that most people are usually afraid to do.

First, download the .reg file that will edit your computer’s registry to disable short cut arrows altogether by clicking hereOpen the .reg file by double clicking on it.

shortcut arrow fix-11

If asked whether or not you really want to run a program from an unverified publisher, click on Run.

shortcut arrow fix-12

When prompted by the Registry Editor, click on Yes.

shortcut arrow fix-13

Once the .reg file is done working its magic, restart your computer and those ugly white boxes will be gone. The .reg file can be deleted once it has served its purpose.

The post BEST FIX: Steps to Fix White Boxes/Squares on Desktop Shortcuts appeared first on Appuals.com.

BEST FIX: Steps to fix Error 1719 on Windows 7/8 and 10

$
0
0

Error 1719 was quite a problem with Windows 7 and Windows 8, and it seems that it has now also ported over to Windows 10. Many Windows 10 users are complaining of an error stating something along the lines of “The Windows Installer Service could not be accessed. This can occur if the Windows Installer is not correctly installed. Contact your support personnel for assistance”, along with the error code 1719, showing up when they try to install or uninstall any programs from their computer. If you are one of these Windows 10 users, you know exactly how aggravating not being able to install or uninstall a program from your computer can be and just how much you want to fix this problem quickly.

Error 1719 can be the result of anything from the Windows Installer Service crashing and closing down or not starting up in the first place to incorrectly configured or corrupted settings for the Windows Installer Service in your computer’s registry. Fortunately, there are quite a few things that you can try in order to fix error 1719. The following are the three methods that have proven to be highly effective in fighting off error 1719:

Method 1: Start the Windows Installer Service

Open the Start Menu and type cmd into the search bar.

Right click on the result named Command Prompt and click on Run as administrator.

run as administrator windows 10

Confirm the action if prompted to do so by your computer.

Type “net start MSIServer” into the Command Prompt without quotation marks and press the Enter

Now try installing or uninstalling whatever program was giving you error 1719 before.

Method 2: Stop and then Restart Windows Installer Service

Press the Windows Logo key and R at the same time to open a Run

In the Run dialog, type msc and press the Enter key.

error-1719-2

Check to see whether or not the status of Windows Installer is running.

If Windows Installer is running, right click on the service and click on Stop from the menu that appears.

Next, right click on Windows Installer and click on Start from the menu that appears.

Now try to install or uninstall the program you wanted to install or uninstall, and, this time, you should not be presented with error 1719.

Method 3: Reset the settings of Windows Installer Service in the registry

Open Notepad.

Copy the following text and then paste it into Notepad:

Windows Registry Editor Version 5.00 [HKEY_LOCAL_MACHINE\SYSTEM\CurrentControlSet\Services\msiserver]

“DisplayName”=”@%SystemRoot%\\system32\\msimsg.dll,-27”

“ImagePath”=hex(2):25,00,73,00,79,00,73,00,74,00,65,00,6d,00,72,00,6f,00,6f,00,\

74,00,25,00,5c,00,73,00,79,00,73,00,74,00,65,00,6d,00,33,00,32,00,5c,00,6d,\

00,73,00,69,00,65,00,78,00,65,00,63,00,20,00,2f,00,56,00,00,00

“Description”=”@%SystemRoot%\\system32\\msimsg.dll,-32”

“ObjectName”=”LocalSystem”

“ErrorControl”=dword:00000001

“Start”=dword:00000003

“Type”=dword:00000010

“DependOnService”=hex(7):72,00,70,00,63,00,73,00,73,00,00,00,00,00

“ServiceSidType”=dword:00000001

“RequiredPrivileges”=hex(7):53,00,65,00,54,00,63,00,62,00,50,00,72,00,69,00,76,\

00,69,00,6c,00,65,00,67,00,65,00,00,00,53,00,65,00,43,00,72,00,65,00,61,00,\

74,00,65,00,50,00,61,00,67,00,65,00,66,00,69,00,6c,00,65,00,50,00,72,00,69,\

00,76,00,69,00,6c,00,65,00,67,00,65,00,00,00,53,00,65,00,4c,00,6f,00,63,00,\

6b,00,4d,00,65,00,6d,00,6f,00,72,00,79,00,50,00,72,00,69,00,76,00,69,00,6c,\

00,65,00,67,00,65,00,00,00,53,00,65,00,49,00,6e,00,63,00,72,00,65,00,61,00,\

73,00,65,00,42,00,61,00,73,00,65,00,50,00,72,00,69,00,6f,00,72,00,69,00,74,\

00,79,00,50,00,72,00,69,00,76,00,69,00,6c,00,65,00,67,00,65,00,00,00,53,00,\

65,00,43,00,72,00,65,00,61,00,74,00,65,00,50,00,65,00,72,00,6d,00,61,00,6e,\

00,65,00,6e,00,74,00,50,00,72,00,69,00,76,00,69,00,6c,00,65,00,67,00,65,00,\

00,00,53,00,65,00,41,00,75,00,64,00,69,00,74,00,50,00,72,00,69,00,76,00,69,\

00,6c,00,65,00,67,00,65,00,00,00,53,00,65,00,53,00,65,00,63,00,75,00,72,00,\

69,00,74,00,79,00,50,00,72,00,69,00,76,00,69,00,6c,00,65,00,67,00,65,00,00,\

00,53,00,65,00,43,00,68,00,61,00,6e,00,67,00,65,00,4e,00,6f,00,74,00,69,00,\

66,00,79,00,50,00,72,00,69,00,76,00,69,00,6c,00,65,00,67,00,65,00,00,00,53,\

00,65,00,50,00,72,00,6f,00,66,00,69,00,6c,00,65,00,53,00,69,00,6e,00,67,00,\

6c,00,65,00,50,00,72,00,6f,00,63,00,65,00,73,00,73,00,50,00,72,00,69,00,76,\

00,69,00,6c,00,65,00,67,00,65,00,00,00,53,00,65,00,49,00,6d,00,70,00,65,00,\

72,00,73,00,6f,00,6e,00,61,00,74,00,65,00,50,00,72,00,69,00,76,00,69,00,6c,\

00,65,00,67,00,65,00,00,00,53,00,65,00,43,00,72,00,65,00,61,00,74,00,65,00,\

47,00,6c,00,6f,00,62,00,61,00,6c,00,50,00,72,00,69,00,76,00,69,00,6c,00,65,\

00,67,00,65,00,00,00,53,00,65,00,41,00,73,00,73,00,69,00,67,00,6e,00,50,00,\

72,00,69,00,6d,00,61,00,72,00,79,00,54,00,6f,00,6b,00,65,00,6e,00,50,00,72,\

00,69,00,76,00,69,00,6c,00,65,00,67,00,65,00,00,00,53,00,65,00,52,00,65,00,\

73,00,74,00,6f,00,72,00,65,00,50,00,72,00,69,00,76,00,69,00,6c,00,65,00,67,\

00,65,00,00,00,53,00,65,00,49,00,6e,00,63,00,72,00,65,00,61,00,73,00,65,00,\

51,00,75,00,6f,00,74,00,61,00,50,00,72,00,69,00,76,00,69,00,6c,00,65,00,67,\

00,65,00,00,00,53,00,65,00,53,00,68,00,75,00,74,00,64,00,6f,00,77,00,6e,00,\

50,00,72,00,69,00,76,00,69,00,6c,00,65,00,67,00,65,00,00,00,53,00,65,00,54,\

00,61,00,6b,00,65,00,4f,00,77,00,6e,00,65,00,72,00,73,00,68,00,69,00,70,00,\

50,00,72,00,69,00,76,00,69,00,6c,00,65,00,67,00,65,00,00,00,53,00,65,00,4c,\

00,6f,00,61,00,64,00,44,00,72,00,69,00,76,00,65,00,72,00,50,00,72,00,69,00,\

76,00,69,00,6c,00,65,00,67,00,65,00,00,00,00,00

“FailureActions”=hex:84,03,00,00,00,00,00,00,00,00,00,00,03,00,00,00,14,00,00,\

00,01,00,00,00,c0,d4,01,00,01,00,00,00,e0,93,04,00,00,00,00,00,00,00,00,00

[HKEY_LOCAL_MACHINE\SYSTEM\CurrentControlSet\Services\msiserver\Enum]

“0”=”Root\\LEGACY_MSISERVER\\0000″

“Count”=dword:00000001

“NextInstance”=dword:00000001

Click on File > Save As. Name the file reg.

Open the dropdown menu in the Save as file type box and click on All Files (*.*).

In the Save in box, set Desktop as the save path for the file. Click on Save. Close Notepad. Right click on reg on your Desktop and click on Run as administrator. If you are prompted by your computer for an administrator password or permission to run the program with administrative privileges, for whatever is needed to confirm the action.

When your computer asks if you really want to continue, click on Yes. Give the computer a few moments to reset the settings of Windows Installer Service in the registry, and then restart it. Once the computer boots up, try uninstalling or installing the program you were trying to before, and the process should complete without fail.

The post BEST FIX: Steps to fix Error 1719 on Windows 7/8 and 10 appeared first on Appuals.com.

BEST FIX: Steps to fix Find.exe Entry Point Not Found Error

$
0
0

One of the many errors that Windows 10 users are currently complaining about is the “Entry point not found” error. This error usually reads something along the lines of. The “Entry point not found” error, in most cases, pops up when you try to open an application and, depending on the specific circumstances around the error, that application may or may not open successfully. The “Entry point not found” error can affect any number of applications and programs and can even start popping up every 10 or so minutes for no apparent reason, which is why this error is one of the most irritating and annoying errors associated with Windows.

“The procedure Entry point? Initialize @CLASS_DESCRIPTOR@@QAEEXZ could not be located in the dynamic link library.

C:\Users\User\AppData\Roaming\Safe_nots_gh\find.exe

The “Entry point not found” error can be caused by anything from a virus or malware infection to one or more vital system files that have somehow been damaged. Fortunately, this error can be fixed, and the following are the three most effective methods that you can use to combat the “Entry point not found” error and free your computer from its grasp:

Method 1: Use Microsoft Safety Scanner to scan your computer for malware

One of the two most common causes of the “Entry point not found” error is a virus or malware infection, with the other most common cause being a damaged or corrupted system file. If a virus or malware is what is causing the “Entry point not found” error, downloading Microsoft Safety Scanner from here and using it to scan your computer and get rid of any and all viruses or malware that it contains will fix the problem.

Method 2: Run a System File Checker Scan

If the “Entry point not found” error is being caused by a system file that has been corrupted or messed around with by you or by some kind of malware or virus, running a System File Checker scan will find any and all corrupted system files, fix them and get rid of the issue.

Right-click on the Start button and click on Command Prompt (Admin).

If your computer prompts you for an administrator password, type it in, and if it asks you to confirm the action, click on Allow or Continue or anything along those lines.

In the Command Prompt dialog, type sfc /scannow.

Hit the Enter

Once the command is executed, your computer will check for damaged system files and repair them, and this should get rid of the “Entry point not found” error if a damaged system file was the culprit behind it.

Method 3: Restore your system to a version without the error

Microsoft’s System Restore feature is truly and entirely a lifesaver for Windows 10 users suffering from any kind of problem whatsoever. The System Restore feature allows you to turn back the clock and restore your computer to a previously created System Restore Point, and the feature restores everything from the programs installed on your computer to your settings and preferences. If all else fails, restoring your computer to a Restore Point that was created before the “Entry point not found” error started showing up will certainly solve the problem for you, and all a System Restore takes is roughly 15 minutes. (see steps  here)

The post BEST FIX: Steps to fix Find.exe Entry Point Not Found Error appeared first on Appuals.com.

BEST FIX: Windows 10 Couldnt be installed Error C1900101-40017

$
0
0

When Windows 10 was first released to the general populous, it was in no way the most stable (or the most complete) version of the Windows Operating System out there. In addition, to top the many flaws that Windows 10 had upon initial release, Windows 10 was also not the easiest version of the OS to upgrade a computer to. In fact, Windows users faced countless problems when trying to upgrade to Windows 10 from previous versions of the Operating System, and one of these problems was (and is) error C1900101-40017.

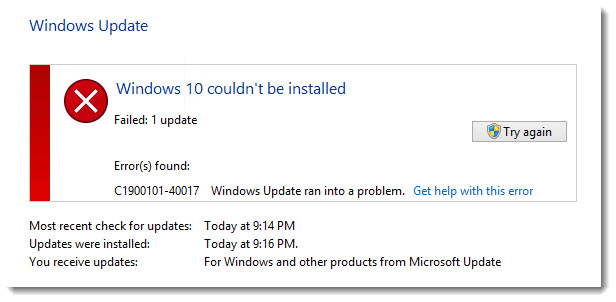
In the case of this problem, the Windows 10 update goes almost all the way, but when it comes to part where it starts diagnosing the user’s PC, the update fails and displaying error message C1900101-40017, which looks like the following image:

Windows 10 Couldnt be installed Error C1900101-40017

It appears that error C1900101-40017 is caused when the Windows 10 update, while attempting to diagnose the user’s computer, attempts to check and diagnose driver signatures, which causes some kind of problem or issue and consequently results in a failed upgrade. The solution to error C1900101-40017, fortunately, is quite simple – disable driver signatures altogether. The following are all of the steps you need to follow to disable driver signatures, fix error C1900101-40017 and successfully upgrade your computer to Windows 10:

When the Windows 10 upgrade process is interrupted, you are provided with a set of options and menus. If you will look around in the menus available to you, you will be able to locate an option titled Advanced. To disable driver signatures, first click on and open Advanced.

0xc00021a-3

Navigate to the section of the option named Startup settings.

0xc00021a-4

When you get into Startup settings, you need to look for an option named disable driver signatures. Once the disable driver signatures option has been found, turn it on.

0xc00021a-5

Once the disable driver signatures option has been enabled, the upgrade process will continue diagnosing your computer and configuring the installation of Windows 10, after which your computer will be successfully booted into Windows 10.

The post BEST FIX: Windows 10 Couldnt be installed Error C1900101-40017 appeared first on Appuals.com.

BEST FIX: Error 0x80070006 – 0x2000C When Installing Windows 10

$
0
0

When Windows 10 was released and people started upgrading to the new Operating System by the boatload, the Windows 10 upgrade was spewing upgrade errors all over the place. Windows users have faced countless recorded errors when trying to upgrade to Windows 10. One of the most common errors that Windows users trying to upgrade to Windows 10 faced is error 0x80070006 – 0x2000C, which is accompanied by a message stating “We couldn’t install Windows 10. We’ve set your pc back to the way it was right before we started installing Windows 10. 0x80070006-0x2000c the installation failed in the SAFE_OS phase with an error during APPLY_IMAGE operation.”

However, if you are trying to upgrade to Windows 10 and are being greeted with error 0x80070006 – 0x2000C, you should not fret as, fortunately, there are some solutions that have proven to be successful at eliminating this error. The following are the three solutions that you can use to try and fix error 0x80070006 – 0x2000C when trying to install Windows 10.

Solution 1: Delete all previous System Restore Points and create a new one

If you are using Windows 7, open the Start Menu, right-click on Computer and then click on Properties. Alternatively, if you are using Windows 8, move the cursor to the bottom-left corner of your screen, right-click on Metro Preview when it opens and click on System, or right-click on the Start button in the bottom left corner of your screen and click on System if you are using Windows 8.1.

0x80070006 - 0x2000C-1

Click on Advanced System Settings which is located on the left. Navigate to the System Protection.

2015-11-02_071123

Click on Configure. Click on Delete at the bottom, and then confirm the action by clicking on Continue in the pop-up, successfully deleting all of your previously created System Restore points and Shadow Copy points.

2015-11-02_071255

Back in the System Protection tab, click on, Name your new System Restore Point and then click on Create. (Name the restore point), Click OK and Wait for your computer to successfully create a new System Restore Point.

Now try upgrading to Windows 10.

Solution 2: Free up space on your hard drive and then try installing Windows 10

In some cases, the Windows 10 upgrade process fails and spews out error 0x80070006 – 0x2000C because of a lack of disk space. If that is the case, freeing up some space on your hard drive (roughly 25-50 gigabytes) is bound to do the trick and make sure that the next time you try to upgrade your computer to Windows 10, you succeed. You can check the disk space on the active partition by Holding Windows Key and Press R then typing diskmgmt.msc in the run dialog.

2015-11-02_071624

Solution 3: Disconnect all hardware and devices and then try again

Last, but certainly not the least, another solution to error 0x80070006 – 0x2000C that has worked for many people is to disconnect all hardware and USB devices (except for the mouse and the keyboard) from the computer and then try upgrading to Windows 10.

Hardware and USB devices such as printers, scanners, speakers and headphones should definitely be removed from the computer. Also make sure that you update all antivirus and firewall programs and system drivers to their latest versions to increase your chances of getting rid of error 0x80070006 – 0x2000C.

Doing all of the aforementioned things and then trying to upgrade to Windows 10 should result in a successful upgrade.

The post BEST FIX: Error 0x80070006 – 0x2000C When Installing Windows 10 appeared first on Appuals.com.

Viewing all 4543 articles
Browse latest View live


Latest Images