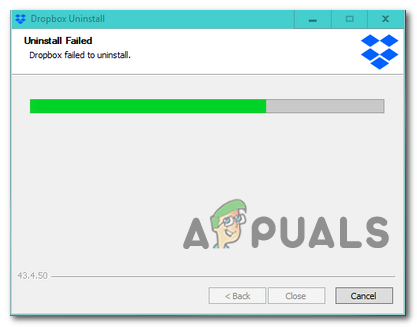
Some users are getting the ‘Dropbox failed to uninstall’ error every time they attempt to uninstall Dropbox conventionally. In most cases, this problem appears after Dropbox refuses to start after it was properly installed.
Dropbox failed to uninstall
One of the most common causes that will end up causing this error is a problem with the connection between your local machine and the Dropbox cloud server. To fix it, you’ll need to remove your computer from the Dropbox web by connecting with your account.
However, a permission issue can also be the root cause of this uninstall error. In this case, you’ll need to use Registry Editor to grant full control to every local user that’s using Dropbox locally.
If these two fixes aren’t effective, you should start to consider a corruption issue. If this scenario is applicable, perform a manual uninstall or delete every Dropbox file manually to fix the problem in this case.
Removing the Computer from Dropbox Web
For a lot of Windows 10 users, this problem will occur due to inconsistency with how the cloud-service that Dropbox uses looks at the set of devices links to your account.
Some users that were also struggling with this error have reported that they managed to fix the problem by accessing the web version of Dropbox and removing the affected computer from the list of affected devices.
After doing this, they delete the main application executable and rebooting their machine, which ended up fixing the ‘Dropbox failed to uninstall’ error.
Here’s a quick step by step guide on doing this:
Ensure that Dropbox and any associated instance is completely closed.
Open your default browser and navigate to the following location (here).
Next, sign in with the same Dropbox account that you’re using locally by inserting your account credentials.
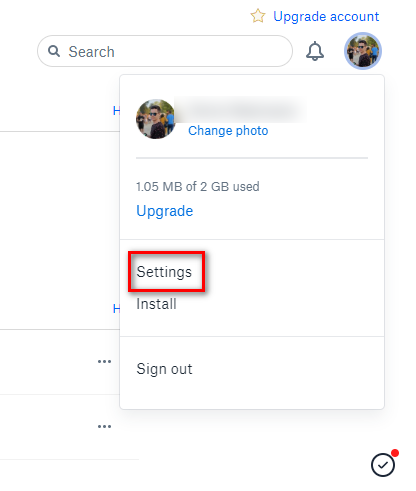
After you have successfully signed in with your account, click on your account icon (top-right corner) and click on Settings from the newly appeared drop-down menu.
Accessing the Settings menu of Dropbox web
Inside the Settings menu, click on the Security tab from the top of the screen.
From the Security tab, scroll all the way down to Devices, and click the X button associated with the Windows computer you’re encountering the ‘Dropbox failed to uninstall’ error on.
Removing the problematic device connected with Dropbox
Once you see the confirmation prompt, click on Unlink to complete the operation.
Next, open File Explorer and navigate to the location where you installed Dropbox. Here is the default location:
C:\Program Files (x86)\Dropbox\Client
Once you get to the correct location, right-click on Dropbox.exe and choose Delete from the context menu to delete it.
Deleting the main Dropbox executable
Empty your recycle bin and restart your computer.
Once the next startup is complete, attempt the uninstallation again and see if the issue is now resolved.
In case the same problem is still persisting, move down to the next potential fix below.
Adding Registry Permissions
As it turns out, if you’re encountering the issue as soon as you’ve finished installing Dropbox, it’s very likely that you are facing this issue due to a permission issue related to an old Domain profile user.
Some users that were also facing this issue have reported that they were able to fix the issue by using the Registry Editor to modifying each permission belonging to each key under HKEY_CURRENT_USER\Software\Dropbox so that every local user can access it with full access.
Here’s a quick step by step guide that will show you how to do this:
Press Windows key + R to open up a Run dialog box. Next, type ‘regedit’ and press Enter to open up the Registry Editor. When prompted by the UAC (User Account Control), click Yes to grant administrative access.
Running the Registry Editor
Once you’re inside the Registry Editor, use the left-hand menu to navigate to the following location:
HKEY_CURRENT_USER\Software\Dropbox
Note: You can also get there instantly by pasting the location directly into the navigation bar at the top and pressing Enter.
After you manage to arrive at the correct location, look at the set of sub-keys under Dropbox. Next, start by right-clicking on the first one and choosing Permissions from the newly appeared context menu.
Accessing the Permissions screen
Next, from the Security tab, select the local user that you’re currently using (from Group or user names) and then check the Allow box associated with Full Control, then click Apply to save the changes.
Granting Full permission control
Note: Do this systematically with every local user that might end using Dropbox on your computer.
Repeat this operation with every subkey of dropbox until each folder has full permissions, then restart your computer.
Reboot your machine and attempt to uninstall Dropbox conventionally once the next startup is complete to see if the issue is now resolved.
In case the same problem is still occurring, move down to the next potential fix below.
Performing a Manual Uninstall
If none of the potential fixes above have worked for you, you should proceed by doing a manual uninstall in order to bypass Programs & Features. This can be done by accessing the installation folder of Dropbox and doing the uninstallation via the DropboxUninstaller.exe file.
In case the issue occurs due to a problem with the Windows uninstaller component and you’re encountering the same problem (to some extent) with multiple programs, follow the instructions below to fix your issue.
Here is the step by step instructions on uninstalling Dropbox manually:
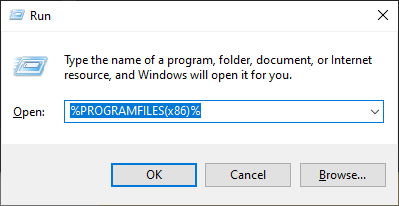
Press Windows key + R to open up a Run dialog box. Next, type ‘%PROGRAMFILES(x86)%’ inside the text box and press Enter to open up the Program File (x86) folder.
Accessing the Program File Folder
Once you’re inside the Program Files (x86) folder, double-click on DropBox from the list of installed 32-bit programs.
Next, access the Client folder right-click on the DropboxUninstaller.exe file and click on Run as Administrator to open the uninstaller with administrative privileges.
Uninstalling Dropbox manually
Note: Click Yes at the UAC (User Account Control) prompt to complete the uninstallation.
Follow the on-screen instructions to complete the uninstallation process to see if the operation is successful.
Removing DropBox Files Manually
If none of the instructions below have worked for you, it’s almost certain that you’re dealing with some kind of corruption in your Dropbox installation folder that’s preventing you from uninstalling it conventionally.
If this scenario is applicable, you should be able to fix the issue by removing every location where DropBox stores files manually. Some users that were dealing with the ‘Dropbox failed to uninstall’ error have confirmed that this operation was finally effective in allowing them to remove this program from their computer.
Here’s what you need to do to remove every DropBox file manually:
Close Dropbox if it’s running.
Press Windows key + R to open up a Run dialog box. Next, type ‘%LOCALAPPDATA%’ inside the text box, then press Enter to open Local folder (hidden by default).
Run dialog box: %localappdata%
Once you’re inside the LOCAL folder, double-click on the Dropbox folder to open it.
After you are inside, press Ctrl + A to select everything, then right-click on a selected item and choose Delete from the context menu.
Deleting the contents of Dropbox
Once the contents of this folder have been deleted, repeat the same steps with the remaining Dropbox folders in %APPDATA%, %PROGRAMFILES% and%PROGRAMFILES(x86)%. Use the same Run dialog box to reach them, then clear their contents.
Reboot your computer then repeat the uninstallation procedure once the next startup is complete.
Whilst WLM is now defunct some Windows users still continue to use it and are prompted with the 0x800CCC6F error whenever they try to send an email via the Windows Live mail client. Most affected users are saying that they can receive emails just fine – It’s just the sending feature that’s affected.
As it turns out, there are multiple potential culprits that might end up causing the 0x800CCC6F error:
Incorrect POP settings – You can expect to see this error in case the port that you’re using is not supported by the SMTP server or due to an incorrect SSL option. In this case, you should be able to fix the issue by changing the email settings so that the port you’re using is supported by your POP connection.
SMTP port is blocked by 3rd party firewall – As it turns out, certain security suites might be overprotective and block the SMTP port from establishing connection switch the email server. In this case, you can either whitelist that port to fix the issue or you can uninstall the 3rd party AV suite altogether.
Email/s is/are stuck in the Outbox folder – You might see this error code after repeated failed attempts at sending an email that’s currently queued in the Outbox folder. To fix the issue in this case, you’ll need to switch your Windows Live Mail application to Offline Mode and clear the Outbox folder manually.
IP range is blacklisted – If you’re unlucky enough, your networking device might have picked up a blacklisted IP rage the last time you started up your computer. In this case, you will need to perform a power cycling procedure on your networking device in order to force it to assign a new IP.
The recipient list is too large – You might also see this error if you are trying to send the same email to a large recipient list that is hitting the spam blocking limit of your email provider (usually in the 125 range). If that’s the case, you will need to make your recipient list smaller, split it into multiple batches or move to an email sending client like GetResponse or Convertkit.
Using the correct POP settings
In most documented cases, the 0x800CCC6F error appeared due to a port that was not supported by the SMTP server or due to the SSL option for SMTP. If this scenario is applicable, you should be able to fix the issue by changing the email server settings so that it a port that’s supported by your POP connection.
In case adjusting the port isn’t effective, you should also try changing the outgoing email SMTP to a different ISP provided and see if that ends up fixing the issue.
If you’re unsure on how to change your email server settings used by Windows Live Mail, follow the instructions below:
Open Windows Live Email and ensure that you are connected with the email account that ends up triggering the 0x800CCC6F error.
Next, click on File (from the ribbon bar at the top), then click on Options > Email accounts… Accessing the Email Accounts screen in Windows Live
Once you’re inside the Accounts screen, select the problematic account from the Mail category, then move to the right-hand section and click on Properties.Accessing the Properties screen of your email account
Inside the Properties screen, select the Server tab from the bar at the top, then change the Outgoing mail (SMTP) to an alternative provided by your email provided. Next, check the box associated with My server requires authentication and click on Settings.Changing the default SMTP server
Note: To find an SMTP alternative for your email, use a search engine to search for ‘SMTP server *Email Provider“. In case your email provider doesn’t offer an alternative SMTP server, leave it unchanged.
Once you’re inside the Outgoing Mail Server, check the toggle associated with Use same settings as my incoming mail server and click Ok to save the changes.
Using the same email server settings
Once you are back in the main Properties screen, select the Advanced tab and change the Outgoing mail (SMTP) server to a different port.
Changing the Outgoing mail (SMTP)
Note: If you’re unsure of the ports supported by your email provided, search online E.G. ‘Gmail supported SMTP ports’.
In case you already went through these steps with no success or this scenario is not applicable, move down to the next potential fix below.
Whitelisting the SMTP port or Uninstalling 3rd party firewall
Another common cause that might end up causing the 0x800CCC6F error is an overprotective firewall that ends up interfering with the port used by your email provider. Keep in mind that this behavior is not reported with Windows Firewall – which is known for doing a very good job of allowing email ports through (unless you specifically force it to block it).
However, certain 3rd party antivirus sites are known to block certain if they determined that they’re engaged in suspicious activities – this is reported to happen even with TLDs.
If this scenario is applicable, the most elegant solution is to access your firewall settings and allow the SMTP port that your email account uses. But as you imagine, the steps of doing so will be different depending on the 3rd party security suite that you’re using.
Whitelisting the email port
Note: You should consult the documentation of your 3rd party AV for instructions on whitelisting the port used by the email server that you are using.
In case you don’t manage (or don’t want) to whitelist that port, the only other method that will ensure that your 3rd party AV doesn’t block it is to uninstall the security suite altogether. If you decide to go this route, follow the instructions below:
Open up a Run dialog box by pressing Windows key + R. Next, type ‘appwiz.cpl’ and press Enter to open up Programs and Features.
Type appwiz.cpl and Press Enter to Open Installed Programs List
Note: If you see the UAC (User Account Prompt), click Yes to grant administrative privileges.
Once you’re inside the Programs and Features screen, scroll down through the list of applications and locate your firewall suite. After you do this, select it and click Uninstall from the newly appeared context menu.
Uninstalling Avast Firewall
Follow the on-screen prompts to complete the uninstallation procedure. Note: You can ensure that you also remove any leftover files left behind by your AV by following this guide here.
After the 3rd party firewall suite has been uninstalled, restart your computer and attempt to send emails again via the Windows Live Mail client once the next startup is complete.
In case the same problem is still occurring, move down to the next potential fix below.
Clearing the Outbox folder in Windows Live Mail
In essence, the error message 0x800CCC6F error is signaling repeated failed attempts at sending an email. However, this might not refer to the latest email that you tried to send – chances are that one got delivered just fine.
But the error may be triggered because you have an older email that cannot be sent that’s located in the Outbox folder. Windows Live Mail will keep throwing the error message until you manage to clear the Outbox queue.
If this scenario looks like it could be applicable, follow the instructions below to clear any stuck emails from the Outbox folder in Windows Live Mail:
Open Windows Live Email and click on Home from the ribbon bar at the top. Then, click on Work Offline from the Tools section and confirm.
Switching to Offline Mode
Once Offline Mode is enabled, click on the View tab from the same ribbon bar and choose the Compact view.
With the Compact view, click on the email icon at the bottom of the folder list (top-left section).
Accessing the email folder
Next, click on Outbox from the list of items to open up the Outbox folder.
Right-click on the stuck email that you want to delete and click on Delete from the newly appeared context menu to clear your Outbox folder.
Restart the Windows Live Mail application and see if the issue is now resolved.
In case the same problem is still occurring, move down to the next potential fix below.
Power-cycling your Router/modem
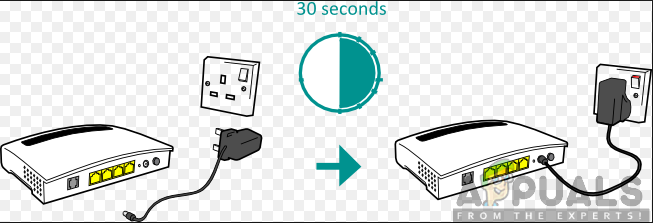
In some rare circumstances, this particular issue can occur because you were unfortunate enough to pick up a blacklisted IP range the last time your modem/router restarted. Several affected users that we’re encountering the same problem have confirmed that they manage to sort out this issue by power-cycling their networking device.
To do this, simply press the On/Off button on the back of your router to turn the device off, then disconnect the power cable and wait for at least 30 seconds to ensure that the power capacitors are completely drained.
A demonstration of restarting the router
Once the period passed, connect your networking device to the power outlet once again, turn it off and wait for Internet access to be reestablished.
Next, repeat the action that was previously causing the 0x800CCC6F error and see if the problem is now fixed.
In case the same problem is still occurring, move down to the next potential fix.
Clearing the Recipient’s List
If you’re only encountering this error with emails send to multiple recipients, the email may be bouncing because you are hitting a spam blocking limit. This is fairly common with users that are using multiple distribution lists trying to send the same email to all of them.
Keep in mind that most email providers will block the sending of emails that exceed recipients in the 125 region.
In case this scenario applies to your current situation, try sending the same email to a single recipient and see if the 0x800CCC6F error is no longer appearing.
If the test above was a success, try cutting back on your distribution list or split it into multiple sections and send the same email multiple times to avoid the same error message.
If that’s not an option, consider moving to specialized email sending services like GetResponse or ConvertKit.
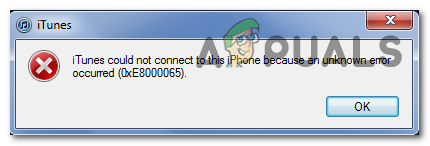
Some Windows users are receiving the ‘iTunes could not connect to this iPhone / iPad because an unknown error occurred (0xE8000065).’ error every time they try to sync their iPhone or iPad with iTunes. This problem is common among users attempting to sync iPhone 5s devices.
iTunes Error 0xE8000065
Since the problem can be caused by a generic glitch caused by long idle periods, start simply by restarting your computer and repeating the syncing procedure. If that doesn’t work, try updating your iTunes version to the latest and see if that manages to resolve the issue.
Keep in mind that you might be also dealing with some type of corruption rooted in your iTunes folder. In this case, you’ll need to reinstall iTunes from scratch along with every other supporting application – The steps of doing so will be different if you’re using the UWP version of iTunes.
However, it’s possible that the problem is actually being caused by a problem with the Universal Serial Bus controller. A driver inconsistency can also cause this issue. To fix this issue, try using a different port (preferably USB 3.0). If that doesn’t work, reinstall every USB controller in order to force Windows to reinstall them from scratch. Also, don’t neglect the possibility of a bad cable that’s corroded or non-congruent.
In some rare circumstances, the issue can also be caused by a BIOS glitch that creates some issues with the USB controller. In this case, updating to the latest BIOS version should take care of the issue.
Method 1: Restarting your Computer
Before you get to any of the other fixes, start simple with a system reboot and repeat the syncing procedure once again once the next startup sequence is complete.
As it turns out, this problem can occur due to a temporary glitch and restarting your computer will clear the data causing the issue. Preferably, you should remove the data cable from your PC USB port before initiating the restart.
In case the restart didn’t resolve the issue, move down to the next method below.
Method 2: Updating iTunes to Latest version
In case you’re encountering the issue on Windows 10, you’re probably dealing with a problem facilitated by a Windows update. If that’s the case, updating your iTunes version to the latest should fix the issue for you. Apple is notoriously known for resolving cross-platform incompatibilities in a matter of days.
Several affected users have confirmed that updating their iTunes version has allowed them to fix the 0xE8000065 and sync their Apple mobile device normally.
Keep in mind that iTunes should be automatically configured to auto-update itself. But in case you have previously disabled this function or a different 3rd party tool is stopping the program from updating, you might need to do it manually.
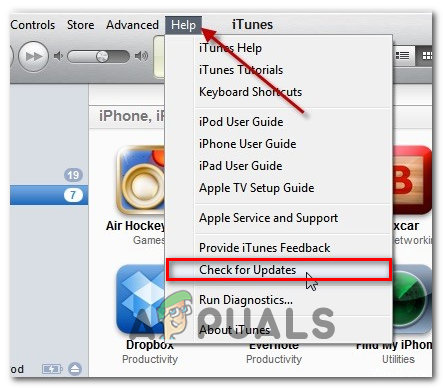
To initiate an iTunes update, open the program and click on Help from the ribbon bar at the top. Next, click on Check for updates and wait for the scan to complete.
Checking for Updates on iTunes
In case a new version of iTunes is available, this process will automatically download it and install it. Just follow the on-screen prompts to do so.
In case the investigation above reveals that you already had the latest version, move down to the next potential fix below.
Method 3: Reinstalling iTunes
As it turns out, the ‘iTunes could not connect to this iPhone / iPad because of an unknown error occurred (0xE8000065).’ error can also be caused by some corruption originating from the iTunes folder. If this scenario is applicable, you should be able to get the issue resolved by reinstalling the iTunes app completely.
Problems like this typically occur after an AV scan ends up quarantining some items belonging to iTunes or the Bonjour program. Several affected users have confirmed that they managed to fix the issue by uninstalling Itunes along with any associated components and then redownloading & installing the latest version.
However, the steps of uninstalling iTunes will be different in case you are encountering the 0xE8000065 error with the UWP (Universal Windows Platform) version.
To accommodate both scenarios, we created two guides that will show you how to reinstall every involved component.
Reinstalling the Desktop Version of iTunes
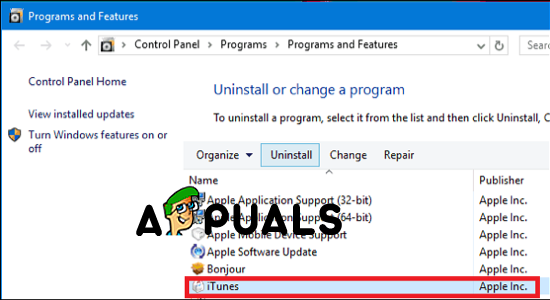
Open up a Run dialog box by pressing Windows key + R. Next, type ‘appwiz.cpl’ inside the text box and press Enter to open up the Programs and Features window.
Type appwiz.cpl and Press Enter to Open Installed Programs List
Once you’re inside the Programs and Features screen, scroll down through the list of applications, then right-click on the iTunes app and click on Uninstall. Next, follow the on-screen instructions to complete the operation.
After the main iTunes application is uninstalled, it’s time to uninstall the rest of Apple’s supporting software. You can make it easier for yourself to view them all by filtering the list of installed programs via Publisher. Once you see them in the correct order, go ahead and uninstall everything signed by Apple Inc.
As soon as you’re finished with uninstalling everything relevant to iTunes, reboot your machine.
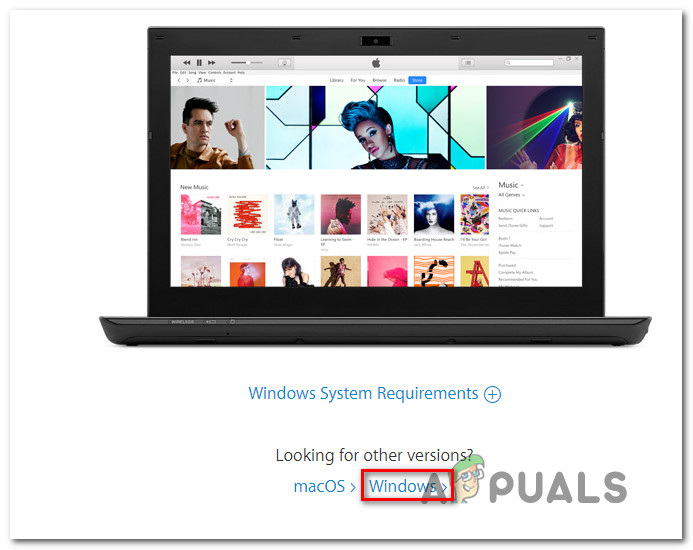
Once your computer boots back up, access this link (here) from your browser, go to Looking for other versions section and click on Windows to download the latest desktop version of iTunes.
Downloading the desktop version of iTunes
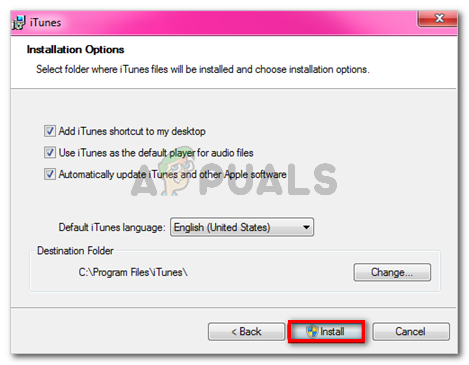
Once the install executable is downloaded, open it and follow the on-screen instructions to install the latest version of iTunes on your computer.
Installing iTunes on your computer
After the installation is complete, reboot your computer and see if you are able to sync your iTunes library once the next startup is complete.
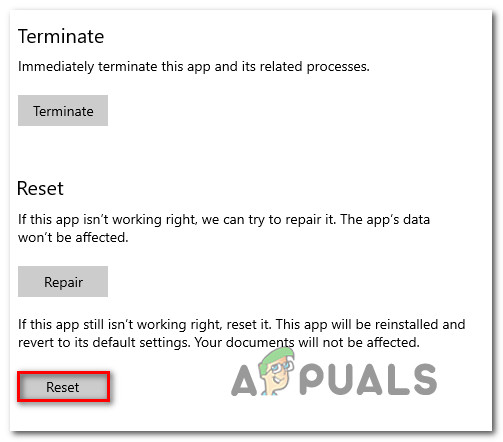
Reinstalling the UWP version of iTunes
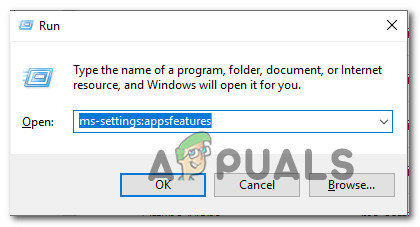
Press Windows key + R to open up a Run dialog box. Next, type ”ms-settings:appsfeatures” and press Enter to open up the Apps & Features tab of the Settings app.
Accessing the Apps & Features Menu
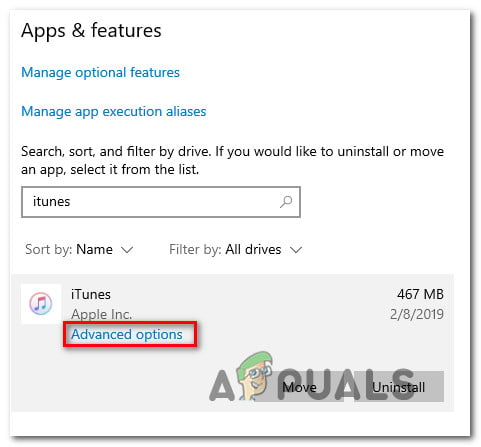
Once you’re inside the Apps & Features menu, use the search function to search for ‘iTunes’. Next, click on iTunes from the list of results and then click on the Advanced options.
Accessing the Advanced Options menu of iTunes
From the Advanced Options menu of iTunes, scroll all the way down to the Reset tab and click on the Reset button.
Resetting the iTunes app
At the final confirmation prompt, click on Reset once again, then wait for the process to complete. During this procedure, iTunes will be reverted back to the default state and every component will be reinstalled. Note: Don’t worry, your iTunes media library will not be affected by this procedure.
After the procedure is complete, open iTunes and follow the on-screen instructions to install the latest updates.
Once you are using the latest version, attempt to sync once again and see if the issue is now fixed.
Method 4: Using a Different USB port
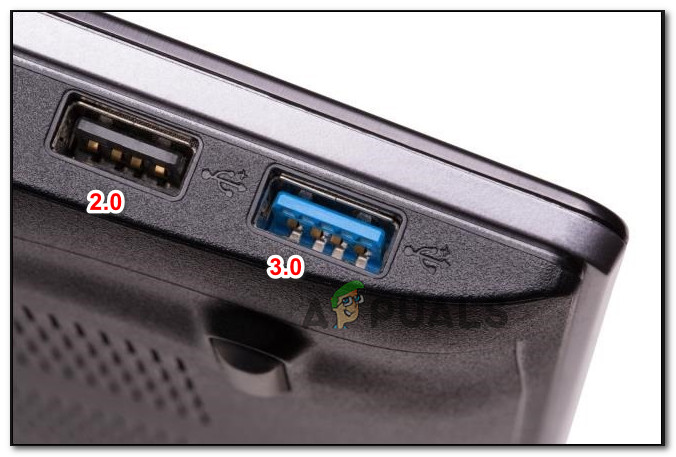
As it turns out, this particular issue can also occur due to a glitched USB port. Several affected users that also encountered this problem have reported that they managed to fix the issue by connecting the iPhone / iPad with a different USB port.
If possible, use a USB 3.0 port since a lot of file transfer inconsistencies have been resolved.
Plugging the keyboard into a 2.0 or 3.0 USB port
In case the same problem occurs with every port that you’re using, you should try reinstalling the Universal Serial Bus (USB) controller.
Here’s a quick guide on how to do this on every recent Windows version:
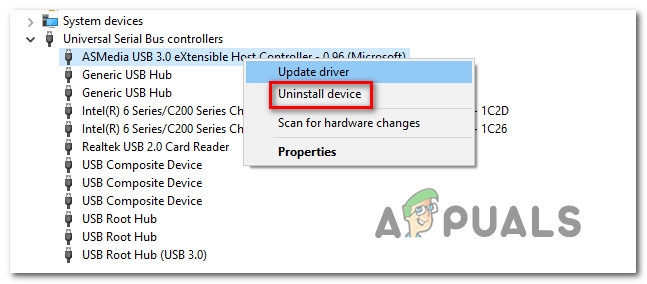
Press Windows key + R to open up a Run dialog box. Next, type ‘devmgmt.msc’ inside the text box and press Enter to open up Device Manager.
Running the Device Manager
Once you’re inside Device Manager, scroll down through the list of devices and expand the drop-down menu associated with Universal Serial Bus controller.
Next, systematically right-click every Host Controller and click on Uninstall Device. Do this for every host controller under Universal Serial Bus controllers.
Uninstalling every available host controller
After every Universal Serial Bus controller is uninstalled, restart your computer. During the next startup, your OS will detect that you don’t have the mandatory USB controller drivers and it will install them automatically.
Once the startup is complete, attempt to complete the syncing procedure with iTunes to see if the 0xe8000065 has been resolved.
In case the same problem is still occurring, move down to the next potential fix below.
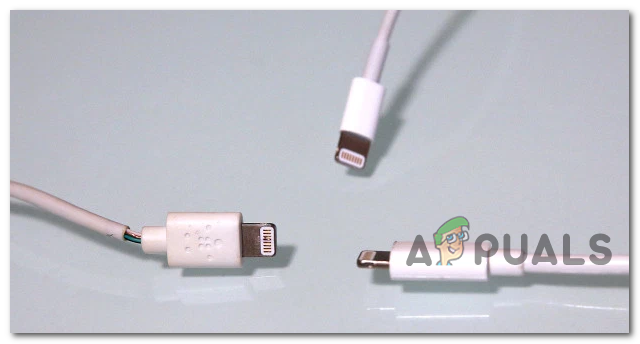
Method 5: Changing the Cable
According to some affected users, this problem can also be caused by a faulty micro-USB cable. If the cable is old, corroded or non-congruent, expect to experience various syncing issues including the apparition of the ‘iTunes could not connect to this iPhone / iPad because of an unknown error occurred (0xE8000065).’ error.
Bad iPad / iPhone cable
If you see any evidence of a faulty cable, you’ll likely need to replace it in order to fix the issue.
In case you’ve determined that the problem is not being caused by a bad cable, move down to the next potential fix below.
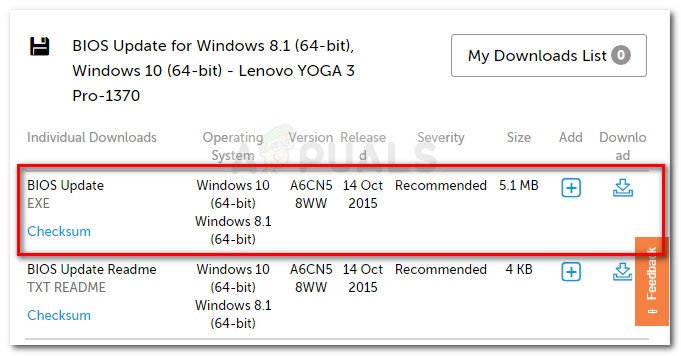
Method 6: Updating BIOS version
As unlikely as it may seem, the 0xe8000065 can also be caused by an unstable BIOS version that ends interfering with the USB controller. For some users, the fix consisted of updating their BIOS version to the latest. In most cases, this method proved to be effective for users with an Intel DP55WP motherboard.
However, keep in mind that the procedure of updating your BIOS version will be different depending on your mainboard manufacturer.
Updating your bios version
IMPORTANT: This operation should not be attempted if you haven’t done it before. Following the steps incorrectly might end up bricking the machine, so proceed at your own risk.
Nowadays, every major manufacturer has developed it’s own BIOS flashing utility making the updating process way easier for the end-user. However, each motherboard manufacturer has their own steps regarding the updating of BIOS.
Here is the official documentation for the major manufacturers that will show you how to update the BIOS:
Some Xbox One users are reporting that their Xbox One console is suddenly showing an ‘Additional Authentication Needed‘ error whenever they attempt to connect their console to their home network. Most affected users are reporting that the issue started to appear out of nowhere (no changes were made to the Internet network)
Additional Authentication Needed error
In case you’re encountering this problem, your first attempt at fixing it should be to clear the currently stored alternate MAC address on your console and see if that allows you to connect to the Internet normally. If that doesn’t work for you, you can also try using your PC’s physical address as the dedicated MAC address on your console.
However, keep in mind that this type of error can also be facilitated by your router if you previously enforced a network-level block. In this case, you will need to login into your router settings and disable access control or remove your Xbox console from the list of blocked devices.
If the ‘Additional Authentication Needed‘ error is being caused by a local inconsistency, you can force the Xbox One system to clear any temp data by forcing an interruption during a test connection or by performing a power cycling procedure.
And lastly, if nothing else works, you should get in contact with your ISP and see if you’re under any security or contract violation that has determined them to limit your network.
Clearing the Alternative MAC address
Before you try anything else, you should start with what Microsoft recommends – Clearing the Alternate MAC address. This operation was confirmed to work by a lot of affected users (from every region).
This feature was developed to give Xbox users the ability to grant their console the MAC address of their PCs network adapter. However, this feature is mostly designed for hotels and other types and limited networks and might create other issues including the ‘Additional Authentication Needed‘ error on home networks.
If this scenario is applicable, you should be able to fix the issue by accessing the Network Settings on your console and clearing the alternate MAC address. A lot of affected users have confirmed that this operation has helped them to fix the issue:
From the main Xbox One menu, access the vertical menu on the right (by pressing the guide button on your controller) and navigate to Settings.Accessing the Settings menu on Xbox One
After you manage to make your way to the Settings menu, navigate to the Network tab from the vertical menu on the right, then access the Network Settings submenu from the right-hand pane.
Accessing the Network Settings tab
Once you get to the Network tab, go ahead and access the Advanced settings menu, then access the Alternate MAC address sub-menu.
Next, select Alternate Wired MAC or Alternate Wireless MAC (depending on your current configuration) and hit Clear to confirm that you want to get rid of the currently stored Alternate MAC address.Clearing the Alternate Wired MAC address
After you successfully manage to reset the Alternate MAC address, reboot your console and see if you’re still encountering the same issue once the next startup sequence is complete.
In case this potential fix wasn’t applicable and you’re still encountering the same ‘Additional Authentication Needed‘ error, move down to the next potential fix below.
Using your PC’s Physical Address
In case your home network has certain restrictions (enforced locally or by your ISP), you might be able to fix this issue by using the alternate MAC address feature on your console to your advantage. Some affected users have managed to fix this issue by using the Physical Address of their PC as the default MAC Address. However, this is only reported to be effective with wireless connections.
If you want to attempt this fix, you will need to use a PC that’s connected to the same network as your Xbox to discover it’s MAC address (Physical Address) and then copies it over to your Xbox console.
To do this, follow the step-by-step instructions below:
First things first, ensure that the PC you will use for this is connected to the same network as your Xbox One console.
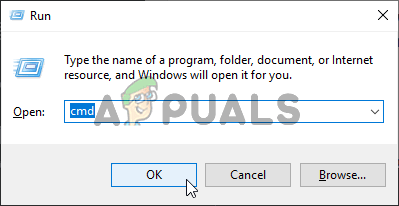
Once you’ve ensured that the PC is connected to the same network, press Windows key + R to open up a Run dialog box. Next, type ‘cmd’ and press Ctrl + Shift + Enter to open up an elevated Command Prompt window.
Running the Command Prompt
Note: When you get to the User Account Control (UAC) prompt, click Yes to grant admin access to the CMD window.
Inside the elevated CMD window, type the following command and press Enter to get an overview of your current IP configuration:
ipconfig/all
Once the results are generated, scroll down to the network that is shared by both your Xbox console and the PC and copy other the Physical address – Copy it over as you’ll use it as the MAC address on your console.
Discovering the physical address on your PC
Next, move over to your console and press the Xbox button on your controller to bring up the guide menu. From there, access the Settings menu.
Accessing the Settings menu on Xbox One
From the Settings menu, go to Network > Network settings and then choose Manual under Alternate Wireless MAC address.
Accessing the Alternate MAC address menu
Inside the Alternate MAC address, enter the physical address that you previously fetched at step 4.
Save the current configuration, reboot your console and see if the problem still occurs after the next console startup is complete.
In case you’re still having the same problem, move down to the next potential fix below.
Unblocking the Xbox from Router settings (if applicable)
As it turns out, this problem can also appear if you previously blocked the Xbox device from being able to access your network at a router level. This is typically enforced by parents as a way to ensure that their kids aren’t abusing the console.
Some users that were encountering this problem have checked their router settings and discover that their console was blocked in their router settings – After unblocking the console, the ‘Additional Authentication Needed‘ error went away and they were able to connect normally.
If this scenario looks like it could be applicable and you suspect that a router restriction might have triggered this problem, follow the instructions below to log into your router settings and unblock the device.
Note: The steps below are only meant to be taken as a general guide since the exact steps will be different depending on your router manufacturer.
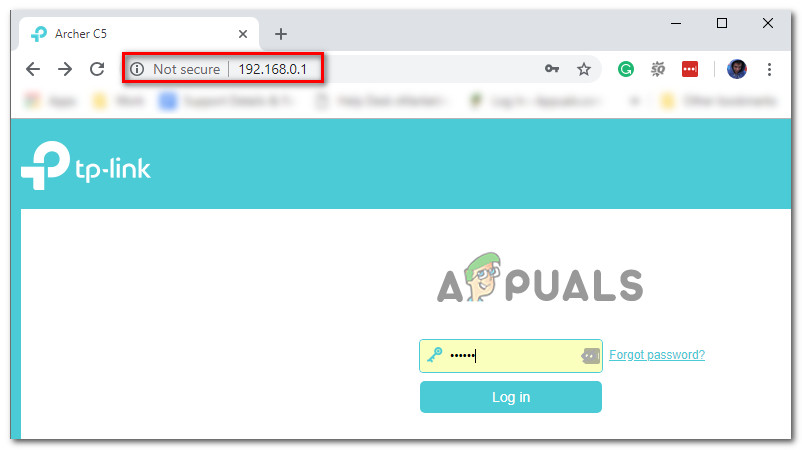
Preferably on a desktop computer, open your web browser and type the IP address of your router inside the navigation bar and press Enter – Most commonly, this your router’s address is either 192.168.0.1 or 192.168.1.1. Accessing your router settings
Once you get to the login menu, enter the required credentials to gain entry to your router settings. Keep in mind that with most manufacturers, you will be able to sign in with admin or 1234 (as username and password) unless you’ve previously established custom login credentials.
Accessing your router settings
Note: If these default credentials don’t work, search online for the specific default login credentials for your router settings.
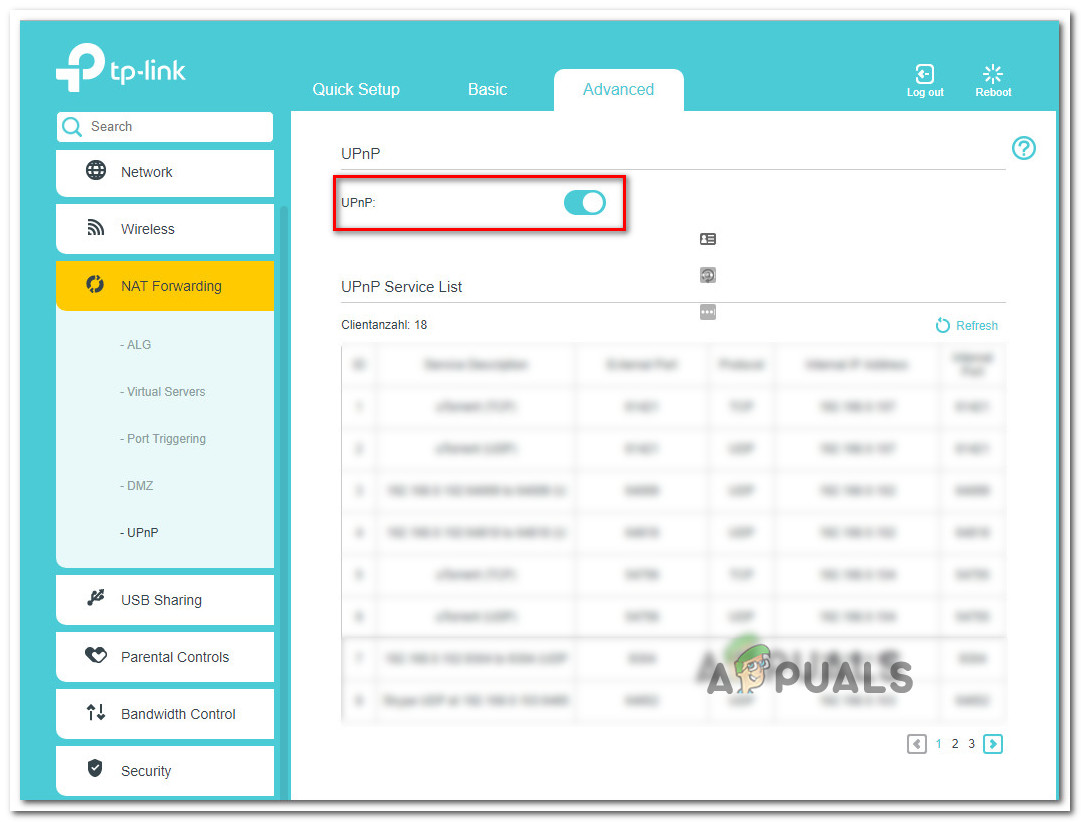
Once you’re inside your router’s settings, go to Advanced (or Security) and look for an option named Access Control.
Accessing the Access Control menu on a TP-Link router
Note: Keep in mind that these steps were performed on a TP-Link router. Different manufacturers will have different menu names. Search online for specific steps of blocking/unblocking devices from your router.
Once you’re inside the Access Control menu, move over to the right-hand side menu and disable Access Control. Disabling the blocked device
Note: If you rely on Access Control to prevent other devices from connection, the ideal approach is to remove your Xbox console from under Devices in Blacklist.
After you’ve performed these modifications, restart your console to force your networking device to assign a new IP and see if the problem is now fixed.
In case this scenario did not apply to your current situation, move down to the next potential fix below.
Causing an Interruption during a Test connection
As it turns out, you might be able to fix this problem by causing a machine interruption while your Xbox is in the middle of testing your Internet connection. It’s not clear why this weird fix is effective for many users, but some argue that this operation ends up forcing your console OS to flush every temporary data and reboot from scratch.
If you want to attempt this fix, follow the instructions below:
With your Xbox One console fully turned on, press the Xbox button on your console to bring up the guide menu. Next, navigate and access the Settings menu.
Accessing the Settings menu on Xbox One
Once you’re inside the Settings menu, access the Network tab.
Selecting Network
From the Network settings menu, move over to the Troubleshooting settings and access the Test network connection menu.
Xbox One Network Settings
Wait for the operation to start, then press and hold on the Xbox button (on your console) until your console shuts down.
Pressing the power button on Xbox One
Power up your console again and wait for the corruption scan to finish, then, once the startup is complete, attempt to connect to your home network again and see the ‘Additional Authentication Needed‘ error is still appearing.
In case it does, move down to the next potential fix below.
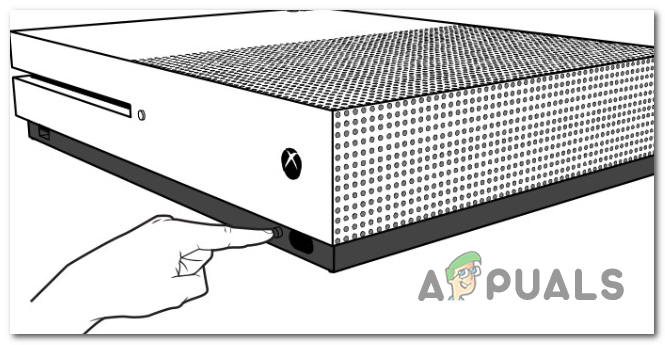
Performing a Power cycling Procedure
If none of the methods above have allowed you to fix the issue, you should also start to consider the possibility of some type of local file corruption originating in your Xbox temp folder. Under certain circumstances (especially after unexpected shutdowns), corruption might end up affecting your console’s ability to establish and maintain an Internet connection.
One of the quickest ways to resolve these issues is to perform a power cycle. This operation will end up clearing any temp data and drain the power capacitors (this will end up fixing the majority of firmware-related issues.
To perform a power cycling procedure on your Xbox One console, follow the instructions below:
Make sure that your console is fully booted or in idle mode (not installing everything and not in hibernation mode).
On your console, press the Xbox button and keep it pressed for 10 seconds or more, or until you see that the front LEDs stop flashing).
Performing a hard reset
After your console is fully shut down, you can safely release the power button. Next, disconnect the power cable on the rear from the power outlet and wait for at least 30 seconds to ensure that the power capacitors are completely cleared.
Next, turn your console back on by short pressing the power console again and see if the lengthy startup animation appears again. If it does, it’s confirmation that this method was successful.
After the next startup is complete, attempt to connect to the Internet again and see if the operation is now complete.
In case you’re still seeing the ‘Additional Authentication Needed‘ error, move down to the final method below.
Contact your ISP support
As it turns out, you can expect to see this issue due to some kind of restriction enforced by your ISP (Internet Service Provider). In most cases, you might expect to see the ‘Additional Authentication Needed‘ error after your ISP blocked your bandwidth as a result of a violation or a pending bill.
If none of the fixes above have worked, you should get in touch with your ISP support and ask for clarification. If there are no pending issues with your Internet package, you can ask them to whitelist the MAC address that you’re currently using on your Xbox One console so that you will not get this issue again.
Some Windows users are reporting that they’re system is unable to install a pending Windows update for Skype (KB2876229). The error code that comes up is either 666 or 667. In the majority of cases, this problem is reported on Windows 7.
Skype Error Code 666
As it turns out, this particular issue is caused by some type of system file corruption. In most cases, it’s reported to occur after an unexpected machine shutdown or after an AV scan ended up affecting quarantining some files belonging to the Windows Update component.
In the majority of cases, affected users have managed to fix this issue by resolving any instance of system file corruption with DISM and SFC scans.
However, if these two utilities are not capable of fixing the issue automatically, you can probably circumvent the Windows update entirely by uninstalling the desktop application conventionally and then installing the latest version manually (from the official page).
Running DISM and SFC scans
As it turns out, the number one cause that will lead to your system’s failure to install the KB2876229 update for Skype is some type of system file corruption. But fortunately, Windows has a couple of built-in utilities (DISM and SFC) that should allow you to fix the majority of corruption-related issues automatically.
Although their core operations are similar, the two utilities go approach file corruption in a different way, which makes them ideal to be used together.
System File Checker (SFC) is an entirely local tool that used a locally stored archive to replace corrupted system files that are discovered in the initial scan.
Deployment and Image Servicing and Deployment (DISM) is is a newer tool that relies on a sub-component of Windows update to replace corrupted instances with healthy copies. Obviously, it requires a stable internet connection to operate normally.
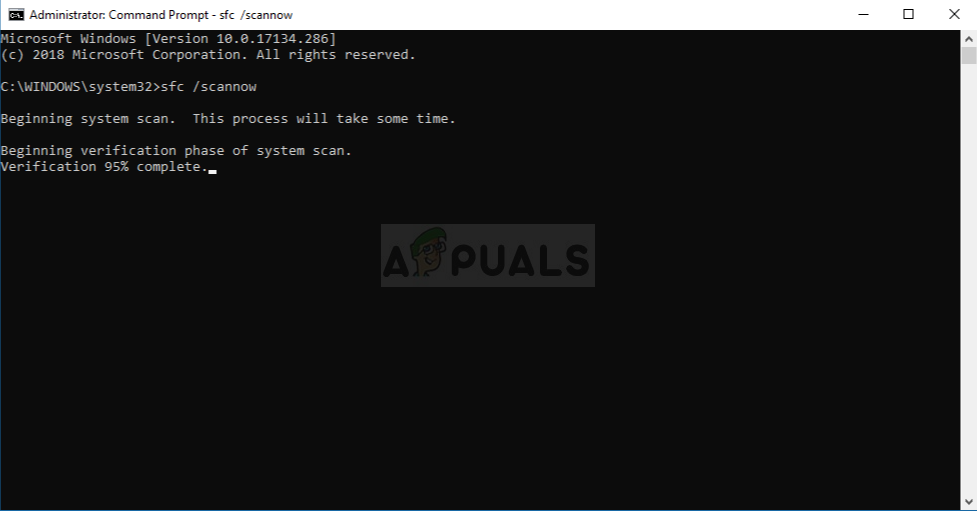
If you suspect that system file corruption might be responsible for the Skype Failed to Install 666 error, start by performing an SFC scan and perform a restart at the end of this procedure.
Running the SFC scan
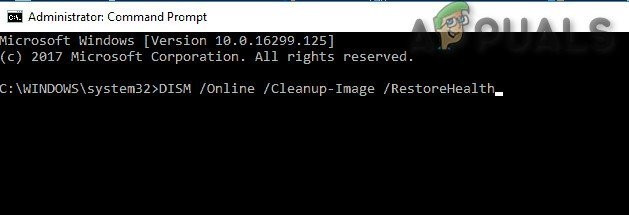
After your system boots back up, open another elevated CMD prompt and initiate a DISM scan.
Run DISM Command
Note: Ensure that you have a stable internet connection before initiating this procedure.
After you manage to perform both scans, restart your system one final time and attempt to install the pending again once the next startup is complete.
In case you still end up seeing the same error code, move down to the next potential fix below.
Installing the Latest version of Skype Manually
Since Skype is owned by Microsoft, Windows Update is tasked with updating it to the latest version whenever a new version becomes available. But keep in mind that this is not the only way that will allow you to update Skype to the latest version – You can also do it manually, without relying on Windows Update.
As it turns out, the KB2876229 update is extremely problematic (especially for Windows 7), but a lot of users have managed to get around this inconvenience by uninstalling the current Skype version and then reinstalling the latest desktop version from the official website.
After they’ve completed the installation of the latest version, Windows Update will stop trying to install the pending update since it will see that your Skype version already has it.
To go this route, follow the instructions below to uninstall and then install the latest Skype version:
Ensure that the main Skype application and any other associated instance or background process are closed.
Press Windows key + R to open up a Run dialog box. Next, type ‘appwiz.cpl’ inside the text box and press Enter to open up Programs and Features menu.
Type appwiz.cpl and Press Enter to Open Installed Programs List
Once you’re inside the Program and Features menu, move over to the right-hand menu and scroll down through the list of installed programs until you find the entry for Skype. Once you see it, right-click on it and choose Uninstall from the newly appeared context menu.
Uninstalling the latest version of Skype
Inside the uninstallation screen, follow the on-screen prompts to complete the process, then restart your computer once the operation is complete.
After the next startup sequence is complete, visit this link (here) and click on the Get Skype for Windows button to download the latest version of Skype for desktop.
Downloading the latest version of Skype for Desktop
Once the download is complete, double-click on the installer and follow the on-screen prompts to complete the installation of the latest Skype version.
Installing the latest Skype version
Once the installation is finished, restart your computer and wait for the next startup to complete.
After your computer boots back up, press Windows key + R to open up another Run dialog box. Inside the text box, type ‘wuapp’ and press Enter to open up the Windows Update component window.
Running dialog: wuapp
Inside Windows Update, perform another scan for new updates. If the latest version of Skype was installed successfully, you should no longer see an error related to Skype and the problematic KB2876229 update.
Even though Star Wars Battlefront 2 was hailed by EA as a commercial success, there are a lot of issues that still plague this game years after it’s the original release date. Xbox One and PC users are reporting that the game simply refuses to start.
Star Wars Battlefront 2 Not Launching
As it turns out, several different components will cause this particular scenario:
Origin glitch – You might be unable to launch the game due to an origin glitch. One way to circumvent this error is to attempt to launch the game via the context menu instead.
Corrupted files inside the cloud storage – If you’re encountering this issue when trying to launch SWBF II via Origin, the launch might fail due to a selection of files hosted on the cloud folder allocated for this game. To test this theory, attempt to launch the game after disabling the Cloud Storage feature in Origin’s settings.
Conflicting in-game Origin Overlay – There are a lot of games that are currently experiencing problems with Origin’s Overlay feature, and Star Wars Battlefront II is one of them. To avoid this issue, simply disable the in-game overlay feature from the Settings menu and to the same thing from the game’s properties.
Corrupted game installation – A corrupted game installation can also be the main cause behind this problem. This is confirmed to happen on both PC and Xbox. To resolve this issue in this case, simply reinstall the game along with every installed addon.
Expired Xbox Gold Subscription – On Xbox One, you can also expect to see this error because your Gold membership is no longer valid or has expired. To fix this problem, simply renew your membership, restart your console and you should be able to launch the game without issues.
Origin Auto-Update isn’t working – If you’re having this issue with Origin, keep in mind that this particular launcher tends to ‘forget’ to update Star Wars Battlefront II (this has been consistently confirmed by users). In this case, you should attempt to force the update via the context menu.
Service pack 1 is missing from Windows 7 – In case you’re still using Windows 7 for some reason, keep in mind that the game needs Service Pack 1 (Platform Update 6.1) to run properly. If this is applicable, you will need to install the latest update from Microsoft’s official download page.
The game cannot launch with current settings – On PC, the game might refuse to launch due to some settings that are incompatible with your GPU capabilities. In this case, you might be able to fix the problem by editing the BootOptions file from Documents and force the game to launch in windowed mode without DX13 and antialiasing. If that doesn’t work, you can also try deleting the contents of the Settings folder entirely.
Launching the Game from Library menu (Origin)
By far, the most issues related to this game are reported on Origin – which is ironic, considering that the game’s publisher is also the owner of this game store.
Fortunately, some affected users have discovered a workaround for instances where the game will refuse to launch.
In case you select the game in Origin, you hit Play from the game page and nothing happens, you might be able to work around the problem. As it turns out, you might be able to launch the game normally by using the drop-down menu associated with Star Wars Battlefront 2.
To do this, open Origin and click on My Game Library – But instead of selecting the game that you’d normally do, right-click on it and click on Play from the newly appeared context menu.
Launching the game via Origin’s drop-down menu
Do this and see if the game can launch normally. If you’re still having the same problem, move down to the next potential fix below.
Disabling Cloud Storage in Origin
One potential issue that might end up preventing you from launching the game normally is corrupted files stored by the cloud service of Origin.
Some users that also faced the same issues have confirmed that StarWars Battlefront II finally ran after they accessed the Origin’s settings and disabled Cloud Storage. After doing so and attempting to launch the game again, the problem stopped occurring.
If you think this scenario might be applicable, follow the instructions below to disable the cloud-storage feature on your Origin installation and see if that resolves your issues:
Open Origin and use the ribbon menu at the top to click on Origin > Application Settings.
Once you’re inside the Application Settings menu, move to the right section of the Origin window and click on Installs & Saves.
Next, scroll down to the Cloud Storage section and simply uncheck the toggle associated with Saves.
Launch Star Wars Battlefront II and see if the game can launch normally.
Disabling Cloud Storage in Origin
In case the same problem still occurring and you’re still unable to play the game, move down to the next potential fix below.
Disabling In-Game Origin Overlay (Origin)
As it turns out, this particular issue can also be caused by a glitch facilitated by the usage of Origin’s in-game overlay function. Some users have discovered that the game refuses to start in their case as long as the overlay function is enabled.
If the same scenario applies to you, try disabling the in-game overlay function before attempting to launch the game – Even if you’re fond of using an overlay tool to view your FPS, there is a lot for worthy alternatives that you can consider.
Follow the instructions below to disable the in-game overlay function of Origin:
Open Origin and click on Origin from the ribbon-bar at the top.
Next, from the newly appeared context menu, click on Application Settings.
Once you’re inside the Settings menu of Origin, move to the right-hand section and click on Origin In-Game tab from the ribbon bar.
Next, go to the Origin In-Game section and disable the toggle associated with Enable Origin In-Game.
After you do this modification and the changes are saved, click on My Game Library from the vertical menu on the left.
Next, right-click on the entry associated with SW BF II and click on Game Properties from the newly appeared context menu.
Inside the Properties menu of the game, uncheck the box associated with Enable Origin In-Game for Star Wars Battlefront II, then hit Save to make the change permanent.
Launch the game again and see if the problem is now resolved.
Disabling Origin’s In-Game Overlay
If the same problem is still occurring and you’re still unable to play the game, move down to the next potential fix below.
Reinstalling the game
As it turns out, launch issues related to StarWars Battlefront 2 are reported on both console and PC. The frequency on PC is higher, but there are also a lot of reports on Xbox One as well.
On PC, affected users double-click on the game’s executable but nothing happens (no error), while on Xbox One, they typically see the 0x80040900 error code along with a message that prompts them to restart.
Note: We weren’t able to identify any underlying issues with SW BF 2 on PS4. If you found a problem, please let us know in the comment section below.
If this scenario is applicable, you should attempt to reinstall the game – If the issue is being caused by some type of corrupted game file, the instructions below should help you fix it. To accommodate both types of users (PC and Xbox One users), we created two separate guides that will help you reinstall the game in both scenarios.
Follow whichever guide applies to your current situation:
Reinstalling StarWars Battlefront 2 on PC
Press Windows key + R to open up a Run dialog box. Next, type ‘appwiz.cpl’ inside the text box and press Enter to open up the Programs and Feature menu.
Type appwiz.cpl and Press Enter to Open Installed Programs List
Once you’re inside the Programs and Features menu, scroll down through the list of installed applications and gate and locate the entry associated with StarWars Battlefront 2. When you see it, right-click on it and choose Uninstall from the newly appeared context menu.
Uninstalling StarWars Battlefront 2
Inside the uninstallation screen, follow the on-screen instructions to complete the uninstallation, then restart your computer.
After the next startup is complete, open the launcher that you used to purchase the game (Steam, Origin, Battlefront) or insert the traditional media and reinstall the game.
Attempt to launch it and see if you’re still having issues with launching the game.
Reinstalling StarWars Battlefront 2 on Xbox One
Press the Xbox One button to open up the guide menu, then use it to access the Games & apps menu.
Accessing the Game & apps menu
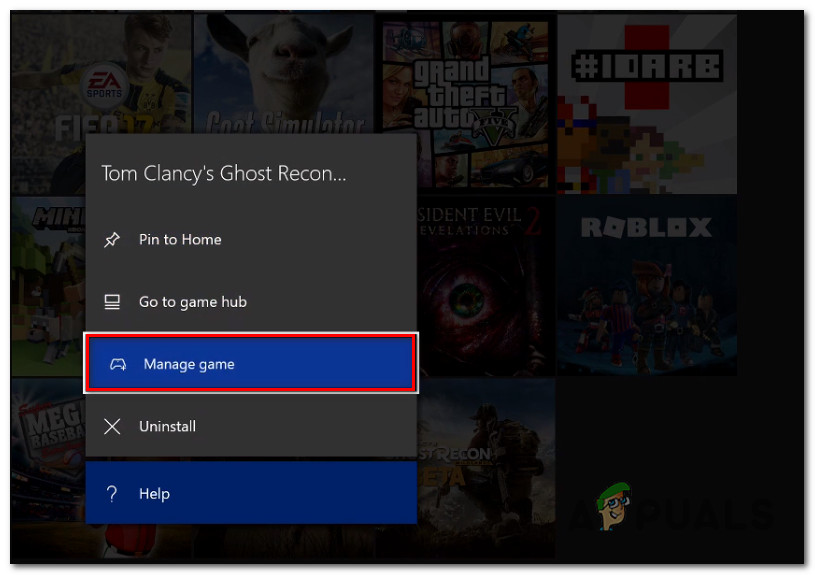
Once you’re inside the Game & Apps menu, navigate to the game that you’re trying to uninstall, press the Start button and choose Manage game.
Managing a game
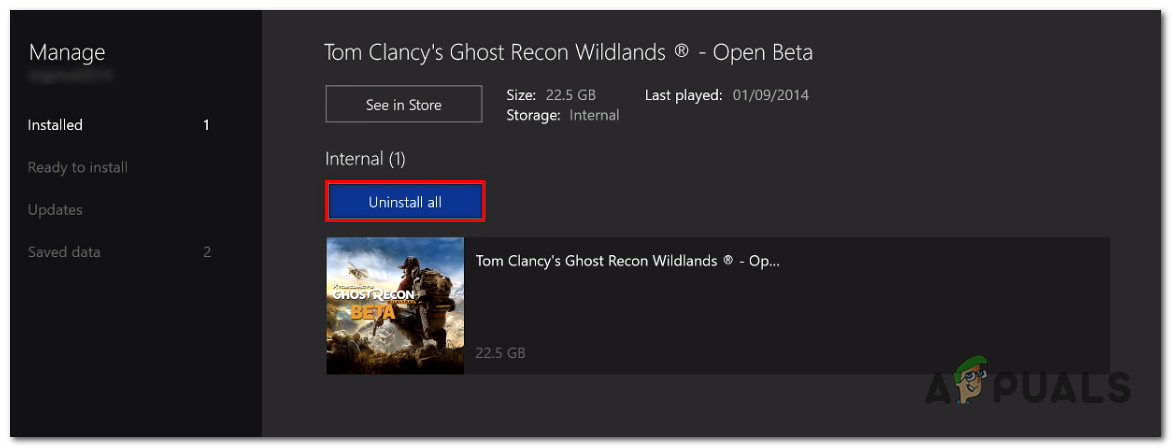
Next, move over to the right pane and select Uninstall All to ensure that the base game along with every install add-on or update is also removed.
Uninstalling the game
After the uninstallation is complete, return to the Manage menu, but this time, select the Ready to install section.
Next, move to the right section and highlight the Ready to install section. Next, select the Install all button associated with StarWards Battlefront 2 to reinstall the base game along with every update and add on.
Attempt to launch the game and see if you’re still seeing the same error message.
In case the game still refuses to start even after you’ve uninstalled the game, move down to the next method below.
Renewing your Gold pass (Xbox One Only)
In case you’re encountering the problem on Xbox One, your first stop should be inside the Account menu checking if your Gold subscriptions have expired. As it turns out, some users have managed to fix the problem related to StarWars Battlefront 2 on their Xbox One console after renewing their Gold subscription.
Keep in mind that just as on PS4, StarWars Battlefront 2 requires you to have an active premium subscription (PSPlus on PS4 and Gold on Xbox One).
If you see that your game suddenly refuses to start on Xbox One, follow the instructions below to check if your Gold Subscription has expired:
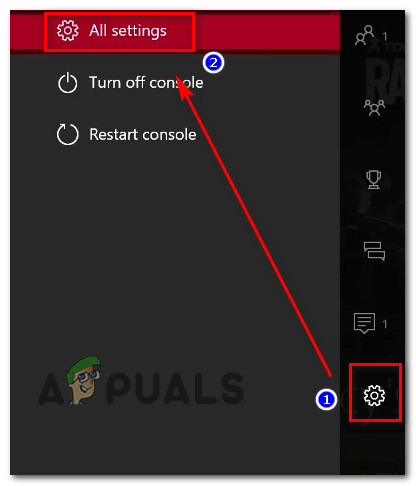
Press the Xbox button on your controller to open up the guide menu. Next, use the trigger on the right to select the Settings tab, then select All settings and press A to access it.
Accessing the Settings menu on Xbox One
Once you’re inside the Settings menu, select the Account tab from the vertical menu on the left, then move over to the right-section and access the Subscriptions menu.
Accessing the Account > Subscription menu on Xbox One
Once you’re inside the Subscription menu, see if your Xbox Gold subscription has expired. If you confirm this, you will need to renew it before you will be able to play StarWars BattleFront 2 again.
In case this scenario did not apply to your current situation, move down to the next potential fix below.
Installing every pending Update (Origin)
If you’re trying to launch the game through Origin, be advised that there’s a weird bug going around for years, where the launcher is refusing to update the game automatically without telling you anything. Upon attempting to launch the game, affected users report that nothing happens (no error message).
This seems to be an issue exclusive to Origin, but fortunately, you can fix it fairly easily. Several affected users have confirmed that they managed to force the game to update itself to the latest version manually, and after doing this, the game launched without issues.
Follow the instructions to replicate the steps on your computer:
Open Origin and click on My Game Library from the left-hand vertical menu.
Accessing the My Game Library on Origin
Once you’re inside your game’s library, right-click on Star Wards BattleFront 2 and choose Update game from the newly appeared context menu.
Updating SW BF 2 to the latest version via Origin
Wait for the initial scan is complete, and if a new update is available, wait for it to install.
When the operation is complete, launch the game again and see if you’re still seeing the same error message.
In case this method did not apply to your particular scenario, move down to the next potential fix below.
Installing the Platform Update (Windows 7 Only)
If you’re encountering this issue on Windows 7, you should ensure that your operating system has the latest platform update installed. Some users that were having trouble launching the game on Windows 7, have reported that the launch was finally successful after they installed the latest Platform Update for Windows 7 (SP 1) and restarted their computer.
Note: You might also want to check the system’s requirements for StarWars Battlefront II to make sure that your current PC configuration is powerful enough to run the game.
Minimum System’s Requirements for SW BT II
If this applies to you, follow the instructions below to install the latest platform update to ensure that your PC is using the latest performance improvements on Windows 7:
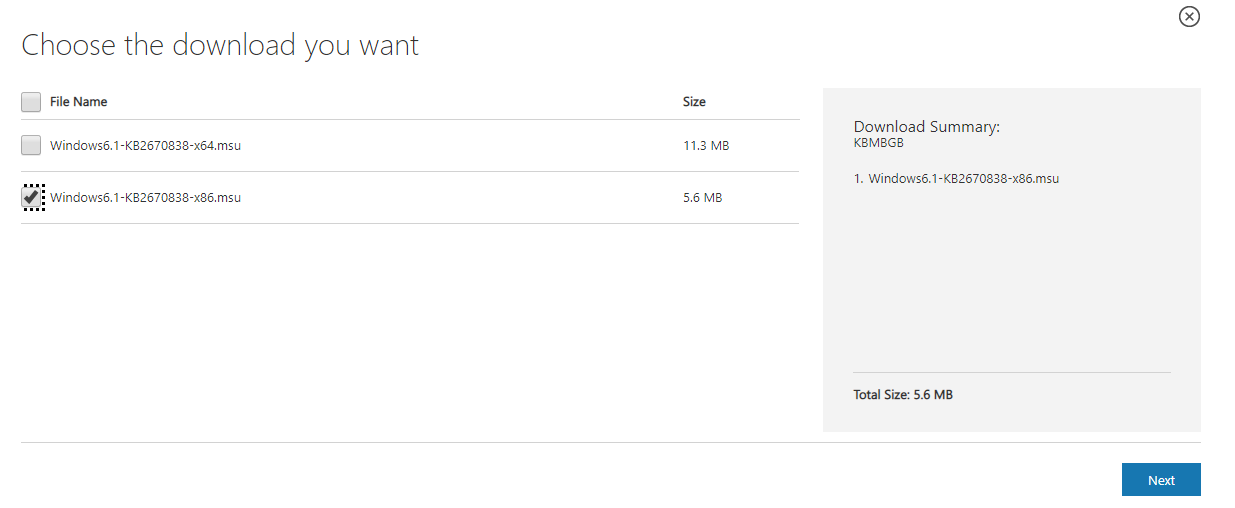
Visit this link (here) to download the platform update for Windows 7. Once inside, scroll down to Platform Update for Windows 7, select a language and hit the Download button.
Downloading the platform update
Once you get to the next screen, check the box associated with the OS infrastructure that you’re using – for 32-bit, check the toggle associated with Windows6.1-KB2670838-x86.msuand press Enter. Downloading the appropriate platform update version
Note: For 64-bit, download the other installer.
After the download is complete, double-click on the installer and follow the on-screen instructions to complete the installation of the platform update
Once the update ins installed, reboot your computer and see if the issue is resolved at the next system startup.
In case you’re still unable to launch the game, move down to the next potential fix below.
Launching the game in Windowed Mode
As it turns out, you might also encounter this problem because the game is forced to launch with a selection of graphic options that are simply not compatible with your PC configuration.
In this case, you should be able to get rid of these problematic settings by editing the settings file directly and force the game executable to launch without DX12, antialiasing and run in Windows Mode with Vsync turned on. This particular configuration has been reported to work for a lot of affected users.
To enforce this fix, follow the instructions outlined below:
Press Windows key + R to open up a Run dialog box. Next, type ‘documents’ inside the text box and press Enter to open up the Documents folder.
Accessing the Documents folder via Run dialog box
Once inside, double-click on the Star Wars Battlefront II folder.
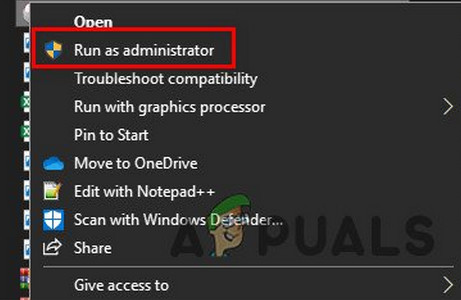
Next, double-click on the settings menu, then right-click on the BootOptions file and choose Open > Notepad.
Opening BootOptions with Notepad
Note: If you have a different editor installed (like Notepad++), it’s better to open it with that one instead.
Once you’re inside your editor, paste the following code and save the changes:
Launch the game again and see if the issue is now resolved.
If you’re still unable to launch the game, move down to the next potential fix below.
Deleting the Settings folder in Documents
If you’re encountering this issue on PC and the method above didn’t work, keep in mind that this problem can also be caused by a selection of temporary files that are being stored inside the Settings folder (not the main game folder).
As it turns out, some affected users have managed to fix the error by navigating to the location of the Star Wards Battlefront II folder and deleting the Settings folder entirely. According to users that have tried it, this will not break the game since the launcher will regenerate the folder during the next launch attempt.
This operation will end up deleting any custom settings that might contribute to the failed launch, and allow the game to use with the default settings.
To enforce this potential fix, follow the instructions below to navigate to the STAR WARS Battlefront II folder and delete the Settings menu:
Make sure that the game and it’s launcher (Origin, Steam, Epic Launcher) are completely closed and no associated background processes are running.
Press Windows key + R to open up a Run dialog box. Next, type ‘documents’ inside the text box and press Enter to open up the Documents folder related to the account that you’ve currently signed it with.
Accessing the Documents folder via Run dialog box
Once you’re inside the Documents folder, double-click on Settings.
Once inside, press Ctrl + A to select everything inside the Settings menu, then right-click on a file and choose Delete from the newly appeared context menu.
Deleting the contents of the Settings menu
After the contents of the Settings folder have been cleared, attempt to launch the game again and see if the issue is now resolved.
Remote Desktop access is one of the best technologies that exist out there. Having the ability to control a computer from almost anywhere is just mind boggling. There are tons of remote desktop applications available out there that are utilized for different purposes. One of the great things about this technology is you get to use a computer as if you were personally present there, in front of the computer. Having this capability while being miles away is incredible. There are so many use cases of the Remote Desktop technology that one could just go on and on about its different purposes. From being able to use your work computer while being at the comfort of your home to providing IT support to your employees and customers, the uses list of remote control software just goes on and on. However, that is not why we are here; to discuss the use cases.
Radmin Viewer
One of the downsides of the remote desktop software is the security of the established connections. Most of the software or tools built for this purpose are often vulnerable to several exploits and your remote connection is not really secure. Hence, you are always on the edge of the sword. However, there exists a software that has been proved impenetrable in this department. Radmin is a secure remote access software that offers security and reliability to its customers. To establish a remote connection via Radmin, there are two main components required. Radmin Server and Radmin Viewer. The server is to be installed on the remote computer that you wish to access and the Radmin Viewer goes on your local PC. Hence, with the help of these tools, you can establish a connection to the remote computer.
Installing Radmin Server and Radmin Viewer
Before we get into the main topic and for you to be able to follow through, you will have to install Radmin Server and Radmin Viewer (download here) on your local and remote system. The installation process is very simple and does not require any configuring. Once you have downloaded the tool, extract the .zip file to any place of your liking. Make your way to the said place and then install the tools on their respective system.
How to Configure Radmin Server
Once you have installed Radmin Server on the remote PC, you will have to configure it. The configuration involves quite a few things but we will go through the most important and relevant things to make it easier. These include choosing a startup mode, IP filtering, setting up a password and more. So, without further ado, let’s get into it.
Choosing a Startup Mode
Once you install the server on the system, you will be prompted with the settings window of the Radmin Server. Here, you can do quite a few things, one of them being choosing a startup mode. Radmin Server can start automatically when the system boots up or you can choose to manually start it up whenever needed. Here’s how to choose a startup mode:
On the Radmin Settings window, click on Startup mode.
Choose either Automatic or Manual. If you wish it to be started automatically, go for Automatic otherwise choose Manual. Manual startup can improve overall security but in some cases, automatic is preferable so go for whatever you require.
Startup Mode
Using Radmin Security
Using Radmin, you can even restrict the incoming remote connections to logins and passwords and thus specific users will be able to access the remote computer. For this purpose, you will have to add users to the Radmin Server. This will even strengthen the security of your remote connections. Here’s how to add a user:
On the Radmin Settings window, click on Permissions.
After that, click Permissions again in front of RadminSecurity.
Radmin Security
On the new window the pops up, click Add User.
Give the user a username and follow it up with a password. Once done, click OK.
Adding User
IP Filtering
If you wish to restrict the incoming remote connections from a specific network, you can use the IP filter functionality of the tool. This will restrict the incoming connections to a specific IP or an IP address range. Here’s how to do it:
On the Settings window, go to Options.
On the left-hand side, click IP Filter and then tick the Enable IP Filter box.
After that, click on Add to provide an IP address range.
IP Filtering
You can either provide a specific IP or an IP address range. Once you have done so, click Add to restrict the access to the provided IP address/range.
Asking User Permission and Logging
On Radmin Server, you can configure it to ask the remote user permission every time you try to connect to the remote computer. Other than that, you can also have the server create log files whenever any error occurs so you can know what is causing the issue. Here’s how to set this up:
On the RadminSettings window, go to Options.
There, tick the Ask user permission checkbox if you wish to enable it. You can also configure it to automatically reject or allow connections after a specific time period.
General Options
For logging, you can log different types of errors. The options can be seen in the drop-down menu provided. To change the log file location, click on Browse and then choose where you would like it to be saved.
Finally, click OK.
How to Securely Connect to a Remote Computer
Now that we have configured the Radmin Server, we are ready to connect to the remote computer. To be able to connect, make sure you have installed Radmin Viewer on your local computer/home PC. Once you have installed the Radmin Viewer, you can connect to the remote system. To do this, you will need the IP address of the remote computer. You can find the IP address by opening a command prompt (cmd) and typing ipconfig in the prompt. You can also transfer files to the remote system via Radmin Viewer. The file transfer goes the other way around as well. Once you have the IP address, do the following to access the remote system:
Open up RadminViewer.
Once it loads up, click on the thunder icon found under the menu bar.
Provide the IP address of the remote computer and make sure Full Control is selected from the drop-down menu.
Connecting to Remote Computer
After that, click OK.
Provide the login user name and password as per the Radmin Server security configuration.
A window will appear displaying the remote computer’s screen.
The importance of log files cannot be denied or overlooked. The significance of log files even increases in large networks where several devices are communicating with each other and with the internet. This, however, does not mean that small networks can overlook the availability of a syslog server. Whenever these network devices communicate with each other, event logs are generated that include information regarding the transaction. Thus, monitoring log messages is really useful whenever an error pops up in the network and you have to pinpoint the issue meaning finding the specific network device responsible for the problem from all the devices present in the network. Network and system administrators often rely on log files to fix issues that plague the network and need a quick resolution. Therefore, having a syslog server in place in a network is really useful and important. There are tons of log management software out there that offer many extended functionalities that can be utilized by almost every network admin in monitoring syslog data.
Kiwi Syslog Server
Solarwinds Kiwi Syslog Server is a syslog server that is available only for the Windows platform. It collects syslog messages from other network devices as well as SNMP traps (Simple Network Management Protocol). SNMP traps are basically alert messages that are sent by a SNMP-enabled network device to the syslog server. Kiwi Syslog Server receives all these system messages from network devices like routers, firewalls, and switches. The server can also be configured to receive Windows event logs in syslog format which makes event logs management easier.
Kiwi Syslog Server
The Kiwi Syslog Server (download here) is the best option for having a central syslog manager or a syslog server in your network that receives all the logs that are sent by different network devices and has a friendly user interface. With Kiwi Syslog, you will be able to create custom rules which then initiate actions that you have defined such as restarting a device or sending out real-time alerts/emails. Therefore, the tool offers full customizability that is essential for a syslog server. Other than that, you can create scheduled tasks that will be executed daily at the time specified. Kiwi Syslog Web Access offers a web interface so that you can access the syslog facility from anywhere in the network. You can filter syslog messages by priority of syslog message as well as monitor log messages by different type of syslog messages with the help of a web console that comes with the tool. This helps in viewing the top syslog priority levels messages more quickly and ensures a higher security level of the network.
Before we get into that, you will have to make sure that you have downloaded and installed the Kiwi Syslog Server tool on your computer. So, go ahead and download the free tool from the link provided above. Some of these tasks cannot be done in the free version of the software which is why you’ll have to get the licensed version of the said tool. You can avail a free trial of the licensed version of the tool to see it for yourself. The installation process of the tool is pretty straightforward and does not require any configuration. However, it does require .NET Framework 3.5 so make sure you have that installed. You can set Kiwi Syslog to be installed as an application or as a service per your needs. Once you are done with that, you will be able to follow through this guide.
Creating Scheduled Tasks
As mentioned above, you can automate certain tasks with the help of Kiwi Syslog server. These tasks include running a script, executing a program, archiving log files as well as cleaning up tasks. Kiwi Syslog allows you to create upto 100 scheduled tasks that are triggered to initiate when the Kiwi Syslog Server application either starts or stops as well as on a schedule. So, without further ado, let’s get into it.
Archiving Log Files
Whenever log files are no longer needed for troubleshooting or if they are more than a week old, you can create a scheduled task to archive the log files. This will save up disk space for you that can be utilized by incoming log files. The options provided in archiving tasks include moving the files to a different location, encrypting the files or compressing them. To do this, follow the step-by-step instructions:
Open up the Kiwi Syslog Server and go to File > Setup.
On the left-hand side, right-click on Schedules and then choose Add new schedule.
A new schedule will be created. Replace the default name by giving it an appropriate name as per the task.
As the TaskType, choose Archive from the drop-down menu. For the TaskTrigger, you can either choose for it to run on a schedule or when the application/service either stops or starts.
Archiving Log Files
If you choose On a schedule, you will have to specify a starting date, the frequency of the task and then an ending date.
In the Source tab, specify the source location of the files that you wish to archive.
Under the SourceFiles heading, you can choose which files to archive.
After that, on the Destination tab, choose where you wish to archive the selected files. You can also choose to either move them or copy the files to the said location.
Destination of Archive Files
To compress the log files, go to the ArchiveOptions tab and tick the Zip files after moving/copying checkbox. After that, you can choose the compression method and level.
Archive Options
You can also run a program every time a file is moved or copied. To do this, tick the Run program after each file is copied/moved checkbox. Specify the location of the executable file and any command-line parameters that are needed for the program.
You can also choose to wait for the program to run completely, this can be done via the Wait for program completion checkbox. You can also provide a specific number of seconds to wait for the program to execute.
Finally, you can have yourself notified by having the server send out email alerts every time the archive task is run on the Archive Notifications tab.
Once you have configured everything, click the Apply button to save your settings.
Deleting Files
With the help of clean-up tasks, you can have the Kiwi Syslog Server delete log files that have been saved for a specific period of time. The server can be configured to delete the files per its age, size etc. Here’s how to do it:
Create a new schedule as shown above and name it accordingly.
For the TaskType, choose Clean-up from the drop-down menu provided and then choose a TaskTrigger per your need.
After that, on the Source tab, provide the location of the folder which holds the files that you wish to delete.
Clean-up Task
Under the Source Files heading, specify the files that you wish to delete either by its age or size.
On the Clean-upOptions tab, you can choose to delete empty folders.
Clean-up Options
Finally, you can have the server email you whenever the clean-up task is run.
After that, click the Apply button to save your configuration.
Running a Program
You can schedule a task to run a Windows program, batch file or process in the Kiwi Syslog server. Here’s how to do it:
Create a new schedule as explained above and then give it a proper name.
This time, choose Run Program as the Task Type and then choose a Task Trigger per your need.
After that, on the Program Options tab, specify the location of the program that you wish to execute and follow it up with any command line parameters that you wish to be passed to the program.
Program Options
You can choose the priority of the process from the drop-down menu provided.
You can have the server wait for a certain number of seconds so that the program execution is completed.
Finally, you have a report sent to you everytime the task is run on the Run Program Notifications tab.
After that, click Apply to save your settings.
Running a Script
The final type of task that you can schedule is known as running a script. You can have the script run at regular intervals by creating a schedule for it. Here’s how to do it:
Create a schedule and give it a name.
Choose Run Script as the Task Type and then choose a Task Trigger from the provided options in the drop-down menu per your need.
On the Run Script Options tab, provide the location of the script file. You can also provide a description about the script if you wish.
Script Options
Select the language of the script from the drop-down menu.
Provide field read/write permissions and then finally, if you wish to be notified, you can do so on the Run Script Notifications tab.
After that, click the Apply button to save your configuration changes.
Some Windows users are encountering the ‘DllUnregisterServer failed with error code 0x80040200′ when trying to register or unregister a DLL file or when trying to install an application that tries to register a DLL file automatically. This problem is reported to occur on Windows 7, Windows 8.1, and Windows 10.
DllUnregisterServer failed with error code 0x80040200
The most common cause that will end up producing this particular error is a permission issue. To take care of it, you will need to try and register or unregister the DLL file with admin access.
However, if the problem occurs when trying to install a program, you might need to re-register the file after the installation fails. If you’re encountering the problem with an OCX dependency, try moving the file to the System32 folder before attempting to do the installation again.
Method 1: Unregistering the DLL file with Admin Access
In case you see this error while attempting to unregister a DLL file manually, you likely end up seeing the 0x80040200 because you don’t have sufficient permissions. If this scenario is applicable, you should be able to avoid this error message altogether by using the ‘regsvr32’ command in an elevated command prompt.
If you didn’t already try this, follow the instructions below to attempt to unregister the DLL file manually from an elevated CMD prompt:
Press Windows key + R to open up a Run dialog box. Next, type ‘cmd’ inside the text box and press Ctrl + Shift + Enter to open up an elevated CMD prompt. When you see the UAC (User Account Control), click Yes to grant administrative privileges.
Running the Command Prompt
Once you’re inside the elevated CMD prompt, type the following command and press Enter to unregister the .DLL file manually:
regsvr32 /u *DLL File*
Note: Keep in mind that *DLL file* is simply a placeholder. You will need to replace it with the name + extension of the DLL file that you are attempting to unregister. For example, we needed to unregister the cdo32.dll file, so we used the regsvr32 /u cdo32.dll command.
In case the operation completed successfully without the 0x80040200 error code, reboot your machine and then complete the installation that was previously causing the problem.
In case the same problem is still occurring or this operation was not applicable, move down to the next potential fix below.
Method 2: Re-registering the File after Program Installation
If you see this error while trying to install an application, you’re likely seeing this error due to some dependencies that are not being loaded properly. In this case, you will probably be able to work around the issue by running the installer with admin rights and then unregistering and registering the failing dependency manually.
Note: This fix is frequently reported to be effective on Windows 7.
In case this scenario is applicable, follow the instructions below to run the installation with admin access, then re-register the failing dependency:
Open File Explorer and navigate to the location of the installer that’s ultimately causing the error.
Right-click on it and choose Run as Administrator from the newly appeared context menu.
Running the installer with admin access
Follow the on-screen instructions to complete the installation. Don’t mind it if you see the same 0x80040200 error – Simply close the error window and move down to the next step.
Open up a Run dialog box by pressing Windows key + R. Next, type ‘cmd’ inside the text box and press Ctrl + Shift + Enter to open up an elevated CMD prompt.
Running the Command Prompt
Once you’re inside the Command Prompt terminal, type the following commands in order and press Enter after each command to unregister and then re-register the OCX dependency:
spr32x30.ocx /UNREGISTER
spr32x30.ocx /REGSERVER
Restart your computer and see if the problem is resolved at the next computer startup.
In case the same problem is persisting, move down to the next potential fix below.
Method 3: Running the OCX File from the System32 folder
In case you encounter this particular issue when working with a .ocx file (OLE Control Extension), you’re most likely a permission issue. Several affected users have confirmed that they managed to get this issue fixed by moving the .OCX file to the System32 folder and launching it from there to ensure that is has the necessary access.
IMPORTANT: Only do this if you are 100% sure that the .OCX file doesn’t pose a security risk.
If you’re indeed encountering the 0x80040200 error code with this file type, follow the instructions below to move the file in the System32 folder before opening it:
Open File Explorer, navigate to the location of the .OCX file, right-click on it and choose Cut from the context menu.
Cutting the file
Next, navigate to C:\Windows\System32 and paste the file that you just copied to your clipboard.
Once the file resides in the System32 folder, repeat the installation once again and see if you’re still encountering the same 0x80040200 error.
Google Chrome is an incredibly quick internet browser because it loads and displays web pages instantly and it is downloaded by thousands of people all around the globe. The simple and basic design of Chrome makes it easy to use therefore people download it on their Smartphones and Desktop PCs. On most of the android phones, Google Chrome is already set as a default browser but sometimes the custom ROMs override the default browser hence, keeping this point in view I will provide an easy procedure to make Chrome as your default browser on Android.
Chrome For Android
Most Android producers ordinarily embed their phones and tablets with their own default browsers like Xiaomi Mi 4i has its own frustrating one hence you should set the device’s default browser to Google Chrome so that you have the access to the synced settings and bookmarks from your phone while enjoying a swift browsing experience. Hence, without wasting a second now let’s proceed to the methodology that needs to be followed to set Chrome as a default browser.
Setting Google as a Default Browser on Android:
Locate the Settings option on your Android phone and navigate to Apps.
Apps
Click on the three-dot icon on your phone on the top right corner and a drop-down menu will appear in front of you.
From that menu choose the Browser App option and click on the Chrome button.
Select Google Chrome
Close the settings and relaunch some random URL to verify that the default browser is set to Google Chrome on your Android phone. The method explained above was tested on Samsung Galaxy S7 Edge and the same method can be followed on any Android Smartphone to set the default browser to Chrome and after following our article whenever you will open a link from any external application the Chrome will be chosen as a default web browser for the job.
Several Xbox One users are reporting that they end up seeing the 0x80270300 error code whenever they try to install or update a game on their Xbox One console. This issue is reported to occur with both digital and disc-based games.
Xbox One Error 0x80270300
Before trying anything else, you should start this troubleshooting guide by ensuring that the game you are trying to start or update manually is not already updating in the background. You can check this by viewing the My games & Apps Queue.
If that’s not the case, you should do a power cycling procedure to clear the power capacitors and ensure that the problem is not being caused by a temporary file. And if you didn’t already try this, reinstall the game conventionally and restart your console at the end of the reinstallation.
However, if the 0x80270300 error code is caused by some type of underlying OS issue, you will need to do a soft reset to refresh every operating system component and eliminate any corrupted instances.
Checking if the game is Currently Updating
As it turns out, one of the most common scenarios that will ultimately trigger the 0x80270300 error is when the user tries to launch a game that is being updated in the background. In most cases, your console should notify of this, but you can also expect to see this ambiguous error message.
To verify if this potential scenario is true, you will need to check your current My games & Apps Queue to see if the game you want to launch is getting an update.
To do this, follow the instructions below:
Press the Xbox button on your controller to bring up the guide menu.
From the guide menu, select My Apps & Games > Games.
Next, select the Queue category and see if the game triggering the 0x80270300 error is currently being updated.
Checking if the game is being updated
In case your investigation has revealed that the game currently causing the error is not being updated, move down to the next potential fix below.
Power Cycling your Console
Another potential culprit that might end up causing this issue is corruption located inside the temp folder that your console maintains. This might end up interfering with the installation of new games or even with the launch of new games.
To resolve this issue, the easiest procedure is to perform a power cycle. This will clear any temp data and drain the power capacitors (also good for resolving the majority of firmware-related issues).
Follow the instructions below to do a power cycle on your Xbox One console to fix the 0x80270300 error:
Ensure that your console is fully booted in idle mode (not installing everything and not in hibernation mode).
On your console, press the Xbox button and keep it pressed for about 10 seconds (or until you see that the front LEDs stop flashing)
Performing a hard reset
After your console no longer shows signs of life, release the power button and wait for at least one minute before powering ON again. While you wait, also disconnect the power cable from the rear to make sure that the power capacitors are completely drained.
Next, turn your console back on by pressing the power button on your console once again. During this startup, keep an eye out for the longer startup animation – if you see it, it means that the operation was succesfull.
Xbox One Starting Animation
Once the startup sequence is finished, launch the same game that was previously causing the error and see if the issue is now resolved.
In case the same problem is still occurring, move down to the next potential fix below.
Reinstalling the Game
If the two potential fixes above didn’t work for you, your problem is most likely caused by a corrupted game file that ends up making the game unplayable. Several affected users have confirmed that in their case, the problem was fixed and they were able to start and update the game after they reinstalled the game conventionally.
To do this, follow the instructions below to reinstall any Xbox One game to fix the 0x80270300 error code:
Press the Xbox button on your controller to open up the guide menu, then navigate to the Games & apps menu.
Accessing the My Games & App section
Next, from the Game & apps menu, navigate to the game that you’re trying to uninstall, press the start button and choose Manage game.
Managing a game
Next, use the Manage menu to navigate to the right pane and click on Uninstall all to ensure that every add-in or update is also removed.
Uninstalling the game
Confirm the installation by choosing Uninstall all, then wait for the process to complete.
Uninstalling the game and associated add-ons
Once the operation is complete, return to the Manage menu on the left-hand side section and go to the Ready to install section. Next, go to the right pane and select Install all. This procedure will end up re-installing the base game plus any game addons that you are currently entitled to.
After the game is successfully reinstalled, restart your console and launch the game at the next startup to see if you’re still seeing the same error message.
In case you are still greeted by the same 0x80270300 error code when trying to launch, install or update a game on your Xbox One console, move down to the next potential fix below.
Soft Resetting your Xbox One Console
If none of the methods above have worked for you, likely, you’re dealing with some kind of corruption originating for your console OS files. To deal with a problem of this kind, you will need to reset every file belonging to your OS – which will also end up deleting corrupted data.
Note: If you want to avoid total data loss, you can make it so that only OS files are touched by this procedure – allowing you to keep your games, applications and other types of media that you’re currently storing.
Several affected users have confirmed that this operation was the only thing that allowed them to install, update, and start games without encountering the 0x80270300 error code.
To enforce this fix, follow the instructions below:
Press the Xbox button (on your controller) to open up the guide menu. From there, navigate to System > Settings > System Console Info.
From the Console Info menu, choose Reset console from the list of available options.
Performing a soft factory reset
After you’re inside the Reset console menu, select the Reset and keep my games & apps. Soft Resetting Xbox One
Note: You can also select Reset and remove everything if you don’t have anything of importance on your Xbox Storage that you are afraid of losing.
Start the procedure and wait for the operation to complete. At the end of it, launch the game that was previously showing the 0x80270300 error code to see if the problem is now resolved.
Some Xbox One users are encountering the 0x8b05000f error code every time they attempt to install a mandatory update on their console. In most cases, the update stops installing at 47%, making their console completely unusable.
Xbox One Update Error 0x8b05000f
When investigating this issue, you should start by ensuring that you’re not dealing with a server issue. If that’s not the case, perform a power cycling to eliminate any problems caused by temporary files.
However, if your console is registered to the Xbox Preview program, you will need to sign in to your Xbox Live account from a Windows 10 console (via Xbox Insider Hub UWP app) and remove your console from the preview program.
In case the problem occurs due to a firmware issue, you have two ways to resolve the problem – You can either install the pending mandatory update manually (you’ll need a flash drive) or you can use the Startup Troubleshooter to reset your console to factory (you’ll end up losing any data it’s currently holding).
Method 1: Investigating the server status
Before you try anything else, it’s important to ensure that the problem is not being facilitated by something that cannot be fixed by the end-user. The update may be failing due to a server issue that is preventing your console from retrieving the files necessary for the firmware update.
To verify if this scenario is true, you will need to check the current status of the Xbox Live services. To do this, visit this link (here) from a mobile or desktop device and see if any service is currently experiencing problems (especially the Xbox Live Core service)
Status of Xbox Live servers
Note: If the status page reveals an issue with some essential Xbox One services, the issue is beyond your control. In this case, all you can do is wait for Microsoft engineers to fix the problem automatically.
If your investigation didn’t reveal any server issues, the problem is likely occurring locally. In this case, one of the fixes below will end up fixing the issue for you.
Method 2: Performing a Power Cycling Procedure
Since you concluded that the problem is only occurring locally, you should start by ensuring that your Xbox One console is not being caused by a temporary file that is interfering with the installation of the new firmware.
When it comes to doing this, the easiest procedure is to perform a power cycling procedure. This is more than a regular console restart since it will end up draining the power capacitors and fix most firmware issues related to corrupted temp files.
To do this, follow the instructions below to do a power cycle on your Xbox One console to fix the 0x8b05000f:
Ensure that your console is fully turned on (not in hibernation).
Press the Xbox button on your console and keep it pressed for about 10 seconds (or until you see that the front LED stops flashing)
Performing a hard reset
Once the front LED stops flashing, release the power button and wait for a full minute before turning your console back on. During this time, it’s recommended that you also physically unplug the power cable from the power outlet to ensure that the power capacitors are completely drained.
Next, short-press the Xbox button on your console and keep an eye for the initial (longer) startup animation screen. If you see it, take it as confirmation that the power cycling procedure was completed successfully.
Xbox One Starting Animation
Once your console boots back up, re-attempt the firmware installation and see if you still end up seeing the 0x8b05000f.
In case you still see the same error, move down to the next potential fix below.
Method 3: Removing Xbox Console from Preview program
As it turns out, you can expect to encounter this particular 0x8b05000f error in case your account is currently signed up for the Xbox Preview Program. The vast majority of users that documented this error have confirmed their enrollment in the Xbox Preview program.
If this scenario is applicable and you are indeed enrolled in the Preview program, you will not be able to unlist conventionally since you are no longer able to access your console normally.
However, you can remove your Xbox from the Preview program from a Windows 10 PC by installing the UWP (Universal Windows Platform) application of Xbox Insider Hub. To do this, follow the instructions below:
Press Windows key + R to open up a Run dialog box. Next, type ‘ms-windows-store://home’ inside the text box and press Enter to open up Microsoft Store.
Opening the Microsoft store via Run box
Once you’re inside the Microsoft Store, use the search function (top-right corner) to search for ‘Xbox Insider Hub‘. Next, from the list of results, click on Xbox Insider Hub.
Click on the Get button associated with Xbox Insider Hub and wait for the download to complete.
Downloading the Xbox Insider Hub UWP app
Once the download is complete and the application is installed, launch it and sign in with the same Xbox Live account that you are using on your Xbox One console.
After you manage to sign in successfully, click on the action button (top-left content) and click on Settings.Accessing the Settings menu of Xbox Insider Hub app
From the settings menu, click on the action button (top-left corner) and click on Manage devices from the Settings menu.
Accessing the Manage Device screen
Once you’re inside the Manage Devices settings, remove your Xbox from the preview program and save the modifications.
Restart your console and your console should now attempt to install a different update since it’s n longer part of the Insider Hub.
In case you’ve followed these instructions to no avail or you weren’t part of the Preview circle, move down to the next potential fix below.
Method 4: Updating the Console’s Firmware manually
If none of the methods below have allowed you to get rid of the 0x8B05000F error while trying to install a mandatory Xbox One update, the only fix left that won’t interfere with your console files is to attempt to install the console’s firmware manually.
This will require you to use a flash drive of at least 10 GB that’s formatted using NTFS. This is the only prerequisite, the rest you can obtain from the Microsoft’s support website. You’ll need to visit the Xbox Support website and download the latest OS firmware version.
If you are prepared to do this, follow the instructions below to update your console’s firmware manually and circumvent the 0x8B05000F error:
First things first, you’ll need to prepare a flash drive that you will use to perform the offline update. To do this, insert the USB drive into a PC and format it to NTFS. To do this, right-click on the drive in File Explorer and click on Format… from the context menu. Next, set the File System as NTFS and then check the box associated with Quick format before clicking on Start.
Using the quick format
Once you’ve ensured that your flash drive is correctly formatted, visit this link (here) and download the latest version of your Xbox One console firmware.
Wait until the download is complete, then extract the contents of the archive ($SystemUpdate) on the root folder of the flash drive.
After the operation is complete, unplug your flash drive safely and move to your console.
On your Xbox One console, press and hold the Bind + Eject button at the same time, then short press the Xbox button on the console (while continuing to hold the Bind and Eject buttons).
Opening the Xbox One Startup troubleshooter
Note: On Xbox One S All-Digital, press the Bond and Xbox button only.
After you hear to consecutive tones, release the Bind and Eject buttons and wait for the Startup Troubleshooter screen to appear.
Once it does, insert the flash drive that you previously created at step 1 and wait for the Offline System Update box to become available. Next, select that option with your controller and press X to access it.
Accessing the Offline System Update option
Confirm the operation and wait for the process to complete. Depending on the aspects of your USB flash drive and if you’re using an SSD or HDD on your console, expect this process to last under or well over 10 minutes.
Installing the latest OS version of Xbox One manually
Once the operation is complete, the console will restart automatically and your system will attempt to boot normally.
In case you don’t have a USB flash drive to complete the operation above, move down to the final fix below.
Method 5: Resetting the Console via Startup Troubleshooter
In case none of the methods below have allowed you to fix the issue, one last resort is to reset your console completely via the Windows Startup troubleshooter. But before you commit to this, keep in mind that this operation will end up deleting your game data, temp files, video content, and anything else you currently have stored on your console.
Note: Save data will not be touched by this operation as long as it’s backed up via Xbox Live.
If you are prepared to go this route and you understand the consequences, start following the instructions below to get started with an offline factory reset on your Xbox One console to fix the 0x8B05000F error:
Start by turning off your console completely and wait for at least 30 seconds.
Press and hold the Bind + Eject button at the same time, then short press the Xbox button to start your Xbox One console.
Bringing up the Xbox One Troubleshooter
Note: On Xbox One S All-Digital, press the Bond and Xbox button only.
After you hear the second tone, release the Bind and Eject button and wait for the Xbox Startup Troubleshooter to appear.
Once you’re inside the Startup Troubleshooter, select the Reset this Xbox with your controller and press the X button to initiate the process.
Resetting the Xbox one via the Startup Troubleshooter
At the confirmation prompt, select choose Remove Everything and wait for the operation to complete.
Once the operation is complete, wait for your console to boot normally and see if the issue is now resolved.
Some Overwatch players are reporting that they suddenly can’t play the game since they end up encountering the BC-124 error every time the game attempts to connect to the game server. This problem is reported to occur on Xbox One, PS4, and PC.
OverWatch Error BC-124
One of the most common causes that will trigger this error is a glitched network adapter. In this case, resetting the network adapter should allow you to fix the issue.
On the other hand, if the issue is caused by an unopened port, you should be able to fix the problem by enabling UPnP on your router settings or by forwarding the port used by Overwatch manually.
Resetting the Network Adapter
If you’re encountering the issue on a PC, it’s possible that you’re dealing with a network inconsistency facilitated by your network adapter. If this scenario is applicable, you should be able to fix the problem and play your game normally by resetting your network adapter to the default configuration – this procedure is commonly referred to as a ‘winsock reset or ‘coms reinstall‘.
Follow the instructions below to fix an inconsistent network adapter on any recent Windows version:
Press Windows key + R to open up a Run dialog box. Next, type ‘cmd’ and press Ctrl + Shift + Enter to open up an elevated Command Prompt. At the UAC (User Account Control), click Yes to grant administrative access.
Once you’re inside the elevated CMD prompt, type the following command and press Enter to completely refresh the network adapter:
netsh winsock reset
After the command is successfully processed, reboot your machine and launch overwatch once the next startup is complete to see if the problem is now resolved.
In case the same BC-124 error is still occurring, move down to the next potential fix below.
Enabling UPnP
In case you already reset your network adapter to no avail or this method above was not applicable to your current scenario, your next troubleshooting attempt would be to ensure that your router is capable of handling the ports used by Overwatch.
Nowadays, the vast majority of end-user routers handle this through a feature called UPnP (Universal Plug and Play). So if this scenario is applicable, you should be able to fix the BC-124 error by enabling UPnP. This potential fix is confirmed to work for users encountering this issue on Xbox One, Ps4, and PC.
Note: Keep in mind that the steps of enabling UPnP will be different depending on the router that you’re using. However, the steps below should be a close fit for the most part,
Here’s what you need to do to enable UPNP:
Open up your default browser and type one of the following addresses in the address bar and press Enter: 192.168.0.1 or 192.168.1.1 Accessing your router settings
Next, enter your credentials to enter your router settings. If you haven’t changed the default login credentials, you should be able to access these settings by using admin for both username and password.
Once you’re inside the router setup screen, look through the settings for a UPnP or Forwarding tab.
Enabling UPnP from your Router settings
Note: The exact steps where your UPnP setting is located will be different depending on your router manufacturer.
Save the changes and restart the device that you use to play Overwatch and see if the problem is now resolved.
In case you’re still encountering the same BC-124 error.
Forwarding the ports used by Overwatch
In case UPnP is not available no with your router, it’s very likely that you’re facing the BC-124 error because your networking device is unable to allow incoming network requests. If this scenario is applicable, you should be able to fix the issue by forwarding the ports used by Overwatch manually from your router settings.
To do this, follow the instructions below to forward the ports used by Overwatch:
Note: Keep in mind that the steps will be a little different depending on your router manufacturer.
Open your default browser, type one of the following addresses and press Enter to access your router settings:
192.168.0.1 or 192.168.1.1
Once you’re at the login screen, enter the appropriate credentials to gain access to your router settings.
Accessing your router settings
Note: Unless you’ve changed the default login credentials, you should be able to get in by using admin or 1234 as username and password. If that doesn’t work, search online for specific steps on accessing your router settings.
Once you’re inside your router settings, expand the Advanced menu and access the NAT Forwarding (Port Forwarding) section.
Next, click on Virtual Servers and click on Add to begin the process of adding your first port.
Adding ports to the Forwarding list
Here’s a list with the ports that you need to open depending on the platform that you’re trying to play Overwatch on:
PC

TCP: 1119,3724,6113
UDP: 5060,5062,6250,3478-3479,12000-64000

Playstation 4

TCP: 1119,1935,3478-3480,3724,6113
UDP: 3074,3478-3479,5060,5062,6250,12000-64000

Xbox One

TCP: 1119,3074,3724,6113
UDP: 88,500,3074,3478-3479,3544,4500,5060,5062,6250,12000-64000

Switch

TCP: 1119,3724,6113,6667,12400,28910,29900-29901,29920
UDP: 1-65535
Some Xbox One users are reporting that they are suddenly unable to get their console to display on their TV or Monitor. Even when the console is fully booted up, they still see a ‘No Signal‘ error on their display as if the console was powered off. This problem is reported to occur with both Xbox One X and Xbox One S models.
Xbox One ‘No Signal’ Error
In some cases, the ‘No Signal’ error can end up being caused by a firmware glitch that’s inhibiting the console’s ability to override the TV resolution. In this case, you should be able to fix the issue by power cycling your Xbox console in order to clean any temporary data that might be causing the issue.
However, you might also see this error due to the fact that you mistakenly plugged the TV into the HDMI In port instead of HDMI Out. Either that or you’re dealing with a faulty HDMI cable that needs to be replaced.
Another potential scenario is that the current resolution for your Xbox One exceeds the maximum resolution supported by the TV or monitor you’re trying to use. In this case, you need to force your console to launch in low-resolution mode before you can use the Settings menu to change to the maximum resolution allowed.
In case you are encountering the problem on Xbox One X (Scorpio), you might be dealing with a manufacturer defect due to a bad soldier. In this case, you should use your warranty to send it for repairs or contact a console technician.
Power Cycling your Xbox Console
Since this problem can be caused by a firmware glitch that is inhibiting the console’s ability to force switch the TV resolution, if the TV resolution is Higher than the on your Xbox, you might end up seeing the ‘No Signal’ error.
If this scenario is applicable, you should be able to fix the by resolving the firmware glitch with a power cycling procedure. This operation will end up draining the power capacitors of your console, clearing any temporary data that might trigger these problems.
Here’s a quick guide on power cycling your Xbox One Console:
With your console fully turned on, press and hold on the Xbox button (on your console, not your controller) for 10 seconds or until you notice that the front LED stops flashing.
Pressing the power button on Xbox One
After the machine is turned off completely, wait for a full minute before attempting to turn it back on. Note: In case you want to ensure that the operation is a success, also disconnect the power cable from your power outlet before plugging it back in.
Start your Xbox One console once again by pressing the Xbox button again – But this time do not keep it pressed like before.
During the next startup, pay attention to your TV display and see if you see the initial animation logo. If it does appear, take it as confirmation that the operation is complete.
Xbox One Starting Animation
In case your TV/monitor screen still shows a ‘No signal’ error, move down to the next potential fix below.
Connecting using HDMI Out slot
Both Xbox One X and Xbox One S have two HDMI slots on the rear – HDMI Out and HDMI In.
The HDMI Out is designed to be used to connect a display source to the console and HDMI In should be used when connecting an SAT/Cable device to watch TV directly on your console.
One of the most common reasons that will actually spawn this ‘No Signal‘ error is users mistakenly plugging their display into the HDMI In slot (typically happens after they clean their console).
To make sure that’s not the case in your scenario, turn your console off and unplug your console from the power outlet. Next, take a look at the back and see in which port does is the HDMI display plugged in.
If it’s plugged into HDMI In, connect it to HDMI Out to fix the issue. As soon as you do so, your Xbox One console will be able to send the signal to your TV or monitor.
Sending Signal to the TV monitor
In case the HDMI cable was already plugged into HDMI Out, move down to the next potential fix below.
Cleaning / Changing the HDMI cable
If you previously determined that the HDMI cable was plugged into the correct slot, you should proceed by investigating if you’re not dealing with a faulty HDMI cable.
In case there’s an underlying problem with the HDMI cable that you’re using, your Xbox One console might be unable to establish and maintain a connection with the displaying device – This is very likely if you experiencing screen flickering prior to the apparition of the ‘No Signal’ error on your TV/monitor.
You can also inspect your HDMI cable and see if you notice any bent pins that might cause the connection interruption.
Faulty HDMI cable
If you suspect that your HDMI cable might be responsible for this issue, change it with a different one and see if the problem is still occurring – In case you don’t have one that’s not used for anything, take one from a different device just for testing purposes.
Note: You can also try turning the cable around and using the opposite ends to see if the connection resumes.
If you confirm that the problem was indeed caused by a faulty HDMI cable, order a replacement in order to fix the issue.
Launching Xbox One in Low-Resolution Mode
You might also see the ‘No Signal’ error with an Xbox One console in a scenario in which you plug your console into a TV that doesn’t support the current resolution currently set for your Xbox console.
If this is applicable, you should be able to fix the issue by forcing your Xbox One console to launch in a low-resolution model.
Fortunately, Microsoft has implemented an elegant solution for situations like this one, so you don’t have to try and change it blindly without a display. On both Xbox One S and Xbox One X, you can force the console to start in the lowest resolution possible by using a combination of buttons during startup
Follow the instructions below to launch your Xbox one console in resolution mode and fix the “No Signal” issue:
First, press the power button on your console and keep it pressed for about 10 seconds or until you hear a beep and the cooling fan grinding to a halt.
The power button on the Xbox One
Wait for 30 seconds or so to make sure that your system is turned off, then press the power button + the Eject button (on your console) at the same time and keep them both pressed until you hear the second beep (after 15 to 20 seconds).
Starting the Xbox Console in Low-Resolution mode
Note: This will force the console to start in low-resolution mode.
Your console should power up, and if the process is successful you will be able to tell that your console has booted in a low-resolution mode via the two bars at the bottom and top of the screen (and the generally low quality of the image).
Low-Resolution mode
Note: When you see the Troubleshoot menu, click on Continue.
If the operation is successful, all you have to do now is change the display to the highest resolution that your TV supports in order to get the best picture possible. To do this, press the Xbox button on your controller, then navigate to the System from the newly appeared guide menu and tap on Settings from the newly appeared menu.
Accessing the Settings menu on Xbox One
From the Settings menu, select Display & Sound from the left-hand menu, then move to the right section and access the Video output menu.
Accessing the Video Output settings
Next, from the Video Output settings, change the Display resolution to the maximum Output accepted by your TV or monitor.
Changing the resolution of your Xbox One
After you do this, confirm and you should be good to go.
In case the same problem is still occurring, move down to the final fix below.
Sending it for repairs
If none of the potential fixes above have allowed you to fix the issue, it’s very likely that you are dealing with a hardware issue that cannot be resolved conventionally.
There is also an ongoing problem with some old Xbox One X (Scorpio) revisions where a bad solder eventually leads to the HDMI Out port to lift off its pad. This will prevent it from making contact so the signal with the image will not arrive at your display device.
If you’re still under warranty, send it for repairs. Else, take it to a console technical and he’ll reseat the pads with a heat gun/soldering iron and press the port legs back down.
Many users are complaining about the Spotify keeps pausing issue on their devices. This issue will make anyone frustrated and unable to enjoy the music on Spotify. The issue will not only be for free users, but also for the premium members. It is one of the common issues that happen because of several different reasons. However, the solution to this fix is quite easy. In this article, we will show you some methods that helped other users in fixing this issue for them.
Spotify keeps pausing music
Fixing the Spotify Keeps Pausing Music Issue
Spotify’s pausing issue can be because of several different reasons. It also depends on the device that you are using Spotify on. The most common reason will be because of using the multiple devices on the same account due to which the Spotify will be unable to play the music normally. Sometimes the network buffering can also be the reason for your continuous pausing on Spotify. The device restrictions for the Spotify application can also cause this issue for the users.
Make sure you check your network, sign out and sign in again, and clear the cache files of your Spotify before applying the below methods.
Method 1: Signing Out from All the Devices
The signing out from all the devices will mostly work for all the devices. Whether you are having an issue on the PC, Android, or iOS, trying this method will help you out in fixing the issue on any of the devices. This method can be applied by signing into your Spotify account in a browser. Follow the below steps to Sign out of everywhere:
Go to the Official Spotify website and Sign in to your account. Click on your Profile name at the top right and then choose Account Settings.
Opening the account settings
Now in the Account Overview tab, scroll down to find the Sign Out Everywhere option and click on it.
Signing out from Everywhere
This will sign out your account from all the devices that you were using with this account.
Method 2: Disabling Background Restrictions on Android
This method is focused on fixing the pausing issue of Spotify on Android devices. The issue on Android phones related to this is always the restriction of background activity. This feature tries to stop the background ongoing applications to save the battery of your phone. There is a possible reason that this is causing the issue for pausing the Spotify music. Follow the below steps to disable this option for fixing the issue:
Open Settings on your phone and go to Apps/Manage Apps option.
Opening the Apps settings in your phone
Search for the Spotify application and open it. Now click on the Battery/Battery Saver option in the list.
Opening Spotify application settings
Here you need to turn off the restriction by selecting No restrictions. Note: In some phones, you just need to toggle on Allow background activity.
Choosing the no restrictions for Spotify
This will probably fix the issue of the continuous Pausing on Spotify.
Method 3: Disconnecting and Reconnecting Internet on PS4
Some PS4 users are also getting the issue of pausing on Spotify. Their music will keep pausing after every 3-4 seconds. Many users applied this method and got it fixed very easily. Make sure you do the steps quickly when disconnecting and reconnecting the internet to your PS4. Follow the below steps to fix this issue on the PS4:
Go to your PS4 Settings at the top. Scroll down and select the Network option in the Settings.
While you are on this menu, try playing the Spotify music through the Quick Menu and quickly disconnect from the Internet while the music is playing.
Play the music through the Quick Menu
Try to connect again to the Internet and then try playing the song in Spotify.
Network settings, disconnect after playing music
If nothing works, then you can try making the new Spotify account and checking if the new account has this issue or not.
With the internet advancing so rapidly, configuration files are deemed to change frequently as well. Network related technologies are skyrocketing and as a result, networks are becoming larger and more complicated by the day. This is something that cannot be avoided since it isn’t in your power. However, what is in your power is the fact that you can implement solutions and tools that will help you go with the flow and meet the demands of the changes.
For the past years, several efforts have been made to ease up the tasks of network administrators. For this purpose, many tools have been developed which are now utilized by them. Back in the old days, IT admins had to set up everything manually from the servers to the config files of the network devices. This was really tiresome especially in case of a large network where you would expect way more devices.
Config Viewer
Fortunately, those days are way behind us now and various tools have been introduced that automate the process of setting up config files for your network devices like routers and switches. However, setting up config files is just not enough. As the network gets bigger and more devices are added to it, changes have to be made to the configuration files of the network devices. Without the proper tool, there would be no track of the changes that have been made and you will never know which alteration caused a network issue. As a result, you will be left with going through a whole config file trying to locate the cause of the issue which is something that doesn’t meet the standards of this modern world.
Download the Config Viewer Tool
In order to help resolve this problem at hand along with many more networking issues, Solarwinds has come up with a product known as Engineers Toolset (download here). Engineers Toolset or ETS is basically a suite of over 60 networking tools that can be made use of in different networking fields.
This includes network discovery where you can implement tools like Switch Port Mapper and MAC Address Discovery, IP address management where tools like Ping Sweep can be used. Other than that, there are more than 60 networking tools that you will be able to make use of one place or the other.
In the same fashion, we will be using this tool in our guide today to go through configuration files of Cisco routers and switches. So, go ahead and download the Engineers Toolset from the link provided and then install it on your system. If you want, you can avail a 14 day evaluation period offered by Solarwinds to test the product for yourself so you can come to a decision.
What is the Config Viewer Tool?
Solarwinds Config Viewer is a tool that comes with the Engineers Toolset as a part of their config management category. With the help of Config Viewer, you will be able to download the running configuration files for Cisco routers as well as archive them for future. You can also compare configuration files of different routers and switches in your network as well as compare the config file with an older version.
Once you have installed the Engineers Toolset, you will be able to locate the tool in the Toolset Launch Pad. Other than your generic comparison, you can also view and edit running config files of network devices and locate any changes made to the files by any other user. The changes are way easier to spot as they are represented by different colors so you know what changes have been made and you can easily revert them should the device face an issue.
Another great feature that comes in the Config Viewer is password decryption. Config Viewer can decrypt Cisco type 7 passwords in a manner of seconds. The tool quickly downloads the running configuration files from Access Servers like AS5200 etc. and then decrypts all the login passwords.
Managing Configuration Files of Cisco Routers and Switches
As we have mentioned, the Config Viewer tool can be used to perform various config management tasks which include editing the running config files, creating a backup of the files as well as troubleshooting any issues via the recent changes made to the config files. All of this is very easy to do, so just follow along.
Downloading a Config File
Open up the Engineers Toolset Launch Pad by going to the Start Menu and searching for it.
Once the launch pad is open, on the left-hand side, go to Config Management and then click the Launch button Config Viewer. You can also just search for the tool in the search field provided and then click the Launch button. Whatever suits you.
Launching Config Viewer
When the Config Viewer tool loads up, click on the Select Router button.
Provide the IP address or the hostname of the device.
After that, specify a Simple Network Management Protocol (SNMP) community string or choose to provide SNMP v3 credentials.
Adding New Device
To test the credentials provided, click the Test button.
When prompted, you can choose to save the provided credentials in the shared credentials database or not.
After that, click the Download button to download a config file.
Finally, choose the config file you wish to download i.e. currently running config files or any other.
Comparing Two Config Files
To compare two config files, click on the File drop-down menu in the menu bar and then click on the Compare Two Config Files option.
Comparing Two Config Files
After that, provide the path to each of the config files.
The config viewer will show the compared files side-by-side with any changes made highlighted in yellow. If you see a red line, that means lines are missing from the respective config file. Finally, the green color represents added lines.
If you wish to print the comparisons, you can do so by going to File and then clicking the Print button.
Decrypting Passwords
To decrypt passwords, open up the configuration file first by selecting the device or opening a config from the system.
After that, click on the Edit drop-down menu and then click on the Decrypt Password option.
Decrypting Passwords
The config viewer will decrypt Cisco type 7 login passwords in a matter of seconds.
Once it has finished, the decrypted passwords will be highlighted in green color so that they are easy for you to spot.
Additionally, there are features like traceroute, ping and telnet packed in the Config Viewer that can be accessed via the IP Address drop-down menu on the menu bar. For this to work, you will have to select an IP address.
Every single device in a network has an IP address. It enables them to access the internet and communicate over the network. This includes sending over data to the other devices in the network as well as communicating with the web servers. Without an IP address, the web server would not know where to send the information or where it came from. The IP address is like the identification of a device with the help of which other devices know who is communicating with them. The internet is evolving and many more devices are having the capability of communicating over the internet. This ultimately involves having to assign more and more IP addresses to the devices in a network.
DHCP Scope Monitor
Manual assignment of IP addresses is fine as long as you have to do it for specific devices and not every single device available in the network. That way, the task would become just a nightmare, to be honest. This is because you will have to keep track of the devices that you have assigned IP addresses to and those which are still awaiting. That is why, there are two standards that are responsible for assignment of the IP addresses. These two standards automate the process so that network admins do not have to worry about the assignment. Dynamic Host Configuration Protocol or DHCP is a protocol that automates the process of IP address assignment. Whenever a device in a network needs an IP address, it contacts the DHCP server in the network and thus an available IP address is assigned to the specific device.
What is DHCP Scope Monitor?
DHCP Scope Monitor is a tool that comes in the Engineers Toolset by Solarwinds using which you can poll DHCP servers to find out the scopes that are running out of IP addresses. With the help of DHCP Scope Monitor, you will also be able to view the assigned and unassigned IP addresses of each server so you have a grasp over the IP address allocation.
Why to Monitor DHCP Scopes?
Where do these DHCP servers save the provided IP addresses ranges, you may ask. The answer is pretty simple, these DHCP servers have what are called scopes that are basically a range of available IP addresses for assignment. So, whenever a device requires an IP address, the said IP address is taken from the DHCP scope and assigned to the device. DHCP scopes determine which IP addresses are allocated to the DHCP clients.
Now, eventually the range of IP addresses provided to a DHCP scope is going to run out of the addresses as more devices request an IP address. Once the scopes are empty, the automated process will stop and your network devices will not be able to communicate with each other. Therefore, it is important for a network administrator to monitor the DHCP scopes so that this can be avoided. We will be showing you how to do this in this guide, so just follow along.
Downloading the DHCP Scopes Monitor
Developed by Solarwinds ETS/DHCP Scopes Monitor (download here) is a network software that comes with over 60 tools that can be used in troubleshooting errors, diagnostics, monitoring your network as well as managing it, along with tools that help in log management and more.
We’ll be using the toolset for this guide so will have to download it from the link provided and install it on your system. Bear in mind, Solarwinds provide a 14 day fully functional evaluation period during which you can use the tool and make up your mind.
With features like automated network discovery, you can use an array of network tools including Switch Port Mapper and more along with having the ability of tracking device availability, memory utilization etc.
Steps to Configure DHCP Scopes
To manage your DHCP scopes and to know which scopes are running on IP addresses, we’ll be using the DHCP Scope Monitor. The process is pretty simple and you have the results in mere minutes. Here’s how to do this:
First of all, open up the Engineers Toolset Launch Pad by searching for it in the Start Menu.
After that, once it has loaded, go to the IPAM/DNS/DHCP option on the left-hand side and then click the Launch button for the DHCP Scope Monitor tool.
Launching DHCP Scope Monitor
This will open up the DHCP Scope Monitor tool. To add a DHCP scope, click on the Add button. The Add DHCP Scope window pops up.
Provide the IP address of the DHCP scope that you wish to scan and then follow it up with the Simple Network Management Protocol (SNMP) community string. You can also add SNMP v3 credentials using the Add button provided.
Once you have filled out the fields, click the OK button to add your DHCP Scope. The tool will try to establish a connection with the scope.
Adding a Scope
On the table, you will be shown the information you wish to see that includes the IP addresses assigned and the number of IP addresses left in the DHCP Scope.
For further configuration, you can choose to change the polling period as well as have alerts when a specific number of IP addresses or less are left.
To do this, click on the Settings button in the bar provided.
On the Polling tab, provide the period after which the DHCP Scope should be polled. The default value is set to 30 minutes. You can decrease or increase it per your requirement.
Adjusting Polling Period
To get alerts, go to the Alerts tab on the DHCP Scope Monitor Settings window.
Adjust the number of IP addresses left for the status to be critical. By default, the tool has a value of 5. That means, if there are 5 or less than 5 IP addresses left in the DHCP scope, the status will be critical which can be seen under the Status column.
Finally, you can choose to add Community Strings so that they are saved for future use using the Community Strings tab.
If you wish, you can poll the scopes manually at any time using the Refresh button provided.
Also, you can export the scan results to a number of file formats provided by clicking the Export button.
Export Formats
As networks become more and more complex, having a grasp over your network environment gets harder as more devices are added to it. This is because of the advancement in the network as more devices are now able to connect to the internet and communicate over the internet, also known as Internet of Things or IoT.
For this very reason, network engineers are expected to have a better understanding of their network and know about the devices that are connected and the IP address management. All of this cannot be done manually as it is way too much for a network admin or a group of IT admins to handle because of the number of devices that are communicating continuously in a network. Therefore, network tools are to be utilized to keep the network’s performance without being affected.
MAC Address Scanner
Another concern of network admins is the IP address management and assignment. Knowing which devices are connected and have an IP address along with the ones that are still awaiting or are disconnected from the internet. All of this can be achieved via third-party tools that have been developed by various companies. We will be using one of the best tools available for network administrators to gain advanced insights on the devices that are available on the network so just follow through.
Downloading the MAC Address Scanner
In order to understand the devices in your network and to be able better manage your network to improve the overall performance and what not, you will have to use an automated tool. Solarwinds Engineers Toolset (download here) is without a doubt the best companion for network engineers. Why you may ask? ETS is a network software that comes with more than 60 tools that can be used in networking by IT admins to easily manage and monitor their network.
It packs a lot of features that includes automated network discovery which lets you deploy tools like Switch Port Mapper and more that enables you to scan your network for connected devices, as well as troubleshooting and diagnostics tools that can be utilized in different scenarios.
That is why, we will be using it in this guide so you will have to download and install it from the link provided above. Thankfully, Solarwinds offers an evaluation period of 14 days for all of their products including Engineers Toolset in which you can use the fully functional version of the product for free so you can come to a conclusion.
Using MAC Address Scanner from Solarwinds ETS
MAC Address Scanner, a tool packed in the Engineers Toolset, allows network administrators to scan their network for MAC addresses. This enables them to gain details on each and every device in their network by scanning the local subnet. The tool matches every IP address found to a MAC address, DNS as well as other details which include the network card manufacturer and more.
So, in theory, the tool not only discovers the MAC addresses of the devices to ease up several tasks for you like IP address mapping, rather it also displays additional information which includes the hostname of the device, hardware manufacturer and more. One of the features, like we mentioned, of Engineers Toolset is automated network discovery and you can benefit from that feature by using the MAC Address Scanner tool.
The tool is not limited to only local subnets, so you can perform the scans over a remote subnet as well for your convenience. You can also customize the table which displays the information by adding more convenient data columns which we will be discussing down below.
Scanning Local and Remote Subnets
We will be using the MAC Address Scanner from Solarwinds ETS to scan your subnets and list the devices connected to the network as well display additional details like IP address, hardware manufacturers and more as explained above. So, without further ado, let us get to it.
To start off, you will have to open up the Engineer’s Toolset Launch Pad. To do this, open up Start Menu and either search for the tool or if you have recently installed it, it will be under Recently Added. Either way, open up the tool by clicking on it.
Once the Engineer toolset is launched, go to Network Discovery on the left-hand side and then click on the Launch button for MAC Address Discovery.
Launching MAC Address Discovery
The tool automatically detects your local subnet. If that’s the subnet you wish to scan, just go ahead and click Discover MAC Addresses.
The tool will start scanning your subnet and start displaying the available devices in a tabular form with their MAC address, IP address, DNS and network card manufacturer. You can add more columns if you wish to.
To do this, just click on the Settings option in the provided which will bring up the MAC Address Discovery Settings window. On the first tab i.e. Columns, on the left-side click on the column that you wish to add to the table and then click the right arrow button.
Adding New Columns
Additionally, you can save the displayed table in different formats by clicking the Export option.
We all know that every device on the internet has an IP address. This IP address basically serves as the identity of the device. So, whenever a different device, let’s say your computer, wants to communicate or access a certain device, all you need is the IP address and any credentials if it’s a private device. In a similar fashion, web servers on the internet are accessed. However, to make it much easier for us to access the devices on the internet, Domain Name System (DNS) was introduced which is basically a system that translates the IP addresses to domain names and vice versa. Words are easier to remember as compared to an IP address.
DNS audit is sadly one of those tasks that is highly overlooked by organizations and often you get to face consequences. However, that doesn’t happen often which is why it is often ignored. Keeping an eye on your DNS zones, records as well as IP addresses can help you avoid many issues that would have otherwise plagued your company.
DNS Audit Scan Results
System administrators need to perform DNS audits from time to time to answer various questions like why my subdomains are down and more. There are various organizations that make a common mistake. Most of them usually set up a DNS server, add some zones and records to it and then the server is forgotten completely. This can cause devastating strikes as apparent from the Mirai botnet attack. Therefore, in this guide, we will be showing you how to perform a DNS audit and troubleshoot any DNS errors in your IP range.
Download the DNS Audit Tool
To audit your DNS, you will be needing a third-party tool that can scan your IP range. In this case, we will be using a product from a very famous and prominent company in the system and network management field – none other than Solarwinds. Engineers Toolset (download here) by Solarwinds is a suite of networking tools that you can use to do your daily networking tasks with ease.
With over 60 tools packed in the software, you are sure to find some really good network tools and utilities. On top of that, all of these tools can be accessed from a single launch pad for convenience which makes the navigation even more easier.
You can easily discover your network via the various tools provided in the software such as Ping Sweep, Switch Port Mapper and many more. Other than that, if you wish to do some troubleshooting, ETS has got you covered as it comes with a list of diagnostics tools as well.
We will be using the Engineers Toolset in this guide so make sure to go ahead and download the product from the link provided. Once you have downloaded the software, install it on your system which is very simple and straightforward. You can also use a 14 day trial period in which the tool is fully functional so that you can assess it for yourself.
What is the DNS Audit Tool?
DNS Audit is a tool that comes in the Solarwinds Engineers Toolset using which you can locate any DNS errors in the database by scanning an IP range. To do this, you will have to provide a starting IP address and then an ending IP address.
This will work as a range and then the tool will start scanning for any DNS errors. The tool first resolves domain name for an IP address and then does the opposite by resolving an IP address for a domain name. This is also called reverse DNS lookup and forward DNS lookup respectively. The scan results are displayed in a tabular form which you can print if you wish to.
Troubleshooting DNS Errors in an IP Range
A DNS audit lets you spot any DNS errors in your IP range so that they can be resolved and you get to avoid any future consequence. This is pretty simple to do and does not require any special configuration or anything. Just follow the instructions provided and you should be good to go. So, without further ado, let us get into it.
First things first, you will have to open up the Engineer’s Toolset. To do this, open up the Start Menu and search for it or if you have recently installed it, click on the Toolset Launch Pad option under RecentlyAdded.
Once you have opened up the Toolset Launch Pad, go to IPAM/DNS/DHCP on the left-hand side and then click the Launch button for DNS Audit.
Launching DNS Audit
After the tool has launched, you will have to provide the starting and then ending IP addresses. So, go ahead and provide the IP address range that you wish to scan and then click the Scan button.
The tool will start scanning the IP address range and show the results in a tabular form.
DNS Audit Scan Results
You can filter the result shown by going to the Filter drop-down menu. If you just wish to see DNS errors, click on the Forward DNS Errors option.
Once completed, you can export the table data into the various formats that are provided. To do this, click on the File drop-down menu and then move your cursor to Export.
Export Formats
You can also print the table by going to File > Print.
In this evolving world, a network exists everywhere. Everything that we try to access over the internet exists over a network where multiple devices are communicating with each other continuously; sending and receiving data. All of these networks are set up and monitored by network admins but you already know that. You also know that there are multiple devices in a network which includes routers, switches and much more equipment. IT admins have to monitor their network to have a better understanding of what’s going on in their network and keep a track on all the devices.
What do they worry about the most? The obvious answer would be the performance of the network. If there are any network outages or downtimes, it is basically a nightmare for network administrators.
Router CPU Load
One of the important things that needs to be monitored in order to keep the performance of the network optimum. Networks are bound to have problems and issues. Some of these issues are related or caused by CPU utilization. The CPU utilization of the routers in the network. This includes the routers and many other network devices.
Therefore, monitoring the CPU load of the Cisco routers in the network is really important. This is because if the devices are utilizing more CPU bandwidth than it should be or if a device is not being able to utilize sufficient memory, the network will show weird behavior which includes slow response times. Having slow response times or high latency is basically unacceptable in this competitive world as it definitely gives your competitors an edge especially if you are an online business.
To avoid such issues, the utilization of the cores of the CPU in the network has to be monitored. How? We will guide you through.
How to Monitor CPU Load on Cisco Routers?
Obviously, you cannot monitor the number of processes that are being executed by the CPU in the network manually. Thus, you will have to use tools that have been developed for the said purpose by companies. Solarwinds is a big name in the network and system management field because of the quality of the products they develop. Solarwinds Engineers Toolset (download here) is no exception here.
Engineers Toolset, as obvious from the name, is a product developed by Solarwinds that includes over 60 tools that prove very useful and helpful to network admins. With the help of these tools, you will be able to monitor availability and latency of network devices (link the article here), troubleshoot network issues via the diagnostics tools packed in the toolset as well as manage network logs and much more. Without a doubt, it packs the best tools and utilities for network administrators.
That is why, we will be using ETS (Engineers Toolset) in this guide to show you how to monitor CPU utilization. Therefore, download the tool from the link provided and install it on your system. Fortunately, Solarwinds offers a 14 day evaluation period during which you can use the product to its full potential and then decide for yourself if it’s worth it.
Monitoring the Router CPU Load
Solarwinds Router CPU Load is a tool that is packed inside the Engineers Toolset using which you will be able to monitor utilization. In order to reduce recurring issues and improve the overall network performance, IT admins need to monitor and analyze the CPU load in the network devices. The tool allows you to monitor the load on various Cisco routers in real-time as well as you are able to record peak CPU level along with the time of occurrence.
A horizontal bar is used to display the current load of CPU for a Cisco router in relation to the maximum CPU load. A great feature in the tool is that if the utilization of memory exceeds a defined value, you will be notified via different colors. If the value satisfies a defined threshold value for warning, the color of the bar will change to yellow while a red color represents critical level.
Analyzing and Monitoring CPU Load in Real-Time
Now that we are done with all of that, we can get into the gist of this article and show you how to analyze and monitor CPU utilization on Cisco devices in real-time. This is very easy to do with the right tool. So, without further ado, let us get into it.
First of all, open up the Engineers Toolset Launch Pad by opening up the Start Menu and searching for it.
Once it has opened up, on the left-hand side, go to Network Monitoring and then click the Launch button for Router CPU Load tool. Alternatively, you can just search for the said tool using the search field provided and then launch it up.
Launching Router CPU Load
After the tool has opened up, you will have to add your device to the tool. To do this, click on the Bar option in the menu bar and then click the Add New CPU Load Bar option.
Provide the IP address of the target device and then follow it up with the SNMP credentials. You can create a new credential by clicking the option provided and then specifying the details requested. After that, click OK to save your credentials.
Adding New Device
Make sure to choose the Real time for the Poll Time option and then specify the number of seconds after which the device should be polled.
Finally, click OK to add your device. Once the device has been added, you will be shown the status of the CPU load.
Setting Custom Alert on Router CPU Usage Spikes
Using Router CPU Load, you can configure thresholds and set up alerts so that you are notified whenever the utilization exceeds a defined value or percentage. To do this, follow the below step-by-step instructions:
Click on the Settings drop-down menu on the menu bar and then select Settings.
To set the thresholds, move the slider provided and adjust it per your requirement. You can also change the text of the red level threshold. Here, yellowlevel means warning and red level represents critical.
Adjusting Threshold
In order to be notified, go to the Notifications tab. There, you are provided three options. Whenever an alarm is triggered, you can choose to have a sound or a popup or both. Additionally, you can also configure it so that you are displayed custom text by choosing the Open Notification window on alarm option.
Finally, you can also have the CPU load logged to a file. The Router CPU Load logs the CPU load of the devices and can store it to devices if you want it to. To do so, tick the Logging Enabled option.
Logging CPU Load
After that, provide the period of time after which the CPU load should be logged. Then, provide a location for the log file where it should be saved. These logs are saved as comma delimited files.