Linux installation programs, including those used to install Ubuntu and its various derivatives, have a tendency to create many partitions. Some users install multiple versions of the operating system on a single physical disk, which creates multiple volumes that partition their drive so much that it looks like it’s sliced pizza. While it’s possible to remove partitions and restructure them, it’s important to understand the difference between different types of partition tables before proceeding.
Older Master Boot Record (MBR) partition tables feature both primary and extended partition types. Extended partitions are actually a container that other Volume Boot Record (VBR) entries are placed inside of to get around an MS-DOS-era four primary partition area restriction. By default, if you’re installing Ubuntu on an MBR table, it creates an extended partition and then a logical drive inside of it to store your swap space. Extended partitions should be clear before removing them. Keep this in mind as you proceed in order to prevent loss of important data.
Freeing Up Space from Older Ubuntu Partitions
Let’s assume that you’ve either created partitions in order to install different variants of Ubuntu as well as a swap area on a volume. You might have Ubuntu, Ubuntu MATE, Xubuntu, Lubuntu and Kubuntu installed on separate partitions of a huge pair of hard drives or SSDs. You could also theoretically have some area reserved for Microsoft Windows or even OS X.
On an MBR system, the first logical partition inside of an extended partition receives the name /dev/sda5, which can be confusing on a single-user system. Ubuntu defaults to /dev/sda1 serving as the root directory mount space, /dev/sda2 serving as the extended partition and /dev/sda5 serving as the Linux swap space area. The reason for this has to do with the way that MS-DOS constructed partition tables. If you’re using a GUID partition structure, then you won’t have to deal with this. While it might seem obtuse, the reasoning behind this is actually quite logical in the context of MS-DOS partition structures.
Ubuntu live USB boots give you a “Delete Other Version and Install” option when you’re installing an operating system, and you could use this if you wanted to install a new version of the operating system on one of the partitions that you’ve created. However, you have to be exceptionally careful while doing so. Make sure you select a single partition when doing so and not the whole device. While /dev/sda6 might be a single partition, selecting /dev/sda instead will completely restructure your partition table in favor of the Ubuntu installer’s new matrix. This can have disastorous consequences.
One thing that trips up new users is the fact that you don’t actually have to uninstall an operating system the same way you would any other piece of software. You simply delete the partition the operating system was installed to, but if you’re dual booting Windows and Ubuntu with MBR partition structures, then you’ll need to reinstall the Windows bootloader after working.
Make sure any partition you want to remove is unmounted first. Even if you booted off an Ubuntu live USB or something similiar, you might find that your swap partition still came up when you restarted the computer. There’s a few different ways you could remove old Ubuntu partitions that you no longer need. The easiest if you’re already familiar with the terminal is through the cfdisk command.
Let’s assume the physical drive you’re working with is called /dev/sda, but you could replace that device file moniker with any other name if need be. Type sudo cfdisk /dev/sda at the CLI prompt and push the return key. You may have to enter your administrator password after doing so.
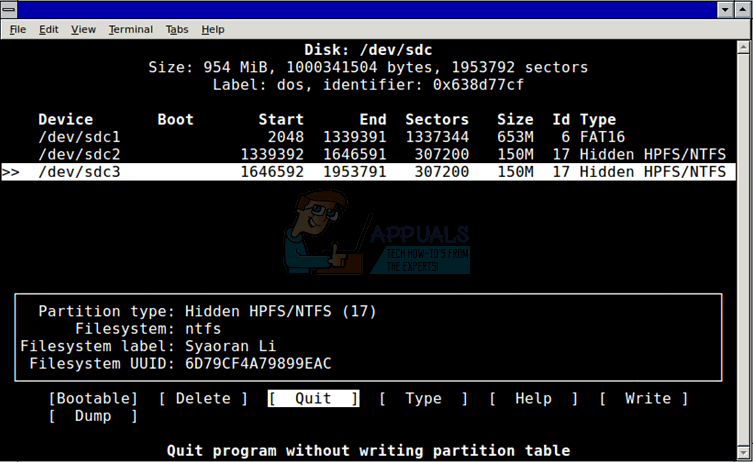
You could also open up a root terminal window in Xubuntu or what have you for the sake of discussion. Use the arrow keys to navigate up and down, then move over to [ Delete ] to clear out the partition. You can then select the newly unallocated space and then create a new partition there, if you were trying to merge two older Ubuntu partitions into one. Keep in mind that unlike Windows or OS X, Ubuntu lets you partition many types of block devices, so you could use this same scheme on a USB memory stick or even an SDXC or microSDXC card. For the sake of an example, images were even taken clearing out old partitions on a small Kingston Datatraveler memory stick created in Ubuntu, some of which were designed to communicate with Windows and therefore featured the NTFS structure.
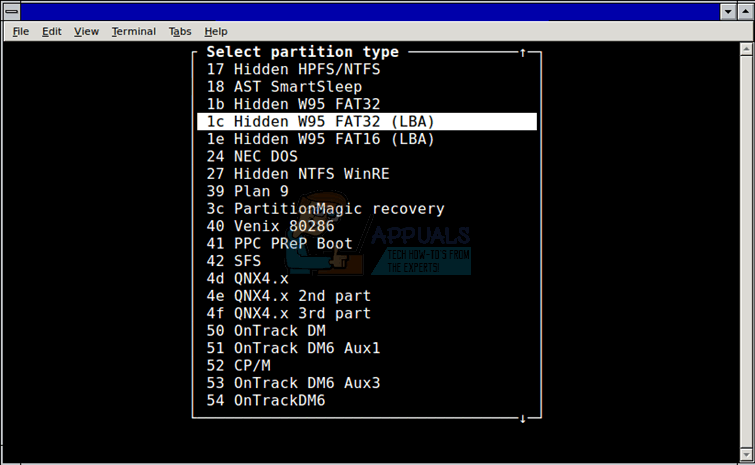
If you create new partitions to fill the space of the old Ubuntu ones, then you’ll be able to select the partition type with the arrow keys. Some of these types are exceptionally exotic, and even include settings for the CP/M and QNX operating systems. You should usually leave them as type 83 if you’re using a native Linux file system. The FAT and NTFS types are equally applicable to Microsoft Windows partitions, if you’re dual booting your system. Once you’re satisfied with your changes, use the arrow keys to select [ Write ] and then type yes before pushing the enter key. You may wish to reboot if you were working on a primary boot drive.
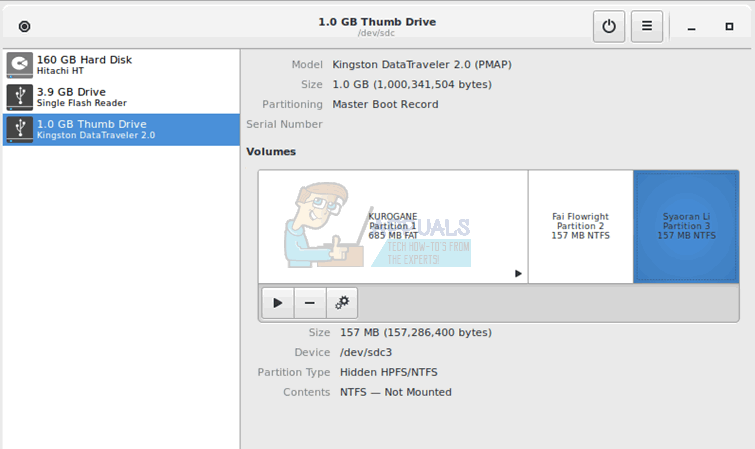
You could also use the Disks utility found in the Ubuntu Dash if you wanted. Select the partition you’d like to delete and then click on the minus button to delete it. Make sure that you’re certain that you want to remove it before doing so. As with the cfdisk utility, the Disks app can remove Ubuntu and Windows partitions of any type. It can even delete a partition that Ubuntu created for a non-native partition type. When you create new partitions, if you boot to Windows they should appear as separate disks, but make sure to not format any it tells you are unformatted because this is how it might handle volumes carrying an unfamiliar file system.
Some gamers using Ubuntu have complained about the partitioning system, but a simple rule of thumb should keep things clear. Steam users should be able to select which partition they’d like to install new games to, but you’ll have a problem if you delete an older Ubuntu partition and simply move your game files elsewhere. This isn’t a problem if you’re using Windows games through Wine that you’re putting into a drive_c directory or portable native Linux games. You’ll need to download games through apt-get again if you’re using them through the native Ubuntu package manager, but you can move saved games out of your ~/ directory before deleting the partition and move them to the new home directory on your new installation.
The post How to Free Up Space from an Older Ubuntu Partition appeared first on Appuals.com.