Warframe is a cooperative free-to-play third person online action game set in an evolving sci-fi world and it gathered quite a fan base around it. The game is fast-paced and it inclused things you have never seen before in a beautiful sci-fi setting.

However, you have run the latest build of the game in order to play it and downloading the latest update is sometimes not possible because of the “update failed” error. This problem is available both on Steam and on standalone game clients so we have gathered methods which are applicable in both of these scenarios for you to check out.
What Causes the Warframe Update to Fail?
There is a variety of different things which may cause Warframe updates to fail and we have focused on the most common ones which appear to users on a regular basis. It’s a shame that some things almost unrelated to the game can cause it to misbehave but everything can be sorted out easily. Here is a full list:
- Faulty Microsoft Visual C++ Redistributable installations
- Internet connection settings
- Warframe launcher settings
- A broken or missing DirectX installation
- Game’s cache
- Malware running on your computer
Solution 1: Repair Your Microsoft Visual C++ Redistributables
The Warframe update failed problem is often caused by a broken or faulty Windows update which somehow ruined the installations of Microsoft Visual C++ Redistributables. Other system files may have been affected as well and you should take care of them as well after repairing your Microsoft Visual C++ Redistributable installations.
- Click the Start menu button and open Control Panel by searching for it there. Also, you can click on the gear-looking icon in order to open the Settings app if your installed OS is Windows 10
- In Control Panel, switch the View as option to Category at the top right corner and click on Uninstall a Program under the Programs section at the bottom of the Control panel window.

- If you are using the Settings app on Windows 10, simply clicking on Apps should immediately open a list of all installed programs on your PC.
- Locate Microsoft Visual C++ Redistributable Package in Control Panel or Settings and click on Modify after clicking it once. You might notice that there are several different versions of the utility. You will need to make note of them and repeat the reparation process for each one of them.
- You may need to confirm some dialog boxes and follow the instructions which will appear along with the wizard. Make sure you choose Repair for each version of the utility.

- Click Finish when the the wizard finishes with the process and repeat the process for all versions of the Visual C++ Package. Check to see if Warframe is able to update now by launching it.
Now, if this doesn’t work. You can choose to Uninstall each Microsoft Visual C++ Redistributable and redownload them again. You will need to reinstall Visual C++ by locating it here. Select the version you want to download and choose the download according to your processor (32-bit or 64-bit).
Locate the file you just downloaded in the Windows folder, run it, and follow the instructions on-screen in order to install the Microsoft Visual C++ Redistributable Package you chose to download. Repeat the same process for all versions you previously uninstalled and check to see if Warframe update fails again.
Follow this link in order to run a SFC scan which can search for missing or corrupt system files and repair them!
Solution 2: Reset LAN Settings
If you have tweaked certain settings regarding your Internet connection to suit another program or if you simply wanted to improve on something, you should know that plenty of programs depend on your Internet connection being set up normally. Make sure you undo these changes by following the steps below.
- Open Internet Explorer on your computer by searching for it on the Desktop or the Start menu. Click on the Gear icon located in the top right corner. From the menu which opens, click on Internet options in order to open a list on related connection settings.

- If you don’t have access to Internet explorer, Open Control Panel by searching for it in the Start menu or by using the Windows Key + R key combination, typing “control.exe” in the Run bar, and clicking OK in order to run Control Panel.
- In Control Panel, select to View as: Category at the top right corner and click on the Network and Internet button to open this section. Inside this window, click on Internet options in order to navigate to the same screen as you would if you opened Internet explorer.

- Navigate to the Connections tab and click on LAN Settings.
- Check the box next to Automatically Detect Settings and make sure the Proxy servers are blank unless you actively use one, which is not recommended if you don’t want further connection settings when playing Warframe.
- Make sure you Apply the changes you made and restart your computer before you check to see if the Warframe update failed error still appears.
Solution 3: Tweak Some Launcher Settings
Not all settings in the launcher window can be used on each computer and sometimes there are settings which should be disabled in order to make the updating process work. Oddly enough, some of those settings even included disabling DirectX10, DirectX11, or even both! However, turning off Bulk download should also get the process going!
- Open Warframe’s launcher either by double-clicking the game’s shortcut or executable from Desktop or any other place on your computer such as Start menu, etc.
- If you downloaded and installed the game on Steam, open it, navigate to the Library tab and double-click the Warframe entry in order to launch it.
- When the game’s launcher opens, locate the cog icon at the top right corner, next to the ‘x’ and the minimize button and click on it in order to open launcher settings.

- Disable the Bulk Download option in the new window which will open and click OK. Try updating the game now. Also, users have reported that disabling the DirectX10 and DirectX11 0 options can also fix the problem so make sure you try this out as well.
Solution 4: Reinstall DirectX
If your DirectX installation has gone corrupt and if you are using DirectX 9 or older which doesn’t come preinstalled on older versions of Windows OS, you should definitely consider downloading the DirectX installer and running it to reinstall it and possibly solve the problem. This has worked for other users and we hope it will work for you!
- Pay a visit to the DirectX End-User Runtime Web Installer Download Page on Microsoft’s official website which is linked in this step.
- Scroll down, locate, and click the red Download button at the site and follow the instructions which will appear on screen in order to directly download the Web Installer for DirectX on your computer.

Note: Microsoft will probably offer a couple of their applications after you click the Download link, but you should uncheck those products if you’d rather not have them on your computer. If you choose not to download these utilities, the Next button will be renamed to No thanks and continue.
- Perform the DirectX installing process by opening the downloaded .exe file in your Downloads folder and following any instructions from the DirectX installation wizard. You will need to scroll through the Terms & Conditions page (while reading it, of course) and click on the Next button.
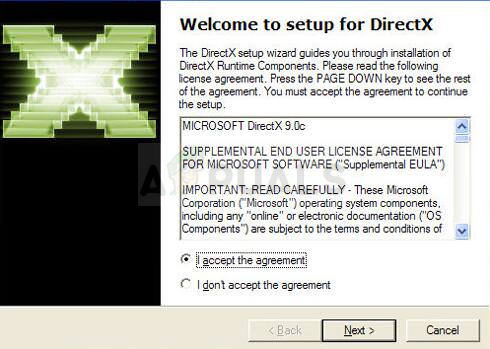
- Restart your computer and check to see if the Warframe update error still appears after launching the game.
Solution 5: Failing to Connect Due to Network Errors
If you suspect you have to blame your Internet connection for the fact Warframe won’t launch, you should definitely try this method out. It’s particularly useful if you find out that you can update the game using your mobile data connection by connecting to a hotspot created by your phone. Follow the steps below for these ultra-helpful commands!
- Search for “Command Prompt” by typing it either right in the Start menu or by pressing the search button right next to it. Right-click the first entry which will pop up as a search result and select the “Run as administrator” context menu entry.
- Additionally, you can also use the Windows Logo Key + R key combination in order to bring up the Run dialog box. Type in “cmd” in the dialog box which appears and use the Ctrl + Shift + Enter key combination in order to run Command Prompt using administrator privileges.
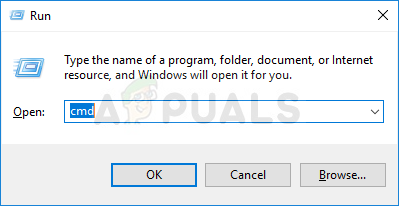
- Type in the following commands in the window and make sure you press Enter after typing each one. Wait for the “Operation completed successfully” message or something similar to know that the method has worked and you haven’t made any mistakes while typing. Make a short pause between these two commands.
ipconfig/flushdns
ipconfig/release
ipconfig/release6
ipconfig/renew
- Reopen Warframe either by double-clicking its shorcut on your computer or by launching it through Steam and check to see if the Warframe update failed problem has disappeared.
Solution 6: Run the Game’s Launcher as an Administrator
Running an app as an administrator gives it extra privileges and access to actions which may have been blocked by default on your operating system. This shouldn’t occur normally but users have reported that simply running the launcher with admin privileges enables it to download and install the update so make sure you try this out before giving upP!
- Open up Steam by double-clicking its icon on the Desktop or by searching for it in Start menu. Head over to the Library sectionn in the Steam window by locating the Library tab at the top, and locate Warframe in the list of games you own in your library.
- Right-click on its entry and choose Properties. Navigate to the Local Files tab and choose Browse Local Files.

- If you have the standalone client version of Warframe, you can still locate the game’s installation folder manually. The easiest way would be to right-click the game’s shortcut on Desktop or anywhere else and choose Open file location from the menu.
- Anyway, once inside the installation folder, locate and open the Tools folder. Inside, you should be able to see a file named Launcher or launcher.exe. Right-click on this file and choose Properties. Navigate to the Compatibility tab in the Properties window and check the box next to the “Run this program as an administrator” option.
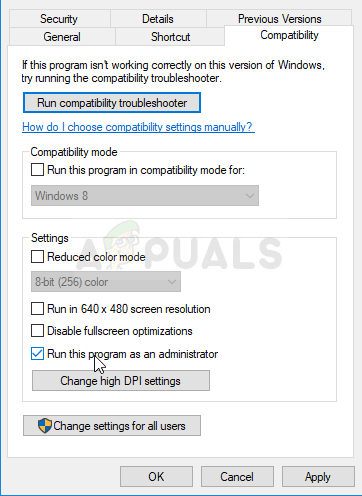
- Apply the changes you have made and try relaunching Warframe from where you installed in order to see if the problem still occurs.
Solution 7: Switch Languages from the Launcher
Switching the language to anything else than the one you had when the error occurred appears to have worked for plenty of Warframe players even though the method appears too basic. This is more of a workaround for the problem but you can simply switch everything back to English after the update is downloaded and installed successfully.
- Open Warframe’s launcher by double-clicking the game’s shortcut or executable from Desktop or any other place on your computer such as Start menu, etc as this will automatically open the launcher.
- If you downloaded the game via Steam, open it, navigate to the Library tab and double-click the Warframe entry in order to open it.
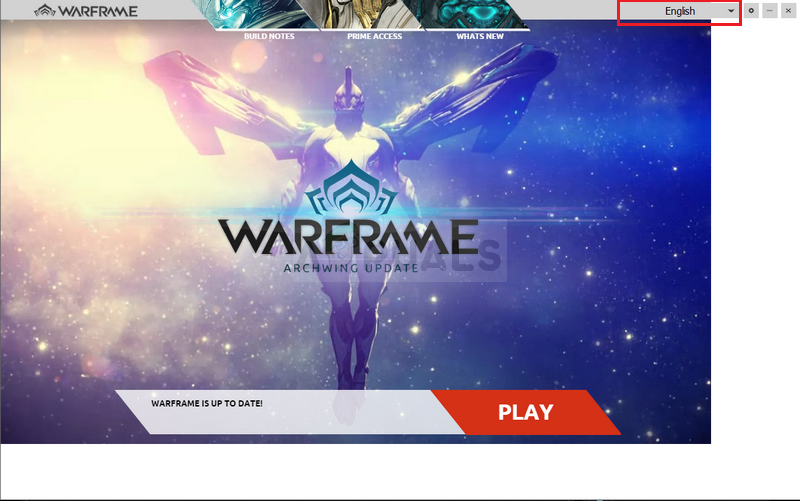
- When the game’s launcher opens, locate the language text at the top right corner, next to the ‘x’, minimize, and settings buttons. Change it to something else and wait for the launcher to reload. Repeat the same process for a couple of languages until it finally works!
Solution 8: Reset the Game’s Cache
The games keeps its cache internally on your computer, inside its installation folder, and deleting or renaming it should reset its updating process and start certain things from scratch. This is a great fix as it allows you to skip any uninstallation and fix the problem simply by using File Explorer and/or Steam on your PC!
- Open up Steam by double-clicking its icon on the Desktop or by searching for it in Start menu. Head over to the Library sectionn in the Steam window by locating the Library tab at the top, and locate Warframe in the list of games you own in your library.
- Right-click on its entry and choose Properties. Navigate to the Local Files tab and choose Browse Local Files.

- If you have the standalone client version of Warframe, you can still locate the game’s installation folder manually. The easiest way would be to right-click the game’s shortcut on Desktop or anywhere else and choose Open file location from the menu.
- Anyway, once inside the installation folder, locate the Cache.Windows folder. Right-click on this folder and choose the Rename option. Change its name to Cache.Windows.old or something like that and click Enter. Reopen the launcher and check to see if the update will start properly. If other errors appear, revert the changes to the folder’s name.
Solution 9: Scan Your Computer for Malware
Users have reported that they have contacted Warframe support team and they claimed that the error is sometimes caused by malware residing on users’ computers. When Warframe servers register the unusual behavior, they block the ISP and you need to get rid of malware before gaining access again.
Here, we will show you how to scan your PC with Malwarebytes as it often shows the best results considering the fact that it really has a vast database. Good luck!
- Malwarebytes Anti-Malware is a great anti-malware tool with a free trial version you can download from the Internet. Hopefully, you won’t need the full program after you solve this issue (unless you want to buy it and have it ready for other problems) so make sure you download the free trial version by clicking here.

- Locate the executable file you just downloaded and double-click on it in order to open it on your computer.
- Select where you want to install Malwarebytes and follow the instructions which will appear on the screen in order to complete the installation process.
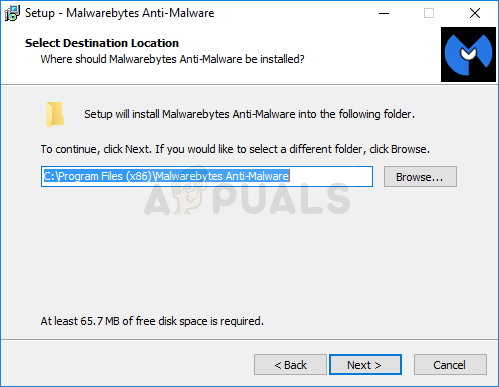
- Open Malwarebytes and select the Scan option available at the home screen of the application.
- The tool will probably launch its update service in order to update its virus database and then it will proceed with the scan. Please be patient until the process finishes which might definitely take a while. If malware is detected on your computer, confirm to have it deleted or quarantined.
- Restart your computer after the scanning process is over and check to see if you still experience issues with Warframe update failed.
Note: You should also use other security tools if you can tell the type of malware you have on your computer (ransomware, junkware, etc.) as one tool probably won’t register all types of malicious apps.
The post Fix: Warframe Update Failed appeared first on Appuals.com.