If you are looking to do a clean install; then you must keep in mind that you will need new activation keys to activate Windows 10. Before you do any upgrade, or clean install; make sure you have the back up in hand should you need to revert back to your previous windows; or if you want to copy your previous data such as your “documents, pictures etc” then a back up is must.
If you don’t have any important data to be saved, then obviously you can proceed with the steps below directly.
Just to help you with making a decision; if i were you i would do a clean install instead of upgrade. This gives me satisfaction in a sense that my hard drive isn’t overloaded with any previous versions of Windows; i can be sure that there will not be any permission issues or user profile corruption issues but again; this is your choice.
The difference between Windows 10 Home and Pro
Generally, Windows 10 Home is for home users and has pretty much everything a home user would need whereas Windows 10 Pro is for business users. (see the image below for comparison). If you are/were a Home User then you should go for Windows 10 Home.
RAM: 1 gigabyte (GB) (32-bit) or 2 GB (64-bit)
Free hard disk space: 16 GB for 32-bit OS 20 GB for 64-bit OS
Graphics card: Microsoft DirectX 9 graphics device with WDDM 1.0 driver
Display: 800×600 screen resolution
Internet access to activate
So first; buy the activation keys either Pro or Home and then begin with the steps below unless you want to run a trial.
You can buy the license and get the code immediately for Windows 10 Home from Amazon for $119 by Clicking Here or for Windows 10 Pro from Amazon for $199.99.

Clean Install Windows 10
1. Get the license and get the code immediately for Windows 10 Home from Amazon for $119 by Clicking Here or for Windows 10 Pro from Amazon for $199.99.
2. Now download the Media Creation Tool which will be used for creating the bootable iso file. Before you download it, check your system type which you can do by right clicking “Computer and Select Properties” on Windows 7 or on Windows 8 you can search for computer, right click “This PC” from the search results and select Properties. The system type field will tell you which is your current type (64-bit or 32-bit). Once you have this information, choose the correct version of tool and download it from https://www.microsoft.com/en-us/software-download/windows10
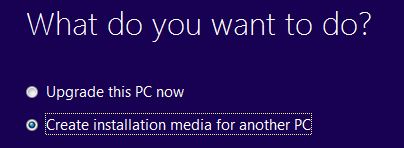
3. Once the tool has been downloaded, open it and run it. Choose “create installation media for another PC”
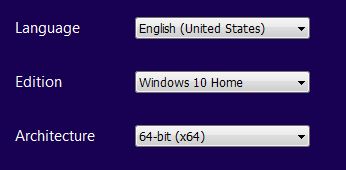
4. Click Next, then choose your language, edition and architecture. Edition would be the one you have the license key for, eg: Windows 10 Home or Windows 10 Pro. There will be 4 options listed though, those with N means (Not with Media Player) suffixed to their names (e.g. Windows 10 Home N) and do not have media-related technologies like Windows Media Player or Camera. The cost of the N Editions are the same as the full versions, as the “Media Feature Pack” can be downloaded without charge from Microsoft.
5. Click Next, and then choose the media you will be writing this on.
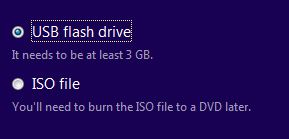
If you choose the USB Flash option make sure it is formatted and inserted onto your computer, otherwise you will get an error. If you want to do this later, you can choose the ISO file option which will create the iso file on your system which you can burn onto a USB or a DVD later. Click Next, and wait for it to create the iso file, once it finishes, and if you have chosen the DVD option; then you will need to write this to a disc.
You can use imgburn to do this easily, it can be downloaded from http://www.imgburn.com/
6. After it has been burned, reboot your computer and enter bios (to change the boot order from hard disk to your usb or dvd) which ever option is being used to install Windows 10. The bios option and boot order options are displayed on the post screen. (look carefully) when you restart.
7. In the first step, choose the Install Now option, agree to the terms and then click Next, you will then be given two options after the PC/System has booted from the bootable media. Since we are doing a clean install, we will choose: Install Windows Only option

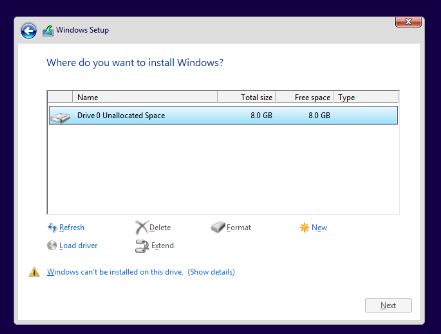
8. The next step will ask you where do you want to install Windows 10; this should be your hard disk. You can format it to completely wipe it off and do a clean install by choosing the Format option and then click Next.
9. The next steps are pretty easy, next, next and next, you will be asked for your key which you have purchased, which should be entered here to activate it.
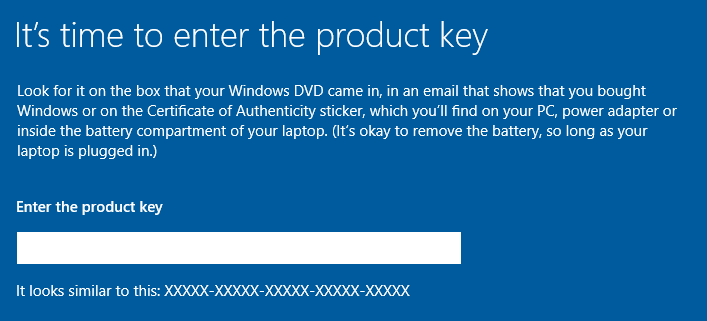
Enter your license key and proceed with the next steps on screen. If you do not have the key, then skip it but you will be prompted to enter it again, so skip it again. Since this will then be a trial version; you do need to activate it in order to use it in future.
10. During the installation, you will be asked to specific settings, choose Express Settings.
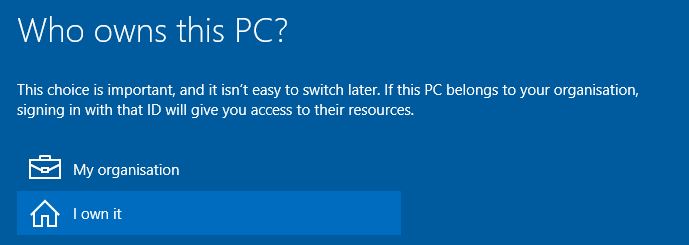
11. Once that is done, you will be prompted to choose the owner of the PC. Here, choose I own it or if it’s your organisations; then choose My Organisation.
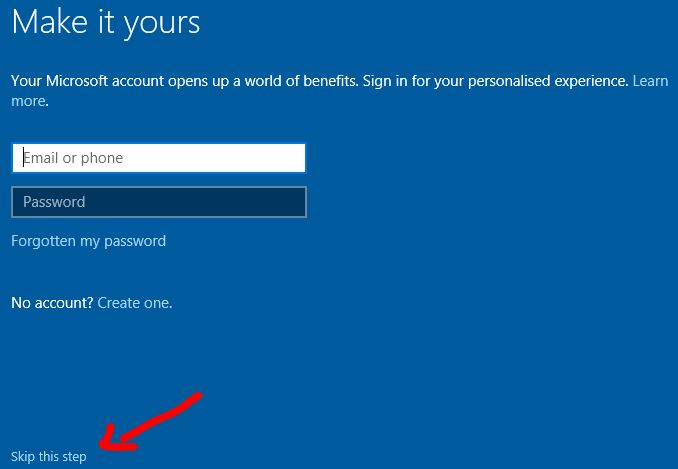
12. You will then be given a choose to create a local account or a microsoft account, i prefer local account; you can switch to Microsoft Account later from PC Settings. To create a local account, choose Skip this step
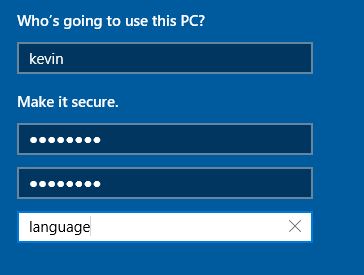
13. Create your account details; your username, password and the hint then click NEXT.
This is it. You should now have the Windows 10 up and running. If you experience any issues; feel free to ask in the comments below or for more specific/direct help; ask me by clicking the “ask an expert” image below.
The post BEST GUIDE: Steps to clean install Windows 10 appeared first on Appuals.com.