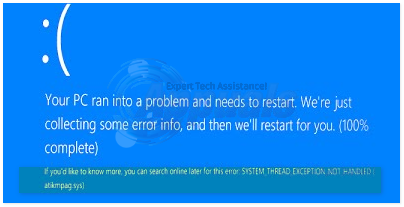
SYSTEM THREAD EXCEPTION NOT HANDLED is an error which appears on a Blue Screen of Death (BSOD). It has been mainly reported by users of Windows 8, 8.1 and 10. While some users get 10 to 15 seconds before they get this error, some have reported immediately getting this error after their windows start, and then their systems reboots, getting stuck in a loop making it impossible for them to use any computer.
This error mainly occurs due to a driver malfunction. An outdated, corrupted or incompatible driver can get your system into display this blue screen. Outdated drivers and overclocking softwares, or a recently overclocked tweak are also known to cause this BSOD. If a recently installed program or a driver caused this issue; then the first approach should be to uninstall them since they are simply not compatible, keep track of updates and attempt reinstall when a patch or update to the driver has been released.
You can do this by booting into Safe Mode. (see below)
First Solution: Check Display Drivers
Display drivers are one of the most common reason for this error to occur. We will uninstall them and then re-install the latest version of the display drivers. If you can log in to Windows for even a few minutes then skip to Step 2. But if you can’t even log in to Windows then start with Step 1.
Step 1: Boot into Safe Mode
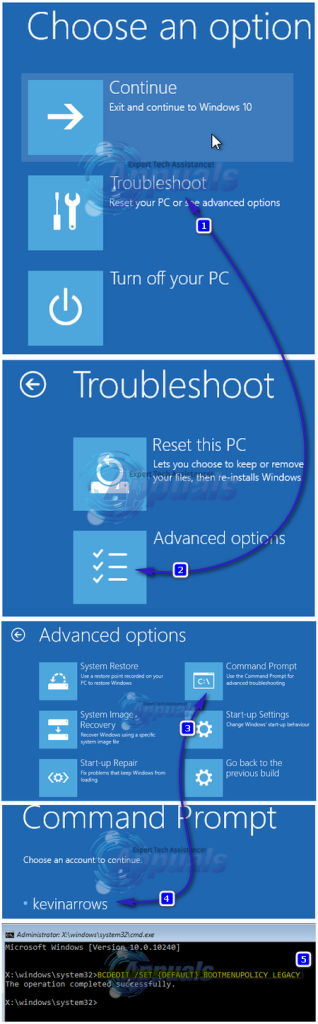
In safe mode, your drivers and services are disabled which are not necessary to run Windows. To boot Windows 8/8.1 and 10 into safe mode, turn your system on and force it to shut down by pressing the power button, turn it back on and repeat the steps until the system starts in repair mode. (you may need to repeat this for 4 to 5 times). The aim is to somehow trigger and push your system to go into repair/advanced mode.
Click on Troubleshoot > Advanced options > Command Prompt. A black command prompt window will appear. Now type the following command and press Enter.
BCDEDIT /SET {DEFAULT} BOOTMENUPOLICY LEGACY
Now type Exit and press Enter. Click Continue.
Now restart your system and keep tapping F8 (Shift + F8 for some) before the Windows logo appear. Advanced Boot Options menu will appear. In it highlight Safe Mode with Networking and press Enter. Now log in. You will be running your Windows in Safe Mode now.
If for some reason you can’t get the recovery options to show up, then get an installation media of your Windows operating system, which can be either a DVD or make a bootable USB through Media Creation tool. You will need an 8 GB USB and a computer with internet access.
To create a Windows 10 Bootable USB Installation media, follow our guide on this link.
To create a Windows 8.1 Bootable USB Installation media, go to this link. Scroll down and click on Download Tool Now. Run the tool and follow the onscreen instructions.
Enter the DVD or insert the USB into the target computer. Power on and keep tapping F2 to access Boot menu. The button to enter boot menu may differ by your system’s model. Normally, for Dell it is F12, for HP it is F9. You may have to check your system’s manufacturer’s website for yours.
After accessing the boot menu, highlight and select CD/DVD if you inserted a DVD, or select USB drive if you inserted a USB.
If you are asked to press any key to boot from the media do so. Click Next if the time zone, keyboard layout preference and language are fine for you.
Now in the lower left corner, click on Repair your computer.
Now follow the above given method to open command prompt and get into safe mode.
Step 2: Uninstall Display Drivers
Hold down Windows key and press R. In the Run dialog, type devmgmt.msc and press Enter.

Device manager window will appear. In it, double click Display adapters to expand it. Under it will be your graphic card installed. (write down the full name of your display driver, before uninstalling it) once done, Right click on it, and chose Uninstall.

Then click Delete the driver software for this device and click OK. Restart your system normally. After restarting, video drivers will get installed automatically. If not, or if you are having the same issue again, then you will have to install the updated version of the drivers manually. Follow step 3 to see how.
Step 3: Install/Update Drivers
To get an updated version of drivers for your graphic card, visit your graphic card manufacturer’s website. Search by the card’s model and download the appropriate drivers compatible with your operating system and system type (x64 or x86). To know them both, hold Windows key and press R, type msinfo32 and press Enter.
In the system information window, note down OS type and System type in the right pane. The downloaded files will probably be an executable. Simply run it and follow the onscreen instructions.
If you don’t have an external graphic card installed, then you will have a integrated display adapter embedded on your motherboard. Visit your motherboard’s manufacturers website (The one whose logo splashes when you power on your system) to get updated drivers for your onboard graphic adapter. In addition to operating system and system type, you will also need your system model, which is also mentioned in the System Information window. The downloaded file here will also be an executable. Simply run it and follow the onscreen instructions.
Method 2: Rename the Faulty Driver
If next to SYSTEM THREAD EXCEPTION NOT HANDLED, you can see a file name such as atikmdag.sys, nvlddmkm.sys, etc.. in a bracket, then we can rename the culprit driver into something that the windows can’t find, hence it will fetch a new copy of the driver file.
Get into the command prompt through steps shown in first solution.
In the black window, type the following commands, and press Enter after each.
c:
dir
If the results of the dir command shows a folder named “Windows” then it is the target drive. If not, type d: and press Enter.
Now type the following commands and press Enter after each line.
cd windows\system32\drivers
ren drivername.sys drivername.old
In the above command, drivername is the name of the fault driver, e.g atikmdag.sys.
Restart your system. The driver we deleted will be installed automatically. If not, log in normal mode, hold Windows key and press R. Type devmgmt.msc and press Enter.
The uninstalled device driver will have a yellow exclamation mark. Right click on it and click Update Driver Software.
Click Search automatically for Updated Driver Software. Windows will search for the driver online and install it once it finds it
The post BEST FIX: SYSTEM THREAD EXCEPTION NOT HANDLED appeared first on Appuals.com.