Individuals coming from a Microsoft or Apple based ecosystem as well as those who are first experiencing Linux mobile devices after working with Google’s Android environment more than likely find the idea of partitioning NAND memory to be rather obtuse. While there are ways to do so on these platforms, they’re extremely rare to find and information on their usage is often rather scarce. There are several reasons a Linux user might want to do this, however. The most obvious reason is simply to create a partition table, which should be useful for those who are attempting to use USB sticks or SD cards in a Web or App server type of environment. This is also useful because of the fact that other operating systems very often can only see a single primary partition on cards or sticks, which means this is an excellent way to generate a hidden backup partition for data in case something goes wrong in a work area.
Troubleshooting is the most important reason someone would ever want to attempt this, though. Boot records can be corrupted on these devices even if you didn’t realize they had one and would never think of using them outside of a camera or smartphone. Fortunately Linux can be used to recover at least part of the data and then freshen the device. Alternatively there are times where you might encounter an unusual phenomenon called Frankenflash, where an unscrupulous online seller alters a drive to show more storage capacity than it actually has. For instance someone may take a 4GB flash stick and modify the firmware to make your computer or tablet think that it’s a 64GB flash stick. These devices can be modified under Linux to show a more correct size and avoid corrupting data, though their use for anything critical isn’t recommended.
Method 1: Create a Partition Table on a NAND Drive
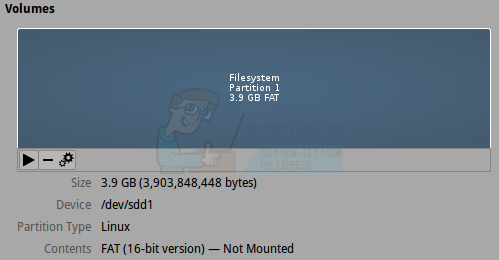
First insert your SD card, USB stick or whatever other type of device you plan to partition into your machine. Once Linux has read your device open up the Applications menu and select Disks from either Accessories or Preferences, which will depend on your distribution of Linux, and then read over the list of drives. The name given by Linux will match the capacity and brand of the drive printed on the physical device. It’s extremely important to click on the correct device, since this will remove data on whichever device was selected.
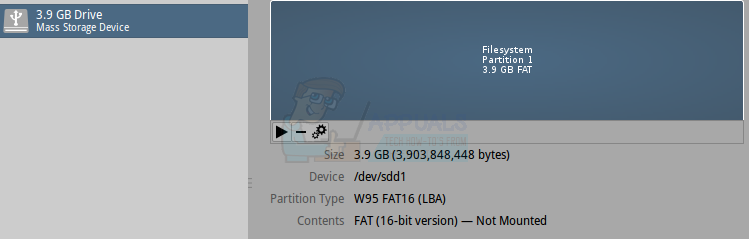
Once you have the correct drive selected, press on the square button to stop and unmount the device. Click on the button with a subtraction icon in it to delete the selected partition. If you have more than one partition, which is unlikely but possible especially in a case of record corruption, you may wish to delete these as well. Some devices may have unallocated space on them, which can’t be deleted, but will be added to your new partition when you create it.

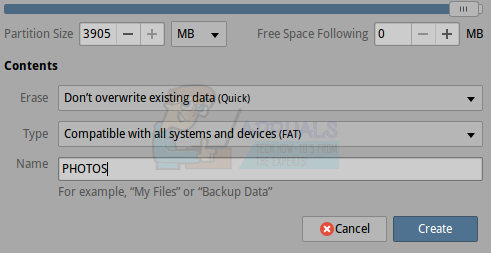
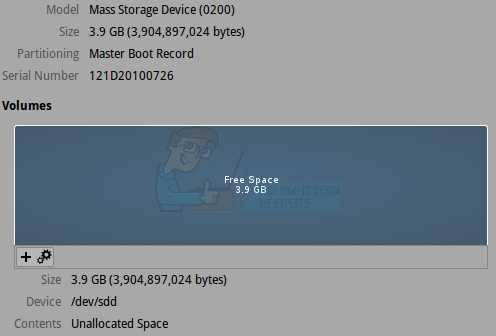
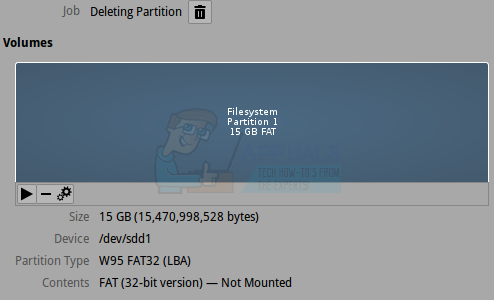
You will be asked to approve the deletion. Select delete and wait a moment. As soon as the entire section reads Free Space, click on the plus symbol. Linux will prompt you with a box that allows you to set up a partition. In most situations you’ll want to leave the default partition size, which is across the whole drive, but you could set it up for less than this for instance if you had wanted to create a backup partition for data that Windows or mobile users couldn’t access. Select the type drop down box and select a file system. In most situations you’ll want to use FAT. In the Name section feel free to give the drive a name that Linux will use to mount the system under. If you’re using FAT, then make sure the name is in all upper case letters and no longer than 11 characters.
Click on create to let the system do the rest. If you specified a size any less than the entire drive’s length, then you can select Unallocated Space after clicking on Create and then press the plus-shaped button again. Otherwise these options won’t be available to you. Once you’re done, click on the triangle-shaped button to mount your drive again.
Method 2: Creating a Partition Table to Recover Data
Sometimes, like if a card was accidentally ejected from a smartphone or something similar, you may not be able to access data because the table was corrupted. Alternatively someone may have accidentally deleted partition data by attempting a process similar to what was laid out in Method 1. In these cases, start the Disks utility as mentioned in Method 1, then click on the drive you attached to your system that you want to recover from. Select partitions on the drive and delete them with the subtraction-shaped icon. You’ll need to have the drive unmounted; if it’s not then push the square-shaped stop button before proceeding. Once the drive is reported as all Free Space, hold CTRL, ALT and T to open up a terminal window.
Type sudo cfdisk /dev/DEVICENAME substituting DEVICENAME with the name reported in the Disks utility. You’ll need to be very careful and make sure you have the exact device name that you were working on in the aforementioned utility. After entering your Super User password, you’ll be presented with a screen telling you that you have a Free space partition across the entire drive, but if there’s recoverable data then the box at the bottom of this screen will announce something like “Filesystem: vfat” or another name. Highlight the [NEW] command and press enter.
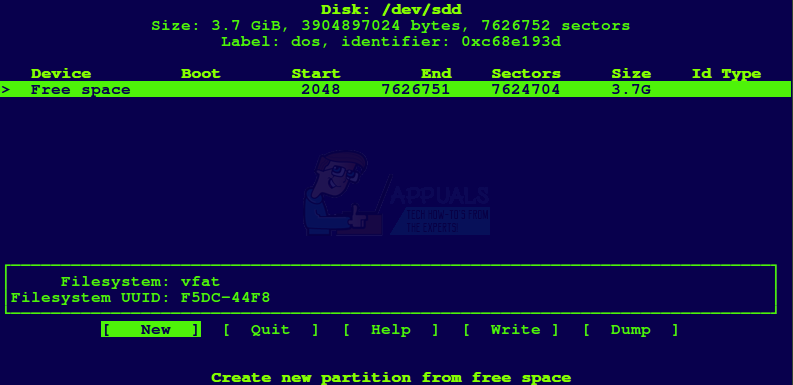
Press enter when asked for Partition Size, enter again when asked [primary] [extended] and then highlight [Write] press enter, type yes and press enter. Highlight quit and then press enter. If you don’t see a message that reads something like “Syncing disks” then type sync at the prompt and press enter before you click back on the Disks utility. Highlight the drive in question then press the triangle-shaped mount button.

Navigate to the drive in your file manager, which is usually launched from the root menu or by holding down the Windows key and pushing E, then copy all of the data off of it possible to your hard drive or another safe drive. You should treat this file system as damaged; after getting whatever you can off of it follow Method 1 to create a fresh file system on it before you use it again.
Method 3: Partitioning Walls Around a Frankenflash Drive
In a minority of cases, though this is somewhat common among those who buy Flash drives online you may receive a drive that’s of a size that’s not accurate. Unscrupulous sellers hack a drive to show more capacity than a drive really has, which means if you write more data to it then is really there you’ll corrupt it. If you have a drive you suspect of having developed this issue, then open a terminal by holding down CTRL, ALT and T. Type cd ~/Documents to get to your documents folder and then type mkdir Test, press enter and then type cd Test and press enter again.
Create a junk file by typing fallocate -l 0.5G test.img and press enter. Open your file manager by holding the Windows key and push E. Type md5sum test.img and make sure you note the number.

Click on Documents and then double click on Test, highlight test.img and press CTRL and X. Navigate to the drive you’re testing in the left panel and then click on an empty space to paste it. Head back to the terminal window and use the cd command to navigate to where your test drive is, then type md5sum test.img and compare the result to the one before. If the numbers match, then you’ll need to type cd ~/Documents/Test to get back to where you were, type fallocate -l 0.5G test1.img and then repeat the steps. Keep going until the md5sum numbers no longer match.
Once you get to this point you’ll know the actual drive capacity. Say you had four of these files match numbers but not a fifth. Since they’re each one half Gig in measure, that would mean you really have a 2GB drive no matter what the label on it reads. Start the Disks utility from the Accessories or Preferences menu then stop the disk in question with the square-shaped icon.
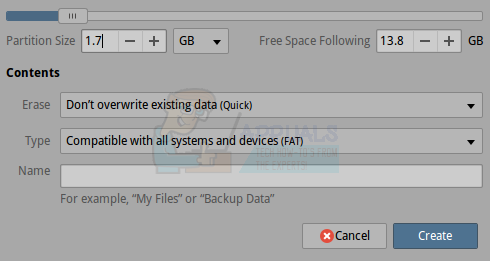
Press the hyphen-shaped delete button and then click on delete. Click on the plus-shaped create partition button and then select the box that reads MB and change it to GB. Highlight the numbers next to it and change them to read less than the amount you found before. For example, if it’s a 2GB drive as we had in our example, it’s best to try 1.7GB. Then click on create and don’t create any further partitions. Your drive will be at least locked down to a certain size, but in this situation it still should not be used for critical information.
The post How to Partition NAND Memory in Linux appeared first on Appuals.com.