Quantcast
Channel: How To's | Everything Tech - Appuals.com
Viewing all 4542 articles
Browse latest View live

Fix: The VPN Client agent was unable to create the interprocess communication depot

$
0
0

Some users get the VPN client agent was unable to create the interprocess communication depot error during the installation of Cisco AnyConnect Secure Mobility Client. Other users are reporting that they encounter the error when trying to launch the AnyConnect application. The issue is mostly reported to occur with version 3.1.05170.
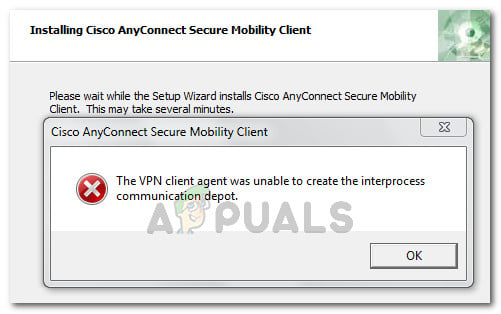
The VPN client agent was unable to create the interprocess communication depot

What is Cisco AnyConnect?

Cisco AnyConnect is a unified security agent that delivers multiple security services to protect enterprises from security attacks. Although it includes a VPN feature, Cisco AnyConnect is much more than a VPN.

This software can be described as a modular endpoint software product that protects networks from security threats. Among other things, Cisco AnyConnect includes security features like web inspection, malware protection, on and off premise visibility.

What is causing the VPN client agent was unable to create the interprocess error?

We investigated the issue by trying to replicate the error and looking at various other user reports. Based on what we gathered, this particular error is always occurring when internet connection sharing is enabled.

As it turns out, Internet Connection Sharing (ICS) is not compatible with the AnyConnect software. In order to allow AnyConnect proper functionality, users must disable the Internet Connection Sharing feature.

If you try to install or launch the AnyConnect application while ICS is enabled on the same machine, the application will return the following error:

 “The VPN client agent was unable to create the interprocess communication depot.”

If you’re struggling to resolve this particular issue, this article will provide you with a list of verified repair steps. Below you have a couple of fixes that other users in a similar situation have used to get the issue resolved. Keep in mind that some of the methods presented below we’re only confirmed to work on a single Windows version. If you want to save as much time as possible follow a method that was confirmed for your operating system.

Method 1: Preventing other network users from using the current Internet connection

This particular method was only confirmed to be effective on Windows 7, but we found that it can also be replicated on Windows 8.1 and Windows 10.

A couple of users have managed to resolve the issue permanently by accessing the Network tab of Control Panel and disabling an option that allowed other network users to connect using the current machine’s internet connection.

Note: This method is to be preferred because it fixes the problem without disabling the ICS service completely.

Here’s a quick guide on resolving the issue by preventing other network users from connecting through this computer’s internet connection:

  1. Access the Start button, then search and access Control Panel. Alternatively, you can press Windows key + R to open a Run box, then type “control” and press Enter to open Control Panel.
  2. Inside Control Panel, change the View by type to Category from the top-right corner.
  3. Then, click on View network status and tasks (directly under Network and Internet).
  4. In the Network and Sharing Center window, click on Change adapter settings from the left-hand side submenu.
  5. In the Network Connections screen, look for the network (or networks) that has Shared in the Status column, then right-click on it and choose Properties.
  6. In the Properties screen, go to the Sharing tab and uncheck the box associated with Allow other network users to connect through this computer’s Internet connection.
  7. Click Ok to save the changes, then restart your machine.
  8. If you have multiple shared connections in the Network Connection tab, repeat steps 5 to 7 with all of them.
  9. At the next startup, reinstall Cisco AnyConnect. You shouldn’t receive the VPN client agent was unable to create the interprocess communication depot error during or after the installation process.
Resolving the error by preventing other network users from connecting through this computer's internet connection
Resolving the error by preventing other network users from connecting through this computer’s internet connection

If this method wasn’t applicable or you’re looking for a different approach, move down to the next method below.

Method 2: Changing the startup type of the ICS service to Disabled

If you are prepared to lose some functionality, the fix is as easy as stopping the Internet Connection Sharing (ICS) service. However, this is only a temporary fix since the service is scheduled to start automatically at every startup. Even more, following this procedure means that you’ll lose the functionality of the ICS service which will hinder the PC’s ability to share your internet connection with other machines.

Several users in a similar situation have managed to get the issue resolved permanently by stopping the ICS service from the Services screen and then changing the Startup type of the service to Disabled. This will ensure that Windows does not re-open the Internet Connection Sharing service at the next startup and the VPN client agent was unable to create the interprocess communication depot error resurfaces.

Note: The guide below can be successfully replicated on all the recent Windows versions (Windows 7, Windows 8.1 and Windows 10).

Here’s a quick guide on disabling the ICS service on Windows 10 via the Services screen:

  1. Press Windows key + R to open up a Run dialog box.  Next, type “services.msc” and press Enter to open up the Services screen.
    Run dialog box: services.msc
    Run dialog box: services.msc
  2. Inside the Services window, use the right-hand pane to scroll down through the list of services and locate the Internet Connection Sharing (ICS) entry.
  3. Once you see it, right-click on it and click on Stop to turn off the service.
    Stopping the Internet Connection Sharing (ICS) service
    Stopping the Internet Connection Sharing (ICS) service

    Note: Keep in mind that after this step is complete, the error should no longer occur when you try to install or run the AnyConnect application. However, the error will return at the next startup. If you want to make the fix permanent, follow the next steps below.

  4. Right-click on Internet Connection Sharing (ICS) and click on Properties.
    Right-click on Internet Connection Sharing and choose Properties
    Right-click on Internet Connection Sharing and choose Properties
  5. In the Internet Connection Sharing (ICS) Properties window, go to the General tab and change the startup type to Disabled using the drop-down menu associated with it. Then, hit Apply to save the changes.
    Changing the startup type of the ICS service to Disabled
    Changing the startup type of the ICS service to Disabled
  6. Once the startup type has been modified, reboot your computer. At the next startup, install or run Cisco AnyCpnnect again – you should no longer encounter the error.

The post Fix: The VPN Client agent was unable to create the interprocess communication depot appeared first on Appuals.com.


How to Fix Error Code 2000-0146

$
0
0

Users experience the Error Code 2000-0146 when their hard drive is causing problems and not booting the operating system. The hard drive fails the self-test which causes it to abort its operation. This situation is very common and there are a lot of causes for why this might happen.

Error Code 2000-0146

This error code doesn’t only occur in old hard drives. In some cases, users experienced this error on new hard drives where there were other hardware problems diagnosed. There are several ways to go about fixing this error. We will start by using software solutions to fix or get your hard drive working again. If they don’t work, we will start with physical inspection and see if we can diagnose anything useful.

What causes the Error Code 2000-0146?

Like mentioned before, this error is primarily because of hard drive issues on your computer. It can have bad sectors/fragments or it might be damaged physically. If the issue isn’t of software, there might be other physical problems as well. Detailed reasons why this error might occur are:

  • Your hard drive as bad sectors or fragments which is making it inaccessible to the computer.
  • SATA Mode e. IDE or AHCI might be conflicting with the hard drive. They might need to be changed.
  • Your hard drive is damaged physically or the SATA cable is not working.
  • BIOS is causing issues. This can be diagnosed by plugging the drive to another computer.
  • Other physical components such as your RAM might be damaged.

Before we start this tutorial, make sure that you know your way around computers. Don’t attempt BIOS operations if you don’t have experience.

Solution 1: Changing SATA Mode

SATA modes determine how your hard drive will communicate with the computer. IDE being the simplest mode where the hard drive is set to run as a parallel ATA whereas Advanced Host Controller Interface (AHCI) allows advanced functions to be performed such as hot swapping etc. We can try to change your SATA mode and see if this leads to the hard drive getting detected by the computer.

  1. Enter your BIOS by pressing the correct key (F1, F2, F3 etc.).
  2. Once in the BIOS settings, navigate to Storage Configuration and change the setting between IDE and AHCI. If it was IDE before, change it to AHCI and vice versa.
Changing SATA mode in BIOS
  1. After making the change, restart your computer properly and check if you are able to successfully access your operating system without the system giving an error.

Solution 2: Checking your hard drive for bad sectors/fragments

If changing the SATA mode doesn’t fix the problem, you change it back to default and try checking your hard drive for bad sectors or fragments present. Bad sectors are very common in a hard drive if they either suffer physical damage or when they get induced through their lifetime. An even new hard drive can sometimes get anomalies. Follow the solution below to check your hard drive in the recovery environment.

  1. Restart your computer and upon booting, press F11 to go into the recovery environment. Now select Troubleshoot.
Entering recovery environment command prompt
  1. Click on Advanced from the list of options available and select command prompt.
  2. Once in the command prompt, execute the following command. If you have Windows installed to some other directory, you can replace “C” with the name of the drive.
chkdsk C: /r /x
chkdsk C: /

Do note that the chkdsk function might take some time to process and complete its operations. Be patient and let the whole process finish. It might even take a day. In some cases, the checking might take 12 -14 hours.

After the hard drive is diagnosed and the bad sectors fixed, you can restart your computer and try booting your computer again.

Solution 3: Checking Hard Drive in another computer

If both these solutions fail to solve the error at hand, we can check if your hard drive is working on another computer or not. If it isn’t, it would signify that there is a problem with the hard drive itself. If it does, it would narrow down the problem to your BIOS. Then we can try changing it to default in the next solution and see if it fixes things.

Plugging hard drive to another computer

Plug your hard drive to another computer and see if it boots to the operating system successfully. Make sure that you select the correct boot device to boot into it (best practice will be to disconnect the existing drive temporarily). You should also check the SATA Cables. They are one of the most problematic reasons why the hard drive gets unreadable.

If the hard drive doesn’t work on other computers as well, there are chances that your hard drive is physically damaged. Nevertheless, you can follow Solution 5 to check for hardware problems. If it does work, it narrows down the problem to your BIOS which we will reset in the next solution.

Solution 4: Loading BIOS in default settings

If the hard drive gets recognized easily and loaded in another computer, it probably means there are problems with your BIOS settings. We can try resetting your BIOS or updating it and see if this fixes issues.

Updating BIOS
Updating BIOS

Disclaimer: Updating or restoring BIOS to default settings are very critical operations. Make sure that you know what you are doing. You can seek the help of an experienced person if you are hesitant on doing it yourself.

You can navigate to your manufacturer’s website and follow the instructions laid out there regarding the instructions. You can also check our site on How to reset your BIOS to default or upgrade it.

Solution 5: Checking other hardware components

If all these methods don’t work, you can check other hardware components on your computer before flagging your hard drive as the potential problem. There were several users who reported that their RAM sticks were causing issues. When any RAM gets damaged or defected, the computer cannot load anything (obviously!).

Check your RAM sticks

Hence if you have more than one RAM module on your computer, take each one out one by one and see if the computer works. That way you can determine if your RAM is at fault or your hard drive. Furthermore, you should also check your SATA connector and your power supply. If you still cannot diagnose and fix the issue, it is best to get the hard drive checked for physical damage.

The post How to Fix Error Code 2000-0146 appeared first on Appuals.com.

How to Solve ‘Enter the Password to Unlock Your iPhone Backup’

$
0
0

In certain situations, you may have to or want to restore your iPhone to the previous backup or maybe you have a new iPhone and want to restore it from the backup from your old phone, and iTunes requires to enter the password to unlock your iPhone backup, but you don’t recall that you had encrypted that backup with password. First of all, we have to explain why iTunes requires a password to unlock your desired backup.

Apple is taking the privacy of the users very seriously and that is the main reason that you cannot share data and files as easy as your Android equals. iTunes is encrypting data while is backing it up. This is the reason that you are asked to enter a password to unlock your backups. And if you have also problems like this, we will help you to fix it in this how-to article.

Enter the password to unlock your iPhone backup

Method #1. Try All Possible Passwords That You Can Recall.

When you will get “Enter the Password to Unlock Your iPhone Backup” message you must try everything that you can think in order to decrypt the previous backup of your old or previous iPhone data. The range of the passwords can be from any of the following:
– Your Apple ID password or iTunes Store.
– Blank Password.
– Any special numbers like anniversaries, birthdays or any dates that are important for you.
– Common numbers and default iTunes backup passwords like 0000, 1111, 12345, etc.
– The Windows Administrator password.
But this list from above can mean nothing, mostly your password depends on you.

Method #2. Ask Your Friends or Family Members.

If you are not able to recall the particular password to unlock and decrypt iPhone backup, then maybe it is possible that you didn’t set it up. Maybe someone of your friends or family set it up or maybe you told someone or sent that password to them. So perhaps asking them is the best possible solution in order to find your lost password.

Method #3. Use Recovery Tools for iPhone Backup.

Maybe this is the quickest way to solve Enter the Password to Unlock Your iPhone Backup but this can be an also risky solution because there are many tools for recovery that are available online but the problem is that not all of them are helpful and can be trusted. You must be sure and check what are you going to use from these online software tools. The best possible way, in order to be sure, the tool that you are going to use is good enough is to read reviews from other users. These tools for recovery can be found on Google or maybe iTunes.

Method #4. Make an iCloud Backup.

iCloud Backup
iCloud Backup

This is the easiest method to solve ‘Enter the Password to Unlock Your iPhone Backup’. If you have tried all the methods from above but nothing works you will solve your problem with this one for sure. If you had all your data backed up previously on your iCloud, then you will be able to use it without finding out your iTunes backup encrypted with a password.

The post How to Solve ‘Enter the Password to Unlock Your iPhone Backup’ appeared first on Appuals.com.

Fix: This app can’t be activated by the built in administrator

$
0
0

Some users are getting the “This app can’t be activated by the built-in administrator” error when double-clicking certain file types. Most of the time, users report that this issue is encountered with PNG, GIF, JPEG, and PDF files. The issue is mostly reported to occur on Windows 10 – most affected users report that the issue started to occur after a certain Windows update.

This app can't be activated by the built-in administrator
This app can’t be activated by the Built-in Administrator

Note: If you are getting the “This app can’t open” error, follow the instructions on this article (here).

What is causing the This app can’t be activated by the built-in administrator error?

This particular error occurs because of a security setting of the recent Windows versions have. Certain file types that are opened through Store apps will require UAC permissions in order to run. Since the built-in account doesn’t have UAC (User Account Control) privileges, you’ll see the “This app can’t be activated by the built-in administrator” error instead.

This change was introduced on Windows 7, Windows 8 and Windows 10 in the months following the launch of Windows 10 via a security update.

So, the “This app can’t be activated by the built-in administrator” error is not actually an error, but a security feature that Microsoft introduced to patch some vulnerabilities. However, there are ways to configure your machine in order to circumvent this.

Resolving the app can’t be activated by the built-in administrator error

This particular problem can be resolved by a few simple Group Policy edits. Following the instructions below will grant UAC (User Account Control) privileges to the built-in administrator account. But keep in mind that this procedure will not link the built-in Administrator account to your Microsoft account – this means that some applications will still show the “This app can’t be activated by the built-in administrator” error.

The procedure below involves using the Group Policy Editor to enforce the User Account Control: Admin Approval Mode for the Built-in Administrator account. Follow the steps below to get this done:

Note: Keep in mind that not all Windows versions include the Group Policy Editor utility. Typically, Home and Student editions of Windows 7, 8.1 and 10 will not include this tool. However, you can add the Group Policy Editor to Windows Home Editions by following this article (here).

  1. Press Windows key + R to open up a Run dialog box. Then, type “gpedit.msc” and press Enter to open up the Group Policy Editor.
    Run dialog: gpedit.msc
    Run dialog: gpedit.msc
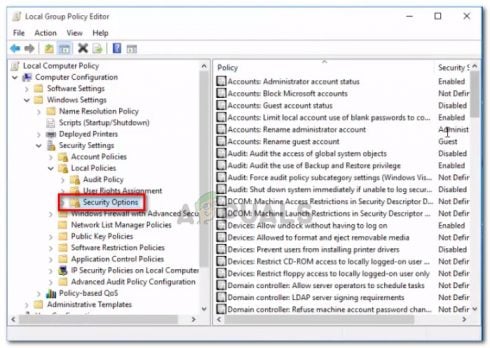
  2. Inside the Local Group Policy Editor window, use the left-hand pane to navigate to Windows Settings > Security Settings > Local Policy > Security Options.
    Navigate to Windows Settings > Security Settings > Local Policies > Security Options
    Navigate to Windows Settings > Security Settings > Local Policies > Security Options
  3. With the Security Options policy folder selected from the left pane, move over to the right pane and double-click on User Account Control : Admin Approval Mode for the Built-in Administrator Account.
    Double-click on User Account Control : Admin Approval Mode for the Built-in Administrator Account from the right pane
    Double-click on User Account Control: Admin Approval Mode for the Built-in Administrator Account from the right pane
  4. In the setting window of the policy, you’ve just opened, expand the Local Security Setting and set the policy to Enabled. Then, hit Apply to save the changes.
    Enabling the Account Control:Admin Approval Mode for the Built-in- Administrator account policy
    Enabling the Account Control:Admin Approval Mode for the Built-in- Administrator account policy
  5. Close the Local Group Policy Editor and restart your machine. At the next startup, you will be able to use Windows Apps from the built-in Administrator account (the ones that won’t require your Microsoft account).

The post Fix: This app can’t be activated by the built in administrator appeared first on Appuals.com.

Fix: Python is not recognized as an internal or external command

$
0
0

Given the increasing popularity of Python, it’s understandable why a lot of users are trying to run Python commands from the Windows Command Prompt. But the problem with this is, if you don’t specify Python’s full path for each command in part, you’ll end up getting an error saying that Python is not recognized as an internal or external command, operable program or batch file.

"Python is not recognized as an internal or external command, operable program or batch file."
“Python is not recognized as an internal or external command, operable program or batch file.”

What is causing the Python is not recognized as an internal or external command error?

This particular error occurs because the user has not specified the full path of the Python distribution. In order for the command to be successful in the current state, the user would have needed to specify the full path of the Python distribution inside the command.

If you want to run Python commands without having to add Python’s full path with each command, you’ll need to add Python to the Windows Path manually. Doing this can be somewhat confusing if you haven’t done this before.

In an attempt to make things easier for you, we’ve created a step-by-step guide that will walk you through the process of adding the Python path to a Windows environment.

Adding a Python to the Windows PATH

In order for this procedure to be successful, you need to ensure that the Python distribution is correctly installed on your machine.

Update: The Windows installer of Python 3.3 (or above) includes an option that will automatically add python.exe to the system search path. Using this installation method will save you from performing the steps below. You can download the latest web installer version of Python from this link (here). You’ll then have to download and run the appropriate x86 or x64 Windows Executable installer, depending on your CPU architecture.

Downloading the appropriate Python installation executable

If you already installed Python on your machine, the steps below will show you how to add Python to the Windows path. Doing this successfully will allow you to run Python commands from a Command Prompt window without having to specify Python’s full path with each command. The following procedure is compatible with Windows 7, Windows 8 (8.1) and Windows 10.

  1. Press Windows key + Pause key to open the System Properties menu. Alternatively, you can right-click on Computer (This PC) in the Start menu and choose Properties.
    Press Windows key + Pause Key or right-click on This PC and choose Properties
    Press Windows key + Pause Key or right-click on This PC and choose Properties
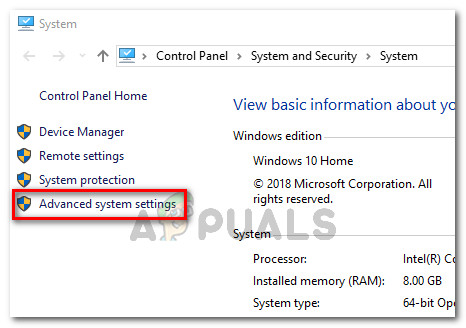
  2. Inside the System Properties menu, click on the Advanced system settings link using the sidebar in the left-hand side.
    Advanced System settings
    Advanced System settings
  3. In the System Properties menu, go to the Advanced tab and click on the Environment Variables button (bottom-section of the screen).
    Click on Environment Variables in the Advanced tab
    Click on Environment Variables in the Advanced tab
  4. Once you get into the Environment Variables menu, select the Path entry in the System variables section and then click the Edit button.
    Select the PATH entry from the System Variables menu and click on Edit
    Select the PATH entry from the System Variables menu and click on Edit
  5. Next, click the New button and add Python’s path at the end of the list. Keep in mind that you can separate multiple paths by semicolons.
  6. Click Ok to save the changes, then try to run a Python command from Command Prompt. If the steps above were performed correctly you should have no issues inputting commands without specifying the full Python path.

The post Fix: Python is not recognized as an internal or external command appeared first on Appuals.com.

Fix: COD WW2 Error Code 4220

$
0
0

Users playing Call of Duty World War 2 face the Error code 4220 when they are unable to connect to online multiplayer mode. This error message is a widespread bug which can happen to anyone despite any specific conditions.

COD WW2 Error Code 4220 on PS4
COD WW2 Error Code 4220

The bug mostly signifies that the console is unable to connect to the internet even if you have a working internet connection and are able to play other multiplayer games. The fix for this error is quite simple. Make sure that you follow the solutions from the top to bottom.

What causes COD WW2 Error Code 4220?

This error message can be caused by a number of different reasons. Most of the time, the cause is your console game; not the servers. The causes of this error message are but not limited to:

  • COD servers are down or having routine maintenance. If this is the case, you shouldn’t be locked out of multiplayer for more than an hour.
  • Your game is in an error state. To fix this error state and remove the bug, you can follow the solutions below.
  • You do not have an active internet connection. This error message mostly originates if the game cannot connect to the online servers as mentioned above.

Make sure that you have an open internet connection without any firewalls or proxies before starting the solutions. The solutions won’t work if your internet connection is not working.

Solution 1: Power Cycling your Console

Before we try more technical workarounds, we can power cycle your console. Power cycling means completely shutting down your console and router and taking out their main power supply. This will erase any bad configurations and refresh their state.

PS4 power outlet
PS4 power outlet

There were several cases where power cycling solved the Error 4220. Turn off your console properly and then take out its main power supply. Let it sit for around 5 minutes before plugging everything back in. Make sure that you power cycle your router as well.

Solution 2: Logging into WW2 Zombies first

If power cycling doesn’t work, we can try logging into Zombies first before attempting to connect to normal multiplayer. It seems that Zombies and the normal mode have some differences in their connecting mechanisms.  If your console connects to Zombies properly, you can exit and try connecting to the multiplayer again.

  1. Launch COD WW2 on your console. Try connecting to Xbox Live. Most probably, you will get the error under discussion. Now click the option Nazi Zombies.
Nazi Zombies game menu - COD WW2 on PS4
Nazi Zombies game option- COD WW2
  1. Once in Nazi Zombies, click on Multiplayer so we can navigate back to the main menu.
Switching back to Multiplayer - COD WW2 on PS4
Switching back to Multiplayer – COD WW2
  1. Once in the main menu, select Xbox Live. Now the console will take a short moment and the multiplayer mode will work out just fine.

Solution 3: Checking the connection from console

Since the bug/error under discussion is related to the internet connection, we can try checking our connection from within the console and then try connecting to Xbox Live. Initially, before the connection test, there isn’t any connection information saved in the console. When you try to establish the connection, only then the network modules gets triggered. If we confirm connection details before connecting, the system will know that the internet is available and will connect immediately.

  1. Open your console settings and navigate to Network.
Settings - PS4
Settings – PS4
  1. Once in Network settings, click on the option Test Internet Connection.
Test internet connection - Network Settings on PS4
Test internet connection – Network Settings
  1. Now your PlayStation will check the connection details and after checking each module, confirm that the connection is established. Now open COD WW2 again and try connecting to Xbox Live. Hopefully, it will connect without any issues.
Confirming connection details - PS4
Confirming connection details – PS4

The post Fix: COD WW2 Error Code 4220 appeared first on Appuals.com.

Fix: Incompatible Office Products are Installed on Your Machine

$
0
0

Some users get the Incompatible Office Products are Installed on your Machine when trying to open Excel, Word, Powerpoint or a document from a similar Office program. Affected users report that upon clicking Ok, the files open normally and all the functions are working correctly. Even though this error is mainly visual, it’s still nerve-racking to have this error pop up every time you open something with the Office suite.

Sorry, we can't perform this action. Incompatible Office products are installed on your machine. If you have an administrator, please contact them for help.
Sorry, we can’t perform this action. Incompatible Office products are installed on your machine. If you have an administrator, please contact them for help.

Based on the majority of affected users are saying, the error typically occurs on the very first document opened with an Office program. Once the error is displayed and closed (via the OK button), other documents opened with a word program will not exhibit the same behavior. The error is mainly reported to occur on Windows 7.

Furthermore, some users report that they only get this error message while opening documents on a mapped network drive. For them, the error is not displayed at all when opening documents stored on the local hard drive.

What is causing the Incompatible Office Products are Installed on your Machine error?

We investigated this particular issue by trying to recreate the issue and looking at various user reports. Based on what we gathered, there are several scenarios that are known to lead to this error message:

  • Stand-alone Microsoft OneDrive 2013 sync client is installed – If you only get this error with documents from a mapped network drive, it’s very likely that Microsoft OneDrive sync client is causing the error. Uninstalling the sync client will likely resolve the issue
  • Microsoft OneDrive bug – There are several reports that point towards the regular Microsoft Office program (not the Business sync client) of being responsible for the error. Some users have managed to get the issue resolved by re-installing Microsoft OneDrive.
  • Stand-alone OneNote 2013 is creating an unsupported configuration – This error can also occur if you have a standalone installation of OneNote over a complete installation of Microsoft Office 2013.
  • Office 2013 ProPlus and Office 365 are installed on the same machine – Apparently, these two versions are known to conflict, causing this particular error. Some users have managed to resolve the conflict by sticking to only one product.

If you’re struggling to resolve this particular issue, this article will provide you with a series of troubleshooting steps. Below you have a collection of methods that other users in a similar situation have used to get the issue resolved. Depending on the source of the issue, there can be multiple causes, so please follow the methods below in order until you stumble upon a fix that is effective in resolving the issue.

Method 1: Uninstalling stand-alone Microsoft OneDrive 2013 sync client (if applicable)

Most of the time, this particular issue is reported to be caused by Microsoft OneDrive for Business 2013 sync client. However, based on what most affected users are saying, the issue can occur with any version of the stand-alone Microsoft sync client.

Basically, the issue is occurring because your edition of Office 2013 already comes with its own OneDrive sync client. This ends up conflicting with the stand-alone sync client that was already present on the system, creating the Incompatible Office product installed on your machine. This supposedly happens because the stand-alone sync client was only designed to be installed with Office 2010.

If this scenario is applicable to your current situation,  you can resolve the issue by uninstalling the incompatible OneDrive sync client. Here’s a quick guide on how to do this:

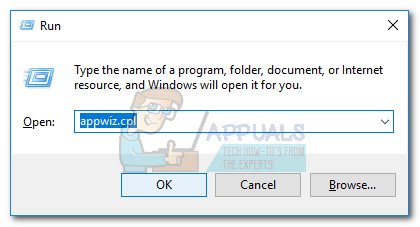
  1. Press Windows key + R to open up a Run dialog box. Then, type “appwiz.cpl” and press Enter to open up Programs and Features.
    Run dialog: appwiz.cpl
    Run dialog: appwiz.cpl
  2. Once you get inside Programs and Features, scroll down through the list of installed programs and locate the entry named Microsoft OneDrive for Business 2013 (or Microsoft OneDrive).
    Uninstalling Microsoft OneDrive for Business 2013
    Uninstalling Microsoft OneDrive for Business 2013 or Microsoft OneDrive
  3. Right-click on Microsoft OneDrive 2013 and choose Uninstall. Then, follow the on-screen prompts to remove it from your system.
  4. Once the sync client has been removed, restart your computer and see if the issue has been resolved at the next startup.

If you’re still seeing the Incompatible Office product installed on your machine error when opening Microsoft Office documents, move down to the next method below.

Method 2: Uninstall the stand-alone version of OneNote

Another scenario in which this error occurs is if the user has also installed the standalone version of OneNote on a machine that has the Microsoft Office 2013 suite. Apparently, this will create an unsupported configuration, triggering the Incompatible Office product installed on your machine error every time a file is opened with a program from the Microsoft Office 2013 suite.

To resolve the issue in this particular case, you’ll need to uninstall the stand-alone version of OneNote from Programs and features and if you need OneNote, reinstall it from the Office Suite. Here’s a quick guide on how to do this:

  1. Press Windows key + R to open up a Run dialog box. Next, type “appwiz.cpl” and press Enter to open up Programs and Features.
    Run dialog: appwiz.cpl
    Run dialog: appwiz.cpl
  2. Inside Programs and Features, scroll down through the list of applications and locate an entry named Microsoft OneNote (Business or Home and Student).
  3. Once you locate it, click once to select it, then click the Uninstall button.
    Uninstalling standalone version of Microsoft OneNote
    Uninstalling standalone version of Microsoft OneNote
  4. Follow the on-screen prompts to complete the uninstallation and restart your computer manually if you’re not automatically prompted to do so.
  5. If you need to use OneNote, return to the Programs and Files screen (Step 1) at the next startup, right-click on your Microsoft Office installation and choose Change.
    Changing the installation of Microsoft Office
    Changing the installation of Microsoft Office
  6. In the Microsoft Office wizard, select the Add or Remove Features toggle and click Continue.
    Select the Add or Remove Features toggle and click Continue.
    Select the Add or Remove Features toggle and click Continue.
  7. Next, from the Installation Options screen, make sure that Microsoft OneNote and all its subfolders are set to Run from My computer.
    Set Microsoft OneNote (and subfolder) to Run from my computer
    Set Microsoft OneNote (and subfolder) to Run from my computer
  8. Wait until the reconfiguration is complete, then restart your computer once again.
    Waiting for the Office reconfiguration to complete
    Waiting for the Office reconfiguration to complete
  9. At the next startup, you should be able to open any Office file without encountering the Incompatible Office product installed on your machine error.

If the issue is still not resolved, move down to the next method below.

Method 3: Resolving the Office 2013 ProPlus – Office 365 conflict

Other users have managed to resolve this conflict after figuring out that having Office 2013 ProPlus and Office 365 installed on the same machine will produce an incompatibility conflict.

Apparently, the issue can be resolved by uninstalling both Office suite and then reinstalling only one client. If this scenario is applicable to you, we recommend keeping Office 365 since it’s the superior product.

Here’s a quick guide on resolving the Office 2013 ProPlus – Office 360 incompatibility conflict:

  1. Press Windows key + R to open up a Run dialog box. Then, type “appwiz.cpl” and press Enter to open up the Programs and Features window.
    Run dialog: appwiz.cpl
    Run dialog: appwiz.cpl
  2. Inside Programs and Features, locate Office 2013 ProPlus and Office 365 installations and uninstall both by right-clicking on their entries and choosing Uninstall.
  3. Follow the on-screen prompts to complete both uninstallations, then restart your machine.
  4. At the next startup, reinstall Office 365 from the supplied link or from the installation media. Once the conflict is resolved, you should no longer encounter the Incompatible Office product installed on your machine error.

The post Fix: Incompatible Office Products are Installed on Your Machine appeared first on Appuals.com.

Fix: An Authentication Error has occurred (Remote Desktop)

$
0
0

People using Remote Desktop Connection might face a situation where they experience the error “An Authentication Error has occurred” when trying to establish a connection with another remote PC. Microsoft has officially acknowledged the error message and even released a document stating the root and causes of the error.

An Authentication Error has occurred (Remote Desktop)

This error message is not new and has been there in Windows for quite some time. This is because the causes of this error message can be tracked ranging from incomplete updates to problems in the group policy.

What causes ‘An Authentication Error has occurred’ while connecting to a Remote Desktop?

Like mentioned before, the causes for this error can be traced to a number of different modules. The causes are but not limited to:

  • Latest updates are not installed in either the connecting computer or the target computer. The mismatch causes the remote desktop to abort.
  • There are some problems in the group policy editor. Some Group Policy keys might need to be changed in order to grant access.
  • There is a real password mismatch while connecting to the target computer.

Before you move on to the solutions, make sure that you have an active internet connection and are logged in as an administrator.

Solution 1: Installing Latest Windows Updates on both computer.

Before we move on to other extensive solutions, it is probably wise to install the latest Windows updates on both computers. When you are attempting to remotely connect, it is necessary that both the computers have the same security patches installed to avoid security vulnerabilities. These security patches are installing through Windows Updates.

  1. Press Windows + S, type “update” in the dialogue box and open the application.
  2. Once in Update settings, click on Check for updates.
  3. Now Windows will connect to its server and after downloading the required files, will install the updates.
Windows Update - Settings on Windows 10
Windows Update – Settings
  1. Make sure that both computers are updated. Restart your computer and check if the error message is resolved.

Solution 2: Making changes in Group Policy Editor

The Windows Group Policy Editor contains critical information which dictates how computers should interact and perform different operations. It is kind of guideline and it may vary computer to computer depending on preferences. There are some keys which we must change so a connection to the other computer is established without any issues.

  1. Press Windows + R, type “gpedit.msc” in the dialogue box and press Enter.
  2. Once in the Group Policy Editor, navigate to the following key:
Computer Configuration > Administrative Templates > System > Credentials Delegation > Encryption Oracle Remediation
Navigating to Credentials Delegation
  1. Now open the key Encryption Oracle Remediation and change its status to Enabled. Also, set the Protection level to Vulnerable.
Encryption Oracle Remediation on Group policy editor
Changing Encryption Oracle Remediation
  1. Press Apply to save changes and exit by pressing OK. Now check if the error message is resolved.

If you do not have Group Policy Editor on your computer, we can use the registry editor to add the key.

  1. Press Windows + S, type “command prompt” in the dialogue box, right-click on the application and select Run as administrator.
  2. Once in elevated command prompt, execute the following command:
REG ADD HKLM\Software\Microsoft\Windows\CurrentVersion\Policies\System\CredSSP\Parameters\ /v AllowEncryptionOracle /t REG_DWORD /d 2
Adding registry key
Adding registry key of Encryption Oracle Remediation
  1. After executing the command, try connecting again. If this doesn’t work, restart your computer and try again.

In addition to the above solutions, you can also try:

  • You can reset the password from the domain controller (for enterprises). Then from Active Directory, you can select the user and open its properties. Then in the tab Account, you can uncheck the option User must change password at next login.
  • If you do not have access to the remote computer, you can remove the security update on the computer so both computers have the same version.
  • Make sure that you are not restricted from connecting to the target computer. Same goes for the target if it is restricted from being connected with.
  • Check your network’s Firewall.

The post Fix: An Authentication Error has occurred (Remote Desktop) appeared first on Appuals.com.


How to Import Photos and Videos from GoPro to MacOS

$
0
0

Many graphic and web designers will tell you that the best laptop or desktop to use for work is Mac. Some of them said this fact is true because of the tradition of using Mac, others said that is because the Macs have the best resolution and best screens that give better color accuracy and typography and have better displays. Also, many of these graphic designers use pictures captured with the GoPro camera so they have to transfer their photos somehow. There are also many users of GoPro camera that are using Mac and maybe need help to transfer their media. In this how-to article, we will show you How to Import Photos and Videos from GoPro to Mac. This article applies to all models of the GoPro family.

Method #1. Use Quik for Desktop or Mac.

Quik for Desktop or Mac is the easiest way to offload and enjoy your GoPro photos and videos. Automatically offload your footage and keep everything organized in one place, so you can find your best shots fast. Make quick edits and share your favorite photos and videos straight to Facebook and YouTube.

  1. Download and install Quik.
  2. Connect your GoPro camera to the computer. Use the USB cable for your GoPro.
  3. Turn on the GoPro. Your Quik app will detect your camera and it will display its details in the Device Window.
  4. Choose where to Import and copy files on your computer and confirm that. A window will prompt asking if you want to automatically import files when a camera is plugged in.
  5. Click Always Import or No. It depends on which you prefer.
  6. Wait until the process is finished and unplug your GoPro Camera. You will see a progress bar and it will take a few minutes to finish depending on the number of files.
    Quik
    Quik App

Method #2. Use an SD adapter.

  1. Insert your SD card into the adapter.
  2. Connect your SD adapter to your Mac.
  3. Open a Finder Window. Your SD card should be on the left sidebar shown under the Devices section.
    Open in Finder
    Open in Finder
  4. Open your SD card with a double-click. You should see two folders MICS and DCIM.
  5. Open the DCIM folder.
    Open DCIM folder
    Open DCIM folder
  6. Open the 100GOPRO folder. If you have taken more videos or pictures than 9999 you will see 101GOPRO, 102GOPRO, and folders.
    Open 100GOPRO Folder
    Open 100GOPRO Folder
  7. Drag and drop the files from the SD card to the Mac desktop.
    Drag and Drop files
    Drag and Drop files

Method #3. Use Image Capture.

With Image Capture, you can transfer files from your GoPro camera automatically and manually. If you had set up your Image Capture automatically you can import files to your desired location, delete files and also viewing files before importing.
1. Select your files and click Import All.

Import All
Import All


And if you had set it up manually you should to the following steps.
1. Click on search on the top right.
2. Search for Image Capture or iPhoto.

Search Image Capture


When the app opens you can import files just like in Method #2.

The post How to Import Photos and Videos from GoPro to MacOS appeared first on Appuals.com.

How to Unlock Xiaomi Devices on Linux and Mac

$
0
0

Owners of Xiaomi devices who want to flash and unlock their devices have the official MiFlashUnlock tool available to them – however, it does not run on Linux. The MiFlashUnlock software can be ran inside Wine or a VM, but there exists a better way.

MiUnlockTool is an unofficial tool based on MiFlashUnlock, which runs natively on Linux (but can also be installed on Mac and Windows). MiUnlockTool is a bridge between fastboot, your Xiaomi credentials, and the Xiaomi server. It retrieves your device info and sends it to the Xiaomi server together with your login token, then checks if you meet all the requirements to receive an unlock key from the server.

The tool will then send the unlock key to your Xiaomi device utilizing a custom build of fastboot. There are no different requirements for receiving an unlock key via MiUnlockTool compared to MiFlashUnlock – you require an authorized Xiaomi account tied to the device through Developer Options.

Requirements

Linux Users

  1. Download the MiUnlockTool, it comes in a .zip file.
  2. Open your terminal and CD to the extracted directory.
  3. In the terminal, type “sudo ./MiUnlockTool.sh”, which will launch the GUI interface. Alternatively, you can use “sudo ./MiUnlockTool.sh username password” for a command-line interface.

Windows and Mac Users

  1. After extracting the .zip file, launch MiFlashUnlock.bat for a graphical interface.
  2. Alternatively you can open a command prompt, CD to the extracted directory, and type “MiUnlockTool.bat username password” for a command-line interface.


After you have launched the MiUnlockTool in whatever OS you’re using, connect your Xiaomi device to your computer while it is in Fastboot Mode.

If you launched the GUI mode, follow the on screen directions. If you are using the command-line interface, there won’t be a confirmation request before unlocking, nor will it check if the bootloader is already unlocked.

Troubleshooting

MiUnlockTool device not recognized.
  • If you receive permission errors on Linux or Mac when launching the MiUnlockTool, you need to open a terminal and CD to the extracted directory.
  • Then grant it 777 permissions using “chmod 777 MiUnlockTool.sh” (or MiUnlockTool.command on Mac), which will set the proper permissions.
  • If you have problems launching the tool even with the Sudo command, you can try the command “java -jar bin/MiUnlockTool.jar”.
  • If you encounter errors with JavaFX class not being found, you are missing JavaFX library from your package. Check the OpenJFX package on Linux.

Final Notes

This tool is absolutely safe to use, as is the unlock procedure. Your Xiaomi device will not be damaged, even if the MiUnlockTool attempts an incorrect unlock key.

However, Windows users should probably stick to the official Xiaomi unlock tool. Because MiUnlockTool is a third-party copy built more specifically for Linux users, it can have additional bugs, and Windows will not manage the drivers for example. So MiUnlockTool does work on Windows, its just not recommended.

The post How to Unlock Xiaomi Devices on Linux and Mac appeared first on Appuals.com.

Android x86 Installation and Troubleshooting Procedures

$
0
0

For users who want to have an Android experience on their desktop, there are a handful of Android-based operating systems out there – however, many of them are really just forks of Android x86 (PrimeOS, Remix OS, Phoenix OS x86). This is because Android x86 slowed down development for awhile, and thus other developers took up in its absence.

However, Android x86 has been releasing steady updates as of late, including an update to Android Oreo. So if you want to enjoy a great Android experience on your desktop, its a good idea to try out Android x86 before trying one of the other forks (Remix OS has totally stopped development, for example).

Requirements:

If you are on Ubuntu, you can grab UNetbootin with the terminal command: sudo apt-get install unetbootin

If you are on Arch Linux, you can use: pacman -S unetbootin

USB Flash Drive Installation

  1. Launch UNetbootin and point it to your Android x86 ISO file.
  2. Now choose “USB Drive” and click OK.
  3. UNetbootin will begin copying Android x86 to your USB flash drive, turning it into a portable installer.
  4. When the process is complete, reboot your computer, and boot into your BIOS menu.
  5. Find the page on your BIOS that allows you to boot directly to a specific media (HDD, CD, USB, etc).
  6. Choose to boot directly to USB flash drive.
  7. A GRUB menu will appear, choose to install Android x86 to your hard drive.
  8. You will now need to choose a partition to install to – if you’re unsure, do not format the partition. Also don’t overwrite your other OS partition, obviously.
  9. A new prompt will come up, asking if you want to install GRUB. If you are primarily using Windows with no other Linux OS on your computer, choose Yes. If you already have a Linux OS / GRUB on your PC, it’s a terrible idea to install over it.
  10. Another prompt will come up, asking to “Make system R/W”. Choose yes. This will “root” Android x86 and enable read-write access to the /system partition.
  11. Reboot your computer, and enjoy your fresh Android x86 installation.

For CD / DVD Installation

The installation process is nearly exactly the same, except that you will burn a bootable CD from the Android x86 ISO. There’s a really a ton of ISO burners out there – you could just go with Free ISO Burner.

Installing to a Virtual Machine

  1. Configure your VM to have a minimum of 512 MB of RAM, though with the latest Oreo-based Android x86, this should probably be a bit higher.
  2. Load the Android x86 ISO file into your VM menu, and load the VM.
  3. A GRUB menu will appear, choose to install Android x86 to hard disk.
  4. Create a new partition, and install Android x86 to it. Format the partition to one of the supported formats – ext3, ext2, ntfs, and fat32. Please note if you choose fat32, a warning will appear that you cannot save data to fat32 – thus, Android x86 will function as a live CD (no data will be saved to the system as you are using it).
  5. Choose “Yes” when it asks to Install bootloader GRUB, and allow it to make the system R/W to enable root.
  6. Reboot when everything is done.

Adding Android x86 to the GRUB Menu

Install GRUB Customizer first, it will make this process much easier.

sudo add-apt-repository ppa:danielrichter2007/grub-customizer

sudo apt-get update

sudo apt-get install grub-customizer

Now launch GRUB Customizer, and add a new GRUB entry.

Click the ‘Sources’ tab, and enter these commands:

set root='(hd0,4)'

search --no-floppy --fs-uuid --set=root e1f9de05-8d18-48aa-8f08-f0377f663de3

linux androidx86/kernel root=UUID=e1f9de05-8d18-48aa-8f08-f0377f663de3 quiet androidboot.hardware=generic_x86 SRC=/androidx86 acpi_sleep=s3_bios,s3_mode

initrd androidx86/initrd.img

If you notice, we bolded a few parts in those commands. That is because you need to change them as follows.

For set root='(hd0,4)’, change the (hd0,4) to the partition where Android x86 is installed.

HD0 means SDA, so if you install Android x86 to SDB, it will be HD1, etc. The number afterwards is the partition number. So hd0,4 would be SDA4, for example – if you installed Android x86 on SDA6, then you will change it to hd0,6.

For the part –set=root e1f9de05-8d18-48aa-8f08-f0377f663de3, the random string is the UUID of the partition where Android x86 was installed. You need to change it to the correct UUID. You can obtain your correct UUID by creating a new entry in GRUB Customizer, then going into the Options tab, and choosing the ‘Linux’ option from the dropdown menu.

In the partition dropdown menu, you need to choose your partition, then go to the Source tab. It will display your UUID.

Where we bolded androidx86/, this is the root of Android x86. You need to change it to your actual Android x86 root, by going into your Android x86 partition. You should see a folder named ‘android’, and that will be the root of your Android x86 installation.

androidboot.hardware is going to be your specific device. If you’re using an older version of Android x86, such as the Android 4.03 versions, you need to change it to androidboot_hardware (with an _ underscore, not a . period). This is entirely unnecessary for latest Android x86 versions. When androidboot.hardware is not set in kernel cmdline, the init process would still get the correct value of ro.hardware. This eliminates the necessity of androidboot.hardware.

Here’s the list of hardware you can change it to:

  • generic_x86: If your hardware isn’t listed, use this
  • eeepc: EEEPC laptops
  • asus_laptop: ASUS laptops (supported ASUS laptops only)

Final Tips and Tricks

Android x86 is unable to use Android Market, so there are alternative solutions to obtaining Android apps.

First you should enable unknown sources. Go to Settings > Applications > enable Unknown Sources, and ignore the warning dialogue.

Now you can download and install APKs from outside of Google Play. There’s a ton of third-party app stores out there, just be really careful. Some of the better stores are:

How to Display Correct Battery Value

Android was developed for specific batteries in mind, thus an Android-based OS will show incorrect battery values on different hardware platforms (such as a laptop). In order to correct this, there are a few things to tweak.

In Linux, applications collect the battery status through sysfs, where the battery status is located in /sys/class/power_supply/. Different platforms, however, may give you a different directory layout under /sys/class/power_supply/, but Android hardcodes the directory layout to /sys/class/power_supply/. To resolve this issue, you can add new entries in vendor/asus/eeepc/system.prop, where the user can change the value of these entries to correctly configure the sysfs directory layout for different platforms. These entries are:

ro.sys.fs.power_supply.ac=/AC0
ro.sys.fs.power_supply.bat=/BAT0
ro.sys.fs.power_supply.ac.feature.online=/online
ro.sys.fs.power_supply.bat.feature.status=/status
ro.sys.fs.power_supply.bat.feature.present=/present
ro.sys.fs.power_supply.bat.feature.capacity.now=/charge_now
ro.sys.fs.power_supply.bat.feature.capacity.full=/charge_full
ro.sys.fs.power_supply.bat.feature.voltage.now=/voltage_now
ro.sys.fs.power_supply.bat.feature.voltage.full=/voltage_full
ro.sys.fs.power_supply.bat.feature.tech=/technology
#ro.sys.fs.power_supply.bat.features.bat.health is not supported
#ro.sys.fs.power_supply.bat.features.bat.temperature is not supported

In essence, these entries tell the Android battery service code to look for the information in the correct place.

To implement your own battery status handling code, simply re-implement the IBatteryServiceStatus class in frameworks/base/libs/utils/IBatteryServiceStatus.cpp, replacing frameworks/base/libs/utils/BatteryServiceStatus.cpp with your own implementation.

To Wake up the Machine

Unlike other OS, you cannot simply wake up the system from sleep status by moving around the mouse or hitting a random keyboard button.

You can only use ESC, Menu, left, right, up and down keys to wake up the system. To wake up the system, you have to hold the keys mentioned above for at least 1 second. You can push menu key when keyguard screen showing up to unlock screen, and you can use mouse to turn the wheel on the keyguard screen to unlock screen.

How to boot Android x86 on Unsupported Graphics

When booting the Live-CD, on the menu that offers various boot options, hit the Tab key on your keyboard. This will display the boot prompt.

Now you should see something like:

kernel initrd=/initrd.img root=/dev/ram0
androidboot_hardware=generic_x86 acpi_sleep=s3_bios,s3_mode video=-16
quiet SRC= DATA= DPI=240

You should edit this line, first by removing “quiet” to see what the kernel messages are displaying.

Then you can set different video mode parameters. You can use NoModeSet, which disables the kernel mode setting and instructs the kernel to not automatically set the graphic resolution. Alternatively you can use Xforcevesa, which enforces using the VESA driver.

Play with these parameters to see which works for you – you can also set them both together “nomodeset xforcevesa”.

The post Android x86 Installation and Troubleshooting Procedures appeared first on Appuals.com.

How to Install Kali Nethunter on Mediatek Android Devices

$
0
0

Kali Nethunter is a popular custom Android ROM, based on Kali Linux, that was originally developed for Nexus devices, but has been forked to many others. Kali Linux is a kind of “hacker’s paradise” distribution, as it comes with over 600 pre-installed apps related to digital forensics and penetrative testing.

While Kali Nethunter has a number of ports for the most popular Android devices, Kali Nethunter has a separate build for Mediatek-based Android devices.

In this guide, we are going to show you exactly how to install Kali Nethunter on your Mediatek device, as well as offer a handful of links to Kali Nethunter ROMs for specific Mediatek-based Android devices.

Requirements:

  • A rooted Mediatek device (search Appuals for Android root guides)
  • TWRP, FlashFire, or Philz CWM Touch Recovery. – CWM is not supported but must be installed.
  • Your device’s kernel version (Settings > About Device)

Note: You do not need to wipe your sytem data before proceeding. Kali Nethunter is an overlay ROM, which means it is meant to be flashed over an existing Android ROM.

At the end of this guide, you will find a large collection of Kali Nethunter downloads, according to specific devices and kernel versions.

For TWRP Users:

  1. Download the correct Kali Nethunter zip for your device and kernel version from our list of downloads below this guide.
  2. Save the .zip onto the SD card of your device.
  3. Boot into TWRP recovery, then tap Install, choose the zip file, and swipe to flash it.
  4. Reboot normally.

For Non-TWRP Users:

  1. Download the correct Kali Nethunter zip according to your device and kernel version.
  2. Download and install the FlashFire app from Google Play or alternative APK resource.
  3. Launch FlashFire, and grant it root permissions.
  4. Tap the plus sign and then choose “Flash ZIP or OTA”.
  5. Tap the drop-down arrow, and then choose “Filesystem Root”.
  6. Next tap “Mnt”, followed by “SDCard2 / SDCard”, and choose the .zip file.
  7. Now check both of the dialogue boxes and tap the checkmark.
  8. On the main menu of FlashFire, scroll down and tap the Flash button – do not mess with any other settings other than what has been instructed here.

Final Steps

  1. After Kali Nethunter has been successfully flashed onto your device, do not open any apps yet. Only open the Nethunter app at this stage, and grant it root permissions.
  2. Go to “Kali Chroot Manager” and also grant it root permissions, then tap “Install Kali Chroot”, followed by “Download Latest”, and choose Full or Minimal Chroot, according to your storage space.
  3. It will begin downloading the necessary files. When it is finished, you can tap “Install Kali Chroot”.
  4. After that is completed, reboot, and you now have Kali Nethunter installed on your Mediatek device!

Developers can find the Kali Nethunter Source Code here.

To completely uninstall Kali Nethunter from your device, flash this zip.

Troubleshooting

If the terminal app force closes, uninstall it and try an alternative, like this terminal app.

Atheros chip based adapters that are unable to get WLAN1 up or displayed in the terminal should proceed like this:

Launch the Nethunter Terminal app on choose “Kali”.

Enter the following commands:

apt-get update
apt-get install firmware-atheros

Next check “airmon-ng” after re-plugging your adapter.

Realtek chip based adapters unable to get WLAN1 up or displayed in terminal:

Launch the Nethunter Terminal app and choose “Kali”.

Enter the following commands:

apt-get update
apt-get install firmware-realtek

Then check “airmon-ng” after re-plugging your adapter.

Any other chips aside from Realtek or Atheros, try these instructions if WLAN1 similarly fails to appear:

Launch Nethunter Terminal app and choose “Kali”.

Enter the following commands:

apt-get update
apt-get install firmware-misc-nonfree

Check “airmon-ng” after re-plugging your adapter.

List of Kali Nethunter Zips by Device and Kernel

MT6572 Downloads

MT6797 Downloads

MT6735 Downloads

MT6577 Downloads

MT6580 Downloads

MT6582 Downloads

MT6589 Downloads

MT6592 Downloads

MT6752 Downloads

MT6753 Downloads

MT6755 Downloads

MT6795 Downloads

MT6782 Downloads

MT6737 Downloads

The post How to Install Kali Nethunter on Mediatek Android Devices appeared first on Appuals.com.

Fix: An error encountered starting Roblox

$
0
0

Roblox is a huge multiplayer online game creation platform where users can design their own games and also play other games created by other users through Roblox studio. This application is one of its kind and mostly features Lego-like features in itself.

An error encountered starting Roblox

Players using Roblox often experience the error message which states “An error encountered starting Roblox”. This prevents them from launching the application and playing the game. This scenario has been here since quite some time with causes ranging from problems in internet connectivity to user permissions.

What causes the error ‘An error encountered starting Roblox’?

Since this is an online game, most of the causes of the error are associated with internet connectivity. The reasons why this error occurs are but not limited to:

  • You do not have an open internet connection. Proxies and VPN’s can hamper the connection and force the game not to launch.
  • You do have sufficient administrator privileges on your Windows account. You should have an elevated status in order to play Roblox without any issues since administrative modules are used while playing.
  • There is some Antivirus software prohibiting the game from communicating with the server.
  • Roblox servers are down and not accessible. This happens all the time and Roblox is well known for poop maintenance of servers.

Before you move on, make sure that you are logged in as an administrator on your computer.

Solution 1: Disabling Proxies

Proxy servers are used by organizations to make use of a single external IP to map into several internal ones. This reduces the cost of accumulated various external IPs and this way the internet can be divided in a cost-efficient manner. However, there are several programs including Roblox who do not sit well with this mechanism and fail to launch. Hence we will disable any kind of proxy and try launching Roblox again.

  1. Press Windows + R, type “inetcpl.cpl” in the dialogue box and press Enter to launch Internet settings.
  2. Once the new window pops up, click on Connections tab present at the top and select LAN settings from the bottom.
  3. Now uncheck any type of proxy set on your computer.
Disabling proxy - Internet Settings on Windows 10
Disabling proxy – Internet Settings
  1. After saving changes, restart your browser and check if you are able to access the platform.

Also, make sure that you have an open internet connection. You can easily check this by accessing the same game from your mobile or another computer. If the problem is with your internet connection, make sure you resolve it first.

Solution 2: Disabling Antivirus Software

There were also many reports which suggested that Antivirus software such as Avast doesn’t work well with Roblox. Since the game requires uninterrupted internet access with several administrator modules for operation, the Antivirus software calls in a ‘false positive’ and blocks the access.

Disabling Malwarebytes

You can try temporarily disabling your Antivirus software and check if this fixes the issue at hand. You can check our detailed article on How to disable Antivirus and perform the steps according to the Antivirus utility installed on your computer.

Solution 3: Adding Roblox to Firewall exceptions

Roblox is also reported by being blocked by Windows Firewall despite the fact the Microsoft has officially launched the game on their store. This usually happens if a new Windows update rolls out along with the security update. We can try adding an exception to your Firewall and see if this makes any difference.

  1. Press Windows + S, type Firewall in the dialogue box and open the application.
  2. Once in the firewall settings, click on Firewall & network protection from the left side and click Allow an app through firewall.
Allow an app through firewall - Firewall settings on Windows 10
Allow an app through firewall – Firewall settings
  1. Now click on Change and then check the browser and the game in both public and private networks. This will make sure that they are whitelisted.
Adding Roblox and browsers to whitelist
  1. If you are using the Windows application for playing the game, you can select Allow another app and then navigate to the installation directory of Roblox. This will whitelist the application.

In addition to the above solutions, you can also try the following fixes:

  • Try a different browser. If you are using a single browser to play the game, try a different one and see if it launches there. If it does, it is a sign that you need to clear all cookies, cache, and temporary data from your browser.
  • You can try to reset your router. Sometimes routers get stuck in wrong configurations and resetting them might grant you a new IP and fix the issue.
  • You can try running the game in compatibility mode. You can set the compatibility for Windows 8 or 7.
  • If you are using the Windows application, it is wise to reinstall the game. You can uninstall it (Windows + R and appwiz.cpl), remove all temporary files, and after downloading the latest version, install the game again.
  • Also, consider power cycling your computer and router both. Turn them off and take out their main power supply. Let them sit for around 5 minutes before starting them again.

The post Fix: An error encountered starting Roblox appeared first on Appuals.com.

Fix: AMD-V is disabled in the BIOS (VERR_SVM_DISABLED)

$
0
0

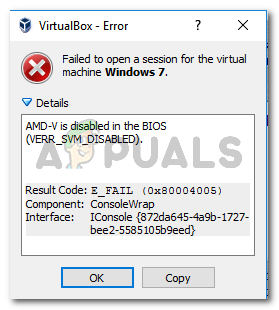
Several users report getting the AMD-V is disabled in the BIOS (or by the host OS) (VERR_SVM_DISABLED) error message when trying to start a virtual machine using  VM VirtualBox. Although this particular issue is mostly reported on Windows 7, Windows 8 and Windows 10, there are several reports of it occurring on Linux distributions.

AMD-V is disabled in the BIOS (VER_SVM_DISABLED)

Note: If you’re getting the VT-X is not available – VERR_VMX_NO_VMX error, follow this troubleshooting guide (here) instead.

What is causing the AMD-V is disabled in the BIOS error?

We investigated the issue by looking at various user reports. From what we were able to gather, there are several scenarios that will trigger the apparition of this particular issue. Here’s a list with common culprits that several other affected users have managed to identify:

  • AMD-V is disabled from BIOS settings – In essence, the VERR_SVM_DISABLE error code is telling you that your PC does support AMD-V, but the host’s BIOS settings are currently disabling it.
  • Microsoft Hyper-V is interfering with the AMD-V technology – If Hyper-V is enabled, it automatically means that the built-in virtualization technology was turned off. In this case, you’ll need to disable it on order to allow AMD-V to pe used.
  • BIOS version doesn’t support this many CPU cores – As it turns out, the issue might get thrown by VM VirtualBox if the software is forced to create a virtual machine with more than 1 CPU core. In order to do this, it requires hardware virtualizations and will throw the error if the feature is disabled or unavailable.
  • VM VirtualBox Bug – There are several reports of this error getting thrown on machines capable of supporting the hardware virtualization technology. In this case, the issue can typically be resolved by modifying some virtual-machine specific settings.

If you’re currently struggling to resolve this particular error message, this article will provide you with several troubleshooting guides. Below you have a collection of methods that other users in a similar situation have successfully used to get the issue resolved.

Keep in mind that the potential fixes below are ordered by efficiency and severity, so please follow them in order until you stumble upon a method that is effective in getting the issue resolved.

Method 1: Enabling AMD-V  from the BIOS settings

AMD-V is the renamed trademark for Secure Virtual Machine Mode (SVM). The number one reason why the  AMD-V is disabled in the BIOS (or by the host OS) (VERR_SVM_DISABLED) error occurs is because the AMD-V technology is disabled from your BIOS Settings.

Even though on most machines this option is enabled by default, a 3rd party interference or a manual modification might mean that it’s disabled on your computer.

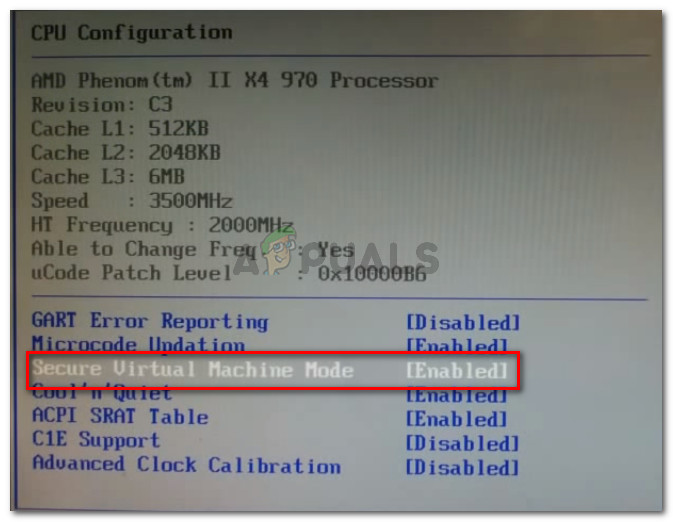
Luckily, you can re-enable AMD-V by accessing your BIOS settings and re-enabling Secure Virtual Machine mode from the CPU Configuration settings.

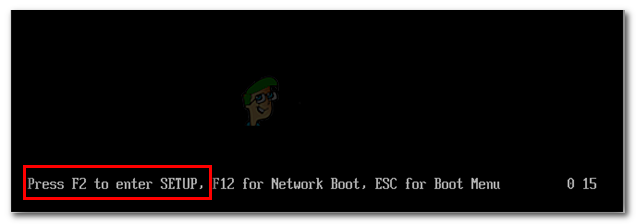
But keep in mind that the steps of entering the BIOS will be different depending on your motherboard manufacturer. To access your BIOS, you will have to press the Setup key during the initial startup procedure. Typically, the setup key is either one of the F keys (F2, F4, F8, F10, F12) or the Del key (for Del machines). If you are unable to discover the Setup key yourself, keep an eye out during the initial startup procedure for any mention of it or search for specific steps according to your motherboard manufacturer.

Press the BIOS key during startup procedure
Press the BIOS key during the startup procedure

Once you successfully enter your BIOS, look for an entry named Secure Virtual Machine Mode and make sure that it’s enabled. On the most popular BIOS version, it can be found in Advanced > CPU Configuration. Once you get there, make sure that Secure Virtual Machine Mode is Enabled, then save the configuration and exit your BIOS.

Make sure Secure Virtual Machine Mode is Enabled

Note: The exact location of this entry might vary according to your motherboard model. If Secure Virtual Machine Mode isn’t there for you, search for specific steps according to your manufacturer. On an Acer motherboard, you can re-enable AMD-V by setting AMD IOMMU to Enabled (you can find it inside the AMD I/O Virtualization Technology menu).

Keep in mind that in order for the change to be enforced, a machine restart is not enough. You’ll need to perform a cold boot. This means that you’ll need to power off your machine completely and then allow it to boot up from scratch.

Once the next startup is complete, open the virtual machine that was showing you the message inside VM VirtualBox and see if the issue is resolved. If you are still seeing the AMD-V is disabled in the BIOS (or by the host OS) (VERR_SVM_DISABLED) error, move down to the next method below.

Method 2: Disabling Windows Hyper-V

Several users encountering the AMD-V is disabled in the BIOS (or by the host OS) (VERR_SVM_DISABLED) error have managed to resolve the issue by disabling the Microsoft Hyper-V feature from the Add/Remove Windows features screen.

Microsoft Hyper-V is Microsoft’s own virtualization technology that is automatically enabled on most of the recent Windows version. This creates a problem because whenever Hyper-V is enabled, the built-in hardware technology is turned off (in this case (AMD-V). Since VM VirtualBox needs AMD-V or VT-X in order to run a virtual machine, you will get an error message instead of the actual VM.

Luckily, you can easily rectify this issue by following a set of simple instructions that will help you disable the Microsoft Hyper-V technology. Here’s what you need to do:

  1. Press Windows key + R to open up a Run dialog box. Then, type “appwiz.cpl” and press Enter to open up Programs and Features.
    Run dialog: appwiz.cpl
    Run dialog: appwiz.cpl
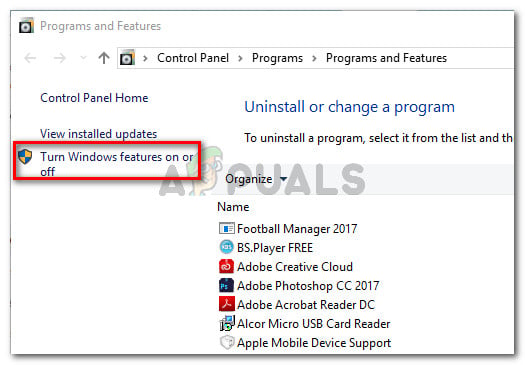
  2. Inside Programs and Features, use the right-hand menu to click on Turn Windows features On or Off.
    In Programs and Features, click on Turn Windows Features On or Off
    In Programs and Features, click on Turn Windows Features On or Off
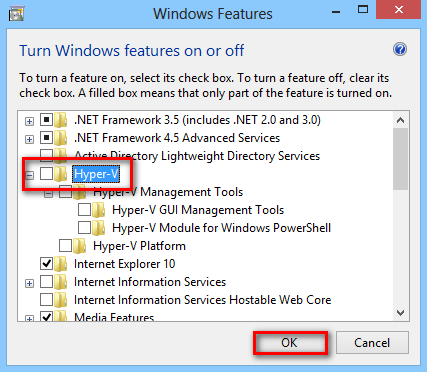
  3. In the Windows Features screen, look for a Hyper-V entry and make sure that the box associated with it is disabled. Then, click Ok to save the changes.
    Uncheck the box associated with Hyper-V
    Uncheck the box associated with Hyper-V
  4. Restart your machine and see if the error is resolved at the next startup.

If you’re still encountering the AMD-V is disabled in the BIOS (or by the host OS) (VERR_SVM_DISABLED) when powering up your virtual machine, move down to the next method below.

Method 3: Changing the number of CPU cores to 1

If you have used the methods above to ensure that your machine has all the requirements to achieve hardware virtualization and the issue is still occurring, it’s very likely that the AMD-V technology id not supported by your current configuration.

Luckily, you can still fix the error with a few very simple steps of instructions. But first, let’s go over what’s causing the problem – Even if you haven’t customized the virtual machine settings that are displaying the error, the default settings might create the issue.

What happens is, the software assigns more than 1 CPU in the System settings, which forces the system to use hardware virtualization in order to start the virtual host. However, if your machine does not support it (you have a Quad-core AMD or something similar), the procedure will not complete successfully and you’ll see the AMD-V is disabled in the BIOS (or by the host OS) (VERR_SVM_DISABLED) error message instead.

Luckily, you can rectify this issue by changing the number of assigned CPUs to 1. This will most likely resolve the issue once and for all. Here’s what you need to do:

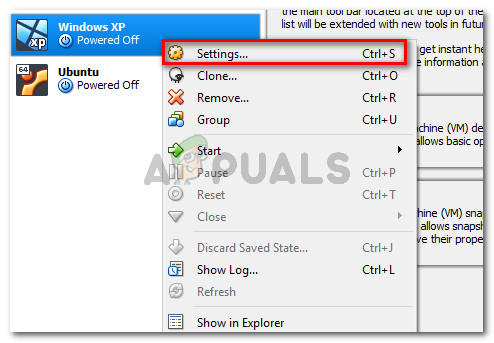
  1. Open Oracle VM VirtualBox, right-click on the machine that is displaying the error and then click on Settings.
    Right-click on the affected machine and click on Settings
    Right-click on the affected machine and click on Settings
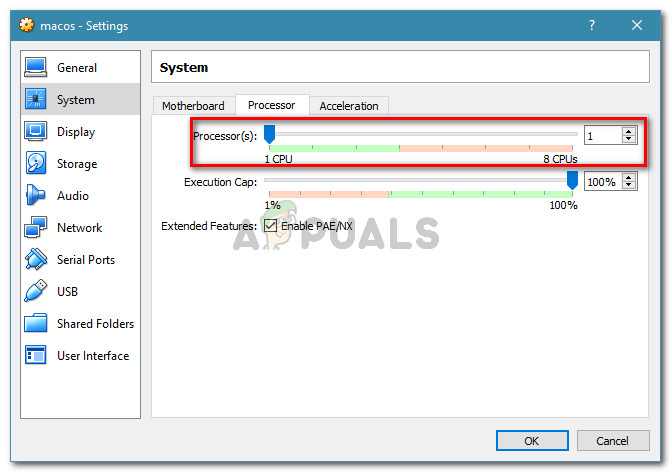
  2. In the Settings of your virtual machine, go to the System tab (using the left-hand submenu) and access the Processor tab. Next, drag the slider associated with Processor(s) to 1 CPU and click OK to save.
    Go to System > Processor and set the Processor slider to 1 CPU
    Go to System > Processor and set the Processor slider to 1 CPU
  3. Close the settings menu and restart your virtual machine. It should boot up without the AMD-V is disabled in the BIOS (or by the host OS) (VERR_SVM_DISABLED) error.

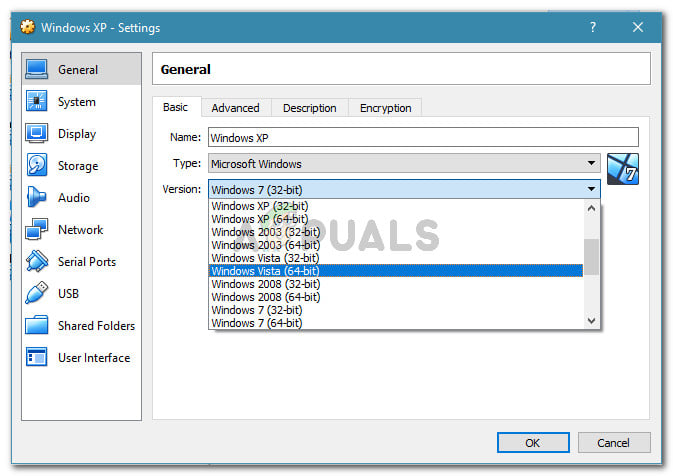
Method 4: Changing the Version to Windows 7 or Windows 2003 (if applicable)

Several Ubuntu (Linux) users that where using VM VirtualBox to run Windows XP or Windows 10 were also getting the AMD-V is disabled in the BIOS (or by the host OS) (VERR_SVM_DISABLED) error. The way they managed to resolve the issue is by changing the Guest OS settings so that the specified version is set to Windows 2003 or Windows 7.

Although there’s no explanation why this fix is successful, it seems to have helped a lot of users to regain the normal functionality of their virtual machines. Here’s a quick guide on changing the specified Version of your Virtual machine:

  1. Open VM VirtualBox, right-click on the machine that is displaying the error and choose Settings.
    Right-click on affected machine and click Settings
    Right-click on affected machine and click Settings
  2. In the Settings menu, go to the General submenu and then click on the Basic tab. Next, change the Version using the drop-down menu to either Windows 2003 or Windows 7 and hit Ok to save the changes.
    Changing the image version to Windows 7 or Windows 2003
    Changing the image version to Windows 7 or Windows 2003
  3. Start the virtual machine again and see if the boot procedure is successful without the AMD-V is disabled in the BIOS (or by the host OS) (VERR_SVM_DISABLED) error

The post Fix: AMD-V is disabled in the BIOS (VERR_SVM_DISABLED) appeared first on Appuals.com.

Fix: The registry refers to a nonexistent Java Runtime Environment

$
0
0

Some users report getting the “registry refers to a nonexistent Java Runtime Environment” error when trying to open certain application executables. Most affected users report that this issue started to occur abruptly ( they where previously able to run the same executable without issues).

The registry refers to a nonexistent Java Runtime Environment installation or the runtime is corrupted. The system cannot find the path specified
The registry refers to a nonexistent Java Runtime Environment installation or the runtime is corrupted.
The system cannot find the path specified

What is causing the “registry refers to a nonexistent Java Runtime Environment” error

We investigated the issue by trying to replicate the issue and looking at various user reports. This particular error message is an indicator that you have remnants from an old Java installation in your Registry editor.

Based on what we found, there are several common scenarios that will lead to the apparition of this issue:

  • The Registry contains entries that don’t lead to the actual Java path – This typically occurs if you move the software to a different directory (manually) after the initial installation. The issue can be rectified by manually removing the registry entries that don’t correspond manually.
  • Incomplete or corrupted Java Installation – Several users have managed to resolve this particular issue by uninstalling Java and then re-installing the JDK. User speculation suggests that a corrupted file or glitch might have caused this.

If you’re currently struggling to resolve this particular issue, this article will provide you with a collection of verified troubleshooting steps. Below you have several methods that other users in a similar situation have successfully used to resolve the issue.

For the best results, follow the methods below in order until you encounter a fix that resolves the problem in your particular scenario. Let’s begin!

Method 1: Removing inexistent registry entries for JavaHome and RuntimeLib

Several users encountering the same issue have managed to get the issue resolved by removing those JavaHome and RuntimeLib registry entries that don’t refer to an existent path.

Every JavaHome variable should refer to a path similar to \bin\client\jvm.dll while each RuntimeLib should refer to an existent jvm.dll file. But because this issue occurs, you might find one or multiple variables that do not have the corresponding path or file.

This might happen if you recently removed the software to another directory after you installed it. If you manage to find any registry variables, you’ll need them to remove them manually.

This procedure will require some manual work and a small amount of technical expertize, but it might allow you to resolve the issue without having to re-install the whole Java Runtime Environment. If you are prepared to go through with it, we have prepared a step by step guide through the whole thing. Here’s what you need to do:

  1. Press Windows key + R to open up a Run dialog box. Then, type “regedit” and press Enter to open up the Registry Editor. When prompted by the UAC (User Account Control), click Yes at the prompt.
    Run dialog: regedit
    Run dialog: regedit
  2. Inside the Registry Editor, use the left pane to navigate to the following location:
    Computer \ HKEY_LOCAL_MACHINE \ SOFTWARE \ JavaSoft \ Java Runtime  Environment
  3. Once you get there, select the first Java version located in the Java Runtime Environment folder and move over to the right pane.
  4. In the right pane, double-click on JavaHome and copy the entire Value data path to your clipboard.
    Copying the JavaHome path from registry Editor
    Copying the JavaHome path from Registry Editor
  5. Open-File Explorer and paste the location you’ve previously copied in the navigation bar. If the location leads somewhere, it means that the registry value has a corresponding path. If it doesn’t lead you anywhere, it means that the registry refers to a non-existent Java installation and it should be deleted.
    Verifying registry value for the corresponding path
    Verifying registry value for the corresponding path

    Note: If the Value data path dosen’t lead you anywhere, right-click on JavaHome and click Delete to get rid of the registry entry.

    Deleting the Registry entry with a non-corresponding installation path
    Deleting the Registry entry with a non-corresponding installation path
  6. Once JavaHome has been taken cared off, double-click on RuntimeLib and copy the Value data path in your clipboard.
    Copy the Value data of RuntimeLib to the clipboard
    Copy the Value data of RuntimeLib to the clipboard
  7. Same as before, open a File Explorer window and past the path you previously copied in the navigation bar. But this time, remove the last part “jvm.dll” before pressing Enter.
    Verifying if the Runtimelib has a corresponding path
    Verifying if the Runtimelib has a corresponding path

    Note: If you find a corresponding path, it means that the RuntimeLib registry value is functioning correctly. In the event that you get a message saying that Windows is unable to find the path, the registry value refers to a non-existent Java installation and needs to be removed. In this case, right-click on RuntimeLib and choose Delete to get rid of the value.

    Example of a non-existent registry path
    Example of a non-existent registry path
  8. Once the first Java Runtime Environment version has been dealt with, repeat steps 4 to 7 with every Java version that you have left under Java Runtime Environment.
    Repeating the same procedure with the remaining Java versions
    Repeating the same procedure with the remaining Java versions
  9. Once all registry entries have been verified and addressed, close Registry Editor and restart your machine and see if the error has been resolved at the next startup.

If this method was not successful or you’re simply looking for a more simple fix, move down to the next method below.

Method 2: Uninstalling Java and installing the Java JDK

If you’re encountering this issue when trying to launch Minecraft or a similar application that relies on the JDK, you might be able to resolve the issue by uninstalling the whole Java environment and then re-installing the JDK (Java Development Kit).

Here’s a quick guide on how to do this:

  1. Press Windows key + R to open up a Run dialog box. Then, type “appwiz.cpl” and press Enter to open up Programs and Features.
    Run dialog: appwiz.cpl
    Run dialog: appwiz.cpl
  2. Inside Programs and Features, click on the Publisher column, then scroll down to the entries published by Oracle Corporation.
  3. Next, proceed to uninstall every Java installation (or update) by right-clicking on each entry and clicking Uninstall. Then, follow the on-screen prompts to complete the uninstallation with each entry.
    Uninstalling every Java instalation
    Uninstalling every Java installation
  4. Once you uninstall the Java environment completely, restart your computer.
  5. At the next startup, visit this link (here) and click on on the Download button.
    Click on the JDK download button
    Click on the JDK download button
  6. In the next screen, scroll down to Java SE Development Kit and click the toggle associated with Accept Licence Agreement. Then, click on the executable download link associated with Windows.
    Downloading the JDK installer
    Downloading the JDK installer
  7. Open the JDK installer and follow the on-screen prompts to install the JDK environment on your PC. Restart your computer if not automatically prompted to do so when the process is complete.
  8. At the next startup, you should be able to start the application without encountering the  “registry refers to a nonexistent Java Runtime Environment” error.

The post Fix: The registry refers to a nonexistent Java Runtime Environment appeared first on Appuals.com.


Fix: PUBG Xbox One Crashing

$
0
0

PUBG has made its way to consoles, mobiles, and PC’s in a very short amount of time. This Battle Royale game has been popular since it hit the market since March 2017. It has intense graphics backed by a challenging gameplay. Since it is a new game, there are many reports about several issues such as freezing or crashing of the game. Conflicting features, the terrain and much more.

PUBG
PUBG

One noticeable issue which was identified was PUBG crashing while running on Xbox One whenever a user opened the inventory. The crash would not occur instantaneously, but after a while when the user performs some other actions.

What causes PUBG to Crash in Xbox One?

PUBG is notorious for crashing while playing so there are several reasons why you might face a crash. Some of the reasons for crashing are but not limited to:

  • Memory leaks in-game. This is the leading cause of PUBG crashing and it is often fixed by developers in their updates as we will see below.
  • There is a problem with the installation of PUBG in your console. This might occur if the game files are not updated or incomplete with some module damaged.
  • There were also some reports which suggested that a bad internet connection was also one of the causes of the crash.

You should make sure that you have a stable and active internet connection before you try anything to fix your game crashing. An ‘open’ internet connection means no proxies and firewalls. It is recommended to check the internet from another device before proceeding.

Solution 1: Installing the latest patch

PUBG officials responded on various forums such as Reddit and PUBG and officially recognized the issue at hand. After gathering data from users, they conducted a research and released a patch which seemed to fix the issue at hand. Hence if you are holding back from updating the game on your console, it is recommended that you install the latest patch right away and check if this solves the issue.

Installing system updates -Xbox One

You should make sure that you are connected with a working internet and Xbox Live is working properly. Also, make sure that you have the latest system version of Xbox One by navigating to Xbox button > System > Settings > System > Updates. It seems that there was a memory leak which was fixed. This leaked caused the cache to run out of space until the game crashed.

Solution 2: Reinstalling PUBG

If you already have the latest patch of PUBG installed on your computer, you should attempt at reinstalling it properly. There are some cases where because of some corrupt or missing files, the game exhibits strange behavior like the one under discussion. Once you uninstall the game, you can easily install it back by navigating to “Ready to install” games. If you do not find the entry there, you can navigate to the store and download a fresh copy from there.

  1. Navigate to the list of your games, locate PUBG, press the options button and when the short menu comes forth, click Uninstall.
Uninstalling PUBG - Xbox One
Uninstalling PUBG – Xbox One
  1. Now navigate to Ready to install using the left navigation bar and install PUBG again. Some files might be downloaded for the fresh installation. Restart your console after the reinstall and check if the issue is fixed.
Installing a fresh copy of PUBG - Xbox One
Installing a fresh copy of PUBG – Xbox One

The post Fix: PUBG Xbox One Crashing appeared first on Appuals.com.

Fix: YouTube 500 Internal Server Error

$
0
0

The 500 Internal Server Error is one of the more ‘generalized’ errors in HTTP which states that something is wrong on the server. However, the server cannot pinpoint the exact issue of why the error occurred. Whenever this happens in YouTube, it probably means there is more than a team working to fix the problem.

500 Internal Server Error - YouTube
500 Internal Server Error – YouTube

The 500 error implicates that there is ‘nothing’ wrong with your end and the problem probably lies with the YouTube servers. This happens very rarely and if it does, the problem usually disappears after a few minutes of downtime

How to fix YouTube 5000 Internal Server Error?

Like mentioned before, the 500 error means there is nothing wrong at your end and there are problems with the YouTube servers. However, we can still try a series of steps to determine and make sure the problem is indeed with YouTube servers and not with your browser.

Solution 1: Wait it out

If you get 500 Internet Server Error on YouTube, it is best that you wait a couple of minutes and see that if it works after refreshing the page. There is probably some issue on the server side and the engineers are working to get it fixed.

YouTube down reports

Leave the platform for around 10-25 minutes and check back again. You can also navigate to other forums such as Reddit and confirm that other users are also facing the same problem. If they are, it probably means there is no problem from your side and you have no choice but to wait it out.

Solution 2: Opening in Incognito mode and clearing Cache

There were some users who reported that YouTube was working for them in the Incognito tab of Google Chrome as opposed to launching it on a normal tab. This behavior suggests that YouTube streaming might have something to do with cookies or data stored in the cache of your computer.

You can try launching YouTube in an Incognito tab and see if the problem persists there. If it doesn’t, it probably means there is something with your browser cache and cookies. Then we can refresh them.

  1. Right-click on Chrome from your taskbar and select New incognito window. You can also launch the window from within Chrome when it is opened.
Incognito window : Chrome
Incognito window: Chrome
  1. After launching the Window, enter ‘www.youtube.com’ and see if you can access it. If you can, we can move on to clearing your browser’s cache and cookies. If you cannot, you should refer to Solution 1 again and wait it out.
  2. Open your Chrome browser and type “chrome://settings” in the dialogue box and press Enter. This will lead the browser’s settings to open.
    Settings- Chrome
    Settings- Chrome
  3. Now scroll to the bottom of the page and select Advanced. 
    Advanced settings - Chrome
    Advanced settings – Chrome
  1. Once the Advanced menu has expanded, under the section of “Privacy and Security”, click on “Clear browsing data”.
Clearing browsing data - Chrome on Windows 10
Clearing browsing data – Chrome
  1. Another menu will pop up confirming the items you want to clear along with the date. Select “All time”, check all options, and click “Clear browsing data”.
Erasing cookies and cache - Chrome in Windows 10
Erasing cookies and cache – Chrome
  1. After clearing the cookies and browsing data, restart your computer completely. Now try opening YouTube and see if the error still persists.


The post Fix: YouTube 500 Internal Server Error appeared first on Appuals.com.

How to Fix The iTunes Store is Unable to Process Purchases at This Time

$
0
0

iTunes is a software application developed by Apple and is used for downloading, playing and managing audio and video files. The users of the application also can easily access the iTunes Store. From iTunes Store you can purchase apps, music and videos and more, this Store is one of the most used software made by Apple. But sometimes when you are trying to buy a new app or you want to open already bought app you get an error message that says “The iTunes Store is Unable to Process Purchases at This Time”. In this how-to article, we will help you to fix “The iTunes Store is Unable to Process Purchases at This Time” error in simple steps.

Error Message
Error Message

Method #1. Check Your Credit on iTunes.

If you are trying to make payment but you can purchase anything because of this error message that keeps popping up, your first thing that should try is to check your credit balance.

  1. Open iTunes or App Store and sign in.
  2. Make sure that you are using your Apple ID.
  3. Beneath your Apple ID, you can see your credit balance.
    Credit Balance
    Credit Balance

Method #2. Logout and Log Back In.

Before starting with this method first make sure that you know and remember your credentials like username and password.

  1. Open iTunes.
  2. Go to Settings.
  3. Click on your Apple account.
  4. Find and click Sign out from your Apple ID.
    Sign out
    Sign out
  5. Wait a few minutes and then log in again.

Method #3. Disable Firewall.

Your computer firewall can be set to block iTunes Store and that can be the main reason behind the error message that you are getting. A network firewall is usually enabled on company devices that they are providing to their staff and they will be denied access to iTunes. In order to disable firewall follow the steps below:

  1. Open iTunes.
  2. Click on the Apple menu.
  3. Open System Preferences.
  4. Choose Security & Privacy.
  5. Click on the Firewall tab.
    Turn Off Firewall
    Turn Off Firewall
  6. If required enter the administrator’s password.
  7. If the firewall is set to block the incoming connections change it. Allowing incoming connections should fix “The iTunes Store is Unable to Process Purchases at This Time” error message.

Method #4. Install or Update the Latest iOS Version.

Updates device can be simple but yet effective way of fixing this error.

  1. Open iTunes.
  2. Open Settings.
  3. Open Help tab.
  4. Click Software Update to check if there is a new version of your iOS.
    Check For Updates
    Check For Updates
  5. If there is a new version of iOS, click the install button and wait to process to finish.

Method #5. Check Apple Server Status.

If you have tried everything from above and still have this problem with your iTunes, maybe the problem is Apple itself. You should try to be patient and wait for a little time in order Apple’s iTunes Support team to release some fix for this error.

The post How to Fix The iTunes Store is Unable to Process Purchases at This Time appeared first on Appuals.com.

Fix: Netflix Error UI-122

$
0
0

Users experience the error ‘Error UI-122’ when streaming videos on Netflix on a vast range of devices and platforms such as PS3, PS4, Roku, Nintendo WI, Smart TV, Xbox 360, Xbox One, Amazon Firestick etc. In a nutshell, you might experience this error in consoles as compared to PCs.

Netflix Error UI-122

This error primarily suggests that there is a problem with your network connectivity or your DNS settings. This issue is seen whenever Netflix fails to connect to the internet ‘properly’. ‘Properly’ signifies that you are either using a restricted network, DNS servers are unreachable, or there are problems while transferring data from your router.

What causes the Netflix Error UI-122?

Netflix has officially recognized this error message in their website and even released a documentation suggesting workarounds to solve this issue. The reasons why you might experience this issue on your console are:

  • You are using a limited internet connection. These type of networks are mostly present in offices, schools, and hospitals.
  • The DNS servers are unreachable and Netflix cannot access them. This is very common in a lot of cases and setting Google’s DNS usually fixes the issue.
  • Your Wi-Fi signal connecting your console to your router is weak.
  • Your router might be in an error state and may not be resolving your console’s requests properly.
  • The Netflix application on your console might be corrupt or have its files missing.

We will start the resolution of this error message starting with the easiest and most likely fix and move our way down to more complex solutions.

Solution 1: Checking your Internet connection

The first step which you should perform in troubleshooting the problem is checking your internet connection. For Netflix to work properly, you must have an open internet connection which doesn’t have any kind of firewall or proxy limiting it. Usually, open networks located at workplaces, hospitals, and schools have limited internet and doesn’t support streaming videos.

PS4 connection test
PS4 connection test

To make sure that your network is open and supports streaming, you should open Netflix from another console/device while connected to the same network and see if you receive the error message. If you do not, we can move on to other specific workarounds. However, if you do, you should diagnose your network since it can be safely said that there is nothing wrong with your console (because if there was, the other device/console shouldn’t be able to stream).

Solution 2: Restarting home network and checking signal strength

This error message might also occur if your home network is not working properly. There can be issues in transmitting the data between the router and your console. If there is any type of signal loss or error while connecting, you will not be able to stream any Netflix content.

We can try resetting the router, placing it on another location, or connecting the console with the internet with an Ethernet wire instead of Wi-Fi.

  1. Turn off your console and unplug it from the mains power supply. This will make sure that all temporary configurations (including internet) are erased.
  2. Now unplug your router for around 2-3 minutes from the mains power supply.
Power cycling router and console
  1. Now plug your router back in and wait until the indicator lights are on and turned green (according to your manufacturer) signifying a successful connection.
  2. Turn on your console and try accessing Netflix again. Check if the error is resolved.
Restarting router and console

Solution 3: Changing DNS settings

Domain Name Systems are used by almost every TV application including Netflix for operating and playing on your console. If DNS is not resolved or your console failed to reach it, Netflix might pop the Error UI-122 and deny you access of the content.

We can try changing the DNS settings on your computer to Google’s DNS and see if this solves the issue. Usually, DNS servers do not go down frequently but there are unique cases where this can happen. You will be making changes to these settings:

DNS Settings: Manual

Primary DNS-Server: 8.8.8.8

Secondary DNS-Server: 8.8.4.4

Changing DNS in Xbox

You can read our article on COD WW2 Error Code 103295 and check solution 2 for the steps on how to change DNS to these settings manually in Xbox and PS.

After changing the DNS settings, save all changes and restart your router before accessing Netflix again.

Solution 4: Reinstalling the application

If all the above methods don’t work, it is possible that your application is either broken or has several missing or corrupt modules. We can try to reinstall the Netflix application and see if this works. Make sure that you have your login credentials at hand because when you reinstall, you will be asked to input them again.

Uninstalling Netflix

Since this error message can occur in so many consoles, it is almost impossible to list every method according to each console on how to reinstall Netflix. Hence you can check online tutorials on how to uninstall and then after downloading, install the application again. Usually, you navigate to the application library and after pressing options on the application, you can select the Uninstall button.

Later on, you can navigate to the store and install the latest application from there.

The post Fix: Netflix Error UI-122 appeared first on Appuals.com.

How to Unlock and Root the Honor 8x

$
0
0

The Honor 8x is a mid-range ‘budget’ phone touted as having flagship specs. With a 6.5” screen at 1080×2340 resolution, a 20mp camera, 6GB of RAM, and the Kirin 710 SoC, it’s hard to deny the Honor 8x isn’t a gorgeous device.

Unfortunately, Honor is part of the Huawei brand, and Huawei stopped their official bootloader unlocking program. Thus, owners of new Huawei and Honor devices are left without a way to officially unlock their bootloader, which means root cannot be achieved. However, there are alternative methods to get your Honor 8x bootloader unlocked.

In this Appuals guide, we are going to show you the options you have for obtaining an unlock code for your Honor 8x, and how to root it using TWRP and Magisk systemless root.

Please note this may not work for the Honor 8x Max, which uses a Qualcomm chipset instead of the Kirin 710.

Requirements

Because you cannot obtain an official bootloader unlock code directly from Huawei anymore, you will need to go through a third-party, which costs money. Yes, it is a sad state of affairs. However, the services we are linking to have been verified as working by numerous XDA forum users.

FunkyHuawei is the priciest of these services, but they are the most reputable, with mostly positive feedback from XDA users.

FunkyHuawei bootload unlock code order form.

Please note that Appuals is not affiliated with these services in any way, we are linking to them for the sole purpose of this instructional guide (and of course, we would only link to services with a good reputation).

Whichever service you choose, you need to provide them with your Honor 8x’s IMEI (Settings > System > About Phone).

  1. After you receive an unlock code, you need to enable Developer Mode. Go into Settings > System > About Phone, then tap on Build Number 7 times, which will activate Developer Mode.
  2. Now go into Settings > Developer Options, and enable both OEM Unlock and USB Debugging.
  3. Next you need to install the Manager Manager app on your phone, using the APK link provided in our Requirements section. Only install Magisk Manager APK at this point, but also download the Magisk .zip onto your computer.
  4. Now connect your Honor 8x to your PC via USB, and choose “Transfer Files” mode on your phone’s screen. You will also see a warning asking if you want to trust this computer for debug mode, choose Yes.
  5. Now launch an ADB terminal (hold Shift + Right click inside your main ADB folder and choose ‘Open a Command Window Here’).
  6. In the ADB terminal, type: adb devices
  7. This should display the serial number of your Honor 8x – if no device is listed, you need to troubleshoot either your USB drivers, or your USB connection.
  8. If your device is successfully recognized in ADB, go ahead and type: adb reboot bootloader
  9. This will reboot your Honor 8x into Bootloader Mode. Once its there, type into ADB: fastboot oem unlock xxx
  10. You need to replace the xxx with the bootloader unlock code you received from one of the services we linked to. Please be warned this is going to format your Honor 8x and reset it to factory settings.
  11. Once your bootloader has been unlocked and the factory reset is complete, your Honor 8x will boot into Android system, and you can proceed through the Android set-up wizard.
  12. Now you need to download the TWRP img file and place it in your main ADB folder.
  13. Also download the Magisk .zip and transfer it to your Honor 8x’s SD card storage.
  14. Open a new ADB terminal, and type: adb reboot bootloader
  15. Once your Honor 8x is in Bootloader Mode again, you can now type into adb: fastboot flash recovery_ramdisk twrp-kirin.img
  16. This is going to flash TWRP onto your device and overwrite the stock recovery. Once the flash is successful, you can turn off your Honor 8x with the power button.
  17. Now disconnect your Honor 8x from your PC (this is important!).
  18. Hold Volume Up and Power buttons together until the blue Honor logo is displayed on your screen, then release both buttons. You should then see the TWRP logo and you will be taken to TWRP recovery menu.
  19. Please note this version of TWRP does not support screen touch, hence why OTG cable and USB mouse are requirements of this guide. So go ahead and connect your OTG cable and USB mouse, then “swipe” to allow modifications.
  20. In the TWRP main menu, choose Install, then choose the Magisk .zip you transferred to your SD card earlier.
  21. Swipe again to flash the Magisk .zip. When it is finished, you may reboot to system.

Once you are back in the Android system, you can launch the Magisk Manager app to check if your device has been successfully rooted.

The post How to Unlock and Root the Honor 8x appeared first on Appuals.com.

Viewing all 4542 articles
Browse latest View live