Quantcast
Channel: How To's | Everything Tech - Appuals.com
Viewing all 4542 articles
Browse latest View live

Ultimate Samsung S9 and S9+ Debloat Guide

$
0
0

The Samsung Galaxy S9 and S9+ are truly fantastic flagship phones – unfortunately they do come with a bit of bloatware, either from your carrier or Samsung itself. Usually we would recommend a combination of root and a /system app remover to debloat Samsung devices, however there is an alternative method for non-rooted users.

In this Appuals guide, we will show you how to safely debloat your Samsung Galaxy S9 / S9+ device through ADB commands, no root necessary. We will also list the most common bloatware apps installed on Samsung devices which you can (usually) safely disable – if disabling an app will effect your device, we will make note of it, so pay attention carefully throughout this guide.

Requirements:

  • ADB & Fastboot (See Appuals guide How to Install ADB on Windows)

When using ADB commands to debloat a Samsung device, there are two separate commands you can use. Its up to you which one to utilize:

pm uninstall -k --user 0: Will force you to perform a factory reset if you want to undo

pm disable-user --user 0: Safer way, can be undone without factory reset
  1. First you need to enable Developer Mode on your Samsung device. Go to Settings > About Phone > tap Build Number 7 times to enable Developer Mode.
  2. Now go to Settings > Developer Options > enable USB Debugging.
  3. Now connect your Samsung S9 / S9+ to your PC via USB.
  4. Launch an ADB terminal on your computer (hold Shift + Right click inside your main ADB pathway, and choose ‘Open a Command Window Here’).
  5. Now in the ADB terminal, type: adb devices
  6. This should initiate a pairing dialogue on your Samsung’s screen – confirm it. ADB should display your device’s serial number.
  7. If ADB does not recognize your Samsung device, you may need to troubleshoot your Samsung USB drivers, or your USB cable.
  8. If your device was successfully recognized, you may type into the ADB terminal: adb shell
  9. Now to get a full list of all packages installed on your Samsung S9 / S9+, including bloatware, type into the ADB terminal: pm list packages | sort

That will show you every single package installed on your Samsung device, which you can scan through and pick and choose which to disable.

However, we will also show you all of the most common apps and bloatware installed on Samsung devices as /system apps – thus, all you need to do is scan through our entire list, and you can copypaste the codes into your ADB terminal (thus, we’ve pretty much done the bulk of the work for you).

Please note we are using pm disable instead of pm uninstall, so you will not need to factory reset your device if you want one of the packages re-enabled. You can simply reverse it with pm enable.

Facebook

pm disable-user --user 0 com.facebook.services

pm disable-user --user 0 com.facebook.katana

pm disable-user --user 0 com.facebook.system

pm disable-user --user 0 com.facebook.appmanager

Bixby

pm disable-user --user 0 com.samsung.android.bixby.agent

pm disable-user --user 0 com.samsung.android.bixby.es.globalaction

pm disable-user --user 0 com.samsung.android.bixbyvision.framework

pm disable-user --user 0 com.samsung.android.bixby.wakeup

pm disable-user --user 0 com.samsung.android.bixby.plmsync

pm disable-user --user 0 com.samsung.android.app.spage

pm disable-user --user 0 com.samsung.android.bixby.voiceinput

pm disable-user --user 0 com.samsung.systemui.bixby

pm disable-user --user 0 com.samsung.android.bixby.agent.dummy

pm disable-user --user 0 com.samsung.android.visionintelligence

pm disable-user --user 0 flipboard.boxer.app

Panels

pm disable-user --user 0 com.samsung.android.app.sbrowseredge

pm disable-user --user 0 com.samsung.android.widgetapp.yahooedge.finance

pm disable-user --user 0 com.samsung.android.widgetapp.yahooedge.sport

pm disable-user --user 0 com.samsung.android.app.taskedge

pm disable-user --user 0 com.samsung.android.app.appsedge

pm disable-user --user 0 com.samsung.android.app.clipboardedge

pm disable-user --user 0 com.samsung.android.app.cocktailbarservice

Google

pm disable-user --user 0 com.google.android.googlequicksearchbox

pm disable-user --user 0 com.google.android.youtube

pm disable-user --user 0 com.google.android.gm

pm disable-user --user 0 com.google.android.apps.maps

pm disable-user --user 0 com.android.chrome

pm disable-user --user 0 com.android.hotwordenrollment.okgoogle

pm disable-user --user 0 com.google.vr.vrcore

pm disable-user --user 0 com.google.android.apps.docs

pm disable-user --user 0 com.google.android.apps.tachyon

pm disable-user --user 0 com.google.android.videos

pm disable-user --user 0 com.google.android.music

pm disable-user --user 0 com.google.android.apps.photos

pm disable-user --user 0 com.google.android.tts

pm disable-user --user 0 com.google.android.configupdater

pm disable-user --user 0 com.google.android.partnersetup

pm disable-user --user 0 com.google.android.feedback

pm disable-user --user 0 com.samsung.android.aircommandmanager

pm disable-user --user 0 com.google.android.onetimeinitializer

pm disable-user --user 0 com.google.android.backuptransport

pm disable-user --user 0 com.google.android.marvin.talkback

ANT Radio

pm disable-user --user 0 com.dsi.ant.service.socket

pm disable-user --user 0 com.dsi.ant.sample.acquirechannels

pm disable-user --user 0 com.dsi.ant.server

pm disable-user --user 0 com.dsi.ant.plugins.antplus

Fonts

pm disable-user --user 0 com.monotype.android.font.rosemary

pm disable-user --user 0 com.monotype.android.font.foundation

pm disable-user --user 0 com.monotype.android.font.chococooky

pm disable-user --user 0 com.monotype.android.font.cooljazz

Game

pm disable-user --user 0 com.samsung.android.game.gamehome

pm disable-user --user 0 com.enhance.gameservice

pm disable-user --user 0 com.samsung.android.game.gametools

Gear VR

pm disable-user --user 0 com.samsung.android.hmt.vrsvc

Hancom

pm disable-user --user 0 com.hancom.office.editor.hidden

Android

pm disable-user --user 0 com.android.nfc

pm disable-user --user 0 com.android.dreams.phototable

pm disable-user --user 0 com.android.emergency

pm disable-user --user 0 com.sec.android.emergencymode.service

pm disable-user --user 0 com.sec.android.easyonehand

pm disable-user --user 0 com.android.egg

pm disable-user --user 0 com.android.managedprovisioning

pm disable-user --user 0 com.sec.spp.push

pm disable-user --user 0 com.android.bookmarkprovider

pm disable-user --user 0 com.android.providers.partnerbookmarks

pm disable-user --user 0 com.sec.android.widgetapp.easymodecontactswidget

pm disable-user --user 0 com.android.wallpaper.livepicker

pm disable-user --user 0 com.sec.enterprise.mdm.services.simpin

pm disable-user --user 0 com.sec.enterprise.mdm.vpn

pm disable-user --user 0 com.android.apps.tag

pm disable-user --user 0 com.android.dreams.basic

pm disable-user --user 0 com.sec.android.emergencylauncher

pm disable-user --user 0 com.sec.android.provider.emergencymode

pm disable-user --user 0 com.sec.android.splitsound

pm disable-user --user 0 com.sec.android.app.camera.avatarauth

pm disable-user --user 0 com.wssnps

pm disable-user --user 0 com.android.calllogbackup

pm disable-user --user 0 com.sec.factory.iris.usercamera

pm disable-user --user 0 com.sec.factory.iris.camera

pm disable-user --user 0 com.android.backupconfirm

pm disable-user --user 0 com.sec.android.app.magnifier

pm disable-user --user 0 com.android.proxyhandler

pm disable-user --user 0 com.sec.android.app.quicktool

pm disable-user --user 0 com.android.bips

pm disable-user --user 0 com.android.wallpaperbackup

pm disable-user --user 0 com.sec.android.app.soundalive

Samsung

pm disable-user --user 0 com.sec.android.app.apex

pm disable-user --user 0 com.sec.android.app.billing

pm disable-user --user 0 com.samsung.android.scloud

pm disable-user --user 0 com.sec.android.desktopmode.uiservice

pm disable-user --user 0 com.sec.android.app.desktoplauncher

pm disable-user --user 0 com.samsung.android.mateagent

pm disable-user --user 0 com.samsung.android.samsungpass

pm disable-user --user 0 com.samsung.android.samsungpassautofill

pm disable-user --user 0 com.samsung.SMT

pm disable-user --user 0 com.samsung.android.spayfw

pm disable-user --user 0 com.sec.android.easyMover.Agent

pm disable-user --user 0 com.samsung.android.easysetup

pm disable-user --user 0 com.samsung.android.beaconmanager

pm disable-user --user 0 com.samsung.android.universalswitch

pm disable-user --user 0 com.samsung.android.visioncloudagent

pm disable-user --user 0 com.samsung.android.app.withtv

pm disable-user --user 0 com.samsung.svoice.sync

pm disable-user --user 0 com.samsung.android.svoiceime

pm disable-user --user 0 com.samsung.android.svoice

pm disable-user --user 0 com.sec.android.widgetapp.samsungapps

pm disable-user --user 0 com.samsung.android.da.daagent

pm disable-user --user 0 com.samsung.android.drivelink.stub

pm disable-user --user 0 com.wsomacp

pm disable-user --user 0 com.sec.android.cover.ledcover

pm disable-user --user 0 com.samsung.android.app.ledcoverdream

pm disable-user --user 0 com.samsung.knox.securefolder

pm disable-user --user 0 com.sec.android.service.health

pm disable-user --user 0 com.samsung.android.knox.containeragent

pm disable-user --user 0 com.samsung.android.smartmirroring

pm disable-user --user 0 com.samsung.android.app.mirrorlink

pm disable-user --user 0 com.mobeam.barcodeService

pm disable-user --user 0 android.autoinstalls.config.samsung

pm disable-user --user 0 com.samsung.android.app.omcagent

pm disable-user --user 0 com.samsung.android.keyguardwallpaperupdator

pm disable-user --user 0 com.samsung.android.app.simplesharing

pm disable-user --user 0 com.sec.enterprise.knox.cloudmdm.smdms

pm disable-user --user 0 com.samsung.android.messaging

pm disable-user --user 0 com.samsung.android.app.talkback

pm disable-user --user 0 com.samsung.klmsagent

pm disable-user --user 0 com.skms.android.agent

pm disable-user --user 0 com.samsung.android.bbc.bbcagent

pm disable-user --user 0 com.sec.enterprise.knox.attestation

pm disable-user --user 0 com.samsung.android.knox.containercore

pm disable-user --user 0 com.samsung.knox.securefolder.setuppage

pm disable-user --user 0 com.knox.vpn.proxyhandler

pm disable-user --user 0 com.sec.android.app.safetyassurance

pm disable-user --user 0 com.samsung.safetyinformation

pm disable-user --user 0 com.samsung.visionprovider

pm disable-user --user 0 service.odtcfactory.sec.com.odtcfactoryservice

pm disable-user --user 0 com.samsung.faceservice

pm disable-user --user 0 com.samsung.android.smartface

pm disable-user --user 0 com.samsung.android.bio.face.service

pm disable-user --user 0 com.samsung.android.app.assistantmenu

pm disable-user --user 0 com.samsung.android.sdk.handwriting

pm disable-user --user 0 com.samsung.android.mdm

pm disable-user --user 0 com.samsung.android.dlp.service

pm disable-user --user 0 com.samsung.android.sdk.professionalaudio.utility.jammonitor

pm disable-user --user 0 com.samsung.android.service.peoplestripe

pm disable-user --user 0 com.samsung.storyservice

pm disable-user --user 0 com.samsung.android.app.galaxyfinder

pm disable-user --user 0 com.samsung.android.server.iris

pm disable-user --user 0 com.samsung.android.app.smartcapture

pm disable-user --user 0 com.samsung.android.themestore

pm disable-user --user 0 com.samsung.InputEventApp

pm disable-user --user 0 com.samsung.android.allshare.service.fileshare

pm disable-user --user 0 com.samsung.android.allshare.service.mediashare

pm disable-user --user 0 com.samsung.android.app.soundpicker

pm disable-user --user 0 com.samsung.android.app.watchmanagerstub

pm disable-user --user 0 com.samsung.android.provider.stickerprovider

pm disable-user --user 0 com.samsung.android.stickercenter

pm disable-user --user 0 com.samsung.android.stickerplugin

pm disable-user --user 0 com.samsung.mlp

# Smart Manager #

(Includes 360 which calls 360.cn (Security Issues). Make sure you get a better Anti-Virus/Malware Software)

pm disable-user --user 0 com.samsung.android.sm.devicesecurity

pm disable-user --user 0 com.samsung.android.sm.policy

pm disable-user --user 0 com.samsung.android.lool

Print

pm disable-user --user 0 com.google.android.printservice.recommendation

pm disable-user --user 0 com.android.printspooler

Risky to Disable

Everything we showed above is totally safe to disable – however, the next list of apps may break some native apps, such as the stock camera. You can skip these, but the veteran user might know what they’re doing by disabling these apps, so we have provided them for convenience.

pm disable-user --user 0 com.tmobile.services.nameid

pm disable-user --user 0 com.samsung.tmovvm

pm disable-user --user 0 com.samsung.android.app.camera.sticker.facear.preload

pm disable-user --user 0 com.samsung.android.app.camera.sticker.stamp.preload

pm disable-user --user 0 com.samsung.android.securitylogagent

pm disable-user --user 0 com.sec.imslogger

pm disable-user --user 0 com.sem.factoryapp

pm disable-user --user 0 com.samsung.daydream.customization

pm disable-user --user 0 com.sec.android.preloadinstaller

pm disable-user --user 0 com.google.android.setupwizard

pm disable-user --user 0 com.google.android.syncadapters.contacts

pm disable-user --user 0 com.google.android.packageinstaller

pm disable-user --user 0 com.sec.android.diagmonagent

pm disable-user --user 0 com.google.android.syncadapters.calendar

pm disable-user --user 0 com.samsung.android.dqagent

pm disable-user --user 0 com.sec.android.soagent

pm disable-user --user 0 com.samsung.android.fmm

pm disable-user --user 0 com.samsung.android.svcagent

pm disable-user --user 0 com.samsung.android.sdk.professionalaudio.app.audioconnectionservice

pm disable-user --user 0 com.samsung.ucs.agent.ese

pm disable-user --user 0 com.hiya.star

pm disable-user --user 0 com.wssyncmldm

Final Tips

To see a list of all the apps you have disabled, use the ADB command:

pm list packages -d

If you want to remove a package but don’t know its name, run:

pm list packages <Name>

Example: pm list packages samsung

If you’d like to remove a package but need more information about it first, run

dumpsys package <Package Name>

Example: dumpsys package com.samsung.android.easysetup

If you by mistake disabled something, or broke something, the easy way to fix it is to enable the package again using the following command:

pm enable --user 0 <Package Name>

Example: pm enable --user 0 com.samsung.android.easysetup

Recommended Set-Up

Below is 185 apps that you can safely disable, and should increase overall battery life and performance of your Samsung device. You can simply copypaste this entire list into ADB as a “one-shot” method.

pm disable-user --user 0 android.autoinstalls.config.samsung

pm disable-user --user 0 com.android.apps.tag

pm disable-user --user 0 com.android.backupconfirm

pm disable-user --user 0 com.android.bips

pm disable-user --user 0 com.android.bookmarkprovider

pm disable-user --user 0 com.android.calllogbackup

pm disable-user --user 0 com.android.chrome

pm disable-user --user 0 com.android.dreams.basic

pm disable-user --user 0 com.android.dreams.phototable

pm disable-user --user 0 com.android.egg

pm disable-user --user 0 com.android.emergency

pm disable-user --user 0 com.android.hotwordenrollment.okgoogle

pm disable-user --user 0 com.android.hotwordenrollment.xgoogle

pm disable-user --user 0 com.android.managedprovisioning

pm disable-user --user 0 com.android.nfc

pm disable-user --user 0 com.android.printspooler

pm disable-user --user 0 com.android.providers.partnerbookmarks

pm disable-user --user 0 com.android.proxyhandler

pm disable-user --user 0 com.android.wallpaper.livepicker

pm disable-user --user 0 com.android.wallpaperbackup

pm disable-user --user 0 com.dsi.ant.plugins.antplus

pm disable-user --user 0 com.dsi.ant.sample.acquirechannels

pm disable-user --user 0 com.dsi.ant.server

pm disable-user --user 0 com.dsi.ant.service.socket

pm disable-user --user 0 com.enhance.gameservice

pm disable-user --user 0 com.facebook.appmanager

pm disable-user --user 0 com.facebook.katana

pm disable-user --user 0 com.facebook.services

pm disable-user --user 0 com.facebook.system

pm disable-user --user 0 com.google.android.backuptransport

pm disable-user --user 0 com.google.android.configupdater

pm disable-user --user 0 com.google.android.feedback

pm disable-user --user 0 com.google.android.gm

pm disable-user --user 0 com.google.android.googlequicksearchbox

pm disable-user --user 0 com.google.android.marvin.talkback

pm disable-user --user 0 com.google.android.onetimeinitializer

pm disable-user --user 0 com.google.android.partnersetup

pm disable-user --user 0 com.google.android.printservice.recommendation

pm disable-user --user 0 com.google.android.syncadapters.calendar

pm disable-user --user 0 com.google.android.syncadapters.contacts

pm disable-user --user 0 com.google.android.tts

pm disable-user --user 0 com.google.vr.vrcore

pm disable-user --user 0 com.hancom.office.editor.hidden

pm disable-user --user 0 com.hiya.star

pm disable-user --user 0 com.knox.vpn.proxyhandler

pm disable-user --user 0 com.mobeam.barcodeService

pm disable-user --user 0 com.monotype.android.font.chococooky

pm disable-user --user 0 com.monotype.android.font.cooljazz

pm disable-user --user 0 com.monotype.android.font.foundation

pm disable-user --user 0 com.monotype.android.font.rosemary

pm disable-user --user 0 com.osp.app.signin

pm disable-user --user 0 com.samsung.InputEventApp

pm disable-user --user 0 com.samsung.SMT

pm disable-user --user 0 com.samsung.aasaservice

pm disable-user --user 0 com.samsung.android.aircommandmanager

pm disable-user --user 0 com.samsung.android.allshare.service.fileshare

pm disable-user --user 0 com.samsung.android.allshare.service.mediashare

pm disable-user --user 0 com.samsung.android.app.aodservice

pm disable-user --user 0 com.samsung.android.app.appsedge

pm disable-user --user 0 com.samsung.android.app.assistantmenu

pm disable-user --user 0 com.samsung.android.app.clipboardedge

pm disable-user --user 0 com.samsung.android.app.cocktailbarservice

pm disable-user --user 0 com.samsung.android.app.galaxyfinder

pm disable-user --user 0 com.samsung.android.app.ledcoverdream

pm disable-user --user 0 com.samsung.android.app.mirrorlink

pm disable-user --user 0 com.samsung.android.app.omcagent

pm disable-user --user 0 com.samsung.android.app.sbrowseredge

pm disable-user --user 0 com.samsung.android.app.simplesharing

pm disable-user --user 0 com.samsung.android.app.smartcapture

pm disable-user --user 0 com.samsung.android.app.soundpicker

pm disable-user --user 0 com.samsung.android.app.spage

pm disable-user --user 0 com.samsung.android.app.talkback

pm disable-user --user 0 com.samsung.android.app.taskedge

pm disable-user --user 0 com.samsung.android.app.watchmanagerstub

pm disable-user --user 0 com.samsung.android.app.withtv

pm disable-user --user 0 com.samsung.android.authfw

pm disable-user --user 0 com.samsung.android.bbc.bbcagent

pm disable-user --user 0 com.samsung.android.beaconmanager

pm disable-user --user 0 com.samsung.android.bio.face.service

pm disable-user --user 0 com.samsung.android.bixby.agent

pm disable-user --user 0 com.samsung.android.bixby.agent.dummy

pm disable-user --user 0 com.samsung.android.bixby.es.globalaction

pm disable-user --user 0 com.samsung.android.bixby.plmsync

pm disable-user --user 0 com.samsung.android.bixby.voiceinput

pm disable-user --user 0 com.samsung.android.bixby.wakeup

pm disable-user --user 0 com.samsung.android.bixbyvision.framework

pm disable-user --user 0 com.samsung.android.clipboarduiservice

pm disable-user --user 0 com.samsung.android.da.daagent

pm disable-user --user 0 com.samsung.android.dlp.service

pm disable-user --user 0 com.samsung.android.dqagent

pm disable-user --user 0 com.samsung.android.drivelink.stub

pm disable-user --user 0 com.samsung.android.easysetup

pm disable-user --user 0 com.samsung.android.fast

pm disable-user --user 0 com.samsung.android.fmm

pm disable-user --user 0 com.samsung.android.game.gamehome

pm disable-user --user 0 com.samsung.android.game.gametools

pm disable-user --user 0 com.samsung.android.hmt.vrsvc

pm disable-user --user 0 com.samsung.android.keyguardwallpaperupdator

pm disable-user --user 0 com.samsung.android.knox.containeragent

pm disable-user --user 0 com.samsung.android.knox.containercore

pm disable-user --user 0 com.samsung.android.lool

pm disable-user --user 0 com.samsung.android.mateagent

pm disable-user --user 0 com.samsung.android.mdm

pm disable-user --user 0 com.samsung.android.provider.stickerprovider

pm disable-user --user 0 com.samsung.android.providers.context

pm disable-user --user 0 com.samsung.android.rubin.app

pm disable-user --user 0 com.samsung.android.samsungpass

pm disable-user --user 0 com.samsung.android.samsungpassautofill

pm disable-user --user 0 com.samsung.android.samsungpositioning

pm disable-user --user 0 com.samsung.android.scloud

pm disable-user --user 0 com.samsung.android.sdk.handwriting

pm disable-user --user 0 com.samsung.android.sdk.professionalaudio.app.audioconnectionservice

pm disable-user --user 0 com.samsung.android.sdk.professionalaudio.utility.jammonitor

pm disable-user --user 0 com.samsung.android.securitylogagent

pm disable-user --user 0 com.samsung.android.server.iris

pm disable-user --user 0 com.samsung.android.service.peoplestripe

pm disable-user --user 0 com.samsung.android.sm.policy

pm disable-user --user 0 com.samsung.android.sm.devicesecurity

pm disable-user --user 0 com.samsung.android.smartcallprovider

pm disable-user --user 0 com.samsung.android.smartface

pm disable-user --user 0 com.samsung.android.smartmirroring

pm disable-user --user 0 com.samsung.android.spayfw

pm disable-user --user 0 com.samsung.android.stickercenter

pm disable-user --user 0 com.samsung.android.stickerplugin

pm disable-user --user 0 com.samsung.android.svcagent

pm disable-user --user 0 com.samsung.android.svoice

pm disable-user --user 0 com.samsung.android.svoiceime

pm disable-user --user 0 com.samsung.android.themestore

pm disable-user --user 0 com.samsung.android.universalswitch

pm disable-user --user 0 com.samsung.android.visionintelligence

pm disable-user --user 0 com.samsung.android.widgetapp.yahooedge.finance

pm disable-user --user 0 com.samsung.android.widgetapp.yahooedge.sport

pm disable-user --user 0 com.samsung.clipboardsaveservice

pm disable-user --user 0 com.samsung.daydream.customization

pm disable-user --user 0 com.samsung.dcmservice

pm disable-user --user 0 com.samsung.enhanceservice

pm disable-user --user 0 com.samsung.faceservice

pm disable-user --user 0 com.samsung.klmsagent

pm disable-user --user 0 com.samsung.knox.securefolder

pm disable-user --user 0 com.samsung.knox.securefolder.setuppage

pm disable-user --user 0 com.samsung.mlp

pm disable-user --user 0 com.samsung.safetyinformation

pm disable-user --user 0 com.samsung.sec.android.application.csc

pm disable-user --user 0 com.samsung.storyservice

pm disable-user --user 0 com.samsung.svoice.sync

pm disable-user --user 0 com.samsung.systemui.bixby

pm disable-user --user 0 com.samsung.upsmtheme

pm disable-user --user 0 com.samsung.visionprovider

pm disable-user --user 0 com.sec.android.app.apex

pm disable-user --user 0 com.sec.android.app.billing

pm disable-user --user 0 com.sec.android.app.camera.avatarauth

pm disable-user --user 0 com.sec.android.app.desktoplauncher

pm disable-user --user 0 com.sec.android.app.magnifier

pm disable-user --user 0 com.sec.android.app.quicktool

pm disable-user --user 0 com.sec.android.app.safetyassurance

pm disable-user --user 0 com.sec.android.app.soundalive

pm disable-user --user 0 com.sec.android.cover.ledcover

pm disable-user --user 0 com.sec.android.desktopmode.uiservice

pm disable-user --user 0 com.sec.android.diagmonagent

pm disable-user --user 0 com.sec.android.easyMover.Agent

pm disable-user --user 0 com.sec.android.easyonehand

pm disable-user --user 0 com.sec.android.emergencylauncher

pm disable-user --user 0 com.sec.android.emergencymode.service

pm disable-user --user 0 com.sec.android.mimage.gear360editor

pm disable-user --user 0 com.sec.android.provider.emergencymode

pm disable-user --user 0 com.sec.android.service.health

pm disable-user --user 0 com.sec.android.splitsound

pm disable-user --user 0 com.sec.android.widgetapp.easymodecontactswidget

pm disable-user --user 0 com.sec.android.widgetapp.samsungapps

pm disable-user --user 0 com.sec.enterprise.knox.attestation

pm disable-user --user 0 com.sec.enterprise.knox.cloudmdm.smdms

pm disable-user --user 0 com.sec.enterprise.mdm.services.simpin

pm disable-user --user 0 com.sec.enterprise.mdm.vpn

pm disable-user --user 0 com.sec.epdgtestapp

pm disable-user --user 0 com.sec.factory.iris.camera

pm disable-user --user 0 com.sec.factory.iris.usercamera

pm disable-user --user 0 com.sec.location.nsflp2

pm disable-user --user 0 com.sec.spp.push

pm disable-user --user 0 com.sem.factoryapp

pm disable-user --user 0 com.skms.android.agent

pm disable-user --user 0 com.trustonic.tuiservice

pm disable-user --user 0 com.verizon.loginengine.unbranded

pm disable-user --user 0 com.wsomacp

pm disable-user --user 0 com.wssnps

pm disable-user --user 0 flipboard.boxer.app

pm disable-user --user 0 service.odtcfactory.sec.com.odtcfactoryservice

The post Ultimate Samsung S9 and S9+ Debloat Guide appeared first on Appuals.com.

How to Extract and Flash Huawei Stock Firmware

$
0
0

For advanced Android users that own Huawei devices, there may be scenarios where you only want to flash specific files from an OTA update. For example, if your device accidentally becomes bricked, and you know for a fact that flashing specific files from an update package (instead of an entire ROM) would help you recover your device.

In this Appuals guide, we are going to show you exactly how to extract and flash specific files from Huawei firmware update packages. We offer 3 methods – Huawei Update Extractor for Windows, SplitUpdate script for Linux / Mac, and an alternative script also for Linux with a couple additional features.

Requirements

First you should determine your current Huawei firmware version. Check in Settings > System > About Phone, then copy down your Build Number.

You should see for example something like: BLA-L29 8.0.0.132(C636)

This translates into: BLA-L29C636B132. Because you will replace “8.0.0.” with C636, and add a B in front of 132.

A brief note on Nougat versus Oreo

The partitions were changed a bit in Oreo. The boot partition was split into ‘ramdisk’ and ‘kernel’. Recovery partition was split into recovery_ramdisk, recovery_vendor, and recovery_vbmeta – which also shares the kernel partition with ramdisk.

So with that information, you probably want to flash ramdisk and recovery_ramdisk – ramdisk is where Magisk/SuperSU would be flashed, and recovery_ramdisk is where TWRP would be flashed.

So let’s say for example you have the firmware BLA-L29C636B132.

You would go to Pro-Teammt firmware database then enter your full firmware into the finder, and search for your model.

Then you locate the row that indicates “FullOTA-MF” and click the “Update” button on that row.

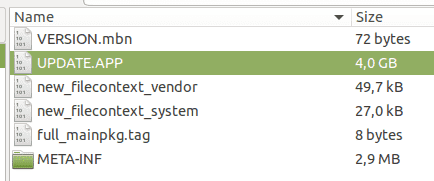
Extracting the update.app from Huawei OTA.

It will then download the full OTA update.zip. You need to open this in an archive manager, and extract the “Update.app” file on your computer.

Huawei Update Extractor method (Windows Only)

Download the Huawei Update Extractor, and extract it on your computer. Launch the HuaweiUpdateExtractor.exe program inside the main folder.

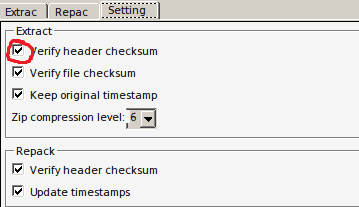
Uncheck the circled box.

Head over to the Settings tab, and uncheck the option for ‘Verify header checksum’.

Now go back to the Extract tab, and click the … button to choose your update.app file that you extracted earlier.

The screen will populate with all the files inside the update.app file. Now you can right-click on any of these files and choose ‘Extract Selected’, which will give you another dialogue to choose where to send the extracted file.

You can then use fastboot to flash the extracted files, for example, to the ramdisk.

For example, you place the files you want to flash in your main ADB pathway, and launch an ADB terminal.

Then you place your device in fastboot mode using ‘adb reboot bootloader’

After this you can flash the file using fastboot. So if you wanted to flash something to the ramdisk, you would use the ADB command: fastboot flash ramdisk xxxxx.img

However, on Nougat you will extract ‘BOOT’ from the update.app file, and flash it using: fastboot flash boot boot.img

Perl Script Method (Linux and Mac)

First you download the splitupdate.zip and extract it.

Now enter the extracted ‘split’ folder, and launch a terminal. Enter the following commands in your terminal:

chmod +x splitupdate
chmod +x crc

Now following the instructions in the Windows section of this guide for obtaining a full OTA update .zip, extract the update.app into the ‘Split’ folder, and open another terminal. Enter these commands:

./splitupdate UPDATE.APP file_to_extract

If you write ‘file_to_extract’ or anything that is or is not in the UPDATE.APP it will list all images in it.

./splitupdate UPDATE.APP’ will extract all files in update.app – it will output files to the newly created ‘output’ folder. The filtering is not perfect.

If you use ‘./splitupdate UPDATE.APP RAMDISK’, it will extract all images with RAMDISK in its name, so you will get RAMDISK.img and RECOVERY_RAMDISK.img.

Alternative Script Method

You will chmod the following files inside the alternative script folder, using the terminal:

chmod +x simg2img
chmod +x mount.sh

If you will use mount.sh, you need to edit the script and replace YOUR_SUDO_PASSWORD_HERE with your actual password. Alternatively you can remove ‘echo YOUR_SUDO_PASSWORD_HERE | ‘ and then manually enter your password while using the script.

You then extract system.img or any other file you like, and use ‘’./mount.sh SYSTEM’.

This will convert SYSTEM.img to SYSTEM.raw and mount it to ‘split_folder/SYSTEM/’ as a loop device, it will also chmod 777 everything in SYSTEM/.

The post How to Extract and Flash Huawei Stock Firmware appeared first on Appuals.com.

Fix: YouTube Full screen not working

$
0
0

There are several cases where users experience the scenario where their YouTube doesn’t go full screen when clicked. This is an ongoing issue which has been there for quite some time in the platform. Since YouTube uses several plugins such as Flash, they can interface or break on a potential update of a browser.

YouTube full screen issue

This issue doesn’t only relate to the update of the browser but can also be caused by several other factors such as bad cache/cookies, hardware acceleration etc. Before you read on, attempt at restarting your computer and check the issue again. If it still occurs, you can move on with the solutions. A restart helps reset the temporary configurations and if they are broken, a simple reset will fix it.

What causes YouTube not to go full screen?

Like mentioned before, this scenario is caused by several different reasons ranging from problems in the browser to internal system settings such as hardware acceleration. Some of the reasons why this error occurs are but not limited to:

  • There are two flash players installed in your browser. This is the most common cause why the window doesn’t go full screen because the two of them conflict with each other.
  • If you are using dual monitors and YouTube doesn’t open in full-screen, it is probably because of themes installed on Chrome.
  • There is a discrepancy in your stored browser cache and data. We can reset your cookies and cache and see if this solves the issue.

Before proceeding with the solutions, make sure that you have an active internet connection and are logged in as an administrator.

Solution 1: Checking Flash Player and content settings (Chrome)

People using Chrome might not know this but they might have two instead of one flash players installed in their browser (older version). This happens rather automatically if you install different versions and gets incorporated inside Chrome. We will navigate to the settings after disabling one of the flash players, check if this solves the issue. In the newer version, if you don’t have correct content settings, you might experience this error.

  1. Navigate to “chrome://settings/content” on your Google’s URL bar and select Protected Content.
chrome://settings/content
  1. Make sure that both the options are checked.
  2. If you own an older version of Google Chrome, type “chrome://plugins” in the dialogue box and press Enter. Here if you have two flash players, they will be displayed along with the details. Locate the entry of the player including “pepflashplayer.dll” and click on Disable.
  3. Restart your Chrome and check if the issue is solved.

Note: You can also try disabling hardware acceleration and see if this solves anything.

Solution 2: Checking Full Screen API (Firefox)

Firefox users reported that they fixed their YouTube not going full screen by enabling the ‘full-screen-api.enabled’ option in the browser’s settings. This can be disabled without you even knowing it by automatic scripts or preferences set by you earlier on. We will check these settings and change the option if it is disabled.

  1. Type “about:config” in the browser’s address box and press Enter.
  2. Search for the entry “full-screen” from the search bar present at the top and make sure that full-screen-api.enabled is checked as true (the default value).
full-screen-api.enabled
  1. Save after making changes and restart your browser. See if this solves the problem.

Note: There is also a workaround where before clicking on the full-screen button on Chrome, make sure that your Chrome window is minimized. When it is minimized and then you click the full-screen button, it works without any issues.

Solution 3: Checking in Incognito mode and clearing browser data

Now we will diagnose if the problem is present at your browser’s data end. You can easily check if YouTube is properly displaying the web page in an Incognito mode. If it is, it means that there is some problem with your browser’s data and not the browser. We will clear it and then try again. Make sure that you export or backup your information before erasing it.

  1. Press Ctrl + N when in the Chrome browser to launch an incognito tab. Now navigate to YouTube and try launching the full screen in any of them. If it displays the screen correctly, continue with the rest of the solution.
  2. Navigate to the normal tab and type “chrome://settings” in the dialogue box and press Enter.
    chrome://settings
    chrome://settings
  3. Now scroll to the bottom of the page and select Advanced settings.
Advanced Google Chrome settings
  1. Once the Advanced menu has expanded, under the section of “Privacy and Security”, click on “Clear browsing data”.
Clearing browsing data - Chrome
Clearing browsing data – Chrome
  1. Another menu will pop up confirming the items you want to clear along with the date. Select “All time”, check all options, and click “Clear browsing data”.
Removing cache, cookies, and browsing data
  1. Now restart your computer and try launching a YouTube video again in full-screen mode.

Solution 4: Logging out of Google profile

If all three solutions don’t work, we can try another workaround in which we log out of your user profile. This workaround signifies that either there is something wrong with the profile mechanism in your browser or your private profile has wrong preferences set. Do note that all your favorites, browser data, etc. will be removed when logging out.

  1. Click on the profile picture on the top-right side of your browser once and then select the button Synching to —.
Launching Google profile settings - Chrome
Launching Google profile settings – Chrome
  1. Now click on Turn off in front of your user profile. After turning off, click on Manage other people.
Turning off sync of Google profile - Chrome
Turning off sync of Google profile – Chrome
  1. Click on the three dots on the top-right side and click Remove this person.
Removing profile from Chrome
  1. Restart your computer and try accessing YouTube in full-screen mode again.

Solution 5: Reinstalling Chrome

If all the above methods don’t work out, you can try reinstalling Chrome. This will remove all the current files and folders of the application and force to install new files when you install the whole package. Remember to backup all your bookmarks and important data before following this solution.

  1. You can download the latest installation file of Google Chrome by navigating to the official website.
  2. Press Windows + R, type “appwiz.cpl” in the dialogue box and press Enter.
  3. Search for Google Chrome through all the applications, right-click it and select “Uninstall”.
Uninstalling Google Chrome
  1. Now navigate to Chrome’s official download site and download the latest version available. Launch the executable and install it again.
Downloading latest Google Chrome

The post Fix: YouTube Full screen not working appeared first on Appuals.com.

How to Fix TWRP Unable to Mount Storage, Internal Storage 0MB

$
0
0

Some TWRP users, especially those who install custom ROMs, sometimes run into an issue where TWRP will an error that reads “Unable to mount storage”. The internal storage will also show up as 0mb in TWRP, even if you have a ton of free space.

What’s happening in a majority of these cases is that TWRP is unable to decrypt your internal storage – basically, TWRP does not properly handle encrypted storage. Another cause could be corruption of the /data partition, and TWRP being unable to find it.

If you are experiencing TWRP unable to mount storage, and internal storage showing as 0mb, read through this guide for how to fix it.

How to Fix TWRP Unable to Mount Storage

  1. The first thing to try is if somehow your internal storage became encrypted when using a legacy screen lock method.
  2. Go to your Android device’s Settings > Security > Screen Lock, and change your screen lock method to either Pass or Pin. Create a new one.
  3. Reboot into TWRP, and it should ask for a password – enter the pass or pin you just created.
  4. TWRP will attempt to decrypt your device’s internal storage, and if it succeeds, you should not have further issues. However, if this does not solve your issue of “unable to mount data, internal storage 0mb”, continue with the rest of this guide.
  5. Reboot your device into TWRP again.
  6. Navigate to Wipe > Advance Wipe > Data, and choose Repair or Change File System.
  7. Press Repair File System to see if this fixes the issue. If not, continue.
  8. Press Change File System, choose Ext2, and swipe to confirm.
  9. Now switch back to Ext4 and swipe to confirm.
  10. Go back to TWRP main menu, then the Mount menu, and check if your partitions can be mounted now.
  11. If you are still unable to mount your partitions, you need to repair Internal partition, which will most likely wipe your internal storage.

The post How to Fix TWRP Unable to Mount Storage, Internal Storage 0MB appeared first on Appuals.com.

Fix: Virtual machine has terminated unexpectedly during startup with exit code 1 (0x1)

$
0
0

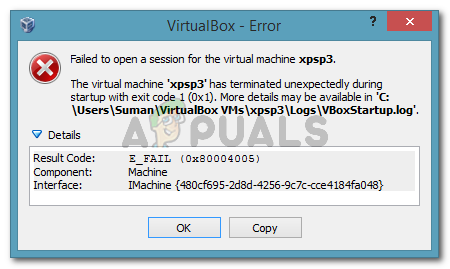
Several VirtualBox users are encountering the “Virtual machine has terminated unexpectedly during startup with exit code 1 (0x1)” error whenever they try to open a virtual machine. Affected users report that this error occurs with multiple virtual machines (including any new ones that they try to create). This particular issue is confirmed to occur on Windows 7, Windows 8.1 and Windows 10.

Failed to open a session for the virtual machine. The virtual machine has terminated unexpectedly during startup with exit code (0x1).
Failed to open a session for the virtual machine.
The virtual machine has terminated unexpectedly during startup with exit code (0x1).

What is causing the “Virtual machine has terminated unexpectedly during startup with exit code 1 (0x1)” error

We tried to get to the bottom of this issue by investigating various user reports. Based on what we gathered and based on several solutions that affected users advertised, we have managed to identify several potential culprits that might trigger this particular error message:

  • The VirtualBox kernel driver is not installed (or is corrupted) – A couple of users have managed to get the issue resolved by reinstalling VirtualBox along with the VirtualBox kernel driver.
  • 3rd-party antivirus is interfering with VirtualBox – In a couple of reports, affected users were able to get the issue resolved by temporarily disabling the real-time protection of their 3rd party AV.
  • A bad Windows Update is causing the error – There’s one particular update that is confirmed to be causing this particular error. So far, this issue is only confirmed to occur on Windows 7.

If you’re currently struggling to resolve this particular issue, one of the methods below will enable you to resolve the issue. Below you have several fixes that other users in a similar situation have used to get the issue resolved.

Since the methods below are ordered by efficiency and severity, follow them in the order that they are presented until you find a fix that successfully resolves the issue in your particular scenario.

Method 1: Restarting your system

If you haven’t already done this, start simply by rebooting your machine. Several users have reported that after they rebooted their computer, VirtualBox was able to open virtual machines without being interrupted by the “Virtual machine has terminated unexpectedly during startup with exit code 1 (0x1)” error.

If a restart is not effective or you’re looking for a more permanent fix, move down to the next method below.

Method 2: Disable the antivirus while running the virtual machine

Another frequent culprit that will trigger the “Virtual machine has terminated unexpectedly during startup with exit code 1 (0x1)” error is an external antivirus suite ( a security option different than Windows Defender).

Several users that were using a 3rd party security suite have reported that the error doesn’t occur if the real-time protection of the AV is disabled. The steps of disabling the real-time protection are specific to each 3rd party antivirus, but you can typically disable it by right-clicking the taskbar icon and using the context menu.

Disabling the real-time protection on Avast Antivirus

An alternative would be to uninstall the security suite completely by removing the 3rd party security suite from your system. You can do this by following this guide (here).

Once the antivirus has been taken care of, open VirtualBox and launch the virtual machine again. If the AV was interfering with VirtualBox, you’ll no longer get the “Virtual machine has terminated unexpectedly during startup with exit code 1 (0x1)” error.

If you’re still seeing the error despite disabling your 3rd party security suite, move down to the next method below.

Method 3: Installing the VirtualBox kernel driver

Several users have managed to resolve the issue by reinstalling VirtualBox along with the VBoxDrv.inf (the VirtualBox Kernel driver). This approach seems to have helped a lot of uses to resolve the issue for good.

Some users have reported that just installing the VBoxDRV.inf driver was enough, but you’re better off re-initiating all of VirtualBox’s components. Here’s a quick guide through the whole thing:

  1. Pres Windows key + R to open up a Run Dialog Box. Then, type “appwiz.cpl” and press Enter to open up Programs and Features.
    Run dialog: appwiz.cpl
    Run dialog: appwiz.cpl
  2. Inside Programs and Features, scroll through the list of applications to locate Oracle VM VirtualBox. Once you see the entry, right-click on it and choose Uninstall. Then, follow the on-screen prompts to remove the software from your system.
    Uninstalling Oracle VM VirtualBox
    Uninstalling Oracle VM VirtualBox
  3. Once the software has been uninstalled, restart your machine. At the next startup, make sure that no 3rd party antivirus is running.
  4. Open File Explorer and navigate to the following location:
    C:\ Program Files \ Oracle \ VirtualBox \ drivers \ vboxdrv \ VBoxDrv.inf
  5. Once you get there, right-click on VBoxDRv.inf and choose Install, then click Yes at the UAC (User Account Control) prompt.
    Installing the VBoxDRV.inf (VirtualBox kernel driver) file
    Installing the VBoxDRV.inf (VirtualBox kernel driver) file
  6. Once you see “The operation completed successfully” prompt, click Ok and run the virtual machine again. It should open without the “Virtual machine has terminated unexpectedly during startup with exit code 1 (0x1)” error.
    Operation is completed succesfully
    The operation is completed successfully

Method 4: Installing Microsoft’s bug fix update (Windows 7 only)

As per various user reports, there is one Windows update that is confirmed to be causing the “Virtual machine has terminated unexpectedly during startup with exit code 1 (0x1)” error. As it turns out, the KB3004394 update will miss installing a .cat file which prevents VirtualBox from verifying the authenticity of several DDL files.

Note: If you are not on Windows 7, jump straight to Method 5.

Luckily, the fix for it is extremely simple since Microsoft has already released a hotfix for it. Follow the steps below to resolve the error (if it was caused by a bad update) on Windows 7:

  1. Visit this Microsoft official link (here) and download the hotfix for Windows 7 by clicking on Download the package now.
    Downloading Microsoft's hotfix
    Choosing the appropriate download package
  2. In the next screen, click the Download button to commence the download.
    Downloading the hotfix
    Downloading the hotfix
  3. Once the download is complete, open the update executable and follow the on-screen prompts to install it on your system. It will act as a removal tool, deleting the bad update altogether.
  4. Reboot your computer and open the virtual machine again at the next startup and see if you’re still encountering the “Virtual machine has terminated unexpectedly during startup with exit code 1 (0x1)” error. If you are, move over to the final method below.

Method 5: Starting the machine in the Headless mode (Temporary fix) 

If you’ve come this far without a result, there’s one fix that a lot of affected users have used to circumvent the “Virtual machine has terminated unexpectedly during startup with exit code 1 (0x1)” error. But it has one major downside – it’s only a temporary fix.

Several users have reported that the error doesn’t occur if they start the machine in Headless mode and then clicking on Show. Here’s a quick guide on how to do this:

  1. Open VM VirtualBox and click once to select the machine that is showing you the error message. Then, with the machine selected, click the arrow near the Start icon and choose Headless start.
    Click the drop-down menu associated with Start, then click on Headless Start
    Click the drop-down menu associated with Start, then click on Headless Start
  2. Wait 10-15 seconds, then click on Show to bring up the screen.
    Click on Show to bring up the virtual machine window
    Click on Show to bring up the virtual machine window

    That’s all there is to it. But keep in mind that you will have to repeat the procedure above every time you start up the virtual machine.

The post Fix: Virtual machine has terminated unexpectedly during startup with exit code 1 (0x1) appeared first on Appuals.com.

Fix: Account Doesn’t Allow Editing on a Mac

$
0
0

Office 365 offers users the services of popular Microsoft products such as Word, Excel,Outlook etc, which are all among the most commonly used tools for document formatting, organization and customization. With an ever growing customer pool, the Microsoft team consistently updates and scans these applications for bugs.

Office 365, in particular, is one of the newer subscription softwares released by Microsoft; and hence, is updated consistently.

Displays: Your account doesn't allow editing on a Mac error
Microsoft Office 365 Editing Error on Mac

Mac users have complained that despite purchasing a licensed Office 365 product with up to date Mac software, previously, well functioning, documentation tools like Word have started to crash randomly and display error messages which say: ‘Your account doesn’t allow editing on a mac. To learn more, contact your Admin about your office plan.’

What is the cause “Editing Not Allowed” on Office Applications on Mac

The problem lies with:

  • The software’s ability to detect correct licenses, which stops users from editing their documents.
  • The Microsoft team has also identified the role of certain files in causing the same error. This article provides methods for the deletion of these files and fixing the error.

Method 1: Make sure you have the correct license.

Follow the steps to check if the license provided to you is correct and then proceed to deletion of error-causing files by locating them in Finder and moving them to Trash.

  1. Log in to Office 365 portal, using this link: http://portal.office.com
    sign in to your Microsoft account
    portal.office.com
  2. Then click on Settings icon and then click on Office 365.
    click Office 365 under My app setting
    My app setting/ Office 365
  3. Then click on Subscriptions.
    Settings/Subscription/windows 8
    Settings/Subscription/windows 8
  4. Next, under Licenses section, check if you have the ‘latest desktop version’ of Office 365.

Check for 'latest desktop version' under licenses

Subscription/licenses/latest desktop versionIf you don’t have the right license, contact your admin for the correct license. Otherwise, proceed as follows:

  1. Connect to the Internet.
    Connect to wifi
    Wifi Status
  2. Now, sign out of your account and close all office applications.
    Sign out of Office 365
    Office 365/Sign out
  3. Open your Library folder and then open Group Containers and move these files to Trash if they are present.
    UBF8T346G9.ms
    
    UBF8T346G9.Office
    
    UBF8T346G9.OfficeOsfWebHost
    Move Office keychains to trash
    Group Container/Office keychains/Move to Trash
  4. Sign in again and reopen your office applications, they should work without crashing now.

Method 2: If the problem persists, uninstall and re-install Office 365

The continued presence of the error indicates corruption of the software itself; and the best way to tackle software corruption is re-installation.

  1. Open Finder and click on Applications.
    Click Applications in Finder
    Finder/Applications/Mac
  2. Press the Command COMMAND key click to select all of the Office applications like Word, Outlook for Mac applications.
    Select all Office applications
    Office Applications/Move to Trash
  3. Press ctrl and click the selected applications. Then click Move to Trash from the options window.

Method 3: Activate Office

Office 365 local applications such as Word are ,at times, unable to detect that they are activated. The microsoft teams suggests a number of root causes for this and suggest checking your subscription at this link and providing them with a screenshot of your licenses.

However, to solve the issue simply:

  1. Click Activate Office and sign-in to your Microsoft account.
    Sign into your office 365 account
    Activate/Sign in
  2. Wait for activation
  3. Begin using your applications.
you're all set message
Activation complete

The post Fix: Account Doesn’t Allow Editing on a Mac appeared first on Appuals.com.

Fix: iPhone Stuck at Apple Logo

$
0
0

It can be a terrifying situation when you are trying to reboot your iPhone when you get stuck and can’t get past the Apple logo. The main thing about this problem is that you cannot instantly diagnose what can cause this problem. Before your iPhone start to run and it is fully operational, there are few processes that your iPhone must run like checking memory, set up a number of internal components and even has to open some apps in order to check if they are running correctly. This problem can occur with every iPhone model from iPhone 4 to the newest models like iPhone XR, XS, and XS Max. In this how-to article, we will help you and show you how to deal efficiently with this problem.

Method #1. Charge Your iPhone.
The first thing you should try when you are facing this problem is to get your charger and plug into your device. The reason behind this problem can be the empty or not enough battery in order to get past the Apple logo.

Charge Your iPhone
Charge Your iPhone

Method #2. Force Restart Your iPhone.
Force restart your iPhone maybe won’t get past the Apple logo but if something is stuck the simplest and yet good solution can be restarting your iPhone. Restarting your device also can be helpful in other minor problems.
How to force restart iPhone 6 and earlier models.

iPhone 6 Force Restart
  1. Press and hold the Power button and in the same time Home button. Hold for about 10 seconds until you start seeing Apple logo on the screen once more, and then release the buttons.

How to force restart iPhone 7 and 7 Plus.

iPhone 7 Force Restart
  1. Press and hold the Power button and Volume button in the same time. Hold for about 10 seconds until you start seeing Apple logo on the screen once more, and then release the buttons.

How to force restart iPhone 8, 8 Plus, X, XS, XS Max, XR.

iPhone X Force Restart
  1. Press Volume Up button and release quickly.
  2. Immediately after releasing the Volume Up button, press and hold Volume Down button and in the same time the Power button. Hold for about 10 seconds until you start seeing Apple logo on the screen once more, and then release the buttons.

Method #3. Restore Your iPhone with iTunes using Recovery Mode.
The iTunes software can be magical and can fix your problem.

  1. Open iTunes.
  2. Make sure that you have the latest version of the software. Open the Help tab and click on Check for updates, if there is newer version click Install.
  3. Connect your iPhone to your Pc or Mac. Use the USB cable for charging your iPhone.
  4. Force restart your iPhone. We explained how to do it for each model in Method #2, but you should release the buttons when you see Connect to iTunes screen. This means that your iPhone is detected by the software in recovery mode.
  5. Click Restore. After iTunes recognizes your iPhone in recovery mode you will get two options in a pop-up window. Choose Restore and confirm. You should wait for the process to be finished.
    iTunes Message
    iTunes Message

Method #4. Use Other Software to Solve this Problem Like Alternative For iTunes.
There are other software’s that can be helpful if you can’t solve your problem with iTunes. This method is the last thing that you should do and you can try this only if the situation urgent and hopeless. We should also inform you that these software’s that we will list, may have features that are not free of charge and you should pay for them in order to use them.

  1. dr.fone (Windows).
  2. Syncios iPhone Transfer Tool (Windows).
  3. CopyTrans iPhone Transfer Tool (Windows).
  4. AnyTrans (Windows).
  5. iExplorer iPhone Transfer Tool (Mac and Windows).

Basically, all these are working in the same way. In order to work with them, you should download and install them on your computer.
1. First of all, as said before, you need to download and then install them on your computer.
2. The second step is to connect your device.
3. And then force restart your iPhone. And follow the next steps from the software.

The post Fix: iPhone Stuck at Apple Logo appeared first on Appuals.com.

Fix: Execution of scripts is disabled on this system

$
0
0

This error occurs when users try to run scripts or specific commands in PowerShell as a part of their job or to troubleshoot a problem which is bothering them on their PCs. The execution of scripts is often disabled by default on users’ systems and this options needs to be tweaked to allow it.

Execution of scripts is disabled on this system

There are other causes to this problem as well and that is why we have come up with an article which should help you solve this problem if you follow the methods carefully. Good luck!

What Causes the “Execution of scripts is disabled on this system” Error?

There aren’t many different causes to this problem and they often differ from one system to another. Still, they can be listed easily and you should see whether your problem can be categorized as some of the options below:

  • Sometimes the execution of scripts is disabled by default on users’ systems and it needs to be enabled manually using methods such as running commands in PowerShell or tweaking the registry.
  • If the execution is disabled at a higher scope, you may need to enable it using the Local Group Policy Editor (GPEdit). There is an option to do so in Windows 10 Settings as well.
  • You might want to provide administrator issues to PowerShell when running the commands.

Solution 1: Run PowerShell as Administrator and Run a Command

There is a command in PowerShell which deals exactly with this problem and it can be solved in a matter of minutes. This includes actually changing the script execution policy from within the PowerShell window. Try it out and see for yourself!

  1. Open the PowerShell utility by right-clicking the Start menu button and clicking on the Windows PowerShell (Admin) option at the context menu. Windows 7 users can just search for it.
Running Windows PowerShell as an admin
  1. If you see Command Prompt instead of PowerShell at that spot, you can also search for it in the Start menu or the search bar next to it. This time, make sure you right-click on the first result and choose Run as administrator.
  2. In the Powershell console, type in the command shown below and make sure you click Enter afterwards:
Set-ExecutionPolicy RemoteSigned
  1. Let this command do its thing and check to see if the message has appeared indicating that the process was indeed successful. This method can be applied to all Windows operating systems, including Windows 10.

Solution 2: Edit Group Policies

If the method above has failed to yield success, which often appears on newer versions of Windows such as Windows 10, you might need to change policies on a higher scope. This is the usual error message which appears after running the command from Solution 1:

Set-ExecutionPolicy: Windows PowerShell updated your execution policy successfully, 
but the setting is overridden by a policy defined at a more specific scope. 
Due to the override, your shell will retain its current effective execution policy of...

In order to solve the problem, you should head over to the Group Policy editor and change the setting from there immediately.

  1. Use the Windows Key + R key combination (tap the keys simultaneously) to open the Run dialog box. Enter “gpedit.msc” in the Run dialog box, and press the OK button in order to open the Local Group Policy Editor tool. On Windows 10, you can try simply type Group Policy Editor in the Start menu and click the top result.
Running the Group Policy Editor
  1. On the left navigation pane of Local Group Policy Editor, under Computer Configuration, double click on Administrative Templates, and navigate to the Windows Components >> Windows Powershell section.
  2. Select the Windows Powershell folder by double-clicking on it and check out its right side section.
  3. Double click on the “Turn on Script Execution” policy option, check the radio button next to the “Enabled” option. Under the Execution policy menu, chose Allow all scripts, apply the changes you have made before exiting. The changes won’t be applied until you restart.
Allowing all scripts to run
  1. Finally, reboot the computer to save the changes and check to see if you are still being targeted with the error

Solution 3: Change it in Windows 10 Settings

Windows 10 users can also change script settings in their Windows 10 Settings app, under the For developers section. Generally, this is the place where you should head for if the steps above have failed to produce any quality results in order to resolve the problem. Note that this can only be applied to users running Windows 10.

  1. Use the Windows Key + I key combination to open Settings on your Windows 10 PC. Alternatively, you can search for “Settings” by using the search bar located at the taskbar or you can click the cog icon right above the Start menu button after it opens
  2. Locate and open the “Update & security” sub-entry in the Settings app by clicking on it once.
Update & Security in Settings
  1. Navigate to the For developers tab and check under the Powershell section for the option called “Change execution policy to allow local PowerShell scripts to run without signing. Require signing for remote scripts”.
  2. Click the check box right next to it in order to enable it and click the Apply button right below.
Allow scripts in Settings
  1. Restart your computer immediately and try running a script in PowerShell to see if the “Execution of scripts is disabled on this system” error still appears.

Solution 4: Resolve the Method Using the Registry

If the methods above have failed to solve your problem, the only thing left to do is to head over to the registry and change the settings manually at the highest scope possible. This method is pretty straight-forward but you should still be careful when editing the registry to make sure nothing goes wrong.

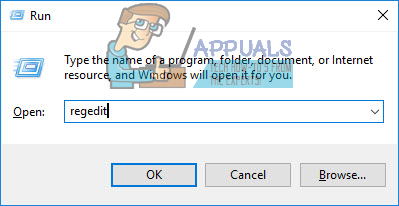
  1. Open the Registry Editor window by typing “regedit” in either the search bar, the Start menu, or the Run dialog box which can be accessed with the Windows Key + R key combination. Navigate to the following key in your registry by navigating at the left pane:
HKEY_LOCAL_MACHINE\SOFTWARE\Microsoft\PowerShell\1\ShellIds\Microsoft.PowerShell
Registry Editor
Registry Editor
  1. Click on this key and try to locate a string entry called ExecutionPolicy at the right side of the window. If such option exists, right-click on it, and choose the Modify option from the context menu.
  2. In the Edit window, under the Value data section change the value to Unrestricted or RemoteSigned and apply the changes you have made. Confirm any security dialogs which may appear during this process.
    Changing the Script Policy in Registry Editor
    Changing the Script Policy in Registry Editor
  3. You can now manually restart your computer by clicking Start menu >> Power button >> Restart and check to see if the problem is gone.

The post Fix: Execution of scripts is disabled on this system appeared first on Appuals.com.


Fix: This Action is Only Valid for Products That are Currently Installed

$
0
0

The error message described above has been received by a wide array of different users while trying to launch applications that are part of the Microsoft Office suite of programs, especially Microsoft Excel. The error message has been reported crossing Windows version borders, meaning that it is a threat to users of all iterations of the Windows Operating System that are currently supported by Microsoft. In addition, the error message is also not specific to one version of the Microsoft Office suite of applications. In fact, the error message has been seen on a wide variety of iterations of Microsoft Office ranging from Office 365 to Office 2007 and Office 2010.

This action is only valid for products that are currently installed

Regardless of what version of Microsoft Office you are receiving this error message with or the version of Windows you are getting it on, the underlying cause behind this problem is the same in almost all instances – a trial version of Microsoft Office being installed on the affected computer alongside the standard, retail copy of Microsoft Office that was later installed on it. The two conflicting instances of Microsoft Office that are installed on the affected computer create a colossal mess, resulting in the user seeing an error message that reads “This action is only valid for products that are currently installed.” whenever they try to launch a Microsoft Office application such as Excel. A trial copy of Microsoft Office being installed on a computer that a retail copy has also been installed to can be especially devastating for functionality if your trial period on the trial copy has come to an end.

Fortunately for anyone that has fallen victim to this specific problem, since the most probable cause of this issue is known, so is its most likely resolution. If you are seeing the “This action is only valid for products that are currently installed.” error message every time you try to launch a Microsoft Office application, here’s what you need to do in order to resolve the problem:

  1. Open the Start Menu (or click on the Cortana Search bar in your computer’s Taskbar).
  2. Search for “add or remove programs“.
  3. Click on the search result titled Add or remove programs.
    add or remove programs
    Add or remove programs
  4. Wait for your computer to populate the list of applications and programs installed on your computer. Once the list has been populated, scroll through it and locate the listing for the Microsoft Office Trial version you have on your computer. As soon as you locate the Microsoft Office Trial version that has been installed on your computer, click on it to select it.
  5. Click on Uninstall.
    uninstall in add or remove programs
    Click on Uninstall
  6. Following the onscreen instructions, go through the uninstallation wizard all the way through to the very end. Once you have made your way through the uninstallation wizard, you will have uninstalled the trial version of Microsoft Office you had on your computer, effectively resolving the conflict the actual retail version of Microsoft Office was running into. You will, however, still have to repair the retail version of Microsoft Office in order to get it to go back to working the way it is supposed to.
  7. Back in the list of applications and programs installed on your computer, locate the retail version of Microsoft Office you have on your computer, and click on it to select it.
  8. Click on Change.
    microsoft office change add or remove programs
    Select Microsoft Office and click on Change
  9. In the window that opens up, select Repair and click on Continue.
    select repair click on continue
    Select Repair and click on Continue
  10. Go through the repair wizard and follow it through to the very end.
  11. Once you reach the end of the repair wizard (at which point the repair will have been complete), click on Close and restart your computer. The repair wizard checks your installation of Microsoft Office for corrupted or otherwise damaged files and replaces them fresh, completely intact copies.
  12. When your computer boots up, check to see whether or not the problem has been resolved.

If the problem still persists, the repair simply wasn’t enough. To get rid of the problem for good, you are going to have to take another step forward – you will have to uninstall your copy of Microsoft Office from your computer and then reinstall it. Doing so will simply reset your installation of Microsoft Office back to day zero, which resolves a plethora of different problems with applications, this one included. To uninstall your copy of Microsoft Office, you need to:

  1. Open the Start Menu (or click on the Cortana Search bar in your computer’s Taskbar).
  2. Search for “add or remove programs“.
  3. Click on the search result titled Add or remove programs.
    add or remove programs
    Add or remove programs
  4. Wait for your computer to populate the list of applications and programs installed on your computer. Once the list has been populated, scroll through it and locate the listing for the version of Microsoft Office you use, and then click on it to select it.
  5. Click on Uninstall.
    select microsoft office click on uninstall
    Select Microsoft Office and click on Uninstall
  6. When asked if you are sure you want to uninstall Microsoft Office from your computer, click on Yes.
    click yes office uninstallation
    Click on Yes
  7. Follow the uninstallation wizard’s onscreen instructions all the way through to the very end.

Once you have successfully uninstalled your retail copy of Microsoft Office from your computer, you can go ahead and reinstall it. When it is time to do so, simply use the same means and mediums you used to install it on your computer in the first place. If you acquired your copy of Microsoft Office as a digital download, simply reinstall it from the internet, or if your retail copy of Microsoft Office came with an installation disc or other installation medium, use that installation medium to reinstall it on your computer. Check to see if you have managed to rid your computer of the “This action is only valid for products that are currently installed.” error message when Microsoft Office has been reinstalled.

The post Fix: This Action is Only Valid for Products That are Currently Installed appeared first on Appuals.com.
Fix: ‘pip’ is not recognized as an internal or external command

$
0
0

Some users trying to install Python packages using a Command Prompt window report seeing the “pip is not recognized as an internal or external command” error. Most affected users report that the issue occurs even after installing the Python distribution and making sure that Python is added to the path variable. The issue is not specific to a certain OS since it’s reported on Windows 7, Windows 8 and Windows 10.

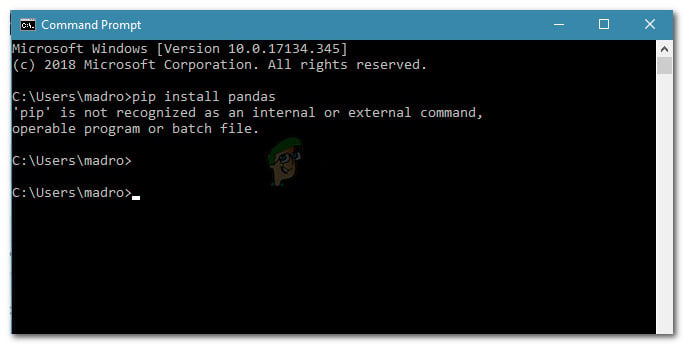
'pip' is not recognised as an internal or external command, operable program or batch file
‘pip’ is not recognized as an internal or external command, operable program or batch file

What is PIP?

PiP is a recursive acronym for “Pip Installs Packages“. It’s essentially a package management system used to install and manage software packages written in Python. Most users make use of PiP to install and manage Python packages found in the Python Package Index.

The latest Python versions (Python 2.7.9 and later and Python 3.4) include Pip by default.

What is causing the ‘pip’ is not recognized as an internal or external command error?

We investigated this issue by looking at various user reports and trying to replicate the issue on our computers. From what we gathered, there are several scenarios that are known to trigger this particular error message:

  • PIP installation is not added to the system variable – In order to be able to run Python commands from a CMD window, you will need to add the path of your PiP installation to your PATH in the system variable. If you installed Python using the installation executable, it should be added automatically.
  • The installation is incorrectly added in your PATH – It’s easy to mess up the PATH if you add it manually. Additional space or the missing of a semicolon before the new PATH will end up producing the error.

If you’re currently trying to resolve this particular error message that prevents you from using Python command in CMD, follow the methods advertised in this article. All the potential fixes below are confirmed to be working by at least one affected users.

For the best results, follow the methods below in order until you find a fix that helps you to resolve the issue in your particular scenario.

Method 1: Checking if PIP is added to your PATH variable

Let’s start by finding out where we stand. If you don’t know if your PIP installation is added to your PATH variable, you can find it out easily by using a certain command at a CMD prompt.

Knowing this will point you in the right direction and save you from trying out unnecessary steps.

Note: If you already know if the path of your PIP installation is added to your PATH variable, move down to the next methods below.

Here’s a quick guide on checking if the PIP installation is already in your PATH variable:

  1. Press Windows key + R to open up a Run dialog box. Then, type “cmd” and press Enter to open up Command Prompt.
    Run dialog: cmd
    Run dialog: cmd
  2. Inside the command prompt window, type echo %PATH% and press Enter to get a listing with all locations added to the PATH variable.
    Checking to see if the PIP installation is present in the PATH variable
    Checking to see if the PIP installation is present in the PATH variable
  3. If you manage to find a path similar to C:\Python37\Scripts (this depends on your Python version), it means that the installation path is already added to your PATH variable. In this case, you can skip next to methods below and jump straight to Method 4 where we start troubleshooting for problems related to the PiP installation path.

If you weren’t able to find the PiP installation path using the test above, move down to the next methods below (Method 2 and Method 3) to add PIP to the PATH environment variable.

Method 2: Adding PIP to the PATH environment variable using the Windows GUI

If Method 1 revealed that the PIP installation is not set to the PATH as an environment variable and you already installed the Python distribution, you’ll need to do it manually.

After completing the procedure below, you will be able to input PiP commands from a Command Prompt window. Here’s a quick guide on Adding the PiP installation to the Path environment variable using the Windows GUI:

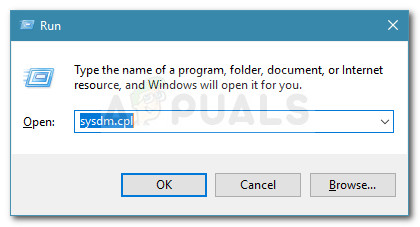
  1. Press Windows key + R to open up a Run dialog box. Then, type “sysdm.cpl” and press Enter to open up the System Properties screen.
    Run dialog: sysdm.cpl
    Run dialog: sysdm.cpl
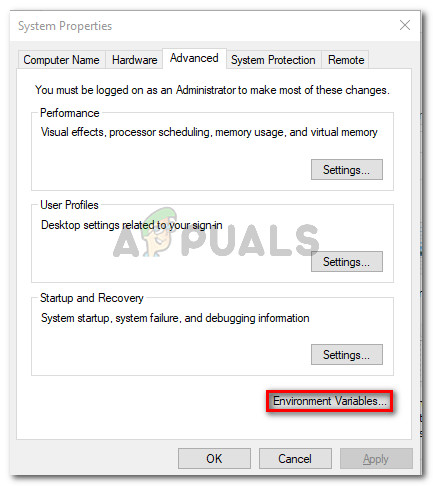
  2. Inside the System Properties screen, go to the Advanced tab, then click on Environment Variables.
    go to the Advanced tab and click on Environment Variables
    Go to the Advanced tab and click on Environment Variables
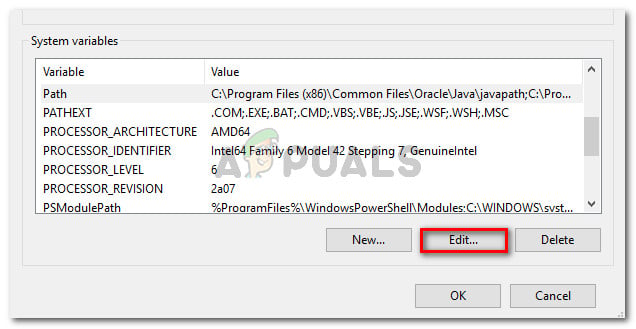
  3. In the Environment Variables screen, go to System variables and click on Path to select it. Then with the Path selected, click the Edit… button.
    select the Path entry under System variables and click Edit
    Select the Path entry under System variables and click Edit
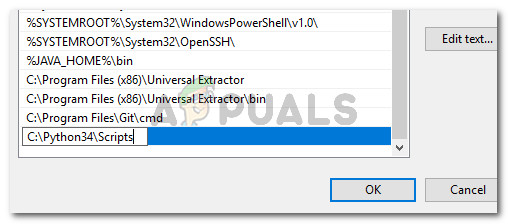
  4. In the Edit environment variable screen, click on New and add the path where the PiP installation is located. For Python 3.4, the default location is C:\Python34\Scripts.
    Adding the PiP installation location
    Adding the PiP installation location
  5. Once the path is added, open a fresh CMD window and try to install a python package that comes with PiP. You should no longer see the “pip is not recognized as an internal or external command” error.

If you’re looking for a quicker way to add the PiP location to the environment variable, follow Method 3.

Method 3: Adding PIP to the PATH environment variable using CMD

A quicker way to set up the PIP path environment variable is to do it directly from a CMD window. This will save you some time, but it can be a little more intimidating if you’re not used to using the terminal.

Here’s a quick guide on setting the PiP path environment directly from a Command Prompt window:

  1. Press Windows key + R to open up a Run dialog box. Then, type “cmd” and press Enter to open a Command Prompt window.
    Run dialog: cmd
    Run dialog: cmd
  2. In the Command Prompt window, run the following command to set the PIP installation to the environment variable:
    setx PATH “%PATH%;C:\Python37\Scripts”

    Note: Keep in mind that in this command, we used the default location for Python 3.7. If you’re using a different Python version or you installed it in a custom location, change the path after ‘;‘ accordingly.

  3. See if this method was successfully by running a Python installation package (one that uses PIP) from the same CMD window. If you’re still encountering the error message, move down to the next method below.

Method 4: Opening the Python package without adding the PiP variable

If you’re looking for a way to install a Python package from CMD without adding PiP to the PATH environment variable, you can use a couple of different commands to install it. This also works if you used the methods above to configure the environment PATH variable but you’re still encountering the error message.

Here’s a couple of ways that you can use to open Python install packages in CMD without adding the PIP variable:

The Short Method:

  1. Press Windows key + R to open up a Run dialog box. Then, type “cmd” and press Enter to open a Command Prompt Window.
    Run dialog: cmd
    Run dialog: cmd
  2. Type the following commands and make sure to change the placeholder to your own package name:
    python -m pip install [packagename]

    Note: Change [packagename] with the name of the package you’re trying to install.

The Long Method:

  1. Open a Run dialog box by pressing Windows key + R. Then, type “cmd” and hit Enter to open a Command Prompt window.
    Run dialog: cmd
    Run dialog: cmd
  2. In the CMD window, use the following command to navigate to the directory where the python .whl file is located.
    cd C:\python installs

    Note: In our example, the Python install package was located in a folder called python installs. Adapt this command to navigate to the directory where the wheel is located.

  3. Next, run the following command to install the Python package using PiP:
    c:\python37\scripts\pip.exe install [package].whl

    Note: Keep in mind need to change the location of your python installation if you have an older version or if you installed into a custom location. Also, make sure to change the [package] placeholder to your own package name.

If these two last methods didn’t enable you to install the Python package from the CMD window, follow the last method below where we ensure that PiP is installed.

Method 5: Ensuring that PiP is included in your Python installation

Before we go ahead and reinstall the whole Python environment, let’s see whether PiP was not omitted from the Python installation. Certain Python installers will leave PiP out of the default installation.

Luckily, you can rectify this by modifying the Python installation and modifying it to install PIP. Here’s a quick guide on how to do this:

  1. Press Windows key + R to open up a Run dialog box. Then, type “appwiz.cpl” and press Enter to open Programs and Features.
    Run dialog: appwiz.cpl
    Run dialog: appwiz.cpl
  2. Inside Programs and Features, right-click on the Python installation and click Change.
    Change Python installation
    Change the Python installation
  3. At the Modify Setup screen, click on Modify.
    Click on Modify to ensure that PiP is installed
    Click on Modify to ensure that PiP is installed
  4. In the Optional Features screen, check the box associated with pip and click Next.
    Modifying the Python installation to include PiP
    Modifying the Python installation to include PiP
  5. Hit the Install button to make the changes to the Python installation.
    Changing the Python installation
    Changing the Python installation
  6. Once the Python installation is modified, open a CMD window and see if you’re able to install a Python package with PiP without seeing the “pip is not recognized as an internal or external command” error.

Method 6: Installing Python via the executable installer

If you’ve come this far without a result, reinstalling Python along with its components will likely resolve the “pip is not recognized as an internal or external command” error.

The easiest way to do this is by using the Python executable installer. If you configure it correctly, it will install PiP automatically. Here’s a quick guide on how to do this:

  1. Press Windows key + R to open up a Run dialog box. Then, type “appwiz.cpl” and press Enter to open Programs and Features.
    Run dialog: appwiz.cpl
    Run dialog: appwiz.cpl
  2. Inside Programs and Features, scroll down to the programs list to find the Python installation. Once you find it, right-click on it and choose Uninstall, then follow the on-screen prompts to remove it from your system. Once the Python distribution is removed from your computer, restart your machine.
    Uninstalling Python from your machine
    Uninstalling Python from your machine
  3. At the next startup, visit this link (here) and download the latest Python executable installer according to your Os architecture.
    Downloading the right Python executable installer
    Downloading the right Python executable installer
  4. Open the installation executable and start by making sure that the box associated with Add Python to PATH is checked – This ensures that you can run Python commands in Command Prompt. Then, click on Customize installation.
    Ensure that Python is added to PATH, then click on Customize installation
    Ensure that Python is added to PATH, then click on Customize installation
  5. In the Optional Features window, make sure that the box associated with pip is checked, then click Next.
    Make sure that pip is checked under optional features
    Make sure that pip is checked under optional features
  6. Leave the default location and Advanced Options, then click Install to commence the installation.
    Installing Python
    Installing Python
  7. Once the installation is complete, restart your computer manually if you’re not automatically prompted to do so.
  8. At the next startup, see if the issue has been resolved by trying to install a Python package via a CMD window.
  9. If you’re still seeing the “pip is not recognized as an internal or external command” error, type the following command in a CMD window:
    python -m ensurepip --default-pip
    

    Note: With certain Python distributions (particularly 3.6), it’s possible that PiP doesn’t get installed by default. One of the official fixes for this included in the documentation is this command.

The post Fix: ‘pip’ is not recognized as an internal or external command appeared first on Appuals.com.
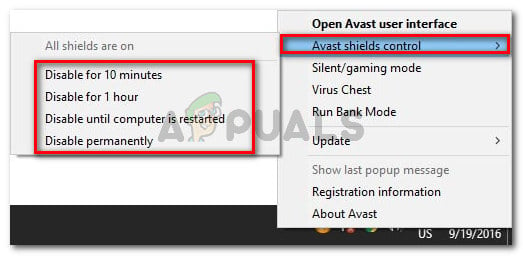
How to connect Bluetooth Headphones to PS4

$
0
0

With consoles becoming more common every single day, it is not surprising that the majority of them have Bluetooth compatibility which allows users to connect their Bluetooth devices such as headphones.

Wireless Headphones for PS4

Play Station 4 also has this feature and allows users to connect headphones, mics, remote screens etc. to the console directly. The method for connecting these Bluetooth devices is quite simple but a bit different from Xbox 360.

Why are not all Bluetooth devices supported in PS4?

One thing which should be noted is that not all Bluetooth headsets are supported by the PS4. According to Sony in its official documentation, the PS4 doesn’t support A2DP or any streaming Bluetooth profile. A2DP means Advanced Audio Distribution Profile which corresponds to music or audio streaming wirelessly using Bluetooth with your PS4.

The reason why Sony bans these type of headsets is that they will lag around 200-300 ms during gameplay which will reduce the overall experience of the game drastically. To keep the gameplay smooth and everything in sync, these headphones are banned.

There are still workarounds listed below which will help you connect your Bluetooth headset with your PS4. The first method will only work for supported headsets.

Solution 1: Connecting via Bluetooth (for supported headsets)

If your headsets support Sony Play Station, you will be able to connect them without any issues at all. You can look for a logo of Sony or Play Station on your headphones box to see if they are supported. You can also refer to its documentation.

Even if you don’t see any signs of support, you can try connecting using Bluetooth. If the error message pops up, we can always move on to the next solutions.

  1. Keep pressing your Bluetooth button on your headsets to toggle it into pair mode. Each headset may have a different way to trigger the pairing mode.
  2. Open your PS4 and navigate to Settings and then Devices. Once in devices, search for Bluetooth Devices.
Bluetooth Devices - PS4 settings
Bluetooth Devices – PS4 settings
  1. Here you will see the name of your headphones mentioned. Click it and PS4 will attempt at connecting.

If you get an error such as Cannot connect to Bluetooth device within time limit or Bluetooth  audio devices are not supported by PS4, you can continue with the other solutions listed below.

Solution 2: Connecting using a wired medium

If you cannot connect your headsets using the first method, you would have to connect them using a wired medium instead of Bluetooth. If you are thinking Sony didn’t make even a single way to connect your Bluetooth headsets, you are wrong. Your PS4 controller has an audio jack which can be connected to any headsets for the voice to be transmitted to them.

You would need a headset audio jack which may have come with your Bluetooth headphones. If not, you easily purchase one for a few bucks on Amazon.

  1. Connect the headset audio jack into your headset and your PS4 controller. Make sure that the controller is properly connected.
  2. Now navigate to Settings > Devices > Audio devices.
Audio Devices - PS4 settings
Audio Devices – PS4 settings
  1. Now select Output device and make sure that you select the option Headset Connected to controller. You can use the Volume control (Headphones) underneath to adjust the volume according to your needs. If your headphones have a mic, you can also change the setting of Input Device.
Changing output device to 'Headset connected to Controller'
Changing output device to ‘Headset connected to Controller’
  1. To make sure that not only chat but game volume also gets outputted to your headsets, we need to change the option Output to Headphones. Make sure it is selected as All Audio.
Selecting 'All Audio' for output on PS4
Selecting ‘All Audio’ for output
  1. Save changes and exit the settings. Now check if you can properly hear the audio on your headphones.

Solution 3: Using USB dongle for headset

If you are not comfortable in using a wired medium for your Bluetooth headsets, you can easily make use of a Bluetooth dongle which can plug into your PS4 and you can connect to the USB wirelessly. This is an alternative to connecting your headphones via Bluetooth to your PS4 machine. Instead, we are using another device as a recipient for your headset Bluetooth signals which forwards the data to the PS4 using a physical connection.

  1. You should purchase a dongle from Amazon which supports this workaround for connecting.
  2. Plug in the USB dongle on your PS4’s USB slot. Make sure that your Bluetooth headset is in pairing mode before you enable the pairing on your dongle.
    USB Dongle for Bluetooth headphones for PS4
    USB Dongle for Bluetooth headphones for PS4
  3. Once both devices are paired, navigate to Settings > Devices > Audio devices.
  4. Now select Output device and make sure that you select the option USB Headset.
Setting output device as 'USB Headset'  on PS4
Setting output device as ‘USB Headset’

You can also change the volume and Output to headphones option as we did in the previous solution. The method for connecting and selecting the Audio output is almost the same as in Solution 2. The only change is that in this scenario, we using the medium of USB instead of wired to the controller.

The post How to connect Bluetooth Headphones to PS4 appeared first on Appuals.com.
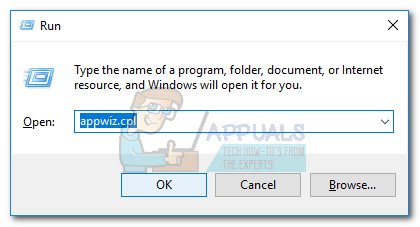
How to Stop iTunes from Opening Automatically When Your iPhone Is Connected to Your Mac or PC

$
0
0

Computer users are annoyed when they see constant popups. They are a major turnoff when you open a website and popup appears from the corner you lose your patience and temper to be on that site. This is the reason why many websites are losing and cannot attract new visitors even they have a high rank on the search engines. Similarly, by default on Pc and Mac, iTunes starts automatically when you plug your device into the computer. But there is a solution to this annoying situation and in this how-to article, we will show you How to Stop iTunes from Opening Automatically When Your iPhone Is Connected to Your Mac or PC.

Method #1. Disable Automatically Sync Device.

  1. Connect your iPhone to the Computer. Use the original USB cable from your iPhone, iTunes will open automatically.
  2. Click on the iPhone It is located under the menu bar. This will open the iTunes settings.
  3. Open the Summary You will see the options in the right panel.
  4. Find and uncheck the Automatically Sync when iPhone is connected option and save the settings.
  5. Click Done.
    Uncheck Automatically Sync
    Uncheck Automatically Sync

Method #2. Disable Automatically Sync from Preferences.

  1. Connect your iPhone to the Computer. Use the original USB cable from your iPhone, iTunes will open automatically.
  2. Open iTunes menu. It is on the upper menu of the iTunes.
  3. Click on Preferences A dialog box will appear.
    Open the Preferences menu
    Open the Preferences menu
  4. Click on the Devices icon.
  5. Uncheck the Prevent iPods, iPhones, and iPads from syncing automatically box.
    Open Devices and Uncheck the Box
    Open Devices and Unheck the Box
  6. Click Ok.

Method #3. Disable iTunesHelper service. This method works on Windows.

As we mentioned this method works only if you are using a Windows operating system. This service is always working in the background and detects all devices that are connected to the computer and automatically opens the iTunes.

Disable iTunesHelper
  1. Open Task Manager. Press CTRL + ALT + DEL and choose task manager or you can open directly with pressing CTRL + SHIFT + ESC.
  2. Go to Startup and find iTunesHelper from the list.
  3. Right click on the iTunesHelper and choose Disable.

The post How to Stop iTunes from Opening Automatically When Your iPhone Is Connected to Your Mac or PC appeared first on Appuals.com.
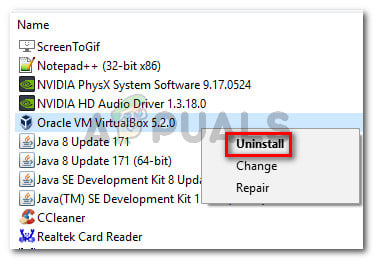
How to Fix Destiny 2 Crashing

$
0
0

Destiny 2 is an online multiplayer game which is run by Battle.net engine. The game was initially released for PC’s in 2017 after which its player count skyrocketed and it became one of the most played multiplayer games.

Destiny 2
Destiny 2

Since all new games have issues, Destiny isn’t special at all. There are many reports by numerous players that Destiny 2 crashed during their gameplay. This crash occurred particularly after the player had played the game for a little while (20 – 30 minutes). Blizzard has officially acknowledged the problem and even released a documentation on what could be the potential causes.

What causes Destiny 2 to crash?

After our research and potential solutions submitted by users, we came to the conclusion that Destiny 2 crashed because of several different reasons. The causes why your game crashes are but not limited to:

  • Antivirus programs are conflicting with your game. Antivirus software always keeps a check on programs running on your computer. They can easily get a false positive if any application is consuming a lot of resources.
  • Third-party programs such as NVIDIA Ge-Force experience etc. conflict with the game’s operation. These programs usually allow in-game overlays and if the game is not designed properly to handle these, you might crash.
  • Overclocking was another potential cause reported by the players. Running the CPU or GPU at 90%+ also caused the game to crash.
  • The priority of the game might not be enough. The computer manages the applications and their need of resources according to their priority.
  • Some DLL files might not be stored in the correct location in the game’s directory.
  • The game and all its components might require administrator privileges in order to run without any issues.

Before you move on to the workarounds listed below, make sure that you are logged in as an administrator on your computer. Furthermore, you should also have an active open internet connection.

Solution 1: Changing priority of the game

Priorities of applications running on your computer dictate on the amount of importance of an application and the level of precedence it is given on allocation of resources and processing power. By default, the priority of every application is set as Default unless it is a system application. We will use the task manager to change the priority of the game and after a restart, check if this solves the error message for us.

  1. Launch Destiny 2 on your computer. Now press Windows + D to launch the Desktop while the game is still running. Press Windows + R, type “taskmgr” in the dialogue box and press Enter.
  2. Now click on the tab of Details, locate all the entries of Destiny and net. Since Destiny 2 runs in Battle.net, it is necessary that you change its priority as well.
  3. Right-click on each entry, hover over set priority and set it either to Above normal or High.
Changing priority of battle.net processes
Changing the priority of battle.net processes
  1. Do this for all your entries. Now Alt-tab to your game and start playing. Observe if this made any difference to the crashing problem.

Solution 2: Uninstalling/Disabling third-party programs

Third-party programs such as Discord or NVIDIA Geforce Experience have overlays which allow them to be incorporated within the game. This allows the users to directly control the application and change their settings/values inside the game. However, it should be noted that not all applications go well with overlays and one example is Destiny 2.

NVIDIA GeForce Experience

You should disable all third-party programs running in the background completely before launching the game. You can either monitor the applications using task manager or look for their icon on your taskbar. Once you have disabled every kind of application and also closed all running ones, launch the game and see if the crash gets fixed. EVGA precision X was also reported to cause issues.

Solution 3: Disabling Antivirus Software

Antivirus software is known to cause issues with the application which consume a lot of processing power and resources. This type of behavior by the antivirus is known as a false positive. The Antivirus software ‘thinks’ that this application is unnecessary and reduces the number of resources allocated to it which in turn crashes the game.

Disabling Antivirus Software

You should temporarily disable all antivirus software running on your computer. You can check our article on How to turn your Antivirus off. Do this temporarily. If you see that it was indeed the Antivirus software, you can add an exception to them. You can check our article on How to Add Steam as an Exception to Your Antivirus or Firewall Software. The process added as an exception is Steam. You can replicate these steps for Battle.net.

Solution 4: Granting administrator access

Another workaround which works for a lot of people is granting Battle.net administrator privileges inside its properties. This must be replicated for every executable in Destiny 2 and Battle.net directory. It is no surprise that these games require more than normal permissions because of the high resources and computation needs. Make sure that you are logged in as an administrator before proceeding.

  1. Navigate to the directory where your Battle.net is installed on your computer. It can be the default location in Program files in C or some custom path which you selected before the installation.
  2. Once in the Battle.net directory, right-click on the following entries, and select Properties.
Battle.net Launcher

Battle.net
  1. Once in the properties, select the Compatibility tab and check the option Run this program as an administrator.
Elevating executable to administrator
Elevating executable to an administrator
  1. Do this for all the entries mentioned. Now enter Destiny 2 folder and on exe, perform the same operation. Save your changes and exit. Restart your computer and play the game. Check if the crashing is resolved.

If administrator privileges don’t work, we can try relocating a DLL file which might be in a wrong directory. The DLL file “GFSDK_Aftermath_lib.dll” should be present in the following directory:

C:\Program Files\Destiny 2\

Instead of:

Destiny 2\bin\x64\

Solution 5: Disabling Overclocking

Latest processor and graphics hardware allow users to overclock their devices. Overclocking is an act of running the processor or graphics hardware at very high clock speed until it reaches its threshold temperature. The computer detects this and reverts them back to their normal clock speeds. When the temperature is cool enough, overclocking starts again.

Overclocking options - ASUS
Overclocking options – ASUS

Even though this process increases your computer’s performance, there were several cases which indicated that whenever their CPU or graphics hardware reached 90%+ utilization, the game crashed. Hence you should disable all overclocking on your computer whatsoever. Overclocking software such as MSI Afterburner was also reported to cause issues.

Solution 6: Repairing game and updating graphics software

If all the above methods don’t work and you still crash when playing the game, the only thing left is to repair the game using Blizzard’s repair utility. Furthermore, you should move forward and update the graphics software on your computer. It is a plus point if you update all your drivers and also update your Windows to the latest version.

Installing Graphic Drivers

Game files can get corrupt any time because if incomplete updates or interference from other programs. When you will repair the game, Blizzard will compare each one of your files with an online manifest and replace any module which it finds to be bad. You can check our article Fix: Overwatch Crashing and follow Solution 5 and 6 listed there for more detail.

The post How to Fix Destiny 2 Crashing appeared first on Appuals.com.
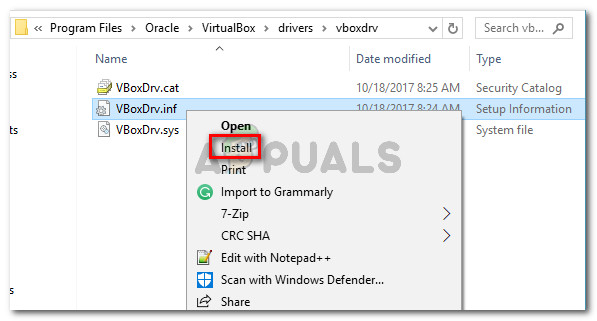
Fix: There is a problem connecting to Netflix

$
0
0

Netflix application users on Android or iPhone experience the error message ‘There is a problem connecting to Netflix’ when they try to stream some shows on their applications. This is a common error present in the application platform of the streaming giant also known as Netflix Error 1011.

There is a problem connecting to Netflix (Error 1011)

Netflix has officially recognized the error message in their website and released a documentation which helps users troubleshoot the issue at hand. This issue is mostly related to your internet connection. If it is not open or behind a firewall/proxy, you may not be able to stream.

What causes the error ‘There is a problem connecting to Netflix’ in its mobile application?

Like mentioned before, this error message mostly relates to issues at the connectivity side of Netflix application on your smartphone. Some of the reasons why this error occurs are but not limited to:

  • Problems in the internet connectivity of the smartphone.
  • Discrepancies in the mobile application This is mostly resolved by resetting the associated saved data.
  • Issues at your device. A simple power cycle mostly solves bad configurations saved on your smartphone.

Before proceeding, make sure that you have your Netflix credentials on hand. When we will reset the application, you may need to enter them again.

Solution 1: Testing your Internet Connection

The main reason why the mobile application fails to connect to network servers is that of a bad internet connection. The term ‘bad’ internet connection doesn’t only mean the speed; it takes into account a number of different modules which you should check.

  • You should not have a proxy installed on your network. A proxy server usually maps internet traffic to external IP addresses which conflict with Netflix’s streaming mechanism. Same goes for VPN’s.
Uninstalling Nord VPN
  • Your home network shouldn’t have any specific firewalls banning the streaming of popular sites such as Netflix.
  • You should be using an open internet connection. Internet in public places such as universities, hospitals, and hotspots etc. are mostly not open and restrict some type of traffic.

If you still cannot diagnose your connection, you should connect to a different network and see if you are able to stream there. You can even try switching to your mobile’s internet data. If it works fine in other networks, it may prove to be a flag that your current network has some issues. If it doesn’t work even on other networks, consider following the other solutions listed below.

You can also power cycle your network and smartphone. Turn off your smartphone and take out the power supply for your router. Wait around 5-10 minutes before plugging everything back and check if the error message went away.

Solution 2: Resetting Netflix application

In some cases, the Netflix application on your smartphone might also get corrupt or have its data or modules set in bad configurations. This is a very common behavior and mostly occurs in smartphones which are rooted. Nevertheless, before reinstalling the application, we can try resetting it and see if this fixes the issue.

The steps listed here are of Android. You can follow similar ones in iDevices.

  1. Open your smartphone’s settings and click on Apps.
Application settings - Android
Application settings – Android
  1. Once in applications, search for the entry Netflix and click to open further properties. Once in Netflix application properties, click on Storage.
Netflix Storage Settings  - Android
Netflix Storage Settings – Android
  1. Once in Storage settings, click on Clear data and Clear cache.
Clearing data and cache - Netflix application
Clearing data and cache – Netflix application
  1. Now try launching Netflix again, input your credentials and check if the issue is resolved.

Solution 3: Reinstalling Netflix

If the above method doesn’t work, we can try reinstalling the Netflix application on your computer. Reinstalling will erase all the application’s modules from your smartphone. The reinstalling will practically refresh the entire application and would help narrow down the error message.

Again the steps mentioned here are of Android. You can replicate them according to your iDevice.

  1. Navigate where Netflix is preset. Keep pressing the application until an option of Uninstall comes forth. Click it.
Uninstalling Netflix - Android
Uninstalling Netflix – Android
  1. Now search for Netflix in the Play Store (or App store on iOS) and Install the application.
Installing Netflix - Play Store
Installing Netflix – Play Store
  1. After entering your credentials, check if the error message gets resolved.

The post Fix: There is a problem connecting to Netflix appeared first on Appuals.com.
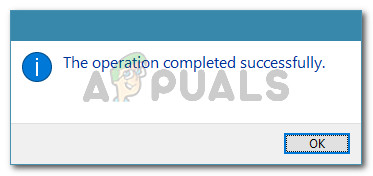
Fix: Setup Incomplete because of a Metered Connection

$
0
0

This issue will arise if you are using (or trying to use) a Bluetooth device while connected to a metered connection on Windows 10. When trying to connect to a Bluetooth device, you will see the Bluetooth manger showing the message “Setup incomplete because of a metered connection”. This problem will, obviously, prevent you from using your Bluetooth devices.

What causes the limitation on Metered Connections in Windows 10?

The main reasons for this issue are:

  • Improper settings in the devices section that won’t allow Windows to download drivers while on a metered connection

If the issue appeared out of nowhere and your devices were working fine just a day ago then the most likely cause must be a Window Update. Window Updates sometimes reset the settings.

Method 1: Change Settings

There is an option under your devices settings that allows Windows to download the drivers or other application info of your devices. This setting, if turned off, will prevent Windows from downloading the drivers of devices when you are on a metered connection. So, changing this setting will resolve the issue. Follow the steps given below

  1. Hold Windows key and press I. This should open the settings window
  2. Click Devices
  3. Select Bluetooth & other devices (or Connected devices) from the left pane
  4. Check the option Download over metered connections

Once done, you should be good to go. Note: Even if your device isn’t listed on the page, you should change the settings. This is because these settings apply to all the connected devices whether they are listed on the page or not.

Note: If the problem comes back then the most likely cause might be a new Windows Update. Window Updates sometimes reset the settings. If the problem reappears then simply apply the solution again.

Method 2: Change the Wi-Fi Status

Since the error message is complaining about your internet connection being a metered connection, changing the Wi-Fi status to a regular connection solves the issue. Don’t worry, you don’t have to keep the Wi-Fi status to regular. Once you switch the status to regular Wi-Fi, Bluetooth devices will connect and you can set the Wi-Fi status back to “Metered connection”. Here are the steps that you have to follow to change the Wi-Fi status

Note: Keep in mind that this is only for people who couldn’t solve the issue by following the steps in method 1. The actual solution is the method 1.

  1. Hold Windows key and press I. This should open the settings window
  2. Select Network & Internet


  1. Click Change connection properties

  1. Click the Toggle switch under Set as metered connection. This should toggle off the option and your network is no longer a metered connection.

  1. Now try to connect your Bluetooth devices and they should connect properly

Once done, repeat the steps 1-4 to set the connection to metered connection again. Keep in mind that you will have to repeat these steps every time you connect your Bluetooth devices.

The post Fix: Setup Incomplete because of a Metered Connection appeared first on Appuals.com.
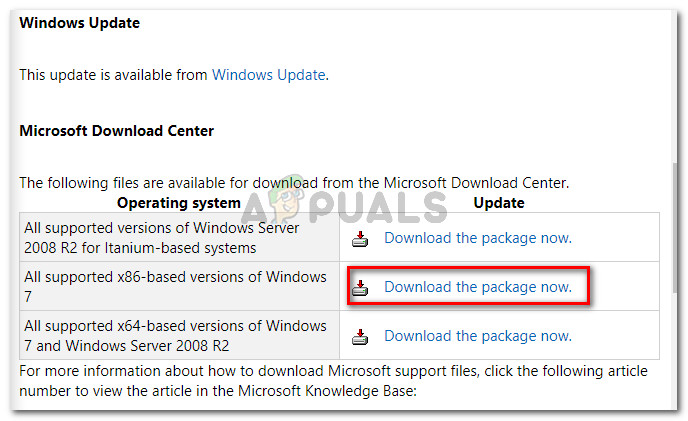

Fix: Error Code RGE-1001 While Using the Spectrum App

$
0
0

Spectrum is one of the most popular content streaming services for mobile devices, both in terms of live TV and Video on Demand. For users on mobile devices such as phones, tablets and devices like the Roku to be able to access and enjoy the streaming services Spectrum has to offer to them, there exists a Spectrum app designed specifically for mobile devices. Subscribers of the service can download this application on their mobile devices and tune in to the content the service offers. Like most other applications of the sort (and mobile applications in general, for that matter), though, the Spectrum app is not perfect and is prone to falling prey to a wide variety of different issues, problems and errors. One such error that users of the Spectrum mobile application have often complained about running into goes by the error code RGE-1001.

error code rge-1001 spectrum app
Error code RGE-1001

On the surface, this error code and the error message associated with it point towards a connectivity issue, but in reality, this issue can be caused by anything preventing the client device from connecting to and interacting with Spectrum’s servers. In addition, this issue is a specifically benevolent one as it can affect all kinds of mobile devices that have the Spectrum app on them, although Roku devices are its feed of choice. If you encounter this issue, you will be unable to gain access to everything Spectrum has to offer to you, and that can be quite the problem for almost all subscribers. If you do run into this error, the first thing you need to do is check your device’s internet connection – a slow or non-functioning internet connection can often result in this problem, so make sure that your internet connection is working and healthy.

If everything’s fine with your connection to the internet and you are still among this issue’s afflicted, do not fear – hope still exists. The following are some of the most effective solutions you can use to try and combat and get rid of this error on your own:

Solution 1: Uninstall and reinstall the Spectrum app

The absolute most effective solution you can use to fight off this error message, and the most promising solution, is to uninstall the Spectrum app in its entirety from your mobile device, and then reinstall it. Uninstalling and reinstalling any application basically brings it back to its starting point, so anything that went wrong with it along its journey will be reset and rectified. On the mobile device that you are experiencing this specific problem on, you need to:

  1. Locate the Spectrum app and uninstall it. Depending on what kind of mobile device you are using, you might have to uninstall the application using some kind of an application manager found onboard your device.
  2. Wait for the application to be successfully and completely uninstalled.
  3. Once the application has been uninstalled successfully, reinstall it. Depending on the mobile device you are using, you can reinstall an application by simply navigating to your device’s native app store, making your way to the page dedicated to the app you want to reinstall and install it from there.
    spectrum app play store android
    The Spectrum app on the Play Store
  4. Once the Spectrum app has been reinstalled, log in to it and try connecting to Spectrum‘s services to see if the solution resolved the issue or if the problem still persists.

Solution 2: Contact Spectrum’s support and have your account reset

Many users affected by this issue have had luck with resolving it by contacting Spectrum’s support. As massive a TV streaming service as Spectrum is, it has a dedicated customer support department that users can contact when anything goes wrong. If you are experiencing this issue, there is a good chance you’ll be able to have to have it resolved if you:

  1. Contact Spectrum‘s support staff.
  2. Explain the issue you are facing to a support representative. Be sure to communicate the specific error code you are seeing (RGE-1001 in this case) to them and clearly describe the entirety of your problem.
    error code rge-1001 spectrum app
    Error code RGE-1001
  3. Allow the support representative to reset your account. This will involve the support representative completely deleting your Spectrum account and then rebuilding it from the ground up. While it might be a bit of an inconvenience to have your account completely reset, it will definitely be less of a bother than this issue is, so don’t hesitate to have your account reset.

Solution 3: Simply wait it out

If neither of the solutions listed and described above managed to resolve this problem for you, there is a pretty decent chance that the root of the issue is simply server-side and nothing on your end is causing the problem. If that is the case, however, there is virtually nada that you can do on your end to try and resolve the problem. In such cases, the recommended course of action is to simply wait out the storm. If some kind of an issue with Spectrum’s servers is sending this error message your way, Spectrum’s development team is undoubtedly aware of the issue and working on a fix for it. All you can do is be patient and wait for the issue to be resolved, but be sure to regularly check on the problem’s status so as to make sure that you find out when it is fixed.

The post Fix: Error Code RGE-1001 While Using the Spectrum App appeared first on Appuals.com.

Fix: Windows couldn’t automatically bind the IP protocol stack to the network adapter

$
0
0

Several users report getting the “Windows couldn’t automatically bind the IP protocol stack to the network adapter” error after they attempt to fix their wireless connection by running the Windows troubleshooter. Most affected users report that the issue started occurring after a botched Windows update or after they uninstalled a VPN software.

Windows couldn't automatically bind the IP protocol stack to the network adapter
Windows couldn’t automatically bind the IP protocol stack to the network adapter

What is causing the Windows couldn’t automatically bind the IP protocol stack error

If you pay attention to the details, the error message is slightly pointing you to the source of the problem. We investigated this particular issue by looking at various user reports and the fixes that they used to resolve the problem. From what we gathered, there are several culprits that are often reported as being responsible for the apparition of this issue:

  • Windows is unable to fetch the IP address using DHCP – When certain scenarios are met, Windows might have trouble fetching the IP address using Dynamic Host Configuration Protocol (due to a bad driver or some network tools that are conflicting).
  • Virtual Private Network (VPN) client is interfering with the connection – This is one of the most common reasons why this particular error occurs. This scenario is frequently encountered when the user tries to delete the VPN client without following the official channels.
  • Unsupported VPN software is installed during the upgrade – If you’ve recently made the upgrade to Windows 10, a Virtual Private Network software like Cisco VPN might have left behind some remnant files that are interfering with your wireless connection.
  • WLan AutoConfig service is disabled – Certain applications or a bad Windows update might stop this service from being started at every system startup.

If you’re struggling to resolve this particular issue, this article will help you to troubleshoot the issue. Below you have a collection of fixes that other users in a similar situation have used to get the issue resolved.

For the best results, follow the methods below in the order that they are presented until you find a fix that is effective in resolving the issue in your particular scenario.

Method 1: Reverting to the default Network Adapter Properties settings

Let’s start simple – by making sure there aren’t any other network items that are interfering with the connection (other than the standard ones). It’s likely that you see this issue occurring because a 3rd party network client (VPN, Virtual Machine Networking driver, or something else) is causing your wireless connection to malfunction.

You can typically resolve any type of interference of this kind by ensuring that the Wi-Fi connection is only using the required items that it needs. Here’s a quick guide on how to do so:

  1. Press Windows key + R to open up a Run dialog box. Then, type “ncpa.cpl” and press Enter to open the Network Connections tab.
    Run dialog: ncpa.cpl
    Run dialog: ncpa.cpl
  2. Inside the Network Connections tab, right-click on the Wi-Fi network adapter that is refusing to work and select Properties.
    Right-click on your Wi-Fi network and choose Properties
    Right-click on your Wi-Fi network and choose Properties
  3. In the Wi-Fi Properties screen, make sure that you are inside the Networking tab. Then, proceed to disable the checkbox associated with every entry that is not mentioned below and click Ok.Note: But before you do so, take the time to take a screenshot with your current configuration so you’ll know which settings to revert to in case this method is not successful.

    File and Printer Sharing for Microsoft Networks
    QoS packet scheduler
    Link-Layer Topology Discovery Responder
    Internet Protocol Version 4 (TCP/IPv4)
    Link-Layer Topology Discovery Mapper I/O driver
    Internet Protocol Version 6 (TCP/IPv6)
    Microsoft LLDP Protocol Driver
    Client for Microsoft Networks


    Ensuring the the connection doesn't use 3rd party items
    Ensuring that the connection doesn’t use 3rd party items
  4.  Connect your computer to the home (or work) network again and see if the error is now resolved.

If you’re still encountering the “Windows couldn’t automatically bind the IP protocol stack to the network adapter” error, move down to the next method below.

Method 2: Using Registry Editor to add a DhcpConnEnableBcastFlagToggle value

There’s another popular fix that seems to have helped a lot of users to resolve the “Windows couldn’t automatically bind the IP protocol stack to the network adapter” error.

This method involves using Registry Editor to navigate to the NetworkCards key and fetching the value data of the adapter that is displaying the error. We’ll then use that adapter value data to navigate to its ServiceName string and create a new DWORD named DhcpConnEnableBcastFlagToggle.

This might seem like a hard method to replicate since it’s all done inside the Registry Editor, but it’s actually pretty easy to do. This procedure will not delete anything from your Registry, so you run no risk of damaging any other component if you follow the instructions below to the letter.

Here’s what you need to do:

  1. Press Windows key + R to open up a Run dialog box. Then, type “regedit” and hit Enter to open up the Registry Editor. When prompted by the UAC (User Account Control) click Yes to grant administrative privileges.
  2. Inside the Registry Editor, use the right pane to navigate to the registry key below. You can either paste this path directly into your own Registry Editor window or navigate there manually.
    HKEY_LOCAL_MACHINE\SOFTWARE\Microsoft\Windows NT\CurrentVersion\NetworkCards
  3. Inside the NetworkCards registry key, you should have 2 (or more) sub-keys. Keep in mind that each of those sub-keys corresponds to an adapter. Now to figure out which sub-key corresponds to the adapter that is giving us the problem, select each folder (2, 3 and so on) and check up the Data value of the Description to pinpoint our culprit.
  4. Once you manage to identify which sub-key corresponds to your wireless network adapter, select it, then use the right-pane to double-click on ServiceName.
  5. With the ServiceName value opened, copy it’s entire Value data to your clipboard.
  6. Navigate to the following registry key manually or by pasting the location inside the navigation bar and pressing Enter:
    HKEY_LOCAL_MACHINE\SYSTEM\CurrentControlSet\Services\Tcpip\Parameters\Interfaces\[Value Data]

    Note: Keep in mind that [Value Data] is merely a placeholder for the value that you copied at step 5. Don’t forget to replace it with your own data.

  7. Once you arrive at this location, move over to the right pane, right-click on an empty space and select New > DWORD Value (32-bit). Then, name the newly created registry DWORD to DhcpConnEnableBcastFlagToggle.
  8. Double-click on DhcpConnEnableBcastFlagToggle and set the Value Data to 1 and press Ok.
  9. Reboot your machine and see if the error has been resolved at the next startup.
Resolving the "Windows Coudn't automaitcally bind the IP protocol" using Registry Editor
Resolving the “Windows Coudn’t automatically bind the IP protocol” using Registry Editor

If you’re still encountering the “Windows couldn’t automatically bind the IP protocol stack to the network adapter” error, move down to the next method below.

Method 3: Removing interfering CISCO VPN registry keys

As per various user reports, it seems like older versions of the Cisco VPN are often responsible for causing this particular error. There’s a lot of user speculation that this happens because older Cisco VPN builds are not designed to run play nice with the latest Windows 10 updates (Anniversary update and the Creators Update).

Apparently, the Cisco VPN app can leave behind some registry key (this one is causing the error) even if the program is uninstalled. Luckily, you can resolve this quite easily by running an administrative CMD command. Here’s a quick guide on how to do this:

  1. Press Windows key + R to open up a Run dialog box. Then, type “cmd” and press Ctrl + Shift + Enter to open up an elevated Command Prompt window. When prompted by the UAC (User Account Control), click Yes to grant admin rights.
    Run dialog: cmd
    Run dialog: cmd
  2. Inside the elevated CMD window, type or paste the following command and hit Enter to delete the troublesome key.
    reg delete HKCR\CLSID\{988248f3-a1ad-49bf-9170-676cbbc36ba3} /f

    Note: Keep in mind that if the key is already removed from your system, you’ll get a “The system was unable to find the specified registry key or value” error.

  3. Insert the following command and press Enter to complete the deletion of the key:
    netcfg -v -u dni_dne
  4. Reboot your computer and see if the error has been resolved at the next startup.

If you’re still seeing the “Windows couldn’t automatically bind the IP protocol stack to the network adapter” error, move down to the next method below.

Method 4: Changing the Startup Type of AutoConfig to Automatic

Several users have reported that the “Windows couldn’t automatically bind the IP protocol stack to the network adapter” error was resolved after they changed the Startup type of the AutoConfig service to Automatic.

Although this service should be enabled by default at every startup, a 3rd party application or a gone-bad upgrading process might modify the standard behavior. Here’s a quick guide on ensuring that the Startup Type of AutoConfig is turned on:

  1. Press Windows key + R to open up a Run dialog Box. Then, type “services.msc” and press Enter to open up the Services screen.
    Run dialog: services.msc
    Run dialog: services.msc
  2. Inside the Services screen, scroll down through the list of local services and locate WLAN AutoConfig. Once you see it, double-click it.
    In the Services screen, double-click on WLAN AutoConfig
    In the Services screen, double-click on WLAN AutoConfig
  3. Inside the Properties screen, go to the General tab and set the Startup type to Automatic using the drop-down menu. Then, press Apply to save the changes.
    Set the Startup Type to Automatic, then press Apply to save the Changes
    Set the Startup Type to Automatic, then press Apply to save the Changes
  4. Reboot your machine. At the next startup, Windows should automatically start the WLAN AutoConfig service and resolve the issue.

If you’re still prevented from accessing the internet through your Wi-Fi, move down to the next method below.

Method 5: Using a system restore point

If you’ve come this far without a result, you can probably get the issue resolved if you happen to have a saved system restore point dated before you started experiencing the problem.

Some users in a similar situation reported that a system restore did it for them after a bad Windows update or a bad uninstallation of a VPN software.

An older System Restore point will revert your machine to a state where your Wi-Fi adapter was functioning properly. Here’s a quick guide on how to do this:

  1. Press Windows key + R to open up a Run dialog box. Then, type “rstrui” and press Enter to open the System Restore wizard.
    Run dialog: rstrui
    Run dialog: rstrui
  2. Wait until the utility is started, then select Choose a different restore point and click Next at the first prompt.
    Select the Choose a different restore point toogle and hit Next
    Select the Choose a different restore point toogle and hit Next
  3. In the next screen, check the box associated with Show more restore points to get a full list of your restore points. Then, select a restore point that is dated before you started experiencing this issue and hit the Next button again.
    Select an older System Restore point and click Next
    Select an older System Restore point and click Next
  4. Upon clicking Finish, your computer will restart and the older machine state will be restored.

At the next startup, you should notice that your Wireless connection is working and you’re no longer encountering the “Windows couldn’t automatically bind the IP protocol stack to the network adapter” error.

The post Fix: Windows couldn’t automatically bind the IP protocol stack to the network adapter appeared first on Appuals.com.
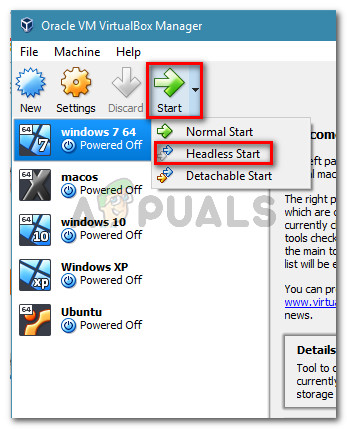
Fix: Can’t move the folder because there is a folder in the same location that can’t be redirected

$
0
0

Some users are getting the “Can’t move the folder because there is a folder in the same location that can’t be redirected” error when they try to change the location of a personal folder the second time in Windows. This is not specific to a certain Windows version since it’s reported on Windows 7, Windows 8.1 and Windows 10.

Can't move the folder because there is a folder in the same location that can't be redirected. Access is denied
Can’t move the folder because there is a folder in the same location that can’t be redirected. Access is denied

What is causing the “there is a folder in the same location that can’t be redirected” error

In this particular error, Windows will actually warn you that you’ll encounter the issue if you go ahead and move a personal folder into SkyDrive, OneDrive or in a similar location.

Windows prompt warning you that you cannot restore to the default location

If you remember, you were prompted with a message saying that if you go ahead with the redirection, you will not be able to restore it to the default location.

Windows is simply not equipped to reverse this modification automatically if you proceeded with the redirection.

Luckily, there’s a way that will enable you to restore the personal folders to the default location, but you’ll have to do everything manually.

How to fix the “there is a folder in the same location that can’t be redirected” error

In this situations where you’ve burned all the bridges that allowed automatic restoration, you’ll need to use Registry Editor to circumvent the error message and regain the normal functionality of your personal folder/s. Here’s a step by step guide with everything that you need to do:

  1. Press Windows key + R to open up a Run dialog box. Then, type “regedit” and press Enter to open up the Registry Editor utility. If the UAC (User Account Control) pops up, click Yes to grant administrative privileges.
    Run dialog: regedit
    Run dialog: regedit
  2. Inside the Registry Editor, use the left pane to navigate to the following location:
    HKEY_CURRENT_USER \ Software \ Microsoft \ Windows \ CurrentVersion \ Explorer \ User Shell Folders
  3. Once you get there, move over to the right pane, locate the personal folder that is displaying the error and double-click on it.
    Locate and double-click the personal folder in the right pane
    Locate and double-click the personal folder in the right pane
  4. Now, replace the current value data with the corresponding Default Value using the list below:
    Desktop   - %USERPROFILE%\Desktop
    Favorites - %USERPROFILE%\Favorites
    Music     - %USERPROFILE%\Music
    Pictures  - %USERPROFILE%\Pictures
    Videos    - %USERPROFILE%\Videos
    Documents - %USERPROFILE%\Documents
    Downloads - %USERPROFILE%\Downloads

    Note: Keep in mind that the corresponding registry key for the Downloads folder is {374DE290-123F-4565-9164-39C4925E467B}.

  5. Once you replace the value data using the list above, press Ok to save the changes, then close Registry Editor.
    Reverting the personal folder to the default value data
    Reverting the personal folder to the default value data
  6. Restart your machine. At the next startup you the personal folder should be fixed and you will no longer encounter the “Can’t move the folder because there is a folder in the same location that can’t be redirected” error.

The post Fix: Can’t move the folder because there is a folder in the same location that can’t be redirected appeared first on Appuals.com.
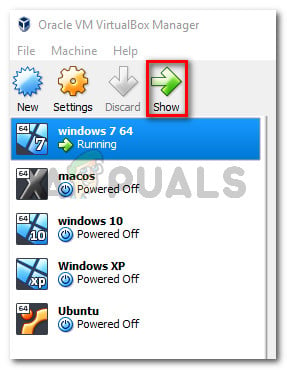
How to Unlock and Root the Google Pixel 2

$
0
0

The Google Pixel 2 and Pixel 2 XL are fantastic, pure Android phones. Despite being released in 2017, the Pixel 2 devices still receive steady updates directly from Google, including the latest updates to Android 9.0 Pie (see Appuals guide How to Upgrade Google Pixel 2 from Oreo to Pie).

In this guide, we will show you how to unlock the bootloader on your Pixel 2 / Pixel 2 XL, and root it using Magisk. It’s a very simple process, so just follow our guide carefully, and comment if anything goes wrong (it shouldn’t).

Requirements:

Unlocking the Pixel 2 / Pixel 2 XL Bootloader

Please be aware that unlocking the bootloader will wipe your phone (factory reset). You should backup any important data before proceeding.

  1. Open your Settings > About Phone > tap Build Number 7 times to activate Developer Mode.
  2. Go to Settings > Developer Options > enable both USB Debugging and OEM Unlocking.
  3. Connect your Pixel 2 to your PC via USB, and launch an ADB terminal on your PC (hold Shift + right click and choose ‘Open a Command Window Here’).
  4. To make sure your Pixel 2 is recognized by ADB, type in the terminal: adb devices
  5. This should display your device’s serial number in the output prompt – if it says your device is not recognized, device offline, or displays no device at all, you may need to try reconnecting the USB, or troubleshooting your USB drivers (also accept the ADB pairing dialogue on your Pixel 2 screen).
  6. If your device is successfully recognized by ADB, type the following command into ADB terminal: adb reboot bootloader
  7. Your Pixel 2 should immediately reboot into Bootloader Mode. Now you need to decide if you want to do a standard or critical unlock. The difference is that a critical unlock will allow you to directly flash bootloader files, and changes the ADB commands you will use.
  8. So you will enter in the ADB terminal either fastboot flashing unlock or fastboot flashing unlock_critical
  9. You now need to follow the prompts on your Pixel 2 – when its all done, reboot the device.
  10. You may now proceed through the Android setup wizard.

Root the Pixel 2 / Pixel 2 XL

Pixel 2 rooted with Magisk.
  1. Download the Magisk Manager APK onto your device. Also grab one of the latest boot images for the Pixel 2 or Pixel 2 XL. Place both of these files on your SD card.
  2. Go through the steps to enable USB Debugging, and also enable Unknown Sources on your device.
  3. Install the Manager Manager APK on your Pixel 2, and launch it.
  4. In Magisk Manager app, press the Install button, then choose Patch Boot Image File.
  5. Choose the boot image you want Magisk to patch (the one you transferred to your SD card, of course!).
  6. After Magisk has patched the boot image, you need to pull it off your device. You can use ADB for this. Just open an ADB terminal on your PC, and type: adb pull /sdcard/MagiskManager/patched_boot.img
  7. This will send the patched boot image to your main ADB folder.
  8. Now in ADB, type: adb reboot bootloader
  9. Now flash the patched boot image with: fastboot flash boot patched_boot.img
  10. Reboot the Pixel 2 with: fastboot reboot
  11. Now when you’re back in the Android system, you can open the Magisk Manager app, and it should confirm your root status!

The post How to Unlock and Root the Google Pixel 2 appeared first on Appuals.com.

How to Upgrade the Google Pixel 2 XL from Oreo to Pie

$
0
0

The Google Pixel 2 is one of the best, pure Android experiences in the cellphone market. Despite being a slightly ‘older’ phone (released in October 2017), the Google Pixel 2 still receives a ton of updates – in fact, the latest factory image for the Pixel 2 was released just this month.

If you’re a rooted user and don’t typically install OTA updates, we are going to show you how to upgrade your Pixel 2 (or Pixel 2 XL) from Android 8.0 Oreo to the latest Android 9.0 Pie factory image. We will also show you how to upgrade to higher versions of Android 9.0 Pie – while it sounds like nearly the same thing, the process differs in a few steps.

Requirements

Before you begin, you should remove any lock screen security, and also uninstall any Substratum overlays if you have them installed. You do not need to remove any Magisk modules you have installed, they should in fact continue working as normal after following this guide.

TWRP 3.2.3-1 decryption works perfectly fine with fingerprint and PIN security methods.

  1. First download and extract the latest factory image, and place it in your main ADB pathway.
  2. Enable USB debugging on your Pixel 2 by going into Settings > About Phone > tap Build Number 7 times until Developer Mode is activated.
  3. Go to Settings > Developer Options > enable USB Debugging.
  4. Now connect your Pixel 2 to your PC via USB, and launch an ADB terminal.
  5. In the ADB terminal, type: adb devices
  6. You should see a pairing dialogue on your Pixel 2 screen – confirm it. The ADB terminal should then display your Pixel 2’s serial number when you use the adb devices command. If ADB does not display your serial number, or returns messages like “No Devices Attached” or “Device Offline”, try to reseat the USB connection or troubleshoot your USB drivers.
  7. If ADB successfully recognizes your device, you can now fastboot the latest factory image with the -w removed in the flash-all.bat file. You need to fastboot this to both slots (A/B partitions), and allow it to fully boot up each time. Alternatively, you can use the Dueces script (allow the factory image to choose which slot to install to).
  8. Now we need to fastboot into TWRP. Download the TWRP 3.2.3-1.img file and place it in your main ADB folder, then transfer the TWRP_installer 3.2.3-1.zip to your Pixel 2’s SD card. Also download and transfer the custom kernel to your SD card as well.
  9. In the ADB terminal, type: fastboot twrp
  10. When you’re in TWRP, swipe to allow modifications. Then from the main menu, choose Install > SD Card > TWRP_installer 3.2.3-1.zip, and swipe to flash it.
  11. After TWRP has been successfully flashed, you should now flash the custom kernel using the same method.
  12. Go ahead and reboot to system, and allow Android to boot up fully.
  13. Now transfer the latest Magisk .zip to your SD card, and reboot your Pixel 2 into TWRP again.
  14. Flash the Magisk .zip via TWRP, and reboot to system once again.

How to Upgrade Pixel 2 from 8x to 9x

Requirements:

  1. First you need to disable any lock screen security on your Pixel 2.
  2. Enable Developer Options (Settings > About > tap Build Number 7 times).
  3. Go to Settings > Developer Options > enable USB Debugging.
  4. Connect your Pixel 2 to your PC via USB, and launch an ADB terminal on your computer.
  5. Make sure the ADB connection is recognized by typing ‘adb devices’ into the ADB terminal.
  6. If your device is successfully recognized, the ADB terminal will display your device’s serial number (you may need to accept a pairing dialogue on your Pixel 2 screen). If it is not recognized, you should try reseating your USB cable, or troubleshooting your USB drivers.
  7. Download the Fastboot 9.0 factory image and place it in your main ADB pathway. Do the same for the TWRP.IMG file.
  8. Download and transfer the TWRP.zip, Magisk.zip, and Magisk Manager APK to your Pixel 2’s SD card.
  9. Open the flash-all.bat file in something like Notepad, and remove the -w from the code, then save and exit the file. If you want the entire device wiped, you do not need to remove the -w from the BAT file.
  10. Launch an ADB terminal on your PC, and fastboot your Pixel 2 into the TWRP .img using: fastboot boot <twrp file name.img>
  11. When you’re in the TWRP main menu, swipe to allow modifications. Then go to Install > SD Card> TWRP .zip file you transferred earlier, and swipe to flash.
  12. When TWRP has successfully flashed, tap Reboot to Recovery (not Reboot to System!), and flash the Magisk Uninstaller the same way you did the TWRP .zip (this step only necessary if you had Magisk previously installed).
  13. Reboot to Recovery again, and flash the custom kernel. Reboot to Recovery again.
  14. Now you can Reboot to System, and allow Android to go through the optimize process. Just let your phone rest for a few minutes.
  15. Now using a file explorer, locate the Magisk Manager APK on your SD Card, and install it (you may need to enable Unknown Sources in your phone’s settings).
  16. Reboot into TWRP recovery once again, and flash the Magisk.zip. Reboot to Recovery followed by Reboot to System.

Troubleshooting Advice

If your Pixel 2 gets stuck on the G logo, or you bootloop into TWRP, try:

  • Performing a hard reboot (long pressing the power).
  • Booting into TWRP, and flashing the Magisk Uninstaller a few times (it may take a few flashes to ‘stick’ correctly).

The post How to Upgrade the Google Pixel 2 XL from Oreo to Pie appeared first on Appuals.com.

Viewing all 4542 articles
Browse latest View live