Quantcast
Channel: How To's | Everything Tech - Appuals.com
Viewing all 4542 articles
Browse latest View live

Fix: Windows Couldn’t Remove your Computer from the Homegroup

$
0
0

Windows Homegroups are extremely useful for connecting several computers into a network and this feature is commonly used among companies and individual users as well. This error message ‘Windows Couldn’t Remove your Computer from the Homegroup‘ appears when users try to exit a homegroup they are a part off and it can be quite difficult to resolve.

Windows Couldn’t Remove your Computer from the Homegroup

Luckily, there are some verified solutions for this problem and they have appeared over the years so we decided to list them out in an article along with detailed solutions. Follow the instructions we have prepared in order to get rid of this error.

What Causes the Windows Couldn’t Remove your Computer from the Homegroup Error?

The list of thing which cause this error is not very long and the problem can be often resolved by looking at the several causes from the list below:

  • HomeGroup Provider and HomeGroup Listener service might be disabled or stopped from running on your computer and you should enable and start them in order to resolve your problem. This can be done easily.
  • A folder called MachineKeys located in C:\ProgramData\Microsoft\Crypto\RSA may have gone corrupt on your computer and you should clear it of any files inside after taking ownership of it.
  • A file called idstore.sst located deep inside the Windows folder in your Local Disk may have also gone corrupt and you should make sure to rename or delete it in order to have Windows replace it manually.

Solution 1: Enable HomeGroup Provider and HomeGroup Listener Services

As is the case with plenty of other Windows features, the HomeGroup feature depends on these two services and they need to be up and running in order for you to be able to opt out of a HomeGroup. Enabling these services is easy and the process is explained in the steps below.

  1. Open the Run utility by using the Windows Key + R key combination on your keyboard (press these keys at the same time. Type “services.msc” in the newly opened box without the quotation marks and click OK in order to open the Services tool.
Running Services from Run dialog box
  1. The alternative way is to open Control Panel by locating it in the Start menu. You can also search for it using the Start menu’s search button.
  2. After the Control Panel window opens, change the “View by” option at the top right part of the window to “Large Icons” and scroll down until you locate the Administrative Tools entry. Click on it and locate the Services shortcut at the bottom. Click on it to open it as well.
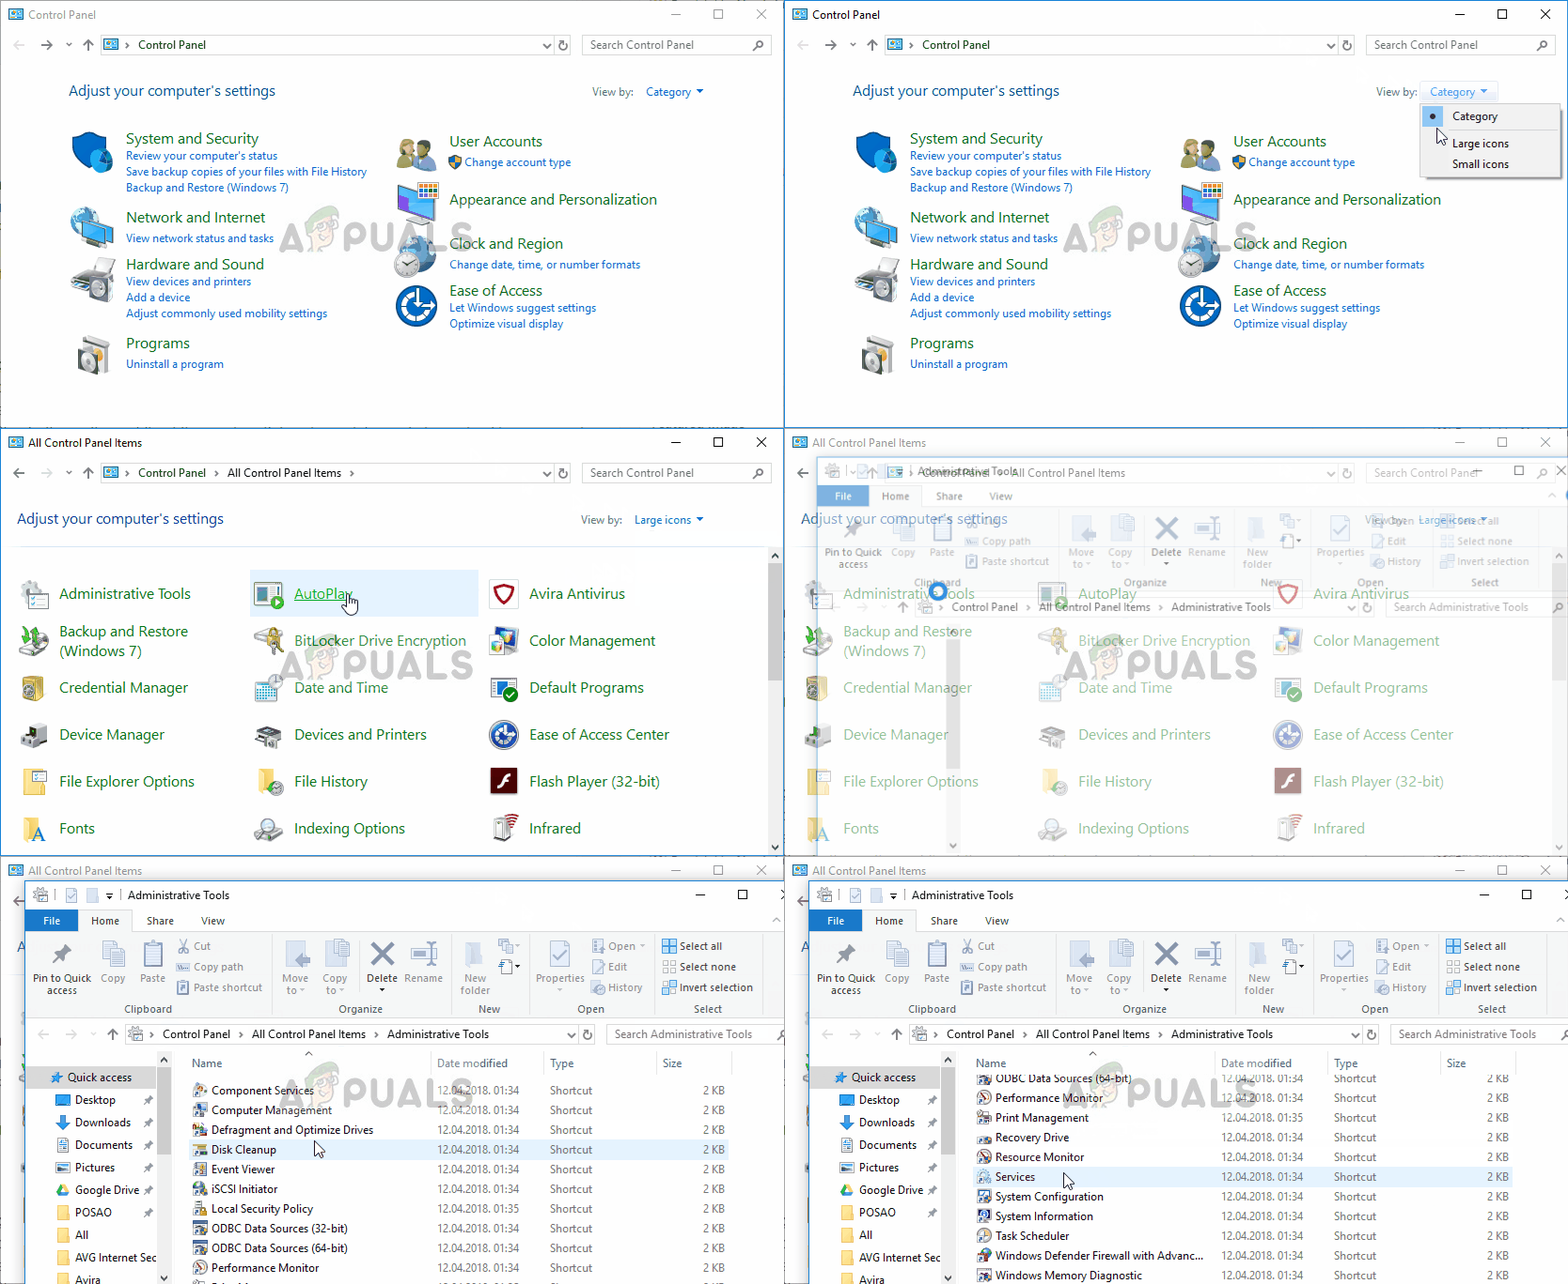
Opening Services from Control Panel
  1. Locate the HomeGroup Provider or the HomeGroup Listener service on the list, right-click on it and select Properties from the context menu which appears.
  2. If the service is started (you can check that just next to the Service status message), you should stop it for now by clicking the Stop button in the middle of the window. If it is stopped, leave it stopped until we proceed.
  3. Make sure that the option under the Startup type menu in the service’s properties window is set to Automatic before you proceed with other steps. Confirm any dialogue boxes which may appear when changing the startup type. Click on the Start button at the middle of the window before exiting. Make sure you repeat the same process for both of the services we mentioned.
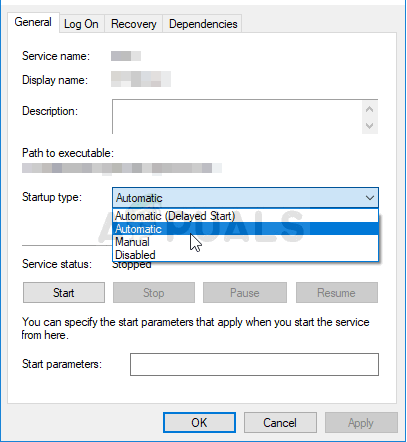
Setting Startup type to Automatic

You may receive the following error message when you click on Start:

 “Windows could not start the service on Local Computer. Error 1079: The account specified for this service differs from the account specified for other services running in the same process.”

If this happens, follow the instructions below to fix it.

  1. Follow the steps 1-3 from the instructions above in order to open the service’s properties window. Navigate to the Log On tab and click on the Browse… button.
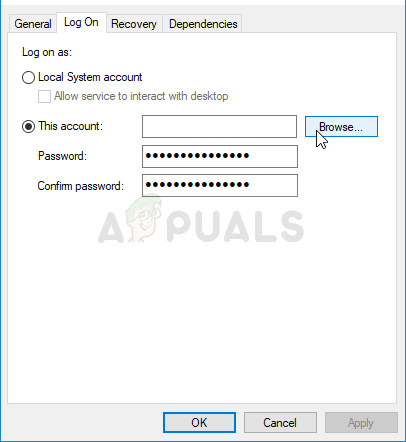
Log On tab in Service’s Properties
  1. Under the “Enter the object name to select” entry box, type in your account’s name, click on Check Names and wait for the name to become available.
  2. Click OK when you are finished and type in the password in the Password box when you are prompted with it, if you have setup a password. It should now start without issues!

Solution 2: Take Ownership of a Folder

Taking ownership of the MachineKeys folder located in C:\ProgramData\Microsoft\Crypto\RSA has fixed the problem for countless users who have struggled with the same problem. The ownership should be transferred to your own user account if you are a local administrator. Follow the steps below to achieve this!

  1. Open your Libraries entry on your PC or open any folder on your computer and click on This PC option from the left side menu.
  2. Navigate to the C:\ProgramData\Microsoft\Crypto\RSA folder.
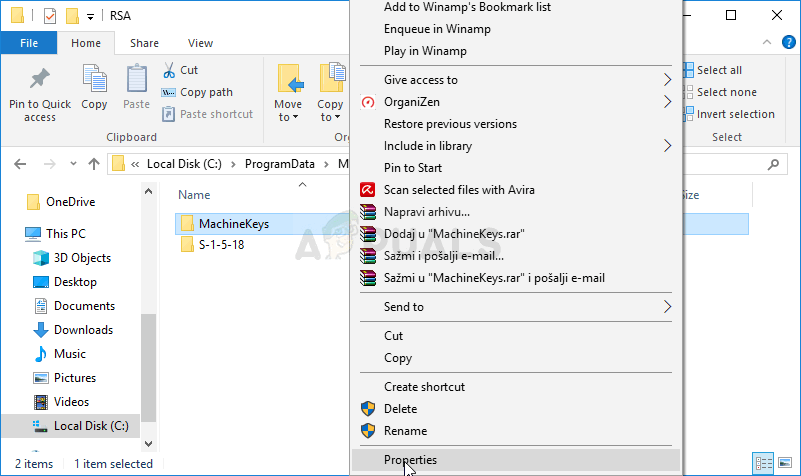
MachineKeys folder in ProgramData…
  1. You will need to take ownership of the MachineKeys folder located inside. Right-click the folder, click Properties, and then click the Security tab. Click the Advanced button. The “Advanced Security Settings” window will appear. Here you need to change the Owner of the key.
  2. Click the Change link next to the “Owner:” label The Select User or Group window will appear.
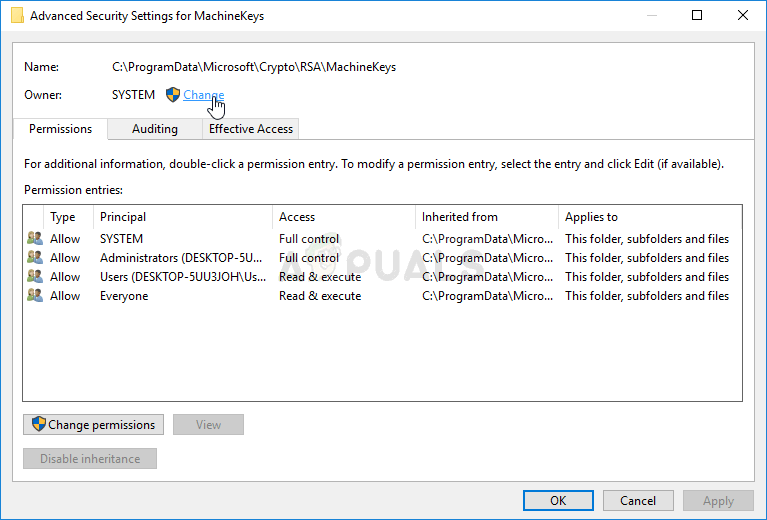
Changing the Owner of MachineKeys Folder
  1. Select the user account via the Advanced button or just type your user account in the area which says ‘Enter the object name to select’ and click OK. Add your user account.
  2. Optionally, to change the owner of all subfolders and files inside the folder, select the check box “Replace owner on subcontainers and objects” in the “Advanced Security Settings” window. Click OK to change the ownership.
  3. Now that you have complete control over the folder, open it, select everything you find inside and remove the files to another location. Restart your computer and the problem should be resolved.

Solution 3: Rename or Delete the Following File

There is a file located in C:\Windows\ServiceProfiles\LocalService\AppData\Roaming\PeerNetworking called idstore.sst which can sometimes become corrupted and directly affect your HomeGroup settings as they are directly related to Peer Networking. The deletion of this file will cause it to be recreated when you either restart your computer restart the PNRP service so make sure you give this a shot.

  1. Open your Libraries entry on your PC or open any folder on your computer and click on This PC option from the left side menu. Double-click to open your Local Disk C: and navigate to the Windows folder inside.
  2. Navigate to ServiceProfiles >> LocalService >> AppData >> Roaming >> PeerNetworking.
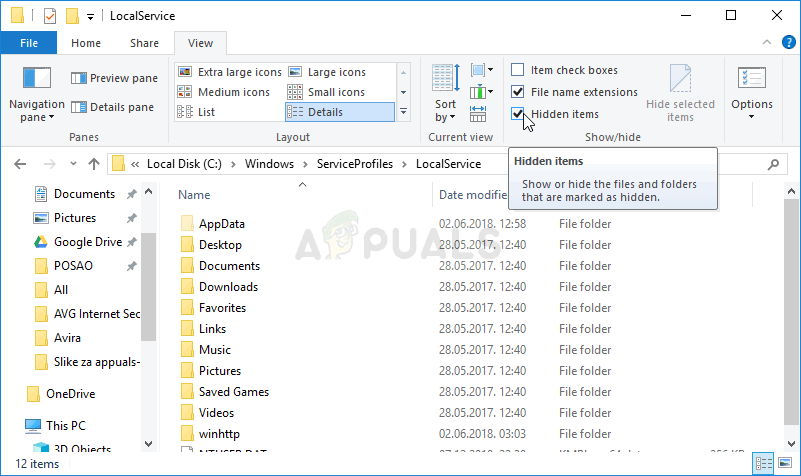
  3. If you are unable to see the ProgramData folder, you may need to turn on the option which enables you to view hidden files and folders. Click on the “View” tab on File Explorer’s menu and click on the “Hidden items” checkbox in the Show/hide section.
    Enabling the View of Hidden Files and Folders
  4. Locate the file named idstore.sst, right-click on it, and choose Rename from the context menu. Rename it to something like idstore.old and apply the changes. Restart your computer and check to see if the problem is resolved.

The post Fix: Windows Couldn’t Remove your Computer from the Homegroup appeared first on Appuals.com.
Fix: Something Went Wrong and your Search Couldn’t be Completed

$
0
0

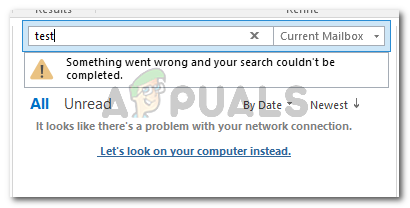
Some Outlook users are seeing the “Something went wrong and your search couldn’t be completed” error when trying to search for something. The issue is only reported to occur on Windows computers and is known to appear on multiple Outlook versions including Outlook 2016, Outlook 2010.

“Something went wrong and your search couldn’t be completed.”

What is causing the “something went wrong and your search couldn’t be completed error?

We investigated this particular error message by looking at various user reports and the repair strategies that they used to get the issue resolved. From what we gathered, there are several common scenarios that are known to trigger this particular error message:

  • The error is caused by a Windows update – KB4022722 (Windows 7), KB4021558 and KB4022722 (Windows 10) are updates released around June 2017 that Microsoft acknowledges that they have the potential of creating this particular error message. Since then, Microsoft patched this potential problem with several hotfixes.
  • Outlook add-in is interfering with the search function – Several affected users have gotten the issue resolved after uninstalling every 3rd party add-in that was active inside Outlook. Apparently, some add-ins have the potential of affecting the search function.
  • Corrupted Office installation – Based on several user reports, the issue can also occur due to an incomplete/corrupted installation. In this case, the issue can most likely be resolved by repairing the Office installation.
  • PreventIndexingOutlook Registry key is stopping the search functionality – Several bad Windows updates and a couple of 3rd party applications might have added a registry value that effectively stops the search function of Outlook.
  • Outlook indexing is broken – Several users encountering the same error message have reported that the issue was resolved after they reset the Outlook Indexing.

If you’re currently struggling to resolve this particular issue, this article will come to your aid. Down below, you have a collection of methods that other users who were in a similar situation have used to get the issue resolved.

To ensure the maximum efficiency, follow the methods below in order until you discover a fix that is effective in your particular scenario.

Method 1: Installing Microsoft’s hotfix for Windows 7

If you suspect that this issue might be occurring because of a Windows update, you’d want to start by installing Microsoft’s hotfix – this addresses this particular issue (along with a few other problems).

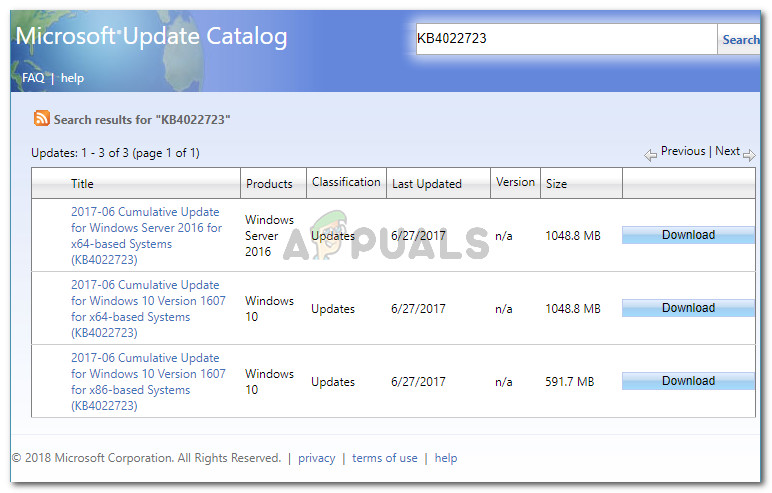
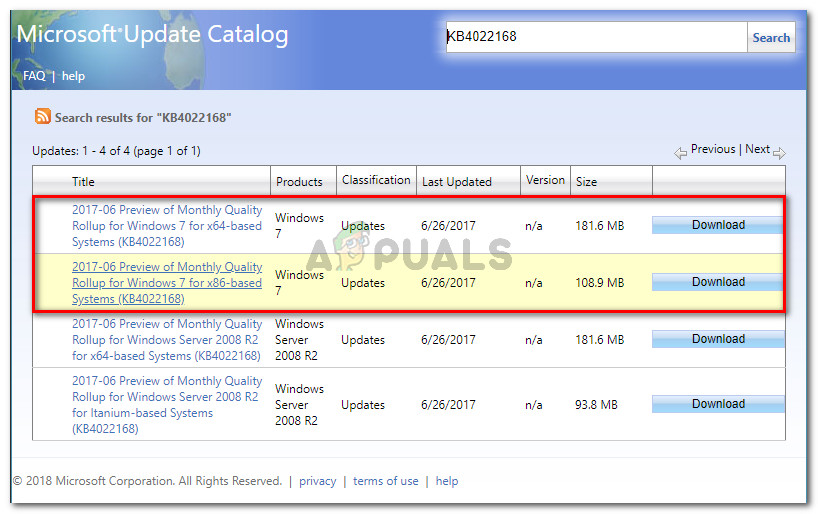
The easiest way to install this particular update is to download the standalone package from this link (here) – according to your Windows version. Once the download is complete, open the installation executable and follow the on-screen prompts to install it on your system.

Downloading the hotfix according to the OS architecture

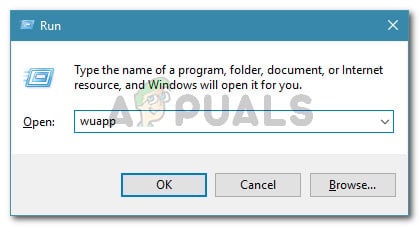
Another way to install the hotfix is to open Windows Update and install the KB4022168 from the Optional section. To open Windows update, press Windows key + R to open a Run dialog box. Then, type “wuap” and press Enter to open the Windows Update utility.

Running dialog: wuapp

Whichever method you choose, make sure to restart your computer to allow the update to install completely. At the next startup, open Outlook and see if the “Something went wrong and your search couldn’t be completed” error is still occurring.

If you’re still seeing the error message or this method was not applicable to your Windows version, move down to the next method below.

Method 2: Installing Microsoft’s Hotfix for Windows 10

If you’re encountering this issue on Windows 10 and it only started occurring after you installed one (or more) Windows updates, you might need to install a couple of hotfix updates.

Microsoft was very slow releasing a fix for Windows 10 when it comes to this error – Windows 7 got almost two months earlier. If you’re on Windows 10, the appropriate hotfix for this particular error depends on your Windows 10 build.

As it turns out, the issue only affects a couple of Windows 10 builds, and the fix is different depending on which version you’re using.

If you’re using build version 1511, download the following hotfix (here). For version 1607, use the following hotfix (here).

Downloading the appropriate hot-fix according to the Windows 10 version

Note: We also recommend that you install every pending Windows Update by opening a Run box (Windows key + R), typing “ms-settings:windowsupdate” and pressing Enter. Then, click the Check for updates button and follow the on-screen prompts to install every pending update.

Once the download is complete, open the installation executable and follow the on-screen prompts to apply the fix to your system. Then, restart your computer to see if this method has been successful.

If you’re still seeing the “Something went wrong and your search couldn’t be completed” error when trying to search for something inside Outlook, move over to the next method below.

Method 3: Removing any 3rd party add-in from Outlook

Some users encountering the same error message have reported that the issue has been resolved after they uninstalled every 3rd party add-in that they had working under Outlook. As it turns out, several 3rd party add-ins have the potential of breaking the search function inside Outlook.

Here’s a quick guide on inspecting and removing any 3rd party add-in from Outlook:

Note: The steps below might vary slightly depending on your Outlook version.

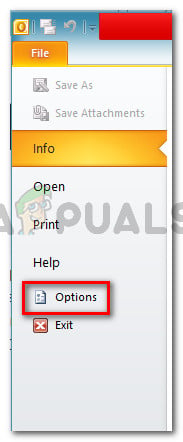
  1. Open Outlook and go to File > Options.
    Opening the Options menu inside Outlook
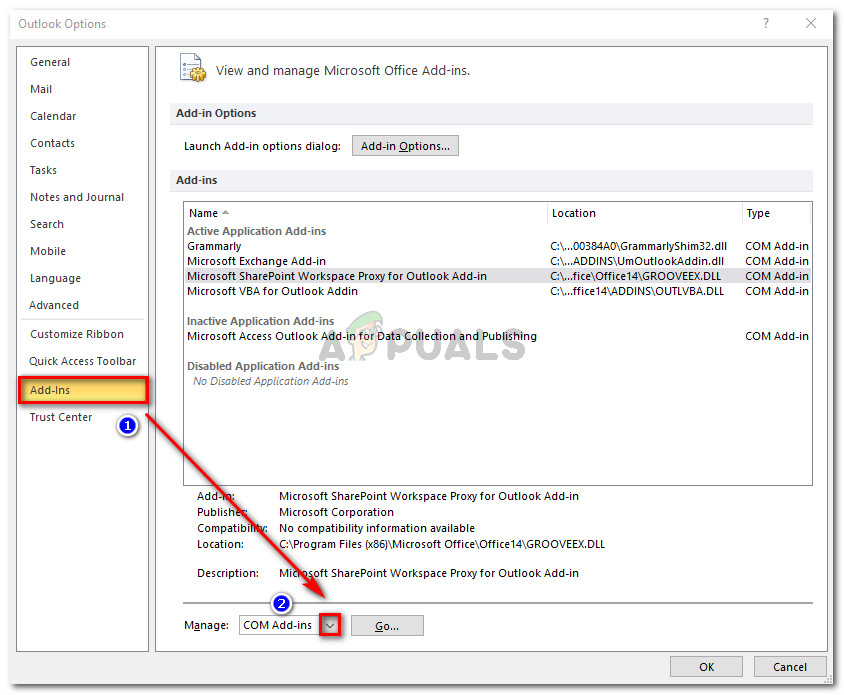
  2. Inside the Outlook Options screen, click on the Add-ins menu from the left menu. Then, move over to the right menu, set the drop-down menu associated with Manage to Com Add-ins and click Go.
    Opening the COM Add-ins menu in Outlook
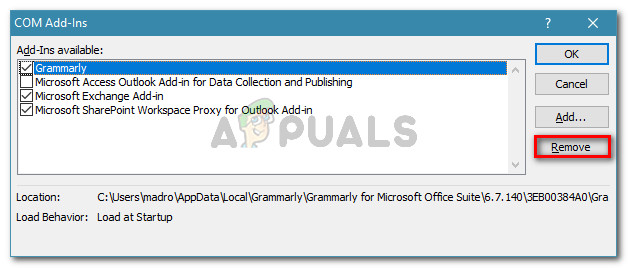
  3. In the COM Add-Ins menu, select each add-in and click Remove to uninstall it from your Outlook application.
    Removing every 3rd party add-in from Outlook
  4. Once every 3rd party update has been removed, restart Outlook and see if the issue has been resolved.

If Outlook’s search function is still showing the “Something went wrong and your search couldn’t be completed” error, move down to the next method below.

Method 4: Repairing the Office installation

Several users encountering the same error message have reported that the issue was completely resolved after they repaired the entire Office installation. This seems to suggest that the issue might also occur due to some kind of corruption among the Office files.

If you suspect that the issue might be occurring due to a corrupted Office installation, here’s a quick guide on repairing it from the Programs and Features window:

  1. Press Windows key + R to open up a Run dialog box. Then type “appwiz.cpl” and press Enter to open up Programs and Features.
    Running dialog: appwiz.cpl
  2. Inside Programs and Features, scroll through the list of applications, right-click on the Office installation and choose Change. If prompted by the UAC (User Account Control), click Yes to grant administrative privileges.
    Accessing the repair menu of the Microsoft Office installation
  3. Inside the repair menu, select the Repair option and click Continue.
    Repairing the Office Installation

    Note: This menu will look different depending on your Office version.

  4. Wait until the process is complete, then restart your computer and see if the error message is resolved.

If you’re still encountering the “Something went wrong and your search couldn’t be completed” error when using the search function inside Outlook, move down to the next method below.

Method 5: Deleting the PreventIndexingOutlook key

As it turns out, this particular issue can also occur even after you apply the Microsoft provided a hotfix. Apparently, the issue might still remain because some registry keys might not get deleted from the Registry. Also, several 3rd party applications might also add this registry key to the Registry, which ends up breaking the search function entirely in Outlook.

Several affected users have reported that for them, the issue was resolved indefinitely after they followed the instructions below:

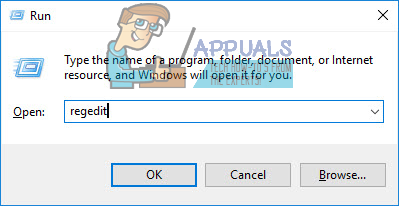
  1. Press Windows key + R to open up a Run dialog box. Then, type “regedit” and press Enter to open up a Run dialog box. When prompted by the UAC (User Account Control), click Yes to grant administrative privileges.
    Running dialog: regedit
  2. Inside Registry Editor, navigate to the following location using the left-hand menu:
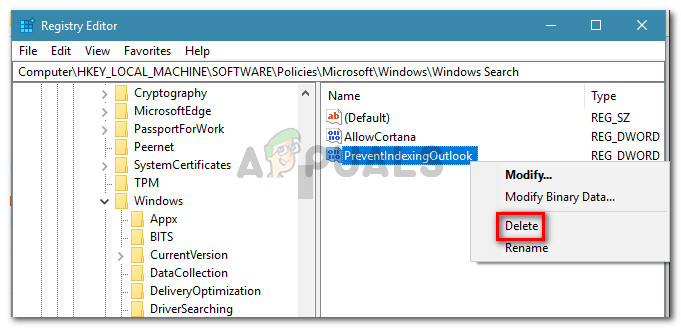
    HKEY_LOCAL_MACHINE\SOFTWARE\Policies\Microsoft\Windows\Windows Search

    Note: For a quicker access, you can also paste the entire path in the navigation bar at the top.

  3. Once you arrive at this particular location, move over to the right-hand menu and see if you have a value named PreventIndexingOutlook. If you do have it, simply right-click on it and choose Delete to get rid of it.
    Deleting the PreventIndexingOutlook value
    Deleting the PreventIndexingOutlook value
  4. Repeat step 3 with the following locations and see the same value is present here. If it is, deletes it just like we did above:
    HKEY_CURRENT_USER\Software\Policies\Microsoft\Office\16.0\Outlook\Search
    HKEY_CURRENT_USER\Software\Microsoft\Office\16.0\Outlook\Search
  5. Once all the PreventIndexingOutlook values have been purged, close Registry Editor, restart your computer and see if the issue has been resolved at the next startup.

If you’re still seeing the same error message, move down to the next method below.

Method 6: Enabling Search Indexing for Microsoft Outlook

Some users have managed to resolve the issue after noticing the Search Index was disabled for Outlook. As it turns out, this can either occur due to 3rd party interference or due to manual user intervention.

If this is what’s causing the “Something went wrong and your search couldn’t be completed” error, you will be able to resolve the issue by going to Indexing Options and enabling Search Indexing for Microsoft Outlook. Here’s a quick guide on how to do this:

  1. Make sure that Outlook is completely closed.
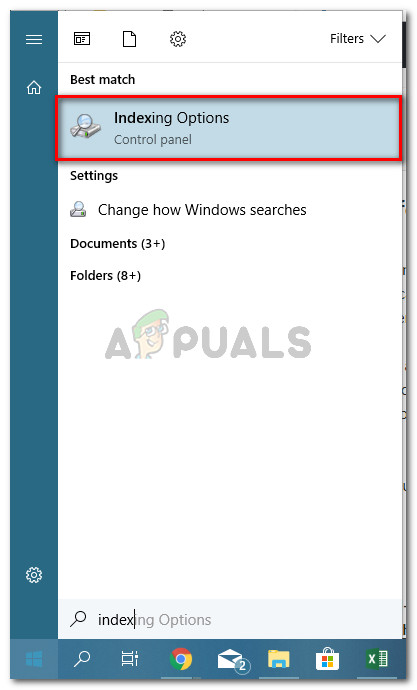
  2. Press the Windows key to bring up the Start menu. Then, type “index” and click on Indexing Options.
    Opening the Indexing options menu
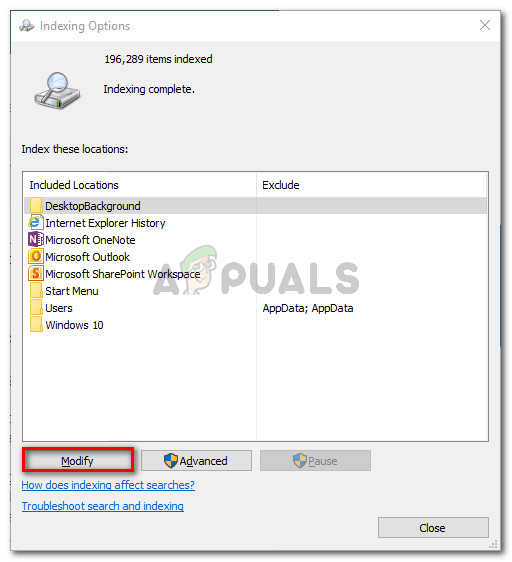
  3. Inside the Indexing Options menu, click Modify.
    Modifying the Indexing Options
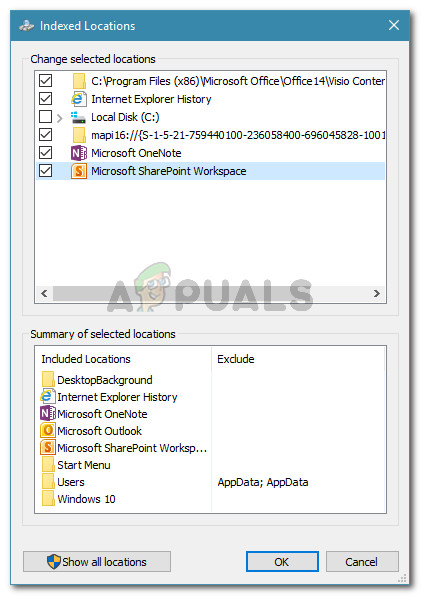
  4. In the Indexed Location menu, check the box next to Microsoft Outlook to include it among the selected locations. Skip this step if Microsoft Outlook already appears under Summary of selected locations. Then, hit Ok to save the changes.
    Making sure that Microsoft Office is included among the Selected Locations
  5. Restart your computer and see if the error message is resolved at the next startup.

If you’re still seeing the “Something went wrong and your search couldn’t be completed” error even after following the steps below, move down to the next method below.

Method 7: Resetting Outlook Indexing

Several users that were struggling to resolve the issue for days have reported that they finally got a breakthrough after they followed a set of instructions used to reset Outlook Indexing.

Here’s a quick guide on how to do this:

  1. Open Outlook and go to File > Options.
    Opening the Options menu inside Outlook
    Opening the Options menu inside Outlook
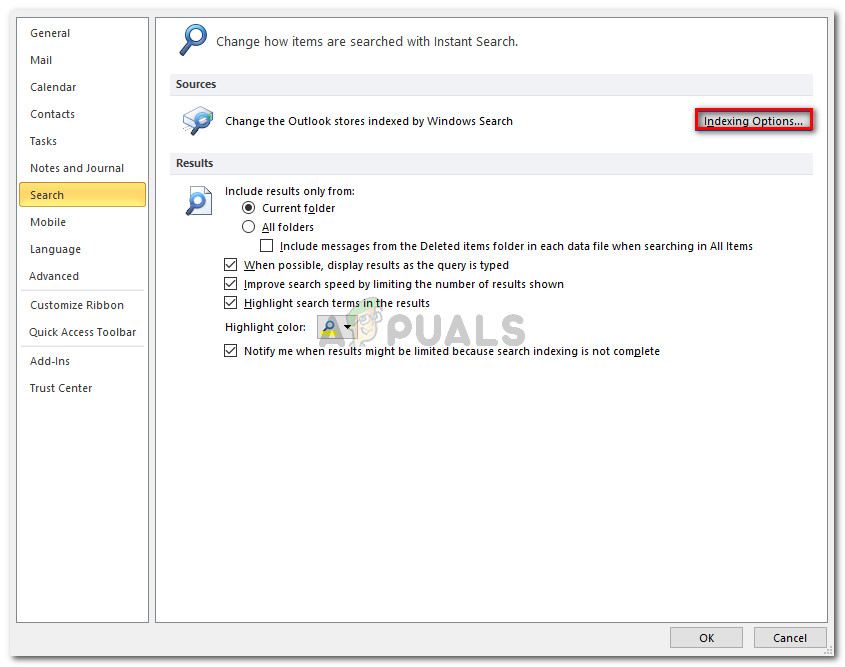
  2. Inside Outlook’s Options menu, go to the Search sub-menu and click Indexing Options under Sources.
    Accessing the Indexing Options Menu from Outlook’s settings
  3. Inside the Indexing Options menu, click on Modify, then uncheck Microsoft Outlook. Once the entry is deselected, click Ok and then Close to save the changes.
    Disabling Outlook indexing
  4. Return to Outlook and go to File > Account settings and click on Account Settings from the newly appeared drop-down menu.
    Accessing the Account Settings menu in Outlook
  5. In the Account Settings window, go to the Data Files tab. Then, note down the location of the OST or PST file that is set as the default.
    Discovering the location of the active PST (OST) file
  6. Close Outlook, open Windows Explorer (File Explorer) and go to the location you previously noted down. Once you arrive at that location, hold down Ctrl and click on each .pst (or .ost) file to select them all, then right click on one and choose Properties.
    Accessing the Properties screen of every PST (OST) file
  7. In the Properties window of the selected files, go to the General tab and click on Advanced.
    Opening the Advanced menu of the selected files
  8. In the Advanced Attributes menu, make sure that the box associated with Allow this file to have contents indexed in addition to file properties is checked. Then, click Ok and Apply to save the changes.
    Allowing the selected files to have their contents indexed
  9. Finally, return to File > Options > Search > Indexing Options > Modify and recheck the box associated with Microsoft Outlook.
    Re-enabling Microsoft Outlook search indexing
  10. Click Close, then restart your computer. At the next startup, the “Something went wrong and your search couldn’t be completed” should be resolved.

The post Fix: Something Went Wrong and your Search Couldn’t be Completed appeared first on Appuals.com.

Fix: Steam App Configuration Unavailable

$
0
0

Steam is a game distribution platform that lets users buy, download, install, and play games. Recently, a lot of users are complaining about the Steam app configuration unavailable issue during the installation of the games. This error will come up during the installation of a game and it will usually appear for a particular game. This error will prevent users from installing the game. Keep in mind that this issue isn’t limited to the installation of complete games, some users are seeing the issue during the downloading/installation of a DLC for the game as well.

Steam app configuration unavailable

What causes the Steam app configuration unavailable error?

There are a couple of things that can cause this issue and they are listed below.

  • Steam Bug: The most common cause of this issue is usually a bug in the Steam system. Since bugs can be introduced during an update and they can cause these type of weird issues, this is highly likely to be a bug. The usual solution for this is to just sit and wait for the developers to release a fix in the next update.
  • Steam appinfo.vdf file: This can also be caused by the Steam’s appinfo.vdf file. This file contains information about your downloaded games like their full names etc. So a problem or corruption in this file can cause issues with the installation. So, deleting this file usually resolves the issue.

Method 1: Delete appinfo.vdf file

Since appinfo.vdf can cause this Steam app configuration unavailable error, deleting the file resolves the issue in most cases. This is because Steam will create this file on the next startup so any corruption or change that might have been causing the issue will not be present in the newly created appinfo.vdf file. So, simply navigate to the location of appinfo.vdf and delete it. Then relaunch the Steam and the issue should be resolved. Steps for performing this process are given below.

  1. Shutdown the Steam app
  2. Hold Windows and press E
  3. Type C:\Program Files (x86)\Steam\appcache\ in the address bar and press Enter
  4. Locate the file named appinfo.vdf. Right click and select Delete. Confirm any additional prompts.
Delete Steam appinfo.vdf file

Now open Steam and try to download the game again.

Note: If this doesn’t work then try to run Steam with admin privileges (right click and select Run as administrator) after deleting the appinfo.vdf file. This might solve the issue.

Method 2: Wait for Steam Update

If method 1 didn’t solve the issue then there isn’t a lot that you can do to rectify the issue. If method 1 didn’t work then that means the issue is caused by a bug in the Steam. These bugs are usually fixed in the next updates so all you have to do is wait for the next Steam update. You don’t have to do anything though, Steam automatically checks for the latest updates. So, updates will automatically be installed once they are available or you will be notified about the new updates. Just don’t forget to open the Steam so it can check for the latest updates.

The post Fix: Steam App Configuration Unavailable appeared first on Appuals.com.

How to Stop Spotify from Opening on Startup

$
0
0

Spotify is a music streaming platform that lets you stream music right from your devices. This service offers a desktop app for Windows users as well. Unfortunately, a lot of Windows users are facing issues with the Spotify app. The Spotify app keeps starting itself on every startup of the Windows. This would have been normal behavior because a lot of apps nowadays comes with a setting that allows them to start at the start of Windows, and this option is turned on by default. But, in this case, users are noticing that the Spotify app always starts at the startup of Windows even if they have turned off the auto-start option from the app.

Spotify

What causes the Spotify app to open at startup?

Here is a list of things that can cause the Spotify app to open at the startup.

  • Spotify app settings: The first and the most common thing that causes this is the Spotify settings. A lot of users aren’t even familiar with this option in the Spotify app and since it is turned on by default, a lot of users are seeing the app turn on by itself at every startup. And even if you want to turn the auto-start option off, this option is well hidden so it makes it really hard for not-so-tech-savvy users to turn it off.
  • Windows Update: The latest Windows updates can also cause this issue. There is a feature in the Windows that reopens the applications that were open on the last shut down. So, even if your auto-start option is turned off, the Spotify app will start on the next startup if you had the Spotify app open at the shut down time.

Note:

Make sure that the Spotify app is closed before you shut down your computer. This will help you narrow down the issue that might be causing this. If the app doesn’t automatically start on the next startup then that means the issue was caused by the Windows feature.

Method 1: Disable Auto-Start from Spotify App

This is the first thing on your to-do list in the process of getting rid of the Spotify auto-start issue. There is an option that lets the Spotify app to auto-start on every startup. Turning it off might solve the issue for you. If you have already disabled this option then move to the next method. Otherwise, follow the steps given below.

  1. Open the Spotify App
  2. Click the downwards arrow beside your picture and select You can also hold the CTRL key and press P to open these settings
Spotify app settings
  1. Select Advanced Settings
Spotify app advanced settings
  1. You should be able to see an option named Open Spotify automatically when you log in to the computer. It should be under the Startup and Windows Behavior. Select No from the drop down menu
spotify app auto-start option disabled

That’s it. This should prevent the app from starting on every log in.

Method 2: Disable Spotify App Auto-Start via Task Manager

Windows provide a way to access the list of applications that are scheduled to run at every startup. You can have a look at this list and disable the auto-start of the Spotify app from this list. Follow the steps given below

  1. Press and hold CTRL, SHIFT, and Esc keys simultaneously (CTRL + SHIFT + ESC). This will open the task manager
  2. Click the Startup This should show a list of apps that are scheduled to open at every startup
  3. Locate the Spotify app from this list and select it
  4. Click Disable from the bottom right corner
spotify app auto-start option disabled (task manager)

This should disable the auto-start of Spotify app.

Method 3: Disable Allow Spotify to be opened from the web

Although it doesn’t make a lot of sense but a lot of users noticed that disabling this option, somehow, fixes the auto-start issue with the Spotify app. So, simply turn this option off by following the steps given below.

  1. Open the Spotify App
  2. Click the downwards arrow beside your picture and select You can also hold the CTRL key and press P to open these settings
Spotify app settings
  1. Select Advanced Settings
Spotify app advanced settings
  1. Toggle off the Allow Spotify to be opened from the web It should be under the Startup and Windows Behavior section and it should be turned on by default
Allow Spotify to be opened from the web disabled

Check if this resolves the issue. If the problem isn’t solved after turning this option off, try to disable the Spotify app from the Task Manager as well (follow method 2). If the problem is rectified then you can keep this option turned off until the issue is fixed by the Spotify developers in the upcoming updates.+

Method 4: Rename Spotify App Exe File

Renaming the Spotify app’s executable file (spotify.exe) and Spotify launcher’s executable file (SpotifyLauncher.exe) will solve the issue for you. So, follow the steps given below to rename the Spotify executables.

  1. Go to your Desktop,right-clickk the Spotify shortcut icon and select Delete
  2. Press and hold CTRL, SHIFT, and Esc keys simultaneously (CTRL + SHIFT + ESC). This will open the task manager
  3. Click Processes tab
  4. You should be able to see the spotify.exe process running in the list. If you don’t see it then run the Spotify app.
  5. Right click the spotify.exe process and select Open file location
Get the location of the Spotify app
  1. Now, close the Spotify app if it is opened
  2. Right click the spotify.exe from the file explorer and select Rename. Add an extra 1 to the name and press Enter. It should be spotify1.exe now. Note: You can name it whatever you want, the point is to rename it.
Change spotify.exe to spotify1.exe
Spotify app executable Renamed
  1. Now right click spotifylauncher.exe from the file explorer and select Rename. Add an extra 1 to the name and press Enter. It should be spotifylauncher1.exe now.

This should prevent the Spotify app to run at every startup. You can right click the spotify1.exe and select Create shortcut. You can cut/paste or drag it to the Desktop so you can use this shortcut to open the Spotify app.

The post How to Stop Spotify from Opening on Startup appeared first on Appuals.com.
Fix: Spotify Search Not Working

$
0
0

A lot of us use Spotify on a day-to-day basis. Since Spotify app is also available for Windows, it’s not uncommon for users to prefer the app over the web version especially when using the Windows. But, the majority of the users are experiencing issues with the search feature of the app. Now as for the problem, users are experiencing problems while searching for the content. For most users, the search function doesn’t work most of the time (sometimes it works). The main issue is that the users either weren’t getting search results or they were seeing an error message. Users got varied messages, some users saw an “Oops Something went wrong” error whereas others saw the “Error: Please Try Again” message. Although a major chunk of the users complained about this issue on the Windows Spotify app, the problem isn’t limited to the Windows platform. However, the solutions provided in this article will only be applicable to the Spotify Desktop app for Windows.

Spotify search not working

What causes the Spotify app search to stop working?

Here is a list of things that can cause this problem

  • Spotify app corrupt file: One of the things that can cause this issue is a corrupt Spotify file. It’s not uncommon for the file to get corrupt and it’s something that happens on its own. The usual solution, in this case, is to replace the corrupted file(s) with the correct ones but it’s really hard to pinpoint the exact corrupted files. So, it can be solved by simply reinstalling the Spotify app.
  • Spotify bug: This issue can also be caused by a bug in the app and this is most likely the case. In this case, it’s usually better to just wait for the next update since these type of bugs are eliminated by the newest updates.

Method 1: Reinstall Spotify

Uninstalling and reinstalling the Spotify app is the solution that has worked for the majority of the users. Although it is a bit tedious but it solves the issue. So, follow the steps given below to completely uninstall the Spotify app and reinstall it.

  1. Make sure the Spotify app is closed
  2. Hold Windows key and press R
  3. Type appwiz.cpl and press Enter
installed programs page
  1. Locate the Spotify app from the installed programs list and select it
  2. Click Uninstall and follow the on-screen instructions
Uninstall spotify from windows
  1. Hold Windows key and press E. This will open the Windows Explorer
  2. Type %AppData% in the address bar and press Enter
  3. Locate the Spotify folder and right click Select Delete and confirm any additional prompts
Delete spotify files from Appdata folder
  1. Now restart the computer
  2. Reinstall the Spotify app once the system restarts

This should fix the search issue of the Spotify app.

Method 2: Web Version

This isn’t a solution but kind of a Band-Aid for the problem and you should do it only as the last resort. If the above method doesn’t work then you should switch to the other versions of the app. If you are experiencing issues on every platform then start using the web version. Majority of the users didn’t experience the search issue on the web version. This isn’t a permanent solution but it will make your Spotify experience a lot better and you can keep using the web version until an official fix is released.

While you are using the web version, keep checking for the latest updates from Spotify. Spotify will most likely fix the issue in the next update.

The post Fix: Spotify Search Not Working appeared first on Appuals.com.

What is WaasMedic and How to Disable it and Fix it?

$
0
0

WaasMedic or Windows Update Medic Service is a Windows Update component that is run in the background for the purpose of repairing Windows Update should it get damaged or corrupted. This service was newly introduced in Windows 10 so that you can run Windows Update without any issues. Windows updates usually include bug fixes, security patches etc. due to which they become an essential part of the system and if you don’t update your system for a while, you might be vulnerable to many security flaws. The WaasMedic.exe file can be detected as a threat or virus by some third-party antivirus software in which case you should add it as an exception. However, this process is usually targeted by malware creators as a disguise as well so make sure to watch out for that.

Since it is a built-in component of Windows update, you can’t really remove it from the system, however, it can be disabled or replaced. You can disable most of the Windows services from ‘Services’, albeit, there are certain services that’ll prompt you with an ‘Access is denied’ dialogue box should you try to disable them. This includes WaasMedic.

Access Denied – WaasMedic

How to Disable WaasMedic?

Although this is not really recommended by Microsoft if you regularly update your Windows, if you don’t, there’s not much to lose then. To disable WaasMedic service, you can’t use the generic method and disable it from Windows Services Manager as it will pop up an ‘Access is denied’ dialogue box, however, you can disable it using a third-party software called Windows Update Blocker. With the help of this tool, you can easily disable any Windows service with just a click. The User Interface is pretty straightforward and easy to use. Once you download the tool, extract it and you’ll get three files; a Read Me text document, a .exe file which is the application and a Wub.ini file. You can download the tool from here.

Windows Update Blocker contents

Follow through the steps to know how to disable WaasMedic:-

  1. First of all, open up Windows Update Blocker.
    Windows Update Blocker
  2. Click on Menu and select ‘Windows Services’ from the list.
  3. Once the Windows Services window loads up, look for ‘Windows Update Medic Service’.
  4. Double-click it and copy the ‘Service name’.
    Windows Service Manager
  5. Go to the Windows Update Blocker directory, and open up the ini file in a notepad.
  6. Under ‘dosvc=2,4’, paste the Service name and put ‘=3,4’ in front of it.
    Wub.ini – Windows Update Blocker
  7. Now, open up the Windows Update Blocker window and hit ‘Apply’.
  8. If you wish to enable the service later down the road, just open Windows Update Blocker, select ‘Enable Service’ and hit Apply.

How to Fix WaasMedic Related Errors??

Since this is merely a background service with the task of repairing Windows update, there are not many errors associated with it. However, the most generic and known would be waasmedic.exe crashes etc. which can be resolved pretty easily.

What causes WaasMedic Errors?

Well, these errors are usually caused by: –

  • Junk files. If you’ve junk files in your system files, they might interfere with the process and as a result, it crashes.
  • Viruses or malware. If your system has been affected by viruses or malware, they might corrupt the service files due to which it crashes.

This error can be solved by the following solutions: –

Solution 1: Using Disk Cleanup

To start off with removing the junk or temporary files stored on your system which might be causing the service to crash, you should use Windows built-in utility Disk Cleanup. This will scan your drives for unwanted files and delete them. To run Disk Cleanup, do the following:

  1. Go to Start Menu, type in Disk Cleanup and open it up.
  2. Select your System volume.
  3. Click ‘Cleanup system files’.
  4. Make sure to check the ‘Temporary Files’ box on the list.
    Windows Disk Cleanup
  5. Wait for it to complete.

Solution 2: Configuring Windows

Finally, if your system had been affected by viruses or malware, it might be the cause of the crashes. Hence, in such a case, you’ll have to turn on DEP for the service. Here’s how to do it:

  1. Go to Desktop and right-click Properties.
  2. On the left-hand side, click Advanced System settings.
  3. Click Settings under Performance.
  4. Switch to ‘Data Execution Prevention’ tab.
  5. Click ‘Turn on DEP..’ and then hit Add.
    Data Execution Prevention
  6. From the list, locate and select waasmedic.exe.
  7. Hit Open.

The post What is WaasMedic and How to Disable it and Fix it? appeared first on Appuals.com.

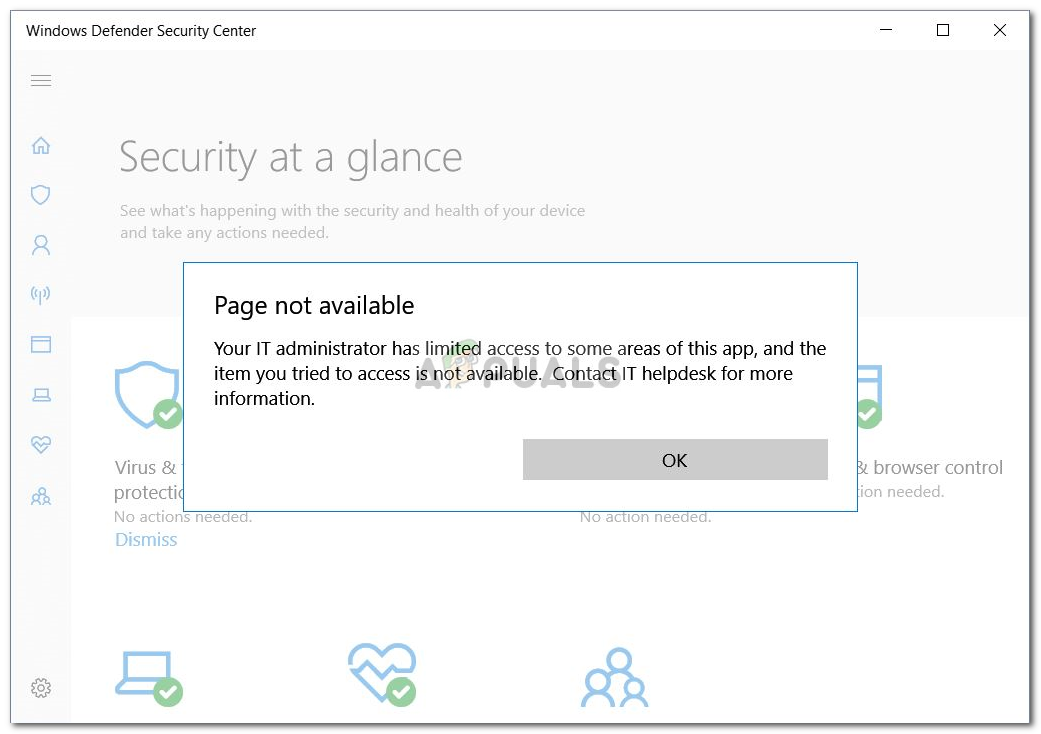
Fix: Your IT Administrator has Limited Access

$
0
0

The error ‘Your IT Administrator has Limited Access’ can potentially be caused by third-party antivirus software and pops up when you’ve recently updated your Windows 10 and try to turn on the Windows Defender. The Windows Defender is an integral part of the Windows 10 that scans your PC without bothering you every time you boot up your system like the other third-party antivirus software out there. The Windows Defender is really effective and requires updates to keep your system safe from the newest malware on the internet. As it’s a built-in component so you can’t really uninstall it however what you can do is turn it off which is something to avoid if you are not a tech guru.

As you can tell from the error itself, it pops up when you try to turn on Windows defender all the while not having the permissions to do it. There are a few ways you can implement to get this error sorted — so no need to worry about that.

Windows Defender Error
Windows 10 Windows Defender Error

What causes your IT Administrator has Limited Access on Windows 10?

The error refers to insufficient permissions which can be due to —

  • Third-party antivirus software. If you’ve been using a third-party antivirus software before the error popped up, it could be due to the antivirus interference.
  • Group policies. Another reason for this error emerging would be group policies. If you’ve set the Windows Defender to disabled in the Group policies, that could be stopping you from turning it back on.

To solve the error, go through the following solutions:-

Solution 1: Sign in as an Administrator

Before you try to turn on Windows Defender, make sure you are signed in as an Administrator. If you have multiple accounts created on your system, log in to the administrative account. If you use a guest or any other non-administrative account, it will result in the error popping up so make sure you’re clear there.

Solution 2: Remove your Antivirus

Another reason for the error appearing could be your third-party antivirus software that is installed on your system. It could potentially be interfering with your system and preventing you from turning on Windows Defender or it might’ve messed up with Windows Defender files due to which it is unable to start again. Therefore, make sure you’ve uninstalled your antivirus before trying to turn on the Windows Defender.

Solution 3: Using a Hidden Administrator Account

When you install Windows on your computer, a hidden administrator account is created automatically. This account is usually utilized by Microsoft Support or any other technicians when you report an error that you’re encountering to them. Hence, to make use of its privileges, use the account to turn on Windows Defender. Here’s how to log into it:

  1. Press Winkey + X and select ‘Command Prompt (Admin)‘.
  2. In the command prompt, type in the following:
    windows hidden account
    Windows command prompt
net user administrator /active:yes
  1. This command makes the hidden account active so you can log into it on the Login screen.
  2. Log out of your account, and log into the hidden administrator account.
  3. Now, try to turn on Windows defender again.

Please make sure to avoid using the account under normal conditions as it can be risky. You can use the following command to make the account inactive:

net user administrator /active:no
deactivate administrator account
Windows – cmd

Solution 4: Editing Group Policies

If you’ve set the ‘Turn off Windows Defender’ policy to ‘Enabled’, that could be one of the reasons the error is popping up. In such an event, you’ll have to edit the Group Policies. Here’s how to do it:

  1. Press Winkey + R to open Run.
  2. Type in ‘gpedit.msc’ to open Group Policies Editor.
  3. Under Computer Configuration, click ‘Administrative Templates’.
  4. Click ‘Windows Components’ to expand the list.
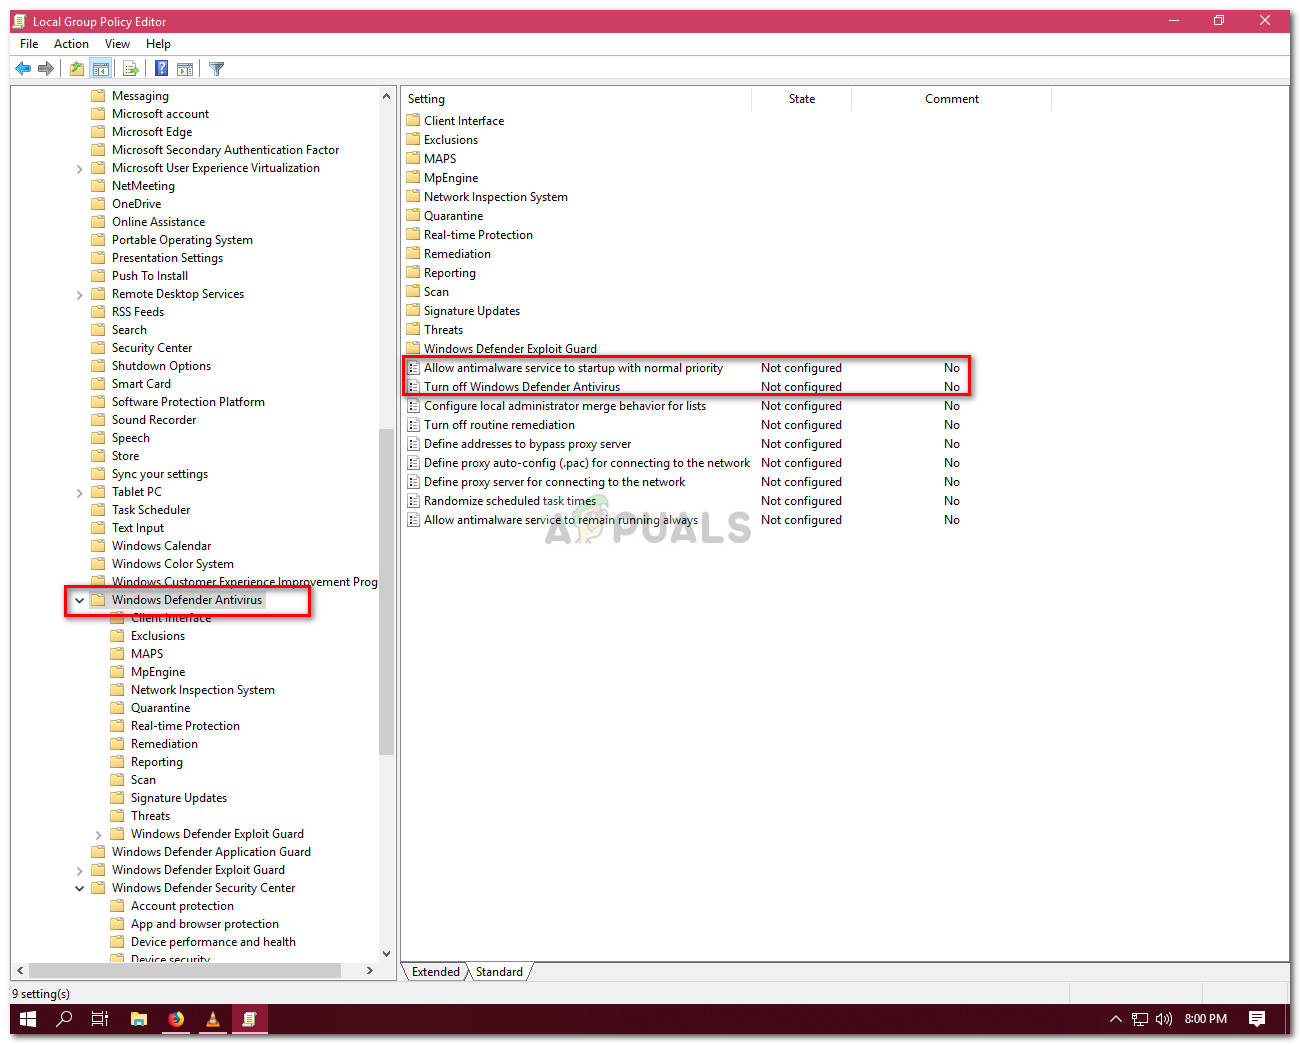
  5. Find ‘Windows Defender’ and on the right-side double-click ‘Turn off Windows Defender’ and ‘Allow antimalware service to startup with normal priority’.
    Group Policies Windows
    Windows Defender Policies
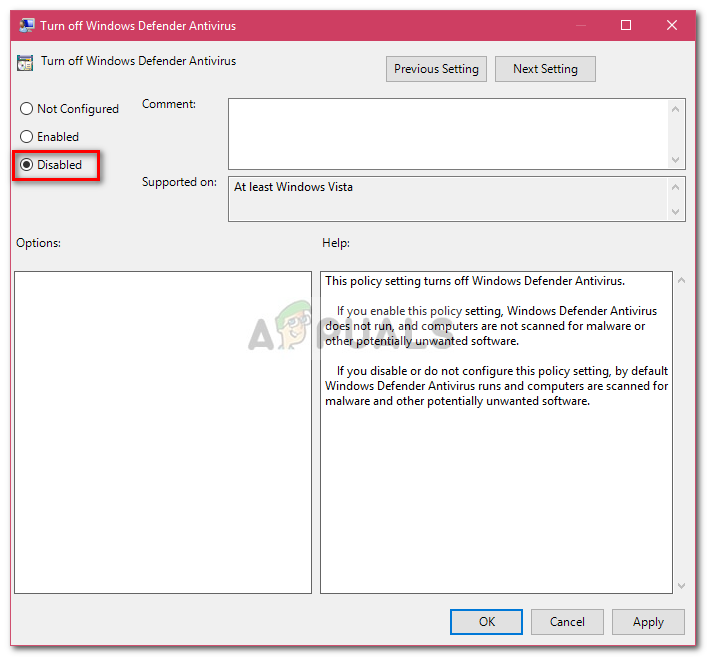
  6. Select Disabled, hit Apply and then click OK.
    Windows defender policies
    Windows Defender policies editor
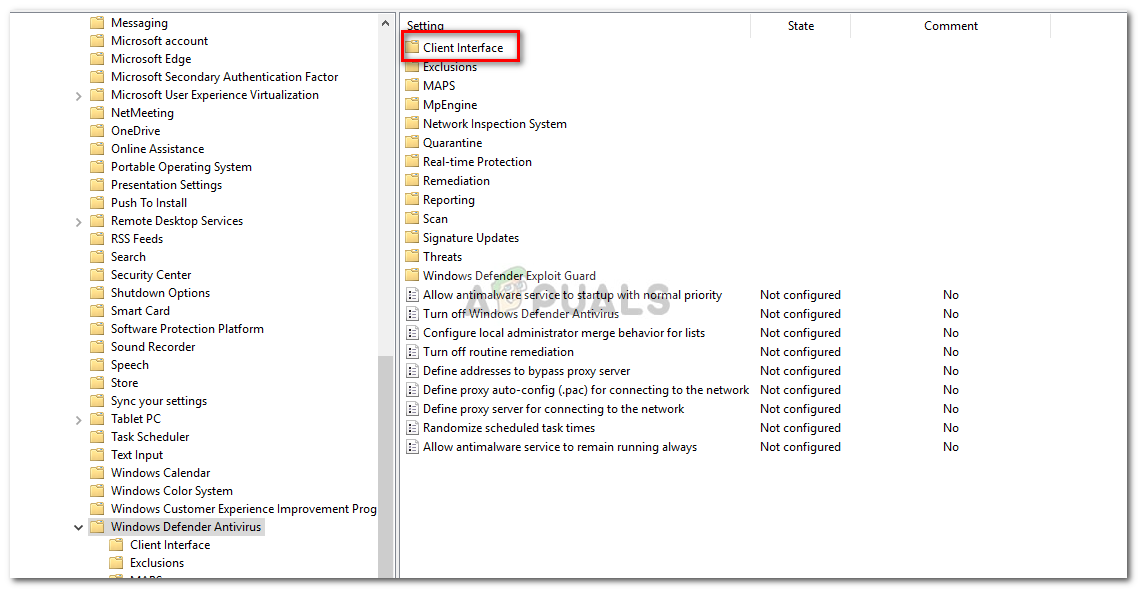
  7. After that, on the same list at the top, you’ll find ‘Client Interface’.
    windows defender policies
    Windows Group Policy – Windows Defender
  8. Open up ‘Client Interface‘ and then finally double-click ‘Enable headless UI mode’.
    Client interface policies
    Windows Defender Client Interface
  9. Set it to ‘Disabled’.
  10. Hit Apply and OK.
  11. Close the Group Policy Editor and try to turn on Windows Defender (might require a reboot).

The post Fix: Your IT Administrator has Limited Access appeared first on Appuals.com.

How to Fix Slow Spotify

$
0
0

Spotify is a great music-streaming application, one of the best out there apparently. However, it does have its issues and errors. One of the most common error with Spotify application is its slow navigation and loading. Most of the users have reported their encounter of this and it is really a hindrance. No one can compromise on music, for example, if you are feeling a little down and require some music to cheer you up? Or maybe you’re with your friends and need some music to lighten up the moods? Spotify is really required at such instances. However, its slowness can be really infuriating.

Spotify is known for their constant updates to let their users enjoy the latest features. This issue, though, is not that repugnant and the workaround is quite easy. Of course, music-streaming requires fast internet speed otherwise you’ll be facing buffering which is quite unacceptable in this modern era. Anyway, with all that being said, let us get into the causes of this issue –

Spotify Slow Load up

What causes the slow load up of Spotify?

This issue can be caused due to lots of generic issues like —

  • Slow internet connection. If you have a bad internet connection while loading up your Spotify app, it could potentially be the cause of it.
  • Messed up Spotify files. If you’ve had a bad Spotify installation i.e power outage during the installation process, this could be the reason.
  • Memory usage. If your system memory is being used by other applications quite the bit due to which Spotify isn’t able to use the required amount, that could be the cause as well.

To speed up your Spotify, you can apply the following solutions: –

Solution 1: Disabling Hardware Acceleration

Spotify makes use of the Hardware Acceleration feature by default which enables it to perform tasks at a higher efficiency and greater priority. However, there’s a downside to it. Instead of speeding it up, it can sometimes be the cause of slowing it down, quite the karma. To fix this, you’ll have to disable hardware acceleration:

  1. Open up your Spotify application.
  2. On the top left corner, click Edit and select Preferences from the drop-down list.
  3. Click on ‘Show Advanced Settings’.
    Preferences of Spotify
  4. Under Compatibility, you’ll see ‘Enable Hardware Acceleration’.
    Enable Hardware Acceleration – Spotify
  5. Turn it off.

Solution 2: Freeing up Memory

Another reason for the slow boot up would be insufficient memory availability. If your background applications like Chrome, Firefox or any other are using lots of your memory, the app won’t be able to utilize the required memory and hence the process will slow down. Therefore, you’ll have to free up memory if you are short on it. Here’s how:

  1. Right click on the taskbar and select Task Manager.
  2. In the Processes tab, look for applications that are utilizing lots of memory.
  3. Click to highlight it and then hit End Task.
    End Applications to Free up Memory
  4. After you’ve freed a sufficient amount of memory, try to open Spotify again and see if it is any faster.

Solution 3: Cleaning up Spotify Folders

Some users have reported that their issue was resolved after they deleted the contents of certain Spotify related folders. You can do this by following these instructions:

  1. If your Spotify application is open, close it.
  2. Then, open up Windows Explorer.
  3. Paste the following path into the directory/address bar of Windows Explorer:
C:\Users\Administrator\AppData\Local\Spotify\
  1. Make sure to replace Administrator by your username.
  2. There, delete the contents of Storage, Data and Browser folders but make sure you don’t delete the folders themselves.
    Local Spotify Folder

Solution 4: Reinstall Spotify

Sometimes, if you’ve had a faulty installation that is, if your pc was shut down during the process of installation, it could’ve messed up the files. In such an event, you’ll have to reinstall the application using the following instructions:

  1. Close Spotify.
  2. Go to the Start Menu and open Control Panel.
  3. Click Uninstall a program under Programs and Features.
  4. From the list of installed applications, locate and uninstall Spotify.
    Uninstall Spotify from Control Panel
  5. Download Spotify from its official website and then install it.

The post How to Fix Slow Spotify appeared first on Appuals.com.

How to Unlock and Root the Razer 2 With Magisk

$
0
0

The Razer 2 is one of the hottest gaming phones available, having a Snapdragon 845 SoC, 8GB of RAM, and 64GB of internal storage. The original Razer Phone was a snap to route, and for the Razer 2 its no different, since Razer just released the official factory images. We can achieve root by unlocking your Razer 2 bootloader, and flashing a patched boot.img from Magisk.

In this Appuals guide we will show you how to unlock and root the Razer 2, just follow our instructions carefully and comment if you encounter any problems during the process!

Warning: This process involves unlocking the bootloader which will factory reset your Razer 2 and wipe all personal data. Please backup your important data before proceeding!

Requirements

Unlocking the Razer 2 Bootloader

  1. The first step is to unlock your bootloader. Go to Settings > About Phone > tap Build Number 7 times to unlock Developer Mode.
  2. Now go to Settings > Developer Options > enable USB Debugging and OEM Unlock.
  3. Launch an ADB terminal on your PC (hold Shift + right click in your main ADB folder and click ‘Open a command window here’).
  4. Connect your Razer 2 to your PC via USB to your PC, accept the ADB pairing dialogue on your Razer 2 screen, and in the ADB terminal type: adb devices
  5. The ADB terminal should display your device’s serial number. If it says “Device Offline” or “No Devices Found”, you may need to troubleshoot either your USB drivers (try installing the Google USB drivers – these are developed for Google Nexus devices but users have confirmed them to work with the Razer devices also). Or try a different USB cable / reseating the USB connection.
  6. If adb devices returned your device’s serial, we’re okay to continue. In the ADB terminal simply type: adb reboot bootloader
  7. Your Razer 2 will reboot to a Download Mode screen. Now you can type in ADB: fastboot flashing unlock
  8. Your Razer 2 will ask you to confirm, so agree if you wish to continue. Your bootloader will be unlocked and your device will be factory reset. When the process is complete, you can reboot to Android system.
  9. Once back in the Android system, you will need to complete the Android setup wizard. Once that is done, re-enable USB debugging in Developer Options as you did earlier.

Rooting the Razer 2 with Magisk

  1. Download the factory image from Requirements section of this guide, and un-archive it. Extract the boot.img file found inside the archive, and copy it to your Razer 2’s SD card.
  2. Download and install Magisk Manager – make sure it gets installed to Internal Storage, not your SD card.
  3. Launch Magisk Manager, and tap ‘Patch Boot Image File’, then choose the boot.img file you transferred to your phone earlier.
  4. After Magisk Manager patches the boot.img, it will be named “patched_boot.img” – transfer this back to your PC, and place it inside your main ADB pathway (in the same folder as ADB.exe).
  5. Boot your Razer 2 into Fastboot Mode (shut it down, then hold Volume Down + Power to reboot into Fastboot Mode).
  6. Once you are in Fastboot Mode, type in the ADB terminal on your PC: fastboot flash boot patched_boot.img
  7. If you encounter an issue, you probably need to specify which slot to flash the patched_boot.img to (it doesn’t always select the correct slot automatically). To do this, type in ADB terminal: adb shell getprop ro.boot.slot_suffix
  8. This should return either _a or _b – whichever one it returns is the slot we need to flash to. So in this case, you will alter the flashing command to: fastboot flash boot_a patched_boot.img (or _b if that was the slot returned).
  9. After you have successfully flashed the patched_boot.img, reboot your Razer 2 and launch Magisk Manager. It should confirm if your device was successfully rooted. If it was, do not accept OTA updates moving forward, or else bad things can happen (bootloops, most usually).

That’s it! Please note an official TWRP port for Razer 2 is not yet available, but you may be able to find an unofficial port. In any case, we will update this article to include TWRP flashing instructions once an official TWRP port becomes available.

The post How to Unlock and Root the Razer 2 With Magisk appeared first on Appuals.com.
How to Unlock and Root the Xiaomi Poco F1

$
0
0

The Xiaomi Poco F1 is a self-titled “flagship killer”, having been designed with Android enthusiasts in mind. It boasts a Snapdragon 845 SoC, with 6GB and 8GB RAM and 64GB or 256GB internal storage options. It’s a powerful device from Xiaomi, who is already known for releasing high-end hardware at affordable prices to consumers.

In this Appuals guide, we will show you how to unlock the bootloader, and root the Poco F1 using a combination of TWRP and Magisk. Please note that Xiaomi uses a bureaucratic bootloader unlock process, so you will need to fill out a form on the Xiaomi bootloader unlock request website, and wait for them to email you a confirmation (usually only takes 2 – 4 days).

Also, unlocking the bootloader will reset your device to factory settings, so make sure you backup your important data before proceeding. As a final note, some users report issues (see linked XDA thread) with the official Mi Flashtool on AMD Ryzen CPUs – if this applies to you, try running the Flashtool on a different CPU (if you have access to one).

Requirements

Note: We are offering several TWRP versions that are compatible with this device, mostly they differ by theme. Just choose one you like. At the end of this guide, we also offer download links for various official and unofficial firmwares.

Unlocking the Poco F1 Bootloader

  1. We begin by unlocking your bootloader. Go to the MIUI Unlock website, and fill out the official bootloader unlock request form (requires a MI account). Then just wait 2 to 4 days for them to email you confirmation your account has been accepted.
  2. When you receive your code, go to Settings > About Phone > tap “MIUI Version” 7 times to unlock Developer Mode.
  3. Go to Additional Settings > Developer Options > enable USB Debugging and OEM Unlocking.
  4. Now download the Mi Flashtool and run it as Administrator on your computer.
  5. Sign into your Mi account in the Mi Flashtool, and make sure you are also signed in on your Poco F1 (check in Settings > Mi Unlock Status > Add Account & Device).
  6. Shut down your Poco F1, and reboot into Fastboot Mode (hold Volume Down + Power).
  7. Connect your Poco F1 to your PC via USB, and click the ‘Unlock’ button in Mi Flashtool.
  8. Your Poco F1 will be unlocked and factory reset. When the process is finished, you can launch an ADB terminal and check if it was successful by typing: fastboot oem device-info
  9. If your bootloader was successfully unlocked, the ADB terminal should display “Unlocked”. If not, you may need to try doing the unlock again, or emailing Xiaomi support.

Installing TWRP Recovery on Poco F1

Before proceeding, make sure you remove any screen security (PIN, password, finger print) on your Poco F1, as TWRP data decryption is not fully working at the moment.

  1. Download the stock recovery from Requirements section, and transfer the recovery.img to your main ADB folder (alongside adb.exe).
  2. Re-enable USB Debugging on your Poco F1, and launch an ADB terminal on your PC.
  3. In the ADB terminal, type the following commands:
  4. Adb reboot bootloader
  5. Fastboot flash recovery recovery.img
  6. You should now be able to reboot into TWRP by holding Power + volume up.

Alternative TWRP Install Method

  1. Download TWRP Installer and transfer to your C:\ on your PC.
  2. Reboot your Poco F1 into Fastboot Mode and connect it via USB.
  3. Open the TWRP Installer folder and run twrp-installer.bat as administrator.

Rooting the Poco F1

  1. Download the Force Encryption Disabler and Magisk 17.2 from our Requirements section of this guide.
  2. Copy both files to your SD card, and boot your Poco F1 into TWRP (remember, Power + Volume Up).
  3. In the TWRP main menu, choose Install > Force Encryption Disabler > swipe to flash.
  4. Do not reboot to system! Choose ‘Reboot to Recovery’ (will reboot back into TWRP).
  5. Now go to Format > Data (Internal Storage).
  6. Finally go to Install > Magisk .zip > swipe to flash.
  7. Now you can reboot to Android system, and install Magisk Manager to verify root status.

Official and Unofficial MIUI Firmware for Poco F1

Note: You should use the official MIUI ROM Flashing Tool for flashing firmware and custom ROMs.

MIUI 9 Global Stable

MIUI 9 Global Stable 9.6.18.0

MIUI 9 Global Stable 9.6.22.0

MIUI 9 Stable 9.6.23.0 OEJRUFD

  • MiFlash / Fastboot V9.6.23.0 OEJRUFD – Download

MIUI 9 Global Stable 9.6.24.0

MIUI 9 Global Stable 9.6.25.0

MIUI 10 10.0.6.0 Global Stable

MIUI 10 Global BETA

EU Firmwares

Android PIE 9.0 Global and EU Firmwares

MIUI 10 Android Pie 9.0 Stable Firmware

Mi-Room

Revolution OS

The post How to Unlock and Root the Xiaomi Poco F1 appeared first on Appuals.com.
Fix: Xbox Sign in Error 0x87dd0006

$
0
0

The 0x87dd0006 error can be caused by incorrect billing information, corrupt profile etc. due to which users are not able to sign in to their Xbox accounts. Xbox lets you enjoy tons of games on your Xbox console, however, your gaming sessions sometimes might be interrupted by generic errors. The 0x87dd0006 error was widely known and the Xbox Support tried their hardest to resolve this issue. Nonetheless, some users still encounter the issue which is atrocious as gaming sessions are not to be meddled with.

The Xbox One was the main victim of this error, but due to the great and early response of Xbox Support, the issue was quickly dealt with. For those, who still get to confront this irksome error, well, worry no more. This article will teach you how to fix your error without any difficulties. So just follow through the mentioned solutions and you’ll be game in no time.

Xbox Sign In Error 0x87dd0006

What causes the Xbox Sign in Error 0x87dd0006?

This login error can be caused due to the following reasons —

  • Incorrect billing information. If the billing information that you’ve provided is incorrect, the error can emerge because of it.
  • Corrupt Profile. Sometimes, user profiles are corrupted due to which the error pops up.
  • Network Configuration. One of the times, your network configuration might be a little uncanny due to which the error can pop up.

To wash away your issue, follow the given solutions.

Solution 1: Rectify your Billing Information

The common cause of the error 0x87dd0006 is incorrect billing information. If your billing information is incorrect, it can cause the error to pop up as the payments are not being made. In this case, you just have to double-check your billing information.

  1. Go to your Microsoft account.
  2. Navigate to the Payment and billing section and choose Billing info.
    Xbox Settings – Payment and Billing
  3. Select Edit Profile option and then follow the given instructions to update your billing information.

Solution 2: Delete your Profile

If your user profile gets corrupted, you’ll have to delete it and then download it again. You can easily re-add your account after deleting so no need to worry. Here’s how to do it:

  1. On your controller, press the Xbox button to open the guide.
  2. Select System and then go to Settings.
  3. Now, navigate to Accounts and then select Remove accounts.
    Remove Account – Xbox Account Settings
  4. Just select the account you want to remove and then hit Remove to remove it.
    Remove My Account – Xbox Accounts

Once done, it is time to add your account again. Do the following:

  1. Once again, press the Xbox button to open the guide.
  2. Select your avatar, move down and select Add new.
  3. Enter your login credentials.
    Xbox – Sign In
  4. Agree to the Service and Privacy terms.
  5. Follow the on-screen instructions to manage your account and Security.

Solution 3: Update the Console

Updates are integral for any hardware. If you haven’t updated your console for quite a while, the error might be emerging because of it. Therefore, make sure you are running the latest version. Here’s how to update your console:

  1. Press the Xbox button to open the guide.
  2. Go to Settings and then select All Settings.
  3. Navigate to System and then Updates.
    Updates – Xbox System Settings
  4. Select Update console to check for any updates out there.

Solution 4: Restart your Router

Like we mentioned, sometimes your network configuration could be the root of the problem. When you restart your router, your network configuration resets and you are able to start fresh. Doesn’t matter if you have a wireless router, make sure you do restart it.

Also, make sure to turn off your Xbox before restarting your router. Once you’ve done that, turn on your Xbox console again and try to log in.

Solution 5: Sign in to a different account

Some users have reported that their error was fixed once they logged into a different account, logged out of it and then tried to login into their account. Therefore, it is worth a try. If you have another account, just sign in to that account, log out of it and try to sign in to your own account.

Solution 6: Sign out of every Account

There have been reports that the error can also be solved by signing out of every account that is logged in. What you have to do is log out of every account, in your connection settings, select the ‘Forget Wi-fi’ option and then turn off your Xbox. After that, turn on your Xbox console and connect to your Wi-fi. Then, try signing in to your account to see if it has solved your issue.

The post Fix: Xbox Sign in Error 0x87dd0006 appeared first on Appuals.com.
Fix: Windows Update Error 0x800704c7 on Windows 10

$
0
0

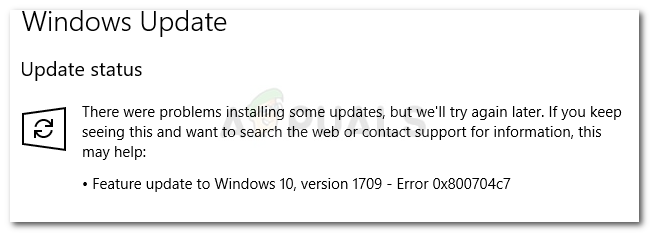
The error 0x800704c7 is caused due to missing or corrupted files, as well as background processes conflicting with the update due to which you are not able to get the update. The error, sometimes, appears while your system is being updated and out of the blue, you are prompted with this error. The hotfixes released by Microsoft are paramount and your system is really dependent on it, however, errors like this one can prevent you from getting your hands on the update.

It is of some essence as the error doesn’t only appear while updating but it has the potential of emerging while you are doing your daily-routine tasks i.e browsing etc. There have been reports that this error popped up while using Chrome so it is not something to ignore. Nevertheless, this article will show you how to resolve your problem in the easiest way possible.

Windows Update Error 0x800704c7

What causes the Update Error 0x800704c7 on Windows 10?

Like we mentioned, the error has the potential of popping up while you are busy in your daily routine tasks, hence, it is usually caused by —

  • Missing or corrupted system files. Missing or corrupted system files mean your system won’t be able to operate normally and you’ll be confronting many errors including this one.
  • Background processes. Another thing that can cause this error to pop up would be background processes. If your background applications like antivirus etc are interfering with your system, the error could be caused because of it.

With that said, it is time to get into the solutions.

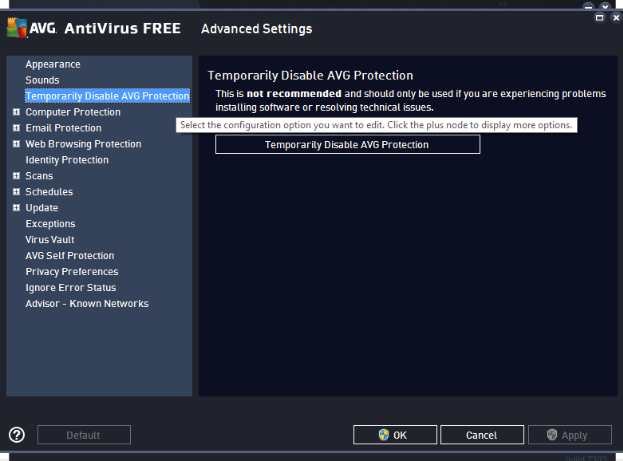
Solution 1: Turn off your Antivirus

Third-party antiviruses are good and they get the credit for it, however, there are certain cons to them as well. The major one would be that they interfere with your system to the degree that they’re able to stop or prevent anything. Due to this interference, you can be prompted with the 0x800704c7 error code. Hence, before we go on any deeper, make sure you’ve turned off your third-party antivirus. Also, make a reboot and try to run the update after your antivirus has been disabled.

Disabling AVG

You can check our article on How to Turn Your Antivirus Off.

Solution 2: Waiting it out

If you are one of the victims whose update gets stuck after reaching a specific percentage, this solution is for you. Sometimes, the update can be delayed from the server-side or potentially anything else due to which it requires some time. Therefore, if your update is stuck, make sure to give it a couple of hours. If the update wizard still doesn’t proceed, you may proceed to the below-mentioned solutions.

Solution 3: Fixing Windows File Corruption

Windows system files corruption could be one of the reasons you are encountering the error. Such scenarios are not that generic, however, they do happen. In such an event, you’ll have to repair or fix your Windows system files using two command-line utilities called SFC and DISM. System File Checker (SFC) is a tool that lets you scan your system and repair any corrupted or bad files; if found. However, there are times when SFC isn’t able to get the errors in which case the Deployment Image Servicing and Management (DISM) comes in handy. It will perform a thorough search of your system and fix the corrupted files.

To learn how to use these utilities, please refer to SFC and DISM articles published on our site containing quite the details.

Solution 4: Downloading the recent KB

You can also try to download the most recent KB that you’ve been trying to install on your system from Microsoft Update Catalog. Here’s how to do it:

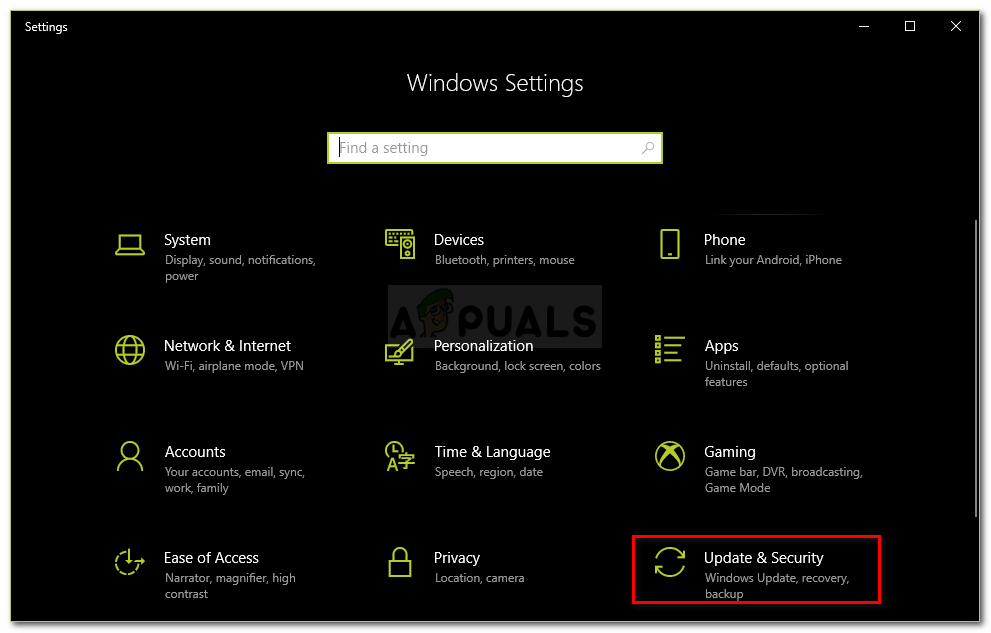
  1. Press Winkey + I to open Settings.
  2. Go to ‘Update and Security’.
    Settings – Update and Security
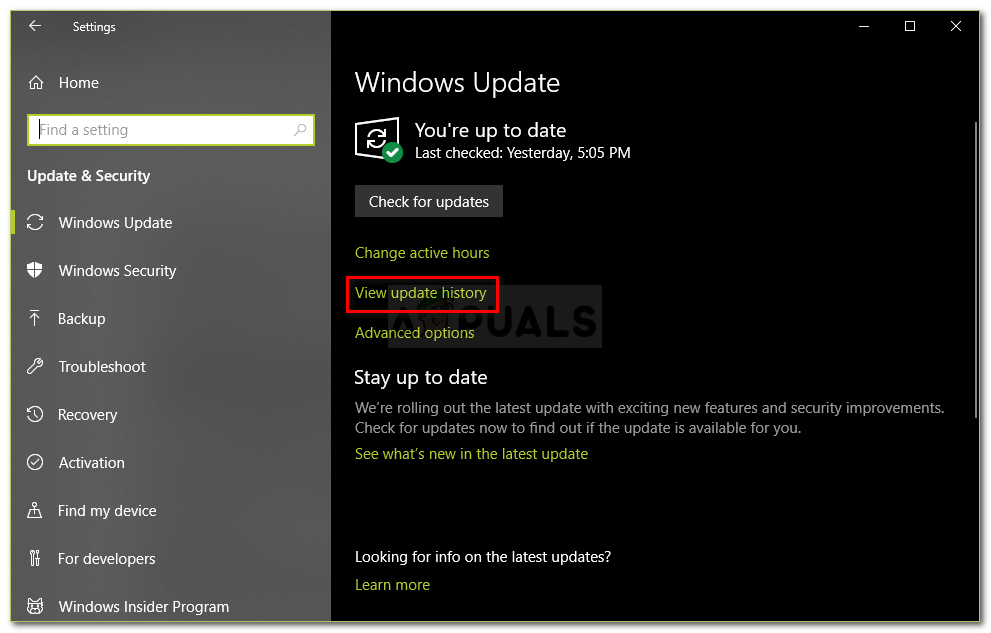
  3. In the middle pane, you’ll see ‘View update history’. Click on it.
    Settings – Windows Updates
  4. There, find the most recent KB which is usually located at the top. Copy the KB code.
  5. Head to Microsoft Update website and search the KB code.
    Microsoft Windows Catalog Search Results
  6. Download it for your respective Windows.
  7. Once the download finishes, open it up and install.

Solution 5: Performing a System Restore

System Restore is something you can utilize if you are facing an error which is popping up after a certain software installation or any other change. It will restore your system to a point back where your error wasn’t occurring. Here’s how to do it:

  1. Go to Start Menu and open up Control Panel.
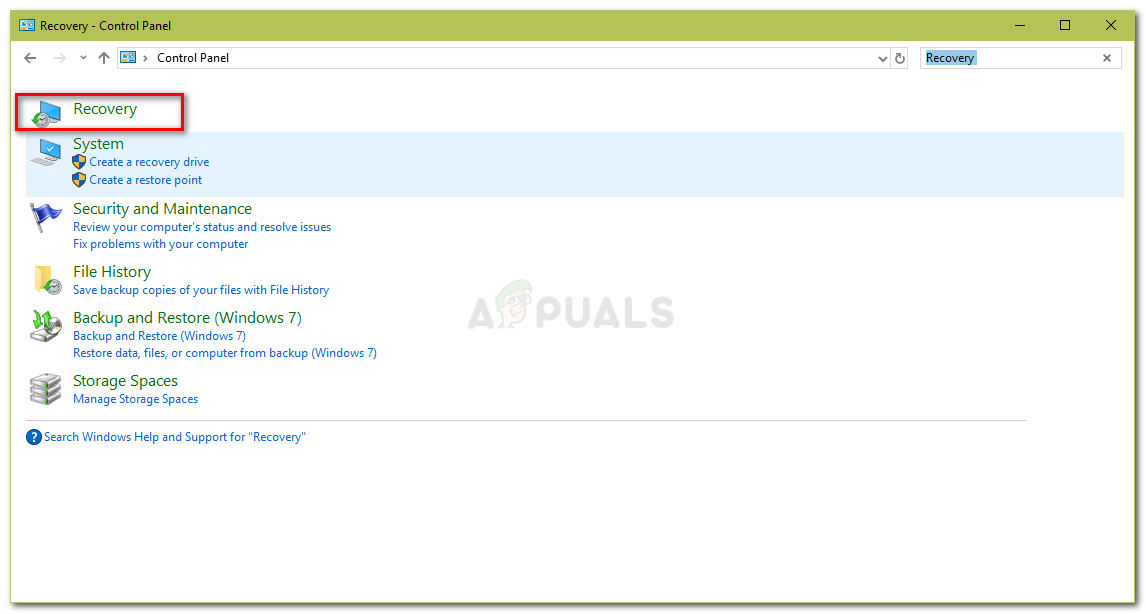
  2. Type in Recovery in the search box and then click on it.
    Control Panel – Recovery
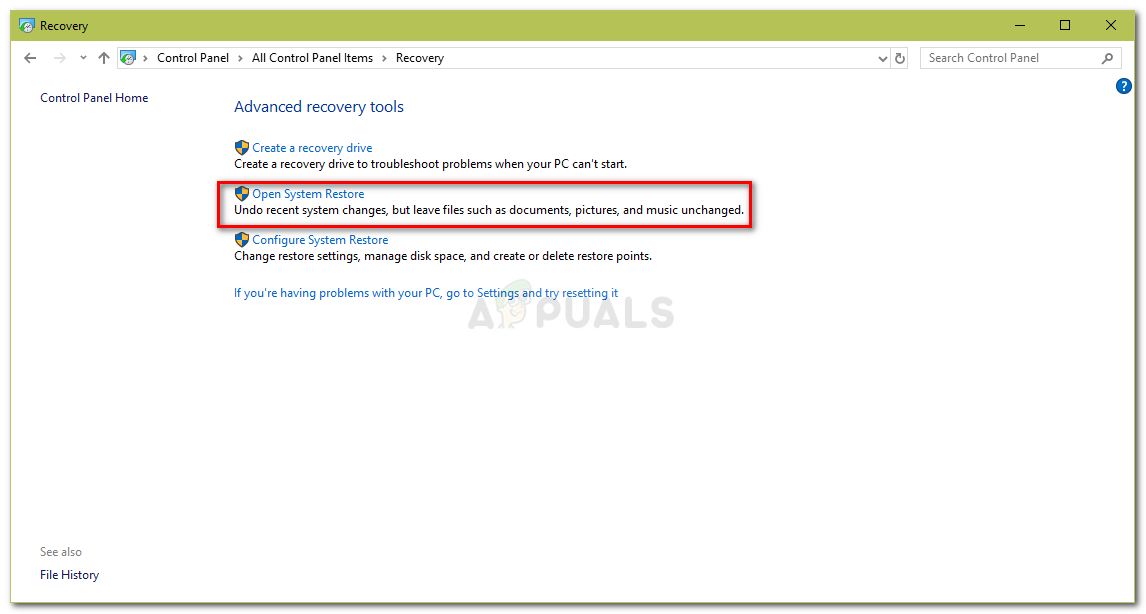
  3. Select ‘Open System Restore’.
    Control Panel – System Restore
  4. After that, select a system restore point when the error didn’t pop up. Click Next and then hit Finish.

Solution 6: Using MCT

Finally, using the Media Creation Tool is your last resort. This is a tool built by Microsoft to help the users upgrade/update their system to the latest version or even perform a fresh Windows installation. Here’s how to do it:

  1. Download the tool from Microsoft’s website.
  2. After the download completes, open it up.
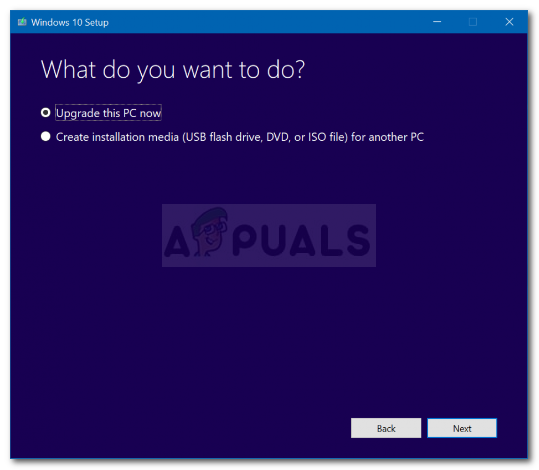
  3. Agree to the terms, and then select ‘Upgrade this PC now’.
    Windows Media Creation Tool
  4. Select ‘Keep Personal Files’ to make sure your files are safe.
  5. Let it finish.

The post Fix: Windows Update Error 0x800704c7 on Windows 10 appeared first on Appuals.com.
Fix: Can’t Establish a Secure Connection with Google Play Music

$
0
0

Several users are seeing the “Can’t establish a secure connection” error every time they try to upload music to their own Music Library using Google Play Music. The issue is not specific to a particular browser since it’s reported to occur on Chrome, Firefox and Microsoft Edge.

Can’t establish a secure connection

What is causing the “Can’t establish a secure connection” error?

We investigated this particular error message by looking at various user reports and the repair strategies that they used to get the issue resolved. Based on what we were able to gather, there are several common scenarios that will trigger this particular error message:

  • The user is trying to update CD’s directly to Google Play – There’s a lot of user speculation suggesting that there has been some kind of update that is now preventing Audio CDs from being uploaded directly to Google Play Music. This can be typically circumvented by ripping the CD with Windows Media Player.
  • 3rd-party antivirus is interfering with the connection – This is one of the most common causes why this error message occurs. Affected users have identified several overprotective security suites that might hinder the connection between the PC and Google Play Music.
  • Internal application server – There have been situations in the past where Google acknowledged being at fault for the apparition of this particular error message. Typically, you can try uploading via the desktop version whenever the web version is showing this error message.

If you’re struggling to resolve this particular error message, this article will provide you with a selection of quality steps. Below you have several methods that other users in a similar situation have used to get the issue resolved.

To maximize the efficiency, follow the methods below in the order that they are presented until you discover a fix that is effective in resolving the issue for your particular scenario.

Method 1: Disabling the real-time protection of your 3rd party AV (if applicable)

If you’re encountering the  “Can’t establish a secure connection” error, one of the first things you should start looking at is your 3rd party Antivirus (if you have one).

There are several 3rd party security suites (Avast, AVG Eset and Kaspersky) that some affected users have managed to identify as being responsible for the apparition of this error. As it turns out, some external security solutions (every other antivirus that isn’t Windows Defender) are overprotective and might block your connection to Google’s servers when certain scenarios are met.

Note: There might be other AV suites that weren’t mentioned by affected users. With this in mind, try to disable the real-time protection if you’re using a 3rd party security suite even if you’re using a different AV than the ones mentioned above.

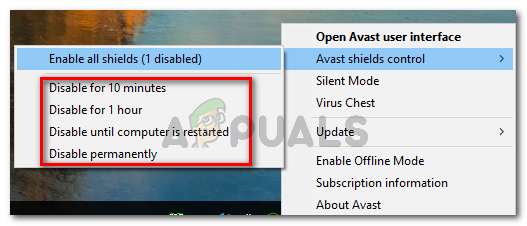
In most cases, disabling the real-time protection of the antivirus is enough to get the issue resolved. With most AV clients, you can do this easily via the traybar icon. For example with Avast, affected users have reported that the error was no longer occurring after they navigated to Avast shields control and clicked on Disable.

Disabling Avast’s shields

You can choose any disabling option. The point is to keep the real-time protection disabled when uploading your locally stored music to Google Play Music.

Note: Keep in mind that the menus will look different if you’re using a different 3rd party AV.

Don’t forget to turn the real-time protection back on when you’re done moving your audio files to the Music library.

If this method wasn’t effective or applicable to your current computer setup, move down to the next method below.

Method 2: Uploading music files via Music Manager

The most accessible fix for the “Can’t establish a secure connection” error is to use the Google Play Music Manager to upload the music files. Google has a long history of dealing with this particular error. Looking back at previous crashes, it seems like in most cases, when the uploading function crashed on the web version it continued to work with Music Manager.

With this in mind, follow the instructions down below to try and upload the music file to your Music Library via the Music Manager desktop app:

  1. Visit this link (here) and click on Download Music Manager to download the installation executable.
    Downloading the installation executable of Music Manager
  2. Open the installation executable and follow the on-screen prompts to install it on your system.
    Installing Music Manager
  3. When prompted to sign-in, provide the required credentials.
    Providing the required credentials to Music Manager
  4. In the next steps, you can instruct your Music Manager to scan for music files automatically.
    Scanning for Music files automatically with Music Manager
  5. Complete the installation by following the on-screen instructions, then click on Go to music player to launch Music Manager.
    Launching Music Manager
  6. Inside Music Manager, go to the Upload tab and click on Add folder, then navigate to the location of your music files. With the files loaded, simply click the Upload button to send them to your Music Library.
    Adding music files to the Music Library using Music Manager

    If this method still doesn’t allow you to upload music files to your Music Library, move down to the next method below.

Method 3: Uploading via forked application

Several affected users have reported that for them, the issue can only be circumvented if they upload the music files via a forked version of Music manager – the same procedure performed through Chrome or Music Manager still triggers the “Can’t establish a secure connection” error.

Fortunately, there is one cross-platform, open source application that will allow you to upload your music files to the Music library. Here’s a quick guide on how to install and use GPMDP (Google Play Music Desktop Player) to avoid the error message:

  1. Visit this link (here) and click on Download Latest to download the installation executable.
    Downloading the latest installation executable of GPMDP
  2. Once the download is complete, open the installation executable and follow the on-screen prompts to install Google Play Music Desktop Player to your computer.
  3. Once the installation is complete, click the Sign In button (top-right) corner and provide your user credentials to log in to your account. Keep in mind that the first time you log-in you might have to wait over one minute for the procedure to complete. Do not close the window during this time.
    Waiting for the Google Music Library to initiate
  4. Once the login procedure is complete, click on Music library from the right-hand menu, then click on Add Your Music. You should then be able to upload your music without encountering the Can’t establish a secure connection error.

The post Fix: Can’t Establish a Secure Connection with Google Play Music appeared first on Appuals.com.
How To Ensure Privacy And Safety Online

$
0
0

Most people are well acquainted with some classical software tools to ensure security on their computing devices. Thus, most computer users have a free or paid antivirus to filter for malicious content in data traffic or in the internal environment of the device (RAM, storage, including detachable disks, core OS processes, etc.). A firewall is typically integrated either in the antivirus or in the OS (if there are more firewalls, typically, only one is active). However, an antivirus or firewall does nothing to ensure online privacy.

VPNs Are Essential For Both Privacy And Safety

Nowadays, any user that thinks about going completely private online but also about ensuring truly comprehensive online safety (because the first contributes to the second) has to consider using a VPN. There are multiple providers on the market, both free and paid, with the latter providing more extensive functionality. Feel free to consult the Windscribe VPN review for a comprehensive description and evaluation of one of the top VPN providers among the competition.

There are significant concerns with regard to Internet privacy in the recent period, given the possibility for accidental leakage of sensitive data, or the diversity of hacking attempts that can be aimed at identifying users and stealing important data from them. Alarmingly, not only individual users with malicious intent can be behind such attacks, but also resourceful mass surveillance government agencies (like NSA, or equivalent divisions in many authoritarian regimes).

How Do VPNs Work

VPNs create safe encrypted communication channels between the user and the Internet, hence, any ill-intentioned third party would have big trouble intercepting and decrypting this traffic. Moreover, given that the traffic is routed via a dedicated VPN server, the physical IP address of the user is hidden from websites and any other online entity. The user can typically select the location of the VPN server from a list of countries and thus, can appear online as a user from the respective country.

The last trait comes as a significant bonus and one of the main reasons VPN services are contracted – adopting the IP address of a given country allows to bypass country-specific geographic restriction for lots of websites including YouTube, Netflix, etc. This aspect is also of paramount importance for users located in countries with the severely restricted Internet, with a vast list of banned foreign websites.

cybersecurity.osu.edu

Choosing A VPN Provider

Different providers come with different features and choosing the most suitable one obviously depends on the specific needs one has, although most top players on the market offer rather balanced solutions that would satisfy a variety of needs. Typical features that are of interest when choosing a provider are as follows:

  • the strength of the encryption protocol (e.g. OpenVPN, L2TP/IPSec, SSTP, IKEv2, PPTP);
  • the length of the encryption key (e.g. AES 256-bit key);
  • the number and type of devices (and OSs) covered, including PCs, laptops, smartphones, tablets, TV boxes, routers, etc.;
  • the number and choice of countries where VPN servers are located (especially relevant for avoiding geographic bans);
  • the log policy (if logs are kept, what information is logged and how is it protected);
  • availability of unique features (such as “kill switch”, ad blockers, etc.);
  • availability of a trial period for the fully functional product;
  • the price for the monthly/ seasonal/ yearly subscription.

As it can be noticed, the features listed above are related both to the level of safety and convenience. The specific combination of desired traits should dictate the choice of the VPN provider.

The post How To Ensure Privacy And Safety Online appeared first on Appuals.com.
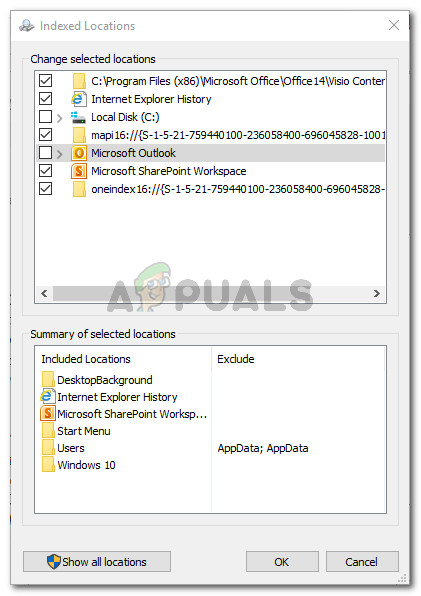
How to use TOAD The Open Source Android Deodexer

$
0
0

Deodexing Android can be a time-consuming process which involves pulling /system files from your Android device, deodexing them using PC tools, and installing them back on your phone. Not to mention that whenever Google releases a new Android version, the process for deodexing ROMs alters – which means tools for deodexing need to play catchup. Many deodexing tools have become defunct due to lack of update from the developers.

A new tool called TOAD (The Open Source Android Deodexer) has been released, which aims to not only be incredibly easy, its open-source nature allows the development community to keep it updated with the latest deodexing methods. TOAD utilizes batch files for processing odexed files, so new batch files can easily be added or modified by the development community.

In this guide, we will show you how to deodex Android files using TOAD – and if you’re development-savvy, maybe you’ll join the TOAD community in keeping it updated for the latest Android updates.

Requirements

TOAD comes in a self-extracting EXE file, so you can just place it on your C:\ (to minimize any potential issues).

After launching the .EXE, you’ll have a folder structure which contains the following folders:

  • Method_files: Contains all the batch files which TOAD will use for deodexing.
  • Tool_Files: Files that TOAD needs for its operations.
  • Your_Files: This is where your files will go.

How to Deodex in TOAD

  1. So to begin using TOAD, you need to copy your “build.prop” file and entire “framework” folder from your Android device into the Your_Files folder of TOAD.
    Your_Files folder in TOAD.
  2. You can copy anything else you’d like deodexed as well, for example the folders “app”, “priv-app”, “vendor app”, “vendor priv-app”, “vendor framework”, etc.
  3. Now you need to run TOAD. It will ask if you want to deodex the entire framework folder, the choice is yours. However, for any Android version higher than KitKat, you absolutely need an odexed framework folder.
  4. TOAD will read your build.prop file to determine your Android version – it discovers the API used in your ROM. Every Android version has its own unique API (build numbers). You can see a full list of official Android APIs here.
  5. So for every Android API that TOAD can handle, TOAD has its own Method file. Hence why Method_Files is full of them. So if TOAD finds a matching Method_File for your Android API, it will ask if you would like everything in Your_Files deodexed.
    TOAD deodexing.
  6. If you choose ‘Yes’, TOAD will begin its process, at which point you just need to relax and wait. TOAD will go through its operation according to the method in the appropriate Methods file. If TOAD cannot deodex a file, it will display a note of the error and continue the operation.
  7. When TOAD is finished deodexing, it will put together a ZIP file of all the deodexed files.
  8. Now you just need to flash this .ZIP file in your recovery, and all the files that were deodexed will now be on your phone.

The post How to use TOAD The Open Source Android Deodexer appeared first on Appuals.com.
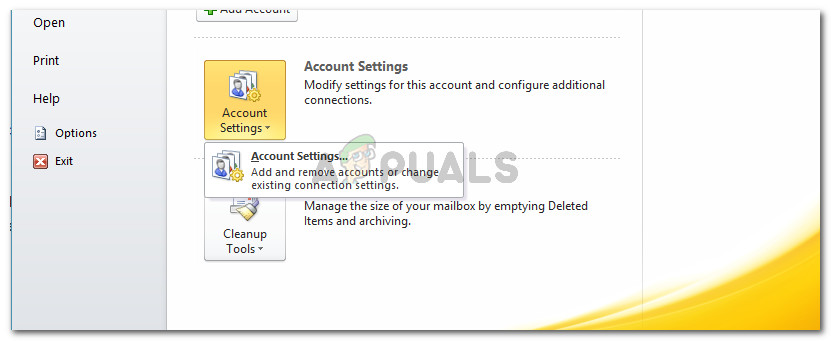

Fix: Content Was Blocked Because It Was Not Signed By a Valid Security Certificate

$
0
0

Several users report that they encounter the “content was blocked because it was not signed by a valid security certificate” error when trying to open one or several different pages with Internet Explorer and Microsoft Edge.

“Content was blocked because it was not signed by a valid security certificate”

What is causing the ‘content was blocked because it was not signed by a valid security certificate’ error?

We investigated this particular issue by looking at various user reports and the steps that they followed in order to get the issue resolved.

From what we gathered, the issue mostly occurs because there was a change in how Internet Explorer treats web pages with an expired or invalid) security certificate. In Internet Explorer 8 and lower, you had the option to continue browsing when encountering a website with an invalid security certificate.

Starting with Internet Explorer 11, that’s no longer an option since you don’t have the option to display insecure content via the blue bar on the top of the browser screen. Microsoft has confirmed that this change was decided in order to patch up a potential vulnerability among Windows computers.

Here are some specific scenarios that are known to trigger this particular error message:

  • Internet Explorer is set up to check for server certificate revocation – By default, Internet Explorer is set to check for server certificate revocation. You might be able to avoid the error by disabling this feature from the Advanced menu (Method 3).
  • The website with the expired certificate is not added to the list of Trusted Sites – If you trust the identity of the website with the invalid certificate, you might be able to resolve the issue by adding the website URL to your Trusted List (Method 1).
  • Trust issue between Internet Explorer and Symantec Endpoint Protection Manager (SEPM) – The issue is reported to occur when trying to access the SEPM web console from Internet Explorer 11.

If you’re currently struggling to resolve this particular error message, this article will provide you with a list of verified troubleshooting steps. Below you have a collection of methods that other users in a similar situation have used to get the issue resolved.

For the best results, follow the methods below in the order that they are presented until you find a fix that is effective in your particular scenario.

Method 1: Adding the website to your Trusted sites

Most of the time, the “content was blocked because it was not signed by a valid security certificate” error will occur if the website certificate used to provide identification of the web server contains an error.

Internet Explorer will prevent you from landing on the webpage with the improper certificate to prevent those scenarios where your connection is intercepted or the web server you’re trying to reach is misrepresenting your identity.

However, these things are not applicable if you trust the website’s identity and you know that your connection isn’t compromised.

If you are sure that’s not the case and you understand the security risks, you can circumvent the error message by adding the website’s URL to your list of Trusted sites.  Here’s a quick guide on how to do this:

  1. Open Internet Explorer, click on the tools button (action menu) and choose Internet Options.
    Accessing Internet options via Internet Explorer
  2. Inside the Internet Options window, go to the Security tab, click on Trusted sites to select it, then click the Sites button.
    Accessing the Trusted sites list of Internet Explorer
  3. In the Trusted sites window, simply type or paste the website URL in the Add this website to the zone box. Next, disable the box associated with Require server verification (https:) for all sites in this zone and click Add.
    Adding the website to the list of trusted website
  4. Once the website has been added to your trusted list, close the Internet Options window and restart your computer.
  5. When the next startup is complete, restart your computer and see if the issue has been resolved.

If you’re still encountering the “content was blocked because it was not signed by a valid security certificate” error, move down to the next method below.

Method 2: Prevent IE from checking for certificate revocation

If you’re encountering this error with a web page that you trust, another quick way to get it resolved is to access the advanced Internet Options for Internet Explorer and prevent the browser from checking for certificate revocation.

Although this is an easy fix, keep in mind that leaving this option disabled my expose your computer to certain security risks. In order to ensure that’s not the case, we encourage you to reverse engineer the steps below and revert to the default behavior as soon as you’re done with the website showing the error message.

Here’s what you need to do:

  1. Start up Internet Explorer. Next, go to the Tools menu (top-right corner) and click on Internet Options.
    Accessing Internet options via Internet Explorer
  2. Inside the Internet Options window, go to the Advanced tab. Then, under the Settings menu, scroll down to Security and uncheck the box associated with Check for server certificate revocation. Don’t forget to hit Apply to save the changes to your Security settings.
    Preventing IE from checking for certificate revocation
  3. Restart your computer to allow the changes to take effect.
  4. Once the next startup is complete, visit the same web page that was previously showing you the “content was blocked because it was not signed by a valid security certificate” error and see if the issue has been resolved.
    Note: In case the issue is resolved, don’t forget to return to the Internet Options window and enable Check for server certificate revocation again to prevent your machine from being at risk.

If you’re still encountering the same error message, move down to the next method below.

Method 3: Resetting the security settings of IE

Several users have reported that for them, the issue was resolved after they reset the Internet Explorer settings. But this fix is only applicable if you have previously tweaked the security settings or if you installed one or more add-ins capable of modifying default behaviors.

Here’s a quick guide on resetting the security settings of IE

  1. Start up Internet Explorer and click the action button (tools menu) in the top-right corner of the screen. Then from the newly opened menu, click on Internet Options.
    Accessing Internet options via Internet Explorer
  2. Inside the Internet Options screen, go to the Advanced tab and click the Reset button under Reset Internet Explorer settings.
    Resetting Internet Explorer’s Settings
  3. In the next prompt, we encourage you to check the box associated with Delete personal settings before clicking Reset.
    Resetting the Internet Explorer Settings
  4. Wait until the process is complete, then click on Close once the procedure is finished.
    Waiting for the reset process to complete
  5. Restart your computer and see if the issue is resolved at the next startup.

If you’re still encountering the same error message, move down to the next method below.

Method 4: Resolving the Symantec Endpoint Protection Manager with IE conflict (if applicable)

If you’re encountering this issue while trying to access the web console of Symantec Endpoint Protection Manager (SEPM), the issue is likely occurring because the browser that you’re using does not trust the SEPM web page.

If this scenario is applicable to your current situation, you’ll need to obtain a trusted Certificate Authority (CA). The easiest way to do so is to follow the official Symantec documentation.

You can also work around the issue by installing the manager’s self-signed certificate. You can do this by following the steps specific to Internet Explorer from this link (here).

The post Fix: Content Was Blocked Because It Was Not Signed By a Valid Security Certificate appeared first on Appuals.com.
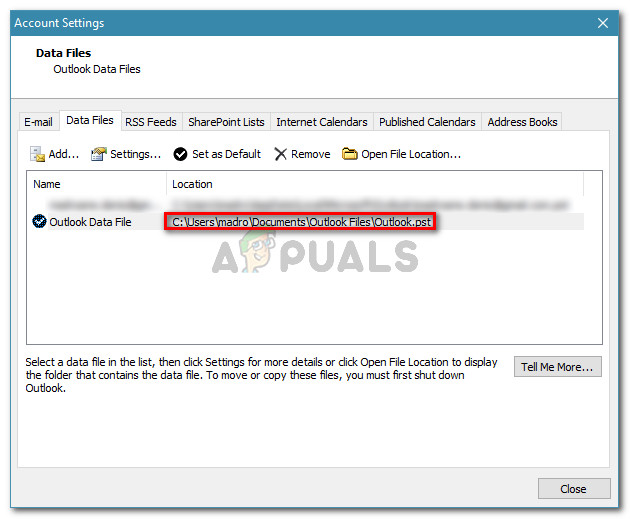
Fix: StarCraft 2 Graphics Device is not Available at this time

$
0
0

Users experience the error message “Graphics Device is not available at this time. Please try starting StarCraft II again, or restarting your machine—” when they try launching StarCraft either after installing it or after updating Windows to the latest build.

StarCraft 2 Graphics Device is not Available at this time

This error message is usually associated with your graphics drivers and how they are unable to provide resources to StarCraft because of technical issues which we will discuss below. This is a very common error message and has also been acknowledged by StarCraft engineers in the official website.

What causes the Graphics Device to not be available on StarCraft II?

This error message mostly relates to the graphics drivers installed on your computer. However, there might also be other reasons which might vary from computer to computer depending on the hardware and configuration. Some of the reasons are:

  • Outdated/corrupt drivers: Drivers not working are the most common reason why you might not be able to launch the game. If the game doesn’t have access to graphics resources, it will not work.
  • Xbox DVR: Xbox DVR is a new feature in Windows operating system which allows more features to users when playing games. However, this is known to cause issues with StarCraft.
  • Full-screen mode: This is a bug in the game where whenever it is launched in full screen, it crashes and displays the error message.
  • Graphics card selection: If you have a dedicated graphics card installed, it is possible that your inbuilt card is being selected.

Before we move on with the solutions, make sure that you have an active internet connection and are logged in as an administrator on your computer.

Note: You should also make sure that StarCraft is updated to the latest version. Bugs like these are fixed by Blizzard through their patches regularly.

Solution 1: Updating your Graphics Drivers

Although this is the advice of almost anyone on the internet whenever you have issues with your graphics drivers, it works for the majority of the cases. Graphics card drivers are updated to resolve issues and have compatibility with other games and applications. If they are broken or outdated, they might not be able to connect properly with the game.

Updating Graphics – DDU

You can check our article Civilization 5 won’t Launch and navigate to Solution 3 where all the detailed steps are written on how to first remove your existing Graphics drivers and then reinstalling the latest ones.

Solution 2: Disabling Xbox DVR

Xbox DVR is a new feature introduced in Windows which allows users to record their gameplay and audio. Even though this is a nifty feature, it causes issues with several games including StarCraft. Below are the steps to disable Xbox DVR recording. If you have a newer version, refer to the second half of the solution to disable the recording from settings.

  1. Press Windows + S, type “Xbox” in the dialogue box and open the application.
  2. Click on the Settings icon present at the bottom left side of the screen. Now select “Game DVR” from the list of tabs and uncheck the option ”Record game clips and screenshots using Game DVR”.
Disabling recording using Game DVR – Xbox application
  1. Restart your computer for the changes to take place and check if the problem at hand got solved.

If you are using a newer version of Windows, the Xbox application will not have this feature. Follow the listed steps instead.

  1. Press Windows + I to launch Settings. Now click Gaming from the menu and click on Captures from the left navigation bar.
Disabling recording and audio while playing – Windows Settings
  1. Uncheck the following options:
Record in the background while I’m playing a game

Record audio when I record a game.
  1. Restart your computer properly and launch StarCraft again.

Solution 3: Selecting Preferred Graphics Card

If you have a dedicated graphics card installed on your computer, chances are that the game is utilizing the in-built Intel HD graphics instead of the dedicated one. This can be the reason why you are experiencing the error message. Here we will navigate to your Graphics card settings and set the preferred card accordingly.

  1. Right-click on any empty space on your screen and select “Nvidia control panel.”
NVIDIA Control Panel
  1. Click “Manage 3D settings” and select “High-performance NVIDIA processor”.
NVIDIA preferred graphics card selection – NVIDIA control panel
  1. Press Apply to save changes and exit. Now check if the problem got solved.

Solution 4: Adding Command Line Argument

If all the above methods don’t work, we can try adding a new command line argument in the Blizzard application for changing the display mode. This was a valid workaround according to several users and will probably work until Blizzard launches a patch to fix the issue.

  1. Open the Blizzard application and navigate to Options > Game Settings > Additional Command Line arguments.
  2. Now type the following command in the dialogue box of StarCraft. Make sure that you also check the option Addition command line arguments.
-Displaymode 0
Blizzard command line arguments for StarCraft
  1. Save changes and exit. Restart your computer properly and try launching StarCraft.

The post Fix: StarCraft 2 Graphics Device is not Available at this time appeared first on Appuals.com.
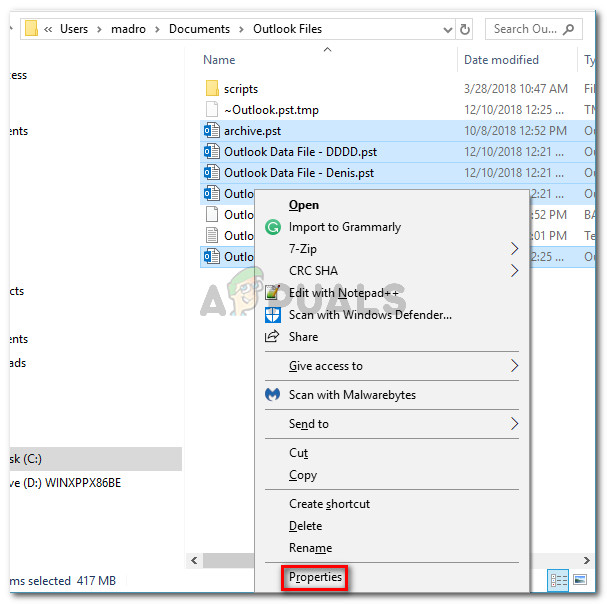
Fix: Your Security Settings Have Blocked a Self-Signed Application From Running

$
0
0

Several users are encountering the “Your security settings have blocked an untrusted application from running” when trying to launch a Java applet. The issue doesn’t seem to be exclusive to a certain Windows version – the error is encountered with every recent version including Windows Vista, Windows 7, Windows 8 and Windows 10.

Your security settings have blocked an untrusted application from running

What causes Security Settings to Block Applications from Running?

We investigated the  “Your security settings have blocked an untrusted application from running” error by looking at various user reports and the repair strategies that they used.

As it turns out, the error prompt will occur due to Java browser plug-in behavior introduced with Java 7 Update 21. The idea was to allow users to make more informed decisions when having to run Java powered applet inside a web browser.

If you have Java 7 Update 21 or older, any application that doesn’t have a certificate or is missing the Application name or the Publisher information is blocked by default. This decision was made to protect unsuspecting users from unsafe or high-risk applications.

Once these new changes enforced, there are three main causes that will trigger this particular Java error message:

  • The application is unsigned – Applications without a certificate or missing Publisher Information and Name are blocked by default. These might end up making your system vulnerable to external exploits.
  • The user is trying to run a self-signed application from an untrusted authority – Applications with self-signed certificates are also blocked by default starting with Java 7 Update 51. These are considered even more dangerous than unsigned applications since they might be granted access to personal data on your computer.
  • Application’s jar file is missing a permission attribute – The permission attribute verifies if the application request uses the same permission level that was specified by the developer. An application with a missing jar attribute is blocked because an attacker might exploit the user by running the application with a different privilege level.

In general, an Applet or application that is missing these key identification parts should be considered unsafe. If you don’t know it, we highly recommend that you avoid running it.

However, if you know the publisher and you trust the applet (e.g. you developed it yourself or you’re testing it) there are ways to circumvent this particular error message.

Below you have a couple of methods that will allow you to deal with the “Your security settings have blocked an untrusted application from running” error. Although Method 1 is widely considered as standard practice when having to deal with this particular error message, you can also follow Method 2 to achieve the same purpose.

Method 1: Configuring the Exception Site List

In the event that you do understand the risk of launching an application that is considered unsafe by Java, you can prevent the “Your security settings have blocked an untrusted application from running” error message from appearing by adding the application to the Exception Site List. You can find this setting under the Security tab of the Java Control Panel.

Here’s a quick guide on opening the Java Control Panel and adding the Java applet to the Exclusion Site List:

  1. Press Windows key + R to open up a Run dialog box. Then, type “control” and press Enter to open Control Panel.
    Opening Control Panel via a Run dialog box
  2. Inside the Control Panel window, click on Programs, then click on the Java icon to open the Java Control Panel.
  3. Inside the Java Control Panel window, go to the Security tab and click on Edit Site List.
    Accessing the Exclusion menu of Java
  4. Inside the Exception Site list, click on Add button, then paste the URL of the Java applet that is giving you troubles. Hit Ok to add the URL to the Exclusion list.
    Adding an application to the exclusion list

    Note: Keep in mind that depending on which applet you’re trying to run, you might also need to add non-standard ports to the Java Exclusion List.

  5. Click Continue at the next Security Warning to confirm that you want to add the URL that you’ve just entered to the exclusion list.
    Confirming the new entry to the Security Warning
  6. Re-open the applet that was previously showing the error. The error should no longer be occurring.

If you’re looking for a different way of resolving the “Your security settings have blocked an untrusted application from running” error, move down to the next method below.

Method 2: Setting the Security level of application to High

Another way to go around resolving the “Your security settings have blocked an untrusted application from running” error is to set the Java Security level to High instead of Very High.

While this method is way easier (and quicker) to implement, it will expose your computer to many potential risks. With this in mind, it’s preferable to follow Method 1 if you trust the source than to modify the security level.

However, if you decide to do it, we encourage you to revert to the default Security Settings level once you are done using the Java application that is triggering the error.

Here’s a quick guide o how to modify the Security Level:

  1. Press Windows key + R to open up a Run dialog box. Next, type “control” and press Enter to open Control Panel.
    Opening Control Panel via a Run dialog box
  2. Inside the Control Panel window, click on Programs, then click on the Java icon to open the Java Control Panel.
  3. Inside the Java Control Panel window, go to the Security tab and select the High toggle from under Security level for applications not on the Exception Site List. Then, click Apply to save the changes.
    Setting the Java Security level for items not included to the Exception Site list to High
  4. Restart the browser that you’re running the applet in and see if the issue has been resolved once you reload the page.

The post Fix: Your Security Settings Have Blocked a Self-Signed Application From Running appeared first on Appuals.com.
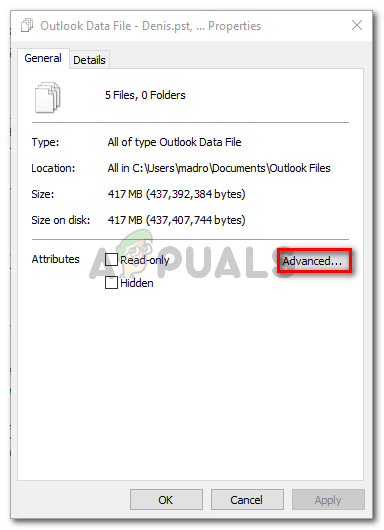
Fix: The Disk You Inserted Was Not Readable by This Computer

$
0
0

Some users are seeing the “the disk you inserted was not readable by this computer” error as soon as they connect an external drive. Some affected users report that the issue occurs with every USB device that they connect while others say that the prompt only appears with one drive. Most of the time, the issue is reported to occur with MacOS High Sierra, but there are reports of it occurring on different Mac OS X versions.

The disk you inserted was not readable by this computer.

What cause the Disk to be non-readable?

We investigated this particular issue by looking at various user reports and the repair strategies that they used to get the issue resolved. We also managed to replicate the issue to a small extent on our testing machines. Based on what we gathered, there are several fairly common scenarios that will trigger this particular error message:

  • Disk failure – It’s possible that either the drive itself or just its USB interface has failed. In this case, a data recovery solution is advisable.
  • The disk is unformatted – This particular error can also occur if the disk you’ve just inserted is not formatted or is formatted with a file system not supported by Mac OS.
  • WD software bug – The issue might occur with WD hard drives due to a race condition on the 1394 bus that causes the table of contents of the VCD to be corrupted by another bus reset.
  • The disk is not formatted to a supported MAC OS X format – If you previously used the same external drive to a Windows computer, chances are it’s formatted to a file system format unsupported by the Mac computer.

If you’re currently struggling to resolve the issue, this article will present you with a collection of verified troubleshooting steps. Down below, you’ll find a collection of methods that other users in a similar situation have used to get the error message resolved.

For the best results, follow the methods below in order until you encounter a fix that is effective in your particular situation.

Method 1: Eliminating the possibility of a faulty external drive (if applicable)

To save you from trying out a lot of potential fixes for nothing, we encourage you to start by ensuring that you’re not dealing with a faulty drive.

You can exclude the possibility of a faulty drive just by plugging in a different external hard drive into your Mac computer. It can be anything from a flash drive to another external drive, just make sure the second drive has the same file system like the one showing the error.

If you don’t get the same error with the other drive and it appears inside the Finder app normally, you can conclude that the problem is not caused by your MAC. You’re probably dealing with an issue that is specific to the external drive that is showing the error.

In the event that you’re only encountering the same error message with every external drive that you plug in, jump straight to Method 4 (if applicable). In case you only see the prompt with one particular drive, continue with the next method below.

Method 2: Repairing the unreadable drive with Disk Utility

If you see this error message as soon as you insert your USB drive / external hard drive / SD card into your Mac computer, you should be able to repair it using Disk Utility. This isn’t guaranteed to work, but some users encountering the same error message have reported that the issue was resolved after performing the steps below.

Here’s what you need to do:

  1. When the initial prompt appears, click Ignore to dismiss it.
    Dismissing the error prompt
  2. Once the error has been dismissed, click on the Launchpad and search for ‘disk“, then click on Disk Utility.
    Opening Disk Utility
  3. Inside Disk Utility, select the disk that is showing the error and click the First Aid button from the ribbon at the top.
    Applying First Aid to the unreachable drive
  4. Wait until the procedure is complete. If you get returned a message saying that the procedure was successful, restart your machine and see if the disk becomes available at the next startup.
    Note: If another message pops up saying that the “First Aid process has failed”, jump directly to Method 2.

Method 3:  Reformatting to Fat32

Another common reason why you might end up seeing the “the disk you inserted was not readable by this computer” error is because of the file system that is formatted in NTFS.

A lot of users have been encountering this particular error message with external drives formatted with the NTFS format because OS X will not work with NTFS. If that’s the case, you will most likely be able to resolve the issue by converting the file system format to FAT32.

This situation is fairly common if the external drive was previously used on a Windows computer.

Warning: Keep in mind that any operation of this kind (disk formatting), will end up erasing all data present on the disk.

If you are prepared to go through with it, follow the steps below to re-format the disk that is showing the  “the disk you inserted was not readable by this computer” error to Fat32:

  1. Once the error has been dismissed, click on the Launchpad and search for ‘disk“, then click on Disk Utility.
    Opening Disk Utility
  2. Inside Disk Utility, select the drive that is showing the error message, then click on Partition from the ribbon bar.  Next, select the number of partitions you want using the Partition drop-down menu (under Volume Scheme), then click on Format (under Volume Information) and click on MS-DOS (FAT).
    Re-formatting the external drive with Disk Utility
  3. To confirm the process, click Apply and then click on Partition to initiate the process.
  4. Wait until the process is finished. Once it is, see if the external drive has become visible.

If it didn’t or it’s showing the same error message, move down to the next method below.

Method 4: Resolving the MacOS High Sierra – clover Bootloader bug (if applicable)

If you’re encountering the “the disk you inserted was not readable by this computer” error while running Hackintosh MacOS 10.13.x High Sierra coupled with the Clover Bootloader, you’re just dealing with an extremely popular bug that a lot of other users have faced.

A lot of users using the same Mac version have reported that the issue was resolved after they applied a patch capable of resolving the bug. But keep in mind that it was developed by independent developers in no way associated with Apple.

Warning: This bug will only occur if you’re using Hackintosh MacOS 10.13.x High Sierra with the Clover Bootloader. If you’re encountering this issue on a different (clean) of MacOS, do not follow the steps below as they won’t be applicable to your current situation.

  1. Visit this link (here) and download the patch.
    Downloading the patch
  2. Once the patch has been downloaded, open the finder application and navigate to the following location: MacOS > System > Extensions. Once you get there, simply drag and drop the .kext file present in the patch folder inside the Extensions folder.
    Dragging & dropping the patch file
  3. Once the extension has been replaced, use the Search function to find and open the Terminal application.
  4. Inside the terminal, run the following command:
    sudo chown -R 0:0 /Library/Extensions/AppleAHCIPort.kext && sudo chmod -R 755 /Library/Extensions/AppleAHCIPort.kext
    sudo touch /System/Library/Extensions && sudo kextcache -u /
  5. After the command runs successfully, restart your machine and see if the issue is resolved at the next startup.

If none of the methods above have helped you to resolve the issue, it’s very likely that you’re dealing with a failed drive. If that’s the case you should start looking for a recovery solution if you have any important data on that drive.

The post Fix: The Disk You Inserted Was Not Readable by This Computer appeared first on Appuals.com.
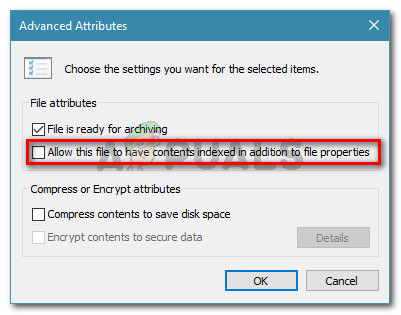
Fix: Unable to Connect to Synaptics Pointing Device Driver

$
0
0

Users experience the error message “Unable to connect to Synaptics Pointing Device Driver” when trying to access or select Symantics mouse properties. This error also occurs when trying to access mouse settings from within Windows.

Unable to Connect to Synaptics Pointing Device Driver

This error occurs mostly when the Synaptics device drivers are not installed properly and cause some of the features not to work. For example, you might experience the two-finger scroll not working or the selection of items using the hand gesture. This error is easily fixed by installing the right drivers or following the other workarounds listed below.

What causes the error “Unable to Connect to Synaptics Pointing Device Driver”?

Like mentioned before, this error message is usually caused because of the correct drivers not installed. However, there might also be other reasons. The causes of this error message are but not limited to:

  • Administrator privileges: Synaptics, like other applications also require administrator privileges in order to work properly without being hurdled with User Permissions each time.
  • Corrupt driver software: There are also several cases where the driver software for the mouse pad is corrupt and is unusable by the system.
  • Corrupt software suite: Synaptics also requires an application to be installed in order for it to work properly. This can also get corrupt.

Before moving on with the solutions, make sure that you have an active internet connection and are logged in as an administrator on your computer.

Note: You should try accessing the mouse settings from your Windows before proceeding.

Press Windows + S, type “mouse settings” in the dialogue box and open the application. Once the settings are opened, click Additional mouse options at the top-right corner of the screen. From here you will be able to check Synaptics settings after selecting the Synaptics tab.

Accessing Synaptics Settings

Solution 1: Granting Administrator Privileges

Some utilities like Synaptics requires administrator privileges in order to work properly and efficiently. Since it takes control of the control/mousepad indefinitely, sometimes Windows restricts its access and hence the drivers are not able to run properly. We will make sure that administrator privileges are granted so this problem never arises.

  1. Press Windows + R, type “taskmgr” in the dialogue box and press Enter.
  2. Once in the task manager, select the Startup tab and locate Synaptics service from the list. Right-click on it and select Properties.
Synaptics Properties – Task manager
  1. Now click on Compatibility and check the option “Run this program as an administrator”.
Setting administrative access – Synaptics Properties
  1. Restart your computer properly and run the installed Synaptics Now check if the error message is resolved.

Solution 2: Deleting Driver and Reinstalling

The solution which works for a majority of the people is deleting the existing driver software and installing the latest one from the manufacturer’s website. You have to perform the second step on your own as each manufacturer is different so it is difficult to list all of them here.

  1. Press Windows + R, type “devmgmt.msc” in the dialogue box and press Enter.
  2. Once in the device manager, expand the category of Mice and other pointing devices.
  3. Select Synaptics touchpad driver, right-click it and select Uninstall device. When asked, check the box which says “Delete driver software”.
Uninstalling Synaptics driver – Device Manager
  1. Now restart your computer properly. The default drivers will be installed automatically.
  2. Navigate to your manufacturer’s website and download the latest drivers from there. Restart your computer again and check if everything is working properly.

Solution 3: Reinstalling Synaptics Software

If you already have the latest drivers installed, and are still facing the issue, chances are that the Synaptics software on your computer is not working properly and is acting out. This can happen quite often and there were many users who reported that fixing it fixed the error message under discussion.

First, you should just try uninstalling the software. If the error message is fixed after that, you might want to skip installing the software. Otherwise, continue the installation.

  1. Press Windows + R, type “appwiz.cpl” in the dialogue box and press Enter. Once in the application manager, search for Synaptics software, right-click on it and select Uninstall.
Uninstalling Synaptics Software
  1. Restart your computer properly and check if the error is resolved. If it still isn’t, you can reinstall the software. Although there were several reports that uninstalling the software did the trick.

The post Fix: Unable to Connect to Synaptics Pointing Device Driver appeared first on Appuals.com.

Viewing all 4542 articles
Browse latest View live