Owners of the latest Huawei Mate 20 Pro may find the native HiSearch function to be extremely annoying – in fact, many users want to know how to disable HiSearch. This is because HiSearch is activated by swiping down from the top edges – thus, if you want to refresh a webpage, for example, you need to swipe down from precisely in the center of the screen.
Luckily, its really quite easy to disable HiSearch using ADB. All we’re going to do is uninstall the package.
First enable USB Debugging on your Huawei Mate 20 Pro. Go to Settings > About Phone > tap Build Number 7 times to activate Developer Mode.
Now go to Settings > Developer Options > enable USB Debugging.
Connect your Huawei Mate 20 Pro to your PC via USB, and launch an ADB terminal (hold shift + right click and choose ‘Open a Command Window Here’ from inside your main ADB folder).
In the ADB terminal, type: adb devices
You may need to accept an ADB pairing dialogue on your Huawei Mate 20 Pro.
When your device is successfully recognized by ADB, type the following commands in order:
The LG V40 is the latest flagship phone from LG, released just last month. It features a 6.4” OLED screen at 3120×1440 resolution, 6GB of RAM, and the awesome Qualcomm Snapdragon 845. It also has LG’s Hi-Fi 32-bit Quad DAC, which is absolutely amazing for audiophiles – in fact, the only companies that rivals LG’s DAC sound quality is perhaps ZTE and Sony, with their Axon and Xperia brands respectively.
In any case, the LG V40 does come with a bit of bloatware. If you want a totally clean, optimized phone, its always a great idea to debloat it. Thus, in this guide we will show you how to safely debloat the LG V40, and remove a lot of the pre-installed packages – this includes packages from the Sprint carrier in the US.
First enable USB Debugging on your LG V40. Go into Settings > About Phone > tap Build Number 7 times, until Developer Mode is activated.
Next go into Settings > Developer Options > enable USB Debugging.
Connect your LG V40 to your PC via USB, and launch an ADB terminal on your PC (hold shift + right click inside your main ADB folder, and choose ‘Open a Command Window Here’).
In the ADB terminal, type: adb devices
You may need to accept an ADB pairing dialogue on your LG V40 screen, and type adb devices again, but this command should display your LG V40’s serial number. If your serial is not displayed, or ADB returns “No devices found” or “Device offline”, you may need to reseat your USB cable, or troubleshoot your USB drivers.
If ADB successfully recognizes your device, we can proceed with debloating.
There are two ADB commands you can use to debloat an Android device. They are:
pm uninstall -k --user 0: Will force you to perform a factory reset if you want to undo

pm disable-user --user 0: Safer way, can be undone without factory reset
You can also type pm list packages | sort, which will display every package installed on your LG V40.
Its up to you which method you will use (pm uninstall or pm disable-user), but we are providing a comprehensive list of the apps / packages which are considered ‘bloatware’, and can be safely disabled without negatively effecting your device’s operations.
Sprint Zone Launcher. com.sprint.zone
Preferred Activity Setter. com.sprint.w.prefact
Sprint ID. com.sprint.w.installer
Carrier Setup Wizard. com.sprint.psdg.sw
Sprint Hub. com.sprint.ms.smf.services
Sprint Device Manager. com.sprint.ms.cdm
Caller ID. com.sprint.ecid
Mobile Installer. com.sprint.ce.updater
App Stack. com.pinsight.dw
Gadget Guardian. com.lookout
360 Video. com.lge.vrplayer (not planning to use vr)
Video Wallpaper. com.lge.video.vr.wallpaper
com.lge.upsell
Update Center. com.lge.updatecenter
SprintService. com.lge.sprintserver
SprintMobileFrameworkSupport. com.lge.sprintnativewfc.smf
SnapPage. com.lge.snappage
LDB. com.lge.mlt
LG Health. com.lge.lifetracker
LG Pay Qlauncher. com.lge.lgpay.qlauncher
FOTA Update. com.lge.lgfota.permission
Software Update. com.lge.lgdms.clientspr
Software Update. com.lge.lgdms.clients
G-DEC. com.lge.gdec.client
GCUV. com.lge.gcuv
Gaming. com.lge.gametuner
360 Image Wallpaper. com.lge.gallery.vr.wallpaper
Collage Wallpapers. com.lge.gallery.collagewallpaper
Exchange. com.lge.exchange
Email. com.lge.email (not working for me)
Parking Assistant. com.lge.carfinding (I know where my car is)
App Updates. com.lge.appbox.client
AnimalResource. com.lge.animal.resource
Software Update. com.lge.android.atservice
AppCloud. com.ironsource.appcloud.oobe
ARCore. com.google.ar.core
YouTube. com.google.android.youtube (I use Vanced)
Google Play Movies & TV. com.google.android.videos
Print Service Recommendation Service. com.google.android.inservice.recommendation
Google Play Music. com.google.android.music
Gboard. com.google.android.inputmethod.latin
Device setup. com.google.android.apps.work.oobconfic
Google Pay. com.google.android.apps.walletnfcrel
Duo. com.google.android.apps.tachyon
Photos. com.google.android.apps.photos (trying out lg gallery)
Google News. com.google.android.apps.magazines
Slides. com.google.android.apps.docs.editors.slides
Sheets. com.google.android.apps.docs.editors.sheets
Docs. com.google.android.apps.docs.editors.docs
Cloud Print. com.google.android.apps.cloudprint
Facebook App Installer. com.facebook.system (using alternative FB app)
Facebook. com.facebook.katana
Facebook App Manager. com.facebook.appmanager
Voicemail. com.coremobility.app.vnotes
com.android.voicemail.omtp
Print Spooler. com.android.printspooler
Default Print Service. com.android.bips
Prime Video. com.amazon.avod.thirdpartyclient
Mobile Device Information Provider. com.amazon.appmanager
If you are seeing this ‘Cannot Reset Apple ID Security Questions’ message means that you didn’t provide the correct details to prove who you are. This kind of message means that you could be a potential imposter and Apple must activate this security protocol and must ask your security questions and if you have forgotten them Apple won’t allow you to reset your security questions. And also, if you don’t provide Apple with another email that will be used as a recovery email when you are making your Apple ID you will be obligated to use security questions.
This is why you should always have a backup email in case you cannot sign in to your Apple ID or you have forgotten your password. Getting a message like this can be very frustrating because you may be prevented from buying music, applications, and other iTunes store content until you answer your security questions correctly. In this article, we will explain how to get rid of ‘Cannot Reset Apple ID Security Questions’ message.
Choose the options to reset your security questions.
Enter your Apple ID password. If you are seeing this message because you are not able to enter your Apple’s ID password you can’t get your Apple ID back.
Follow the steps to verify your identity.
Choose new security questions and answers. Select new security questions
If you cannot verify your account, you will be not able to reset your Apple ID security questions and you probably will get the “Cannot reset security questions. We don’t have sufficient information to reset your security questions” message. In this case, you must do the following:
Then you will get many different options for help. These options will vary depending on your region.
Apple support team will ask you a few questions and if you cannot answer their questions, they cannot help you. They can offer you a new Apple ID but you must be aware that you will lose all your purchases. When you are done with this and you solved your problem, maybe the best thing to do is to set up two-step verification or two-factor verification.
A VPN is part of a network architecture in which devices reroute their internet traffic through a computer or server. This gives the illusion that the traffic is coming from the specified server/computer, and not from your own device.
VPN architecture
VPN’s are used by people for hiding their real-time location and accessing geo-specific content if they don’t meet requirements. One example is Netflix; some shows which may be available in the USA might not be available in Germany.
There are two ways through which you can set up a VPN on your Android device. You can either enter the VPN credentials provided by your organization or you can use third-party applications to do the job. If you are using the VPN for personal use, you will probably use third-party applications.
Method 1: Setting up VPN through Android Settings
If you are given a VPN from your organization or you have credentials from some other subscription, you can easily use these details to setup VPN on your smartphone directly from Android settings. However, if you are planning to use some third-party application for using the VPN, you can refer to the second solution.
Launch your phone’s Settings and click on Connections. Some steps or names might vary because of your Android version but the procedure and order of steps are the same.
Connections – Android Settings
Now navigate to the bottom of connection settings and click More connection settings.
More connection settings – Android Settings
Now somewhere near the bottom of the screen, you will see the option of VPN. Open it.
VPN – Connection Settings
If you haven’t set a VPN before on your Android device, you will see a blank screen with the message ‘No VPNs’. Click on Add VPN present at the top-right side of the screen.
Adding new VPN – Connection settings
Now you will come across a new screen consisting of various fields. Fill them out according to the information you have been provided by your organization or the company. Save changes after you are done.
Adding VPN information
Now attempt at connecting to the VPN. If you are successful, you will be displayed an icon on your notification bar telling you at all times that the VPN is working and is connected.
Method 2: Using third-party applications (CyberGhost VPN)
If you want to use a VPN for your personal use, you can use several third-party applications available on Android’s Play Store. We came across one VPN which outperformed others in usability and reliability. CyberGhost VPN is one of the top VPNs in the Android market with support in Windows, MAC, iDevices, and Android. We have listed the steps on how to use the VPN and how to check whether your VPN is connected properly or not.
Open the Play Store and search for the entry CyberGhost VPN. Open the application’s page and click on Install.
Installing CyberGhost VPN – Play store
When you launch the VPN for the first time, you will be prompted to allow VPN access to the application. Simply click Allow VPN Access and OK when a permissions dialogue box pops up.
Enabling VPN access for CyberGhost
By default, the location of the VPN is set as the nearest point near your actual location. You can change it and select any country. This country will be forwarding your internet traffic and because of this, it would appear as if the traffic is indeed being generated from the target location (instead of your actual location).
Changing location – CyberGhost VPN
After you select the location, the VPN will automatically connect and show a successful connection on your screen.
VPN connected – CyberGhost
How can I confirm that the VPN is connected?
There are two ways through which you can indeed confirm that you are connected to a VPN. First of all, you should always look for a key icon on your notification bar. This goes for both Solution 1 and 2. Whenever you are connected to a VPN, Android will display an icon on your notification bar informing you.
Checking if VPN is connected
To confirm whether the VPN is working correctly and your location is indeed masked, you can easily access IP checker websites from the internet who will provide details on your IP address and the current location from where the data is being transmitted. One of these websites is Whatismyipaddress. As you can see, the location we selected in CyberGhost was the USA and our location is indeed masked successfully.
Media keys on your keyboards are special keys that allows you to control media on your system. A common use of these media keys is to play/stop the media from your keyboard. These media keys allows users to interact and control media files, like songs, in a very easy way. But, sometimes the media keys will stop working. This can happen randomly or after a Windows update. The keys of your keyboard will most likely be fine.
However, you might not be able to use them on your system or on specific applications like Spotify app. Whenever you will press the media key, nothing will change or happen. Your application won’t respond to your media keys. This problem also isn’t specific to a particular keyboard brand. This problem can happen with any manufacturer keyboard because it isn’t related to the hardware.
What causes the Media Keys stop Working
The most likely causes of this issue are
Windows built-in applications (or other third party applications) taking control over the access of media keys. In other words, certain applications will become the default applications for your media key usage.
The Desktop overlay option being enabled in certain applications.
Google Play Music extension
Method 1: Change Default Program
Changing the default program to the application that you are trying to use media keys with usually solve the issue. Here are the steps that you need to take in order to make the targeted application as your default application
Hold Windows key and press R
Type control panel and press Enter
Click Programs
Select Default Programs
Click Select program defaults and computer access
Now select your application for the type of program. For example, if you are having troubles with iTunes for Windows, click Music and select iTunes from the list. This will make iTunes as the default program
Once done, you should be good to go.
Method 2: Disable Google Play Music
Note: Although this method shows the steps to disable or change settings of Google Play Music, this problem can be caused by other music related extension like Plex. So, the steps for disabling or changing extension settings will be similar for other extensions as well. If you have other music/media related extensions then use this solution.
If you have the Google Play Music extension installed on the Google Chrome then that might be the culprit behind this. A lot of users solved the issue by simply disabling the Google Play Music extension or changing the settings so that the media keys work with other apps too. Both of the approaches are given below. First, we will try to solve the issue by changing some settings in the Google Chrome so you don’t have to disable the Google Play Music extension.
Open Google Chrome
Click on the 3 dots on the top right corner of the browser
Select More tools and click Extensions
Click on the 3 bars on the top left corner of the extensions page
Select keyboard shortcuts
Find the Google Play Music section and you will be able to see a drop down menu with Global selected. This drop down menu should be in front of media keys options like play/stop. Simply select In Chrome from the drop down menu.
Once done, you should be good to go. But, if this doesn’t solve the issue then you can disable the Google Play Music extension completely. Here are the steps that you need to take in order to disable the Google Play Music extension
Open Google Chrome
Click on the 3 dots on the top right corner of the browser
Select More tools and click Extensions
You should be able to see all your installed extensions. Simply toggle the slider to turn off the Google Play Music extension.
Once done, check if this resolved the issue or not.
Method 3: Disable Desktop Overlay When Using Media Keys Feature
Note: This is applicable for people who are experiencing this issue with the Spotify app.
There is an option named Desktop Overlay when using media keys in the Spotify application. Disabling this option has resolved the issue for the majority of Spotify users. Follow the steps given below to change these settings.
Open the Spotify app
Click Options (or Settings)
Uncheck the option Desktop overlay when using media keys
This should solve the issue and your media keys should start working on the Spotify app now.
Windows 10 provide a very convenient way of logging in to your Windows using a pin code. However, some users are experiencing problems with the Windows 10 pin login. After a Windows Update, users can’t sign in using their previous pin code. And this isn’t related to users forgetting their pin codes. It seems like their old pin code has been removed from the Windows and their PCs aren’t recognising it.
Now, there are a lot of scenarios of this. Some people can’t sign in because the system doesn’t recognise their PIN. On the other hand, some people can’t even enter their pin because there isn’t a pin option available for them.
What Causes the Pin to Stop Working?
Here is a list of things that can cause this issue
A bug in the Windows Update that might have broken the PIN sign in option
Corrupt files in the Ngc folder
Usually it happens after a Windows Update so it’s a bug that breaks the PIN sign in option.
Tips
Before you dive deep in to the methods given below, try these few tricks that might work for you.
Try to restart your system a couple of times. The login pin option might work after a few restarts
Try to disconnect from the internet and then try again. You can take out the Ethernet cable if that’s what you are using. If you are wirelessly connected, get to the login screen and you should be able to see your Wi-Fi option on the right bottom corner. Turn off your Wi-Fi from there and reboot.
Use your password option by clicking on the Sign-in options at the login screen. Once you are in your Windows, go to Settings > Accounts > Sign-in Options > Remove PIN and then Add PIN.
Method 1: Sign in With Safe Mode (If you can’t get into Windows)
Try signing in with Safe Mode to see if that works. If you can get into the Windows with Safe Mode then you can change the pin or password from there. Follow the steps given below to enter in the Safe Mode
Start your computer.
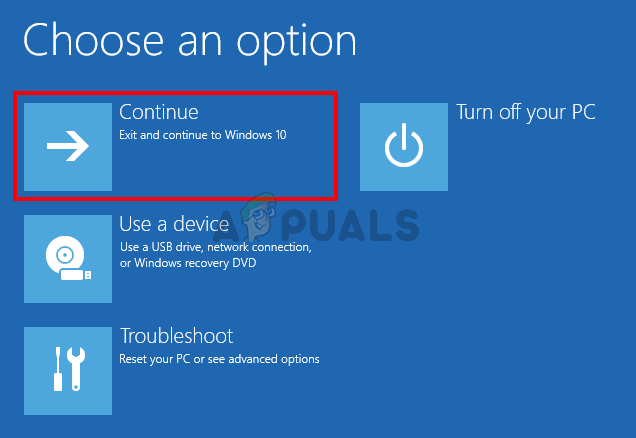
At the login screen, click the power button from the bottom right corner
Hold Shift key and select the Restart option
Keep holding the Shift key until you see the Advanced recovery options menu
Select Troubleshoot
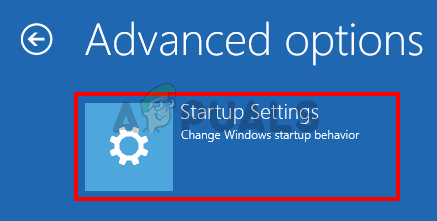
Click Advanced options
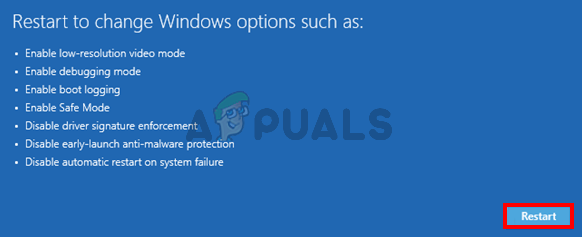
Click Startup Settings
Click Restart
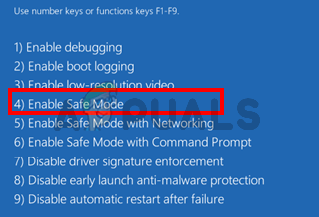
Now you should be able to see a list of options with numbers beside them. You just need to press the number that is allocated to the Safe Mode. This should be 4. So simply press (F4) to Enable Safe Mode
Wait while Windows 10 starts in safe mode.
Log in and change the settings of your password or pin login. You can hold the Windows key and press I to open up the settings screen. Click Accounts. From here, you can click Sign-in Options and manage your accounts, PINs, and passwords. We will suggest you remove your PIN and then use the Add PIN option to activate the pin.
Method 2: Reset Account Control Lists Ngc Folder
You can reset your ACLs to reset the PIN of your system via the command prompt. Follow the steps given below.
Press Windows key once
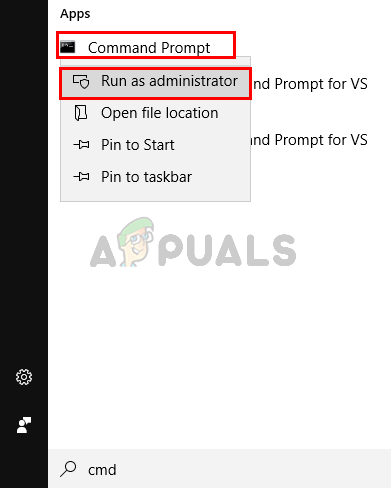
Type command prompt in the Start Search menu
Right click command prompt from the search results and select Run as administrator
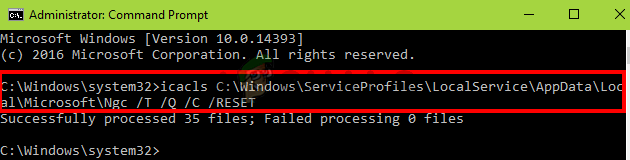
Type icacls C:\Windows\ServiceProfiles\LocalService\AppData\Local\Microsoft\Ngc /T /Q /C /RESET and press Enter
This should solve the issue for you. You might need to set a new PIN again but the issue with the PIN should be gone.
If you can’t login to Windows
You won’t be able to follow the steps given above if you can’t even sign in to Windows. You can still use the command prompt without signing in to Windows. Follow the steps given below
Turn on your computer and get to the login screen
At the login screen, click the power button from the bottom right corner
Hold Shift key and select the Restart option
Keep holding the Shift key until you see the Advanced recovery options menu
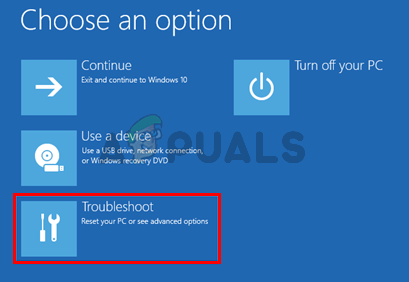
Select Troubleshoot
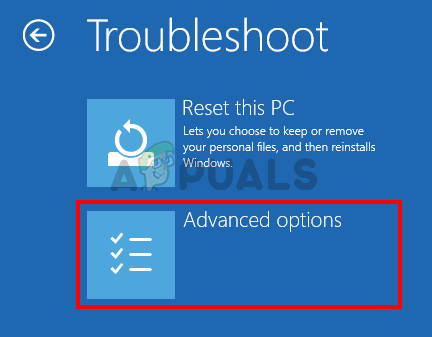
Click Advanced options
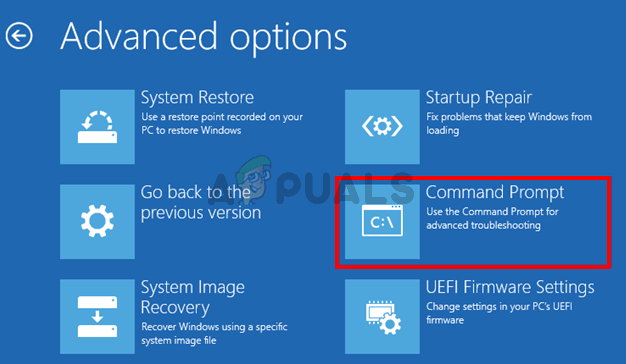
Click Command Prompt
Type icacls C:\Windows\ServiceProfiles\LocalService\AppData\Local\Microsoft\Ngc /T /Q /C /RESET and press Enter
Close the command prompt
Click Continue
Reboot and check if this resolves the issue
Method 3: Delete NGC Folder Contents
If you are able to sign in with a password but your PIN still isn’t working then you can try to delete the contents of the NGC folder. Deleting the contents of the NGC folder will reset your PIN and you will be able to add a new pin of your choice.
Make sure you are signed in with the administrator account because you will need admin access to delete the contents of Ngc folder
Hold Windows key and press E to open the Windows Explorer
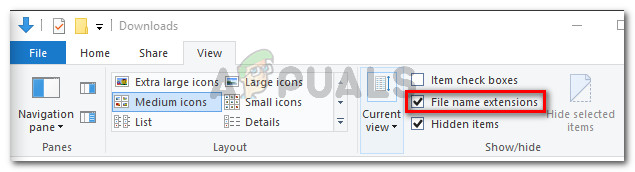
Some folders, especially the AppData folder, might be hidden. So, you need to make sure that hidden folders can be seen. Click View from the top in File Explorer and check the option Hidden Items from Show/Hide section
Navigate to this path C:\Windows\ServiceProfiles\LocalService\AppData\Local\Microsoft\Ngc. You can copy/paste this whole path in the address bar of File Explorer and see if it works. If it doesn’t then you will have to manually navigate to the given path.
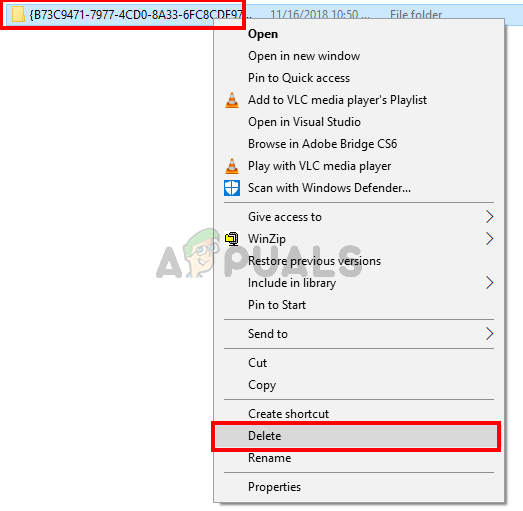
Once you are in the Ngc folder hold CTRL key and press A to select all the files and folders. Press Delete and follow any additional on-screen instructions or prompts. Note: You can also just rename the Ngc folder by right clicking it and selecting Rename.
Once done, you should be good to go. You can go to Settings > Accounts > Sign-in Options > Add PIN.
Method 4: Use a Local Account
You can also get around this problem by using a local account or creating a local account if you don’t already have one. Follow the instructions given below to make a local account and set a PIN via that account
Sign in to Windows
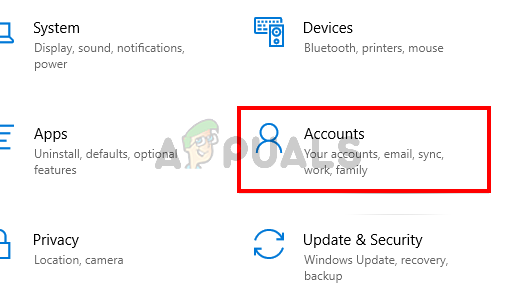
Press and hold Windows key and press I
Select Accounts
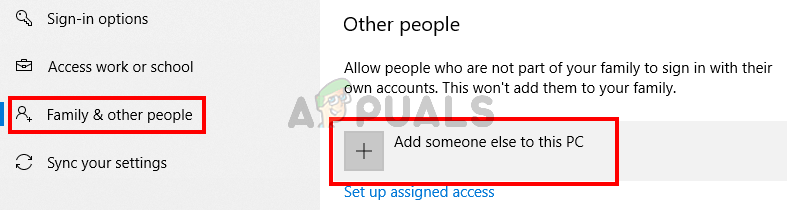
Click Family & Other people from the left pane
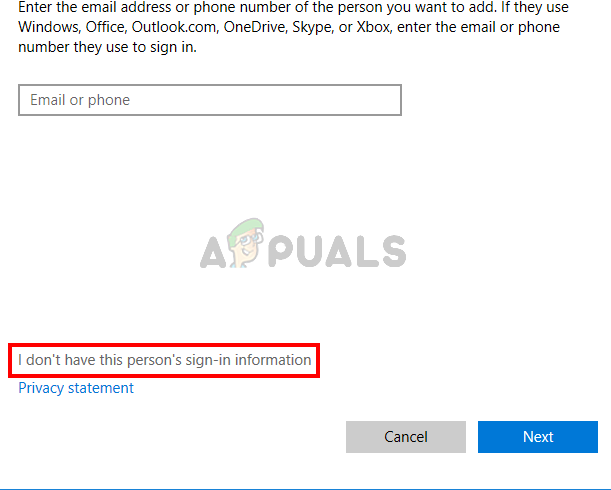
Select Add someone else to this PC under the Other People section
Click I don’t have this person’s sign in information
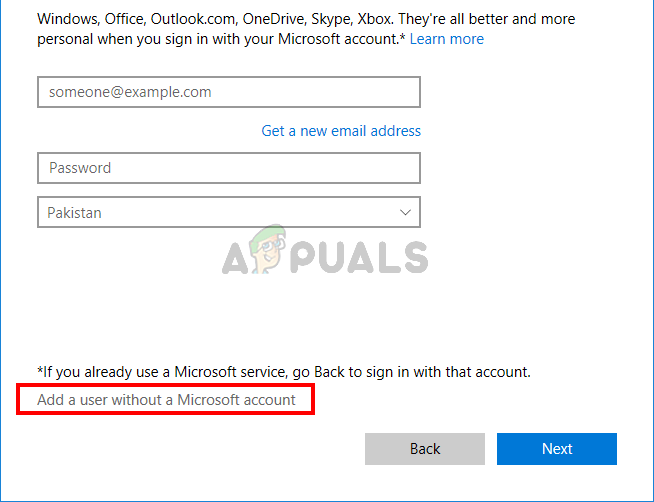
Click Add a userwithout a Microsoft account
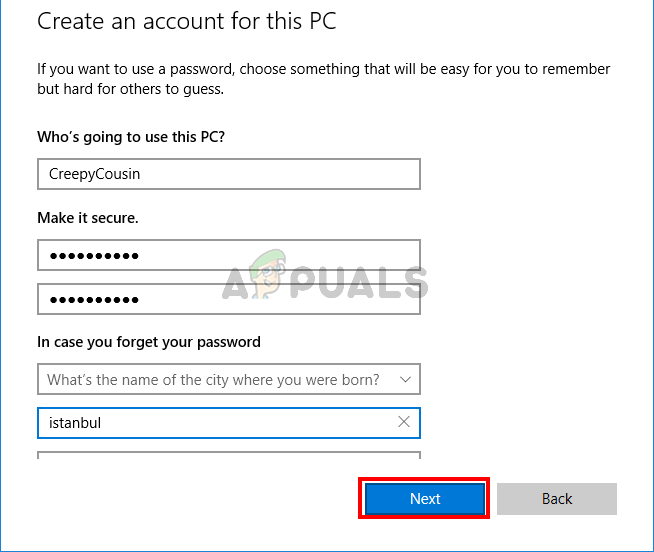
Fill in the details and click Next
Now sign out and sign back in with your local account
Press and hold Windows key and press I
Select Accounts
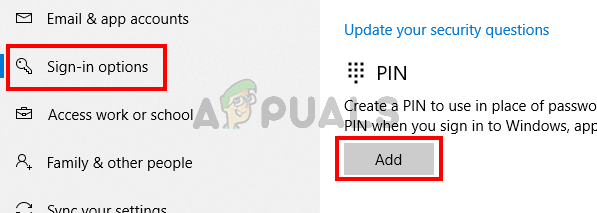
Click Sign-in Options from the left pane
Click Add and set up your PIN
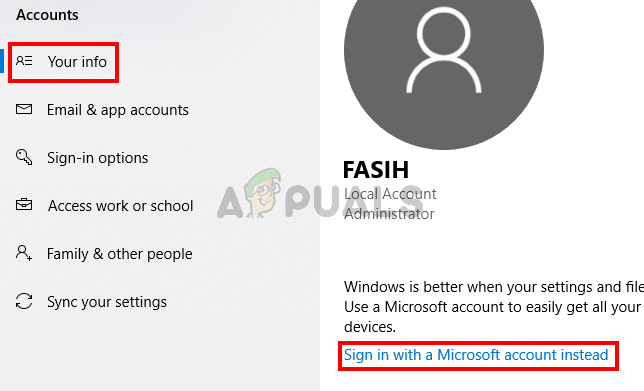
Now all you have to do is switch back to using the Microsoft account for your login. Click Your Info from the left pane
Select Sign in with a Microsoft Account option and follow any additional on-screen instructions
Now you should be able to use the PIN code when signing in.
Users encounter the error message ‘Photoshop has encountered a problem with the display driver’ when the application fails to connect and utilize the graphics hardware properly. All the enhancements who make use of graphics are temporarily suspended. Since Photoshop relies heavily on graphics rendering, this error message makes it almost unusable.
Photoshop has encountered a problem with the display driver
Adobe has acknowledged this error and even released an official documentation on the website describing the causes. The troubleshooting offered by Adobe isn’t helpful and leaves the user at a state of confusion on what to do. This error message may seem intimidating but can be fixed using the workarounds listed below.
What causes the error ‘Photoshop has encountered a problem with the display driver’?
This error message only occurs when Photoshop is unable to access your graphics resources for its operations. The reasons why it is unable to access can vary computer to computer. Some of the causes are:
There is a conflict with your onboard and dedicated graphics installed on your computer.
The graphics sniffer program of Adobe Photoshop is not working properly and fails to retrieve details of the graphics hardware installed.
The application is not installed in your system directory which may cause issues in permissions in accessing the graphics resources.
There is a problem with your graphics drivers. If the drivers are not working properly, no application will be able to use the resource.
Before we start with the workarounds, make sure that you are logged in as an administrator on your computer and have an open internet access.
Solution 1: Disabling ‘sniffer.exe’
The executable ‘sniffer.exe’ is an application which detects the graphics modules installed on your computer. It detects your graphics resource and passes the information on to the application so the resource can be utilized. The sniffer can sometimes go into an error state which might cause Photoshop not to detect any hardware. We can try moving/rename it and see if this fixes the problem at hand.
Navigate to the directory where Photoshop is installed. The default directory is:
C:\Program Files\Adobe\Adobe Photoshop CC 2015.
Once in the directory, search for the executable ‘sniffer_gpu.exe’. Cut it and paste it to some other location (such as the desktop).
Relocating Photoshop’s GPU sniffer
Now restart your computer and try accessing Photoshop. Check if the error is resolved.
Another workaround which was reported by users was disabling onboard graphics if dedicated graphics (such as AMD or NVIDIA) are installed on your computer. It seems that Photoshop has issues when two graphics options are available and it fails to make a choice which one to use for its rendering and operations. Before following the steps, you should verify that your third-party graphics card is functioning properly.
Press Windows + R, type “devmgmt.msc” in the dialogue box and press Enter.
Once in the Device Manager, navigate to the entry “Display adapters”, right-click on the onboard graphics and select Disable device.
Disabling onboard graphics – Device Manager
Now try accessing Photoshop and check if the error message is resolved.
Solution 3: Changing directory of Adobe Photoshop
Another hiccup which Photoshop faces are the permissions if it is installed on another directory. Whenever an application is installed in program files (the driver where the OS is installed), it gains all the basic permissions automatically. If your Photoshop is in another directory, we can try changing its directory and see if this fixes the issue. If simply changing the directory doesn’t work, you might need to reinstall the application to the targeted directory.
Press Windows + E to launch Windows Explorer. Once in the explorer, navigate to the directory where you installed Photoshop. Right-click on the folder and select Copy.
Relocating Adobe Photoshop
Now navigate to the driver where your OS is installed (by default, it is Local Disk C), and open your Program files. Paste the application there.
Relocating to System drive
Now navigate inside Photoshop’s folder and launch the executable. Check if the issue is resolved.
Solution 4: Updating Graphic Drivers
If your graphics drivers are not working or installed properly, Photoshop will not be able to use the graphics resources. Drivers are the main modules which enable interaction between the hardware and software and if they are corrupt/outdated, the resources might not be accessed. We can try updating your graphic drivers and see if this fixes the issue at hand.
Press Windows + R, type “devmgmt.msc” in the dialogue box and press Enter.
Expand the category of ‘Display adapters’ and select the graphics card. Now there are two options. Either you can search online for the latest/older driver available for your hardware from the manufacturer’s website such as NVIDIA etc. (and install manually) or you can let Windows install the latest version itself (search for updates automatically).
Here we will just look at how to update automatically. Right-click on your graphics hardware and select Update driver.
Updating graphics hardware – Device manager
Now select the first option “Search automatically for driver software”. Now your computer will connect to Windows Update modules and install the drivers available.
Updating driver automatically – Device manager
After installing, restart your computer and check if this resolved the error message.
KB4041994 is an update for computers running on the 64-bit variant of Windows 10 version 1709. Like all other Windows updates that are rolled out, Windows Update automatically attempts to download and install this update on all computers for which it has been rolled out. Many Windows users, however, have complained of seeing the following error message when Windows Update tries to download and install update KB4041994 on their computer:
“There were problems installing some updates, but we’ll try again later. If you keep seeing this and want to search the web or contact support for information, this may help: Update for Windows 10 Version 1709 for x64-based Systems (KB4041994) – Error 0x80070643”
Update KB4041994 can fail to install with error code 0x80070643 for one of a number of different reasons – ranging from some kind of an issue with Windows Update or a conflict with an application already installed on the computer to the update simply being incompatible with the computer Windows Update is trying to install it on and it having been wrongly sent out to that computer in the first place. If you’re having trouble downloading and installing update KB4041994 on your computer, the first thing you need to know is the fact that this is not at all a critical system update and failure to install it will not result in any hindrance in system performance or functionality.
In actuality, update KB4041994 is merely an HEVC media extension installer for computers running on a 64-bit iteration of Windows 10 version 1709. As insignificant an update as it might be, however, not being able to download and install update KB4041994 can definitely prove to be an issue. That being the case, the following are the absolute most effective solutions you can use to try and resolve this problem (or at least get it to subside):
Solution 1: Reset Windows Update
The first, and the simplest, possible cause of this problem is some kind of an issue with Windows Update itself. Since Windows Update is the courier that delivers updates to your computers and takes care of installing them, an issue with the utility can result in updates not being installed. Almost all of the problems that Windows Update can be afflicted by, however, can be resolved by simply resetting it. To reset Windows Update on Windows 10, you need to:
Click hereto download a .BAT file that will automatically reset Windows Update and all of its components for you.
Save the .BAT file to an easily accessible and memorable location on your computer, and navigate to this location once the file has been downloaded.
If the file is blocked (and there is a pretty good chance it will be), right-click on it, click on Properties in the context menu, check the checkbox next to the Unblock option in the Security section, click on Apply and then on OK. If an Access Denied dialog box pops up, click on Continue and then either click on Yes (if you are logged into an Administrator account) or type in the password for an Administrator account (if you are logged into a Standard User account).
Check the Unblock optionClick on Continue
Right-click on the .BAT file, and click on Run as administrator in the resulting context menu.
Click on Run as Administrator
If you are asked to confirm the action by UAC, click on Yes in the dialog box that appears.
Click on YesType in the password for your account and click on Yes
As soon as the .BAT file has executed all of the commands it contains and ran to completion, Windows Update on your computer and all of its components will have been reset. At this point, restart your computer.
When your computer boots up, check to see whether trying to install update KB4041994 still results in failure and returns error code 0x80070643.
Solution 2: Uninstall HEVC from your computer and then install the update
Error code 0x80070643 in the context of installing update KB4041994 can also be caused by a conflict with another application installed on the affected computer. Seeing as update KB4041994 is an installer for an HEVC media extension, any conflicts with other applications on affected computers can only be with other HEVC applications installed on them. If you have some kind of an HEVC app installed on your computer and are seeing this error message, simply uninstalling the app might just be what needs to be done in order for you to be able to install update KB4041994 successfully. To uninstall HEVC from your Windows 10 computer, you need to:
Open the Start Menu.
Click on Settings.
Click on Settings
In the Settings window that opens up, click on Apps.
Click on Apps
Wait for Windows to populate a list of all the apps that are currently installed on your computer. When you see this list in its entirety, go through it and locate HEVC.
When you locate the HEVC app installed on your computer, click on it to select it.
Click on Uninstall.
Confirm the action if required to do so and go through the uninstallation process until the app has been removed from your computer.
Once done, go back into Windows Update and (unless it starts doing so of its own accord), get it to Check for updates. Windows Update will begin downloading and installing any and all updates available for your computer, including update KB4041994, the installation of which should now go off without a hitch.
Solution 3: Hide Update KB4041994 from Windows Update
If neither of the solutions listed and described above have worked for you, your only remaining option might just be to hide the update from Windows Update, after which the utility will no longer try to download and install update KB4041994 whenever it checks Microsoft’s servers for updates for your computer. While it is true that not being able to successfully install update KB4041994 won’t have any adverse effects on your computer or its performance, it being there in Windows Update will just turn out to be a nuisance in the long run and it might interfere with the installation of other, comparatively more important, updates for your computer. Taking all of that into consideration, hiding update KB4041994 from Windows Update is a pretty neat course of action. If you would like to hide update KB4041994 from Windows Update, you need to:
Go here and download the wushowhide.diagcab file from Microsoft’s servers. This file is Microsoft’s Show or hide updates troubleshooter for Windows.
Save the wushowhide.diagcab file to an easily accessible and memorable location on your computer.
Navigate to where you saved the wushowhide.diagcab file once it has been downloaded, locate it and double-click on it to launch it.
Click on Advanced in the window that pops up.
Click on Advanced
Check the checkbox next to the Apply repairs automatically option, enabling it.
Check the checkbox for the Apply repairs automatically option
Click on Next.
Once the troubleshooter has done its thing, click on Hide updates.
Click on Hide Updates
Locate Update for Windows 10 Version 1709 for x64-based Systems (KB4041994) in the list of updates the troubleshooter finds are available for your computer, and check the checkbox located directly beside it.
Click on Next.
The selected update (update KB4041994, in this case) will have been successfully hidden from Windows Update at this point. Click on Close to get out of the troubleshooter.
Once done, you will no longer have to worry about this insignificant update or being met with an error message containing error code 0x80070643 every time Windows Update begins automatically downloading and installing updates for your computer simply because this annoying little update refused to install.
We’ve all been there at some point in recent times – when you’re just surfing your way through the World Wide Web as usual, see a video you want to watch, play it and, after a feeble attempt from the respective online media player to play the video in question, BAM – you see an error message within the video player. The error message you see reads:
The media could not be loaded, either because the server or network failed or because the format is not supported
“The media could not be loaded, either because the server or network failed or because the format is not supported”
What does this error message tell us? Not a lot, to be honest, as it does not pinpoint an exact reason for keeping you from the video you wanted to watch. All it does make clear is that the player was unable to load the video you were trying to view, and that this could have been caused by a failure on the server’s end or the format the video is in not being supported on your end by the medium you used to access it – your internet browser. This little error message has been seen on basically every single internet browser that exists and is also not exclusive to one or two online media players – it affects all of them.
There’s a lot of ground to cover when it comes to determining exactly what this issue is caused by, which is why trying to resolve it is no walk in the park either. If you are seeing the “The media could not be loaded, either because the server or network failed or because the format is not supported” error message while trying to view a video on a webpage, the following are the most effective solutions you can use to get rid of the error message and successfully watch the affected video:
Solution 1: Disable AdBlock for the webpage the video is on
It has come to light that video players and video hosts all across the internet are using this error message as a tactic to get visitors to disable whatever advertisement blocking software or extension they are using and to allow advertisements to be visible to them in exchange for access to videos. In many cases, the display of this error message instead of the video in question is triggered when the video player detects that the visitor has some kind of advertisement blocking utility engaged. If AdBlock is the reason why you’re viewing this error message instead of the video you want to view, the problem can be resolved by simply disabling AdBlock for the webpage (or website) the video you want to watch is on.
The exact steps you need to go through in order to disable your AdBlock on a specific webpage or website vary depending on the kind of advertisement blocking utility and internet browser combination you use. For example, if you’re using AdBlock Plus on Google Chrome and want to disable the extension on a specific website, you need to:
Navigate to the webpage that has the affected video on it.
Click on the Options button (represented by three vertically aligned dots) in the top-right corner of the Google Chrome window.
Click on Options
Click on the little icon for AdBlock Plus.
Click on the AdBlock Plus icon
You will see that the Power button is blue, meaning that AdBlock Plus is enabled. Click on the Power button and the extension will be disabled for the website you are on.
Click on the Power button
For the changes to take effect, be sure to refresh the webpage you were on. Once you have refreshed the webpage, try playing the affected video and see if your browser successfully plays it.
Click on Refresh to refresh the page via AdBlock Plus
Solution 2: Update your internet browser
Your internet browser might be having issues playing the video in question because of some kind of a problem with it (such as a lack of support for the format the video is in), a problem that was remedied by the browser’s developers in a later update. If you are seeing the “The media could not be loaded, either because the server or network failed or because the format is not supported” error message while trying to watch a video, try checking to see if there are any updates available for the internet browser you are trying to watch the video on, and then downloading and installing any updates that are available.
Exact instructions for manually checking for updates on your internet browser will vary depending on the internet browser you use. For example, if you’re using Google Chrome, here’s what you need to do in order to manually check for updates:
Launch Google Chrome.
Click on the Options button (represented by three vertically aligned dots) in the top-right corner of the Google Chrome window.
Click on Options
Hover your pointer over Help.
In the resulting context menu, click on About Google Chrome.
Click on Help > About Google Chrome
On the page that you will be taken to, Chrome will automatically begin manually checking for updates. If any updates are available, the browser will even do you the courtesy of downloading and installing them for you.
Chrome will check for updates
If you do end up installing any updates for your internet browser, be sure to check whether doing so gets the affected video to start playing without a hitch.
Solution 3: Use a different internet browser
If neither of the solutions listed and described above have worked for you, there’s a chance that the internet browser you are using to play the affected video, in and of itself, is the problem. This error message has been known to affect any and all internet browsers, but in most cases, it only affects one specific internet browser for one victim of this issue. That being the case, you might be able to resolve this problem by simply using a different internet browser to play the video you want to watch. For example, if you were seeing the “The media could not be loaded, either because the server or network failed or because the format is not supported” error message while playing a video on Internet Explorer, try playing the same video on Google Chrome or Mozilla Firefox and you should be able to watch it with no problems.
Solution 4: Wait out the storm
If every single attempt you have made to remedy this situation up to this point has bore no fruit, you might have to swallow a difficult pill – there is a good chance that the problem simply does not lie on your end, and is actually a server-side issue preventing your browser or the media player from playing the video for you. If that is true, there’s not much else you can do. Only wait for the folks behind the server the video is hosted on to get things in order on their end, at which point you should be able to successfully play the video you want to watch. Be sure to check whether the server or network the affected video is located on is back up every now and then so that you know as soon as you can watch the video.
A lot of Windows 10 users are facing the issue of Encrypting File System Popups. Usually, seeing an Encrypting File System popup shouldn’t be an issue since the purpose of the popup is to simply remind the user to back up their encrypted files. The issue here is that users who haven’t encrypted any of their files and haven’t used bitlocker or any other encryption software. In fact, a lot of users are seeing this popup on a freshly installed Windows 10.
What is Encrypting File system?
Encrypting File System (EFS) is a Windows built-in feature that lets users encrypt their important files to help keep the files safe from any intruders. This file encryption technology can be used on NTFS volumes. Usually, there isn’t any difference for the user who encrypted the file in using an encrypted file. The file will automatically be decrypted before opening and the encryption will be reapplied when the owner closes or stops using the encrypted file. So, the Windows EFS provides a seamless way of encrypting your important files and sensitive information.
What causes the EFS pop ups?
The main purpose of this prompt is to remind you to backup your encrypted files. If you are seeing the popups and you haven’t encrypted any files then the reasons might be:
You might have downloaded an already encrypted file from the internet that might have triggered this popup issue. This is the most likely reason if the popups started appearing all of a sudden.
You installed a software/application and it created a certain encrypted file during the installation process.
Your system is compromised by a Trojan that has forcefully encrypted your files or it already came up with its file encrypted.
Method 1: Check Which Files Are Encrypted
The easiest and the most common solution is to simply check if you have encrypted files on your system. If you do find some encrypted files then you can simply check when they were created and which application they belong to. You can then simply decide whether to keep the files/certificates or delete them. Follow the steps given below to locate the encrypted files on your system.
Press Windows key once
Type command prompt in the Start Search bar
Right click command prompt from the results and select Run as administrator
Type CIPHER.EXE /U /N and press Enter. Note: This command might take a while. It might seem that command prompt is stuck but just wait a while.
Once you see the list of encrypted files, navigate to their locations and check if the file was created by you or something else. You can look at the time of creation or the associated application. If you don’t see anything suspicious then simply delete the file. You can also just decrypt the file and the popup will stop appearing. You can decrypt the file by right clicking and select File Ownership > Personal or Right click > Properties > General > Advanced > UncheckEncrypt contents to secure data > Ok.
On the other hand, if you do notice something suspicious or do you feel like the file was created on its own then we will suggest a full PC scan. You can use any anti-virus application and perform a full system scan to make sure there isn’t anything harmful on your system.
Method 2: Use Certificate Manager
You can use the certificate manager to have a look at the certificates created on your system. These certificates can automatically be created by other applications during the installation period and cause this popup to trigger. Once you locate these certificates, simply delete them and you should be good to go. Follow the steps given below to locate these certificates.
Hold Windows key and press R
Type certmgr.msc and press enter
Double click Personal from the left pane
Select Certificates and check if there are any certificates listed on the right pane. If there are and the timing of their creation doesn’t look suspicious (you can look at the Issues By section to check which application issued the certificate) then simply right click and select Delete. You can also just leave the certificate their and backup the certificate when the popup appears again. Delete the certificate only if you are sure. The purpose of this is the to check whether the encrypted file is legitimate or not.
Now, locate and double click Trusted People from the left pane
Select Certificates and check if there are any certificates listed on the right pane. If there are and the timing of their creation doesn’t look suspicious (you can look at the Issues By section to check which application issued the certificate) then simply right click and select Delete. You can also just leave the certificate their and backup the certificate when the popup appears again. Delete the certificate only if you are sure. The purpose of this is the to check whether the encrypted file is legitimate or not.
If you are a Windows 10 user who likes to keep the Windows updated to the latest version then you might have noticed a weird new service/program in your installed program lists. This new program will be named Windows Setup Remediation (KB4023057). This will be in the installed programs list that you can access via the settings and it will also have an app on your Windows as well. If you look at the install date then the installation date will most likely be very fresh.
This isn’t something new but it installs on its own and doesn’t appear in the Windows update catalog so you must be confusing it with a virus or Trojan. Also, the vendor name is Unavailable which makes it really suspicious.
What is Windows Setup Remediation (KB4023057)?
If you are one of those users who is worried about the Windows Setup Remediation (KB4023057) update then don’t worry. Most of the users are correct, it is relatively new and you wouldn’t find it if you were specifically looking for it, but it is a legitimate Windows Update. Windows Setup Remediation (KB4023057) is a Windows servicing stack update and includes reliability improvements. This update includes files and resources that address issues that affect the update processes in Windows 10. The goal of these files is to improve the quality of the Windows Updates and make the Windows Update process seamless.
In other words, it will make changes on your system like fix corrupt Windows files, request your device to stay awake longer to enable installation of updates, change network settings, and various other changes to fix problems in Windows Update itself.
This app/update is updated on its own and it is usually updated before a Windows Update or during the Windows Update via the Windows Update components or Windows Store.
Should I Delete it Windows Setup Remediation (KB4023057)?
You can delete this update without any major consequences since it’s only needed for specific Windows builds. However, we wouldn’t recommend it since it is used for the reliability of Windows Updates. And, even if you uninstall this update, users have complained about it being offered in the next updates. So, you can’t really prevent it 100% because it will be offered again and, eventually, get installed again.
Wireless Devices work with radio waves so there’s no cable or wire to ensure connection, which is why factors like your computer’s ability to receive signals, proximity to main routers or modems etc. play a huge role in providing users with efficient and fast-working internet.
If you’re a Microsoft Windows user then you’ve probably heard about or come across the: ‘We couldn’t find wireless devices on this PC’ error. The fact is this type of error can occur in all sorts operating environments, not just Windows, and for a number of reasons.
The problem lies in bugs in the operational code or problems with your internet settings or even your hardware; but don’t worry, because this article will take you through all the steps to solving this wireless device problem, once and for all.
We couldn’t find wireless devices on this PC
What causes the error ‘We couldn’t find wireless devices on this PC’
An Upgrade Bug: While the Microsoft Windows team regularly releases updates to fix bugs and add in improvements to the latest version of the Windows operating environment series, Users have reported this particular error most after an update to a new version of Windows. Hence, the problem lies in the Windows code itself.
Old, Corrupted or Missing Drivers: Most of the time, the drivers required for detecting wireless devices such as adapters are unavailable. A lack of proper drivers can be attributed to a number of reasons such as: accidental deleting by users when clearing memory or negligence in updating drivers when required.
Weak or Disrupted Wifi signals: Sometimes factors such as distance from your Wifi routers or other obstructions to Wifi signals can also contribute to causing this error.
Method 1: Updating Drivers
This method will show you the steps to efficiently update all your required Drivers for Wireless device detection.
Click on the search icon, type and select Device Manager.Search/Device Manager
Select the Network adapters option.
Device Manager/Network Adapters
Right click on the Ethernet/Wireless Adapter and select Update Drivers.Wifi/Ethernet Adapter/Update Drivers
Select Search automatically for updated driver software option on the window that pops up.
Search automatically for updated driver software
Wait for it to install.
Check your wireless connection.
Method 2: Resetting TCP/IP Settings
Sometimes, rebooting the whole connection process is the best tactic. Thus, this method will show you how to reset your TCP/IP settings so that your PC can start the device detection and connection process fresh.
Click on the search icon and type Command Prompt.
Settings/Command Prompt
Right click on the command prompt icon and select Run as administrator.
Command Prompt/Run as Administrator
In the black, pop up window that opens type netsh int ip reset resetlog.txt and press enter.
Command Prompt windowCommand Prompt
Restart your PC and check your wireless connection.
Method 3: Resetting winsock Catalog
This method follows the same principle of resetting and starting the detection and connection process anew, as Method 2; but in a different, ‘catalog’ capacity.
Click on the search icon and type Command Prompt.
Settings/Command Prompt
Right click on the command prompt icon and select Run as administrator.
Command Prompt/Run as Administrator
In the black, pop up window that opens type netsh winsock reset and press enter.
Command prompt/netsh winsock reset
Restart your PC and check your wireless connection.
Method 4: Change Power Management Option for your Wireless Adapter
Here, we’ll be taking you through the steps to change a specific ‘Power Management’ setting which may be the cause of your error.
Click on the search icon, type and select Device Manager.Search/Device Manager
Select the Network adapters option.
Device Manager/Network Adapters
Right click on the Ethernet/Wireless Adapter and select Properties.
Network Adapters/Ethernet/Wireless Adapter /Properties
Click the Power Management tab.
Remove the check mark beside Allow the computer to turn off this device to save power, click OK.
Power Management
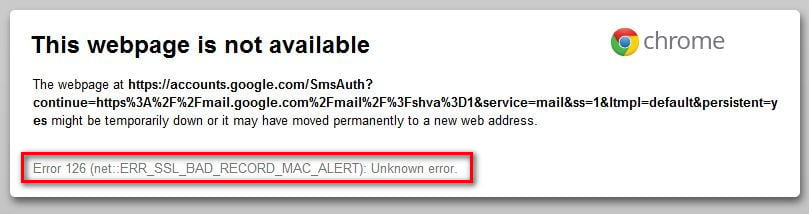
Some users have been complaining that they get the ERR_SSL_BAD_RECORD_MAC_ALERT error when trying to access some web addresses. Most affected users report that they only get this error while trying to connect to accounts.google.com – the address responsible for handling the login for most (if not all) of Google’s services. However, the issue does not seem to be exclusive to Google Chrome, as most affected users report that the same web addresses are also not accessible from different web browsers.
ERR_SSL_BAD_RECORD_MAC_ALERT
What is causing the ERR_SSL_BAD_RECORD_MAC_ALERT error?
We investigated this particular issue by looking at various user reports and the steps they took in an attempt to resolve the issue. Based on what we gathered, there are several common scenarios that will lead to the apparition of this issue:
3rd party Antivirus software is inspecting the HTTPS traffic – Although most Antivirus software is configured to do this by default, some end up being overprotective. Affected users report that they managed to resolve the issue after disabling HTTPS inspection (SSL Scan) from their 3rd party AV settings.
Chrome build is severely outdated – This particular issue is also reported to occur on machines running an outdated version of Chrome. However, this is only known to occur with every outdated Chrome version (build 40 and older)
Router’s MTU value is incompatible with the network configuration – The error is also confirmed to occur if the router’s MTU value is incompatible with the current network configuration.
If you’re currently struggling to resolve this particular issue, this article will provide you with a selection of verified troubleshooting steps. Below you have several methods that other users in a similar situation have used to get the issue resolved.
For the best results, follow the methods below in order until you stumble upon a solution that is effective in your particular scenario.
Method 1: Disabling HTTPS inspection from 3rd party antivirus settings (if applicable)
As per various user reports, the issue is likely to occur if you have a third party Antivirus software that is configured to inspect HTTPS traffic in order to guard against malicious attacks on the secure channels.
Although this is not necessarily a bad thing, a lot of 3rd party AV suites including ESET, AVAST, BitDefender, and McAfee are reported to facilitate the apparition of the ERR_SSL_BAD_RECORD_MAC_ALERT error.
Most affected users have managed to resolve the issue by disabling the HTTPS inspection feature from the AV’s settings. You can typically resolve this problem by preventing your 3rd party antivirus from doing any sort of HTTPS inspection (SSL scanning).
Of course, the steps of doing this are highly dependent on the AV that you’re using. On BitDefender, you can disable this feature by going to Settings > General > Advanced and unchecking the Scan SSL entry.
If you are unable to find the equivalent settings (it might not have the option to disable HTTPS inspection), the only way to ensure that the error is not occurring because of your AV is to uninstall it completely. You can ensure that you uninstall it completely without leaving any leftover files (that will enforce the same rules) by using our guide on How to Completely Uninstall a Third-Party Computer Security Program.
Note: Affected users report that the ERR_SSL_BAD_RECORD_MAC_ALERTerror is not occurring while Windows Defender is the active security option.
If this method wasn’t applicable to your particular situation or it hasn’t helped you to resolve the issue, move down to the next method below.
Method 2: Update Chrome to the latest version
Some users reported that for them, the fix was as easy as updating Chrome to the latest version. But keep in mind that this fix is only reported to be effective for users that have been only encountering the issue on Chrome and had a very old build installed (20 – 40).
Here’s a quick guide on trying to resolve the ERR_SSL_BAD_RECORD_MAC_ALERT error by ensuring that you’re using the latest Chrome build:
Open Google Chrome and go click the action button in the top-right corner. Then, click on Help > About Google Chrome.
Go to Settings > Help > About Google Chrome
Note: Keep in mind that Google Chrome is configured to update by default. However, manual user intervention or certain extensions might change this default behavior.
Wait until the scan is complete, then click on Update Chrome and wait for the new version to be installed.
Ensuring that you’re running the latest version of Google Chrome
Restart your browser and see if the issue has been resolved.
If you’re still encountering the issue (or you’re encountering the issues accessing certain websites with multiple browsers), move down to the next method below.
Method 3: Changing the router’s MTU to 1400
A lot of users encountering the ERR_SSL_BAD_RECORD_MAC_ALERT error have managed to resolve the issue entirely (on every device connected regardless of the used browser) by changing the involved router’s MTU value to 1400.
The steps of changing the MTU (Maximum Transmission Unit) will be different according to your router manufacturer. However, we created some general steps that should point you in the right direction:
Launch a web browser and enter your router login address. Most routers use the default IPs: 192.168.0.1. or 192.168.1.1.
Look through your router’s settings and for any Network or WAN setting that allows you to change the MTU Size. On most routers, you can find this in the Advanced menu under WAN setup.
Set the MTU size to 1400 and hit Save (or Apply) to save the changes.
Modifying the MTU Size
Restart your router and see if the issue has been resolved by trying to access the same address that was previously triggering the ERR_SSL_BAD_RECORD_MAC_ALERT error.
Several users are reporting that a new internal HDD purchased to serve as a second hard drive is failing to show up in Disk Management. Most affected users report that even though the new hardware is showing in their BIOS settings, it doesn’t appear inside Disk Management. The issue is not specific to a certain Windows version as it’s reported to occur on Windows 7, Windows 8.1 and Windows 10.
New HDD is not showing inside Disk Management
What is causing the hard drive not showing up in disk management error?
We investigated this particular issue by looking at various user reports and the steps that they followed to resolve the issue. From what we were able to gather, there are several fairly common scenarios that will lead to the apparition of this issue:
Faulty SATA cable – If your HDD is showing in your BIOS Settings but it’s not showing inside Device Manager, it’s usually a clue that the SATA cable or port is faulty.
Windows is unable to find ATA devices – There are several reports of users that have managed to resolve the issue after they deleted all ATA channels from IDE ATA/ATAPI controller. This will force your operating system to find all the ATA devices again.
HDD is included in a storage space – Several users have managed to resolve the issue after deleting the Windows virtual storage space that was using the HDD.
SATA (RAID) driver is not installed or corrupted – A number of users have reported that the issue was fixed after they re-downloaded and installed the SATA (RAID) driver from the motherboard manufacturer’s website.
New HDD is perceived as a foreign disk – Several users that encountered this issue for the same reasons have managed to get the issue resolved by importing the foreign disk inside the Disk Management utility.
If you’re struggling to resolve this particular issue, this article will provide you with a list of verified troubleshooting steps. Below you have a collection of methods that other users in a similar situation have used to get the issue resolved.
For the best results, follow the methods presented below in order until you encounter a fix that is effective in getting the issue resolved.
Method 1: See if HDD is showing up inside your BIOS
A lot of users have managed to get the issue resolved after discovering that they were, in fact, dealing with a hardware issue. If the SATA cable connecting your new HDD to your motherboard is partially broken, it might not pass your os requirements, so Windows will not show it inside the Disk Management Utility.
The same goes for a partially broken SATA port. A quick test to see if this scenario might hold true in your case is to access your BIOS settings and see if the new HDD is showing inside your BIOS settings.
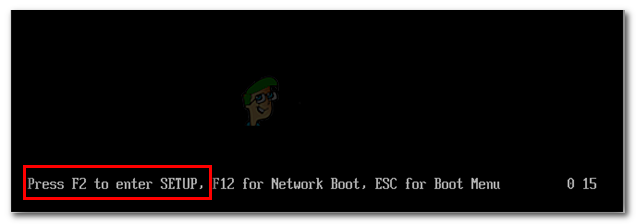
You can access your BIOS settings by pressing the Setup key repeatedly during the very start of the Startup procedure. Most motherboards will show the Setup key during the initial boot (somewhere on the bottom of the screen). But if you don’t see it, try pressing one f the F keys (F2, F4, F8, F10, F12) or the Del key (for Dell computers).
Press the BIOS key during the startup procedure
Note: You can also search online for your specific BIOS Key.
Once you get inside the BIOS settings, go to the Boot tab (or Boot Device Priority) and see if your new HDD shows up there.
If the new HDD shows up here but you can’t see it inside Disk Management, power off your computer and replace the SATA cable connection your HDD to the motherboard with a different one. Also, consider plugging the other SATA cable into a different SATA port.
Once you change the SATA cable and port, power on your computer again and see if the HDD is now showing inside Disk Management.
If you’re still having the same issue, move down to the next method below.
Method 2: Deleting all ATA channel drivers with Device Manager
A couple of users encountering this particular issue have managed to fix it entirely after using Device Manager to delete all ATA channels from the IDE ATA/ATAPI controllers menu. This supposedly forces the Windows to search for all connected ATA devices again and re-configure them from scratch at the next system startup.
Here’s a quick guide on how to do this:
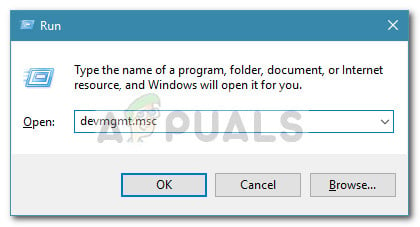
Press Windows key + R to open up a Run dialog box. Then, type “devmgmt.msc” and press Enter to open up Device Manager.
Run dialog: devmgmt.msc
Inside Device Manager, expand the IDE ATA/ATAPI controllers drop-down menu.
Expand the IDE ATA/ATAPI controllers
Right-click on the first ATA Channel and choose Uninstall device.
Right-click on an ATA channel and choose Uninstall device
Once the first ATA Channel has been uninstalled, repeat the procedure above with every ATA Channel that you have under IDE ATA/ATAPI controllers.
Uninstall every ATA Channel that you have under IDE ATA/ATAPI controllers
Once every ATA Channel has been uninstalled, restart your machine to let Windows find all ATA devices and install the drivers again at the next startup.
When your computer boots back up, open Device Management and see if the HDD is now visible.
If you’re still encountering the same issue, move down to the next method below.
Method 3: Deleting the storage space that is using the HDD
As per various user reports, this particular issue can also occur if you used the HDD to create a common storage space. Some affected users have managed to resolve the issue after they deleted any storage space that was using the HDD from the Storage Spaces utility.
Storage Spaces are virtual drives that will appear inside your File Explorer as normal local drives. This feature works with ATA, SATA, SAS and USB drives and was introduced with Windows 7. It essentially allows you to group different types of drives (SSD and traditional HDDs into a single storage pool).
If you previously created storage space that includes the HDD that is not showing inside Disk Management, you will most likely be able to resolve the issue by deleting the HDD from the storage pool.
Here’s a quick guide on how to do this:
Press Windows key + R to open up a Run dialog box. Then, type “control” and press Enter to open up Control Panel.
Run dialog box: control
Inside Control Panel, click on System and Security, then click on Storage Spaces.
Go to System and Security, then click on Storage Spaces
Next, expand your Storage pool options and click the Delete button associated with the storage space that includes your HDD.
Deleting the storage space including the HDD
Click Yes at the confirmation prompt, then restart your computer.
At the next startup, open Disk Management again and see if the HDD is now visible.
If your HDD is still not visible, move down to the next method below.
Method 4: Installing the SATA (RAID) driver from the motherboard manufacturer’s website
Although we can’t show any specifics steps, more than a few users have managed to get this particular issue resolved after they downloaded the SATA (RAID) driver from the motherboard manufacturer’s website.
To download the SATA (RAID) driver according to your motherboard manufacturer, do an online search with “your motherboard manufacturer and model + SATA (RAID) driver” and download the latest version from the official download center.
Downloading the SATA (RAID) driver for an ASRock motherboard
Once the driver is downloaded, double-click on the installation executable and follow the on-screen prompts to install it on your system. Once the installation is complete, restart your computer and see if the HDD becomes visible at the next startup.
Method 5: Importing the foreign disk from Disk Management
The disk might not appear as a viewable partition inside My Computer or Disk Management because it is seen as a foreign dynamic disk by the system. Some users encountering the same issue have been able to easily rectify this by importing the foreign disk. Here’s a quick guide on how to do this:
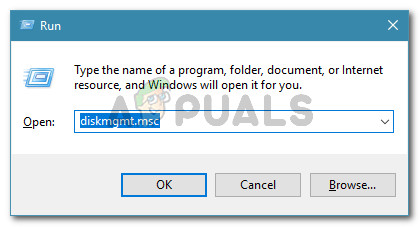
Press Windows key + R to open up a Run dialog box. Then, type “diskmgmt.msc” and press Enter to open up Disk Management.
Run dialog: diskmgmt.msc
Inside the Disk Management utility, see if you have another disk under your OS disk. If you have one and it has an exclamation-type icon, right-click on it and click on Import Foreign Disks.
Importing the Foreign disk utility
After a short while, your new HDD drive should become visible as a volume in both Disk Management and File Explorer.
TWRP is the most popular custom recovery for Android devices, but unfortunately there is no “generic” TWRP that is guaranteed to work with all devices. In fact there are many devices that do not have a TWRP available, possibly due to (lack of) device popularity.
If you own such a device that does not have an available TWRP port, it is actually really quite easy to port it yourself. In this Appuals guide, we will show you how to port TWRP without source, all you need is your device’s stock recovery and Android Kitchen. We’ll be using Android Kitchen for Linux in this guide, as the procedure in the Windows version is quite a bit trickier (and perhaps prone to error).
First download and extract the Android Image Kitchen file to its own folder.
Place your stock recovery.img file inside the extracted AIK folder.
Right click inside the extracted folder, and choose “Open Terminal here”.
In the Linux terminal, type the command: ./unpackimg.sh
Your stock recovery image will be unpacked into two new folders ramdisk and split_img. Do not close the terminal at this point.
Move the newly created ramdisk and split_img folders outside of the AIK folder.
Now delete the stock recovery.img inside the AIK folder.
Copy the twrp_recovery.img file you downloaded from the Requirements section of this guide, into the AIK folder.
Inside the Linux terminal, type: ./unpackimg.sh
Now the twrp_recovery.img will be unpacked, as it did with the stock recovery.img
Go inside the split_img folder (from the TWRP image we just unpacked, not the one from your stock .img we moved earlier) and delete all of the files inside.
Now copy all the files from the stock split_img folder into the TWRP split_img folder.
Delete these files from the TWRP ramdisk folder:
default.prop
fstab.devicename_or_chipsetname
ueventd.rc
Any other file like ueventd.devicename.rc
Now copy these files from the stock ramdisk folder to the TWRP ramdisk folder:
default.prop
fstab.devicename
ueventd.rc
Now go into the stock ramdisk/etc folder and copy recovery.fstab, and place it in the TWRP ramdisk/etc folder.
Open both the twrp.fstab file and the recovery.fstab file in a text editor, and edit the properties in twrp.fstab to match properly with the properties in recovery.fstab
You need to replace instances of “/sdcard” with “/external_sd”, and “/usb” with “/usb-otg”.
If those partitions are not available in your fstab files, you need to add these lines:
/external_sd          vfat         /dev/block/mmcblk1p1  flags=removable;storage;display="SDCARD"
/usb-otg                auto         /dev/block/sda1    flags=removable;storage;display="USB-OTG"
Now you must edit the following lines as displayed in default.prop:
Back out of the ramdisk folder, and launch the terminal. Enter these commands: ./repackimg.sh
The TWRP .img will be repacked, and named “image-new.img” by default. You can rename this if you wish.
Instructions for Mediatek Devices
Note: The recovery.fstab file you get after unpacking the stock recovery.img will have some flaws in it, most likely deliberate from the OEM. You need to install DiskInfo app from Play Store, and a root explorer, so that you will known which partition is mounted at which location and device.
Launch the DiskInfo app, and make sure the following Settings are enabled:
Show mount path
Show partition name
Show file system
Expert Mode
Unmounted partitions
Device Mapper partitions
Temporary filesystems
Now launch your root explorer app, and find the path of your partitions. Typically, they would be found under /dev, and some other partitions like /system and /cache are located in deeper levels.
If you need to trace their exact locations, you can navigate inside the /dev directory and search for partition names such as “mmcblk0p5”.
Devices Without Recovery.Fstab
If your device does not produce a recovery.fstab file after unpacking the stock recovery.img, there are a few things to try.
First, check in the ramdisk/etc folder, where you might find a dummy recovery.fstab file that has a link symbol.
Right click on the dummy file and choose “Show Target”, which should present you with the location of the original recovery.fstab. Sometimes OEMs place them in other folders, such as /vendor/etc folder.
A VPN (Virtual Private Network) acts like a tunnel which may extend across a private or public network which helps users to exchange information and data securely and anonymously across the internet. It gives an illusion as if you are directly connected to a private network. VPN’s are also used to bring about fake access locations which might be useful in streaming sites like Netflix.
VPN terminology
Like all other operating systems, Mac OS also has an inbuilt VPN mechanism which allows users to enter their VPN credentials as given by organizations or third-party vendors. If you do not have such access, you can also make use of third-party vendors (such as CyberGhost).
Method 1: Using Inbuilt Mac VPN Setup
Like Android and Windows, Mac OS also has the inbuilt VPN system integrated into the operating system itself. This enables users to input the details of VPN’s given to them by their organizations or VPN service provides and enjoy the seamless application developed by Apple itself. If you do not have the details provided to you, you can always make use of third-party applications for your personal use as shown in the next solution.
Open your home screen and click on the Apple logo present at the top-left side of the screen. Now select System Preferences.
System preferences – Home screen
Once system preferences are opened, select the category of Network.
Network – System preferences
Once in Network settings, click on the Add icon (+) present at the bottom-left side of the screen.
Adding a network – Network settings
Once you click the add icon, you will be presented options on which network interface do you wish to add. Select the option VPN after clicking the dialogue box.
Adding a VPN
Make sure that you know the VPN type when adding extra details. Enter these details carefully as you will be using them in the future for reference.
Adding VPN type and name
Now you must enter the details which are provided to you by your organization or your VPN vendor. After entering the Server Address and the Account Name, click on Authentication Settings and enter your User and Machine Authentication. Click OK to save changes.
Now click on Advanced after you are navigated back to the main menu of the VPN connection. Select the option Send all traffic over VPN connection. Press OK to save changes and exit.
Send all traffic through VPN – VPN settings
Now try connecting to the VPN and see if you are to successfully reroute your internet traffic. You can easily check websites like whatsmyipaddress to see your current IP address and check if the rerouting is successful.
Method 2: Using third-party applications (CyberGhost)
If you don’t have access to a dedicated VPN through an organization or your workplace, you can always use third-party applications (like CyberGhost) to get access to a VPN for your personal use. These applications are fast and get the task done even if you are a complete novice in the networking world.
After downloading the package, install it on your Mac device.
Installing CyberGhost
When the application is installed, look at the top on your screen towards your taskbar and click on CyberGhost VPN icon. If you don’t have an account, create one and log into the application.
Logging into CyberGhost
Now you will be asked to grant permission to the application. Click Allow when prompted. You may also be asked to enter your computer’s password.
Adding permissions for VPN
Once permission is granted, click on the location icon present at the near bottom and select the location of the server which you want to connect to (this is where your traffic will originate to the target website). Once a custom location is selected, slide the power button on the VPN’s screen to connect to it.
Setting VPN location and turning on
Now you can check if your VPN is working properly before moving on with your work. This can also be used to unblock streaming websites like Netflix for specific viewership content according to countries.
YouTube is the go-to streaming website with millions of users. This giant has made its footprint in the streaming industry with support on various platforms. However, there is an issue on Windows that will slowly make the audio of your YouTube videos go out of sync. This YouTube audio desync will probably happen while watching a YouTube video. The size of the YouTube player won’t have any effect on the audio and it will only be fixed after a refresh of the page (in some cases it won’t). So, if you have this issue then you will have to refresh the YouTube page after every minute or so. As you can imagine, this can create a lot of problems and make YouTube almost unwatchable for any user.
What causes this issue?
There are a few things that can cause this issue. These are as follows
Audio driver issues: These are more likely to occur if the issue is in every browser. Audio drivers play a key role in running YouTube codec.
Graphics driver issues: Without proper graphics drivers, the audio being played with either lag or lose the synchronization. Drivers get corrupt all the time (especially after a Windows update).
Google Chrome issue (if the problem is only on Chrome)
Google Chrome’s Hardware Acceleration option
Cache and cookies
Since there are a lot of things that can cause this issue, there are quite a few solutions for this problem. Simply go through each of the methods listed below until your problem is solved.
Note:
You should try to watch YouTube in other browsers as well. This will help you narrow down the causes of this issue. If the problem is with all browsers then the most likely cause is your drivers since it’s affecting everything. On the other hand, if other browsers are fine then the problem might be with your specific browser.
Solution 1: Updating Drivers (If the issue is with all browsers)
Since driver issues can be the culprit behind this, updating your drivers should be the first thing on your troubleshooting list. Drivers are the main modules connecting your operating system with the system hardware. Drivers can either get corrupt or outdated. To fix both scenarios, you can update your drivers to the latest version available.
Hold Windows key and press R, type devmgmt.msc in the dialogue box and press Enter.
Expand Display adapters, Right click your graphics card and select Update driver.
Select Search automatically for updated driver software and wait for the Windows to give you the current status of drivers.
Updating Display drivers
If Windows find a new version of your graphics driver then you will see a “downloading driver” status on the window. On the other hand, if Windows can’t find the latest version of your graphics driver, you can do it manually by following the steps given below
Go to your motherboard’s manufacturer website (if you have integrated graphics) or your graphics card’s manufacturer website (if you have an external graphics card) and download the latest driver for your device.
Hold Windows key and press R, type devmgmt.msc in the dialogue box and press Enter.
Expand Display adapters, Right click your graphics card and select Update driver.
Select Browse my computer for driver software
Manually updating drivers
Click Browse and navigate to the location where you downloaded the driver. Select it and open it
Selecting downloaded driver file
Click Next and follow any additional on-screen instructions.
Once done, you should be good to go. The steps for updating your Audio drivers are the same except that you will have to select your audio drivers from the device manager (step 3). You can perform the steps given above to update your audio drivers. Once done, reboot and check if it resolves the issue.
Method 2: Disable Hardware Acceleration
If you are facing issues on Google Chrome then the issue might be because of their Hardware Acceleration setting. Hardware acceleration allows using hardware for software rendering purposes. This enables performance and reduces the load on the OS. This setting, if enabled, is known to cause issues like these. So, simply disabling the setting will help you get rid of this issue.
Open Google Chrome and click the 3 dots from the top right corner. Select Settings from the drop-down menu.
Settings – Chrome
2. Scroll down and select Advanced.
Advanced settings – Chrome
3. Scroll down even more and navigate to the section System. Toggle off the option that says Use hardware acceleration when available and click Relaunch button
Disabling hardware acceleration – Chrome
Check if this rectifies the YouTube audio video sync issue for you.
Method 3: Clear Cache and Sign Out
Clearing the cache from Google Chrome and Signing out has worked for a lot of people. However, don’t just sign-out, there is a specific way of signing out and signing back in that resolves this issue. Follow the steps given below
Open Google Chrome and navigate to Advanced settings as in the previous solution. Select Clear browsing data.
Clearing browsing data – Chrome
Check the options Cookies and other site data and Cached images and files
Select All time from the drop-down menu of the Time range and Click Clear dataClearing Chrome data and cookies
Now, sign out of your google account. You can simply click your Google profile from the top right corner in Google Chrome and select Sign out
Open a new tab and open YouTube. Click sign in and sign in with your Google account. Make sure you sign in through YouTube.
Signing in into YouTube
Close the tab that you used to sign in to YouTube and Open a new tab. Open YouTube again and Sign in to your Google account by clicking on the sign in from the top right corner
Check if the issue is resolved.
Method 4: Disable Optimized background video playback flag
Disabling the Optimized background video playback flag has helped resolve the issue for a lot of users as well. Keep in mind that this solution is for Google Chrome users. Follow the steps given below
Open Google Chrome
Type chrome://flags/#disable-background-video-track in the address bar and press Enter
Select Disable from the drop-down menu of Optimized background video playback
Disabling background video playback – Chrome
That’s it. Restart the browser and the problem should be solved.
Solution 5: Reinstalling Browser
If the issue is with just one browser and YouTube is working fine on other browsers, then reinstalling the browser might work for you. You should uninstall the browser, reboot, and reinstall the browser from scratch. This should solve the issue for you.
Hold Windows key and press R, type appwiz.cpl and press Enter
Locate your browser from the installed programs list and click Uninstall. Follow any additional on-screen instructions
Uninstalling Chrome
Once done, restart your system. Now download a fresh installer copy of the browser and install it.
Check if the issue persists once the browser is installed.
Windows 10 night light is a relatively new feature that helps users keep their eyes relaxed by reducing the blue light emitted from our screens. However, plenty of users are experiencing problems with the feature. Some users cannot turn on the night light because the night light button is greyed out from the Action Center. On the other hand, users who can turn on the night light will experience night light not working e.g. night light won’t turn on at the scheduled time or night light will turn on randomly.
Windows 10 night light not working
What is Windows 10 Night Light?
Latest research suggests that the blue light emitted from the screen of our devices can put a lot of strain on the eyes and can reduce the quality of our sleep especially if we use the devices before going to sleep. Windows 10 came up with the night light feature that lets a user change the blue light to some other shade. This helps users in keeping their eyes less strained. As a Windows 10 user, you can schedule the night light to turn on or off at certain times or day phases like at sunset.
What causes Windows 10 Night Light to Not Work?
The main reason behind this issue is the Windows 10 update. It is a well-known fact that these issues started with Windows Updates and you will most likely experience these issues after a Windows Update. Both of these issues i.e. night light greyed out or night light randomly starting/stopping are caused by a bug in the Windows 10.
Note:
If the nightlight isn’t turning on at the proper time then make sure you have your time and region correctly set. The night light feature uses your location and region to determine the time of sunset and sunrise.
Resetting Night Light
The easiest and the most common solution for both of these problems is to just reset the Night Light from the registry editor. However, we will provide a method that will make the task of resetting night light a lot easier. You won’t have to go into the registry editor and deal with the technical stuff. Simply follow the steps given below
Hold Windows key and press R. Type “notepad” in the dialogue box and press Enter.
Type everything given below. You can copy the information and paste it in the notepad.
Windows Registry Editor Version 5.00[HKEY_CURRENT_USER\Software\Microsoft\Windows\CurrentVersion\CloudStore\Store\Cache\DefaultAccount\$$windows.data.bluelightreduction.bluelightreductionstate][HKEY_CURRENT_USER\Software\Microsoft\Windows\CurrentVersion\CloudStore\Store\Cache\DefaultAccount\$$windows.data.bluelightreduction.bluelightreductionstate\Current]"Data"=hex:02,00,00,00,54,83,08,4a,03,ba,d2,01,00,00,00,00,43,42,01,00,10,00,\d0,0a,02,c6,14,b8,8e,9d,d0,b4,c0,ae,e9,01,00
Once done, click File and select Save
Navigate to the location where you want to save the file. Do not forget the “.reg” part when saving the file. For example, a name could be ‘nightlight.reg’.
Now close the notepad and navigate to the location where you saved the file. Double click it to execute.
Click Yes if the system asks you to confirm your actions.
Saving registry commands in registry executable format
That’s it. Once the file is run, you should be good to go.
This error is not very common with the users and appears only if the user is trying to erase their Macs and reinstall macOS High Sierra. If you are getting this error message “could not create a Preboot Volume for APFS install” when you are trying to reinstall macOS High Sierra, in this article we will show you why this error occurs and how to fix it.
Error Message
First of all, we should explain what does it mean when your Mac is saying that “could not create a Preboot Volume for APFS install”. This error means that the Preboot Execution Environment (PXE) cannot be installed on the APFS volume. The main reason that you cannot install the preboot is caused by something (that Apple hasn’t figured it out yet) wrong with the APFS or Apple File System, the new file system that Apple is introducing in High Sierra to replace the 20-year-old file system or HFS+.
APFS Volume
The new system APFS has improved the security also it is faster and more compatible with SSD, but the problem occurs with the OS X that is not compatible to it and also with macOS that is older than High Sierra. And when you are trying to reinstall the High Sierra using Recovery Mode, it doesn’t work because of the Apple File System partition type.
There are two possible solutions or methods in our case when you are not able to reinstall macOS High Sierra and you are getting the “could not create a Preboot Volume for APFS install” error message, and they are: delete the partition or volumes on your Mac or install Sierra on Internet Recovery Partition. We will walk through this methods step by step.
Method #1. Delete Your Partition (Volume).
Note: We must tell you that this method is the most effective in order to fix “could not create a Preboot Volume for APFS install” error.
Turn Off your Mac.
Reboot your Mac into Recovery Mode. Press and hold the Power button and in the same time command + R until you see the Apple logo.
Utilities menu will appear. macOS Utilities
Select Disk Utility. All drivers on your Mac will show up.
Select the internal drive and click Erase. This will delete the drive.
Close Disk Utility.
Now you have two options:
Re-open Disk Utility and select the internal drive and format it as “Mac OS Extended”. And then you can reinstall macOS.
Or you can turn off your Mac and the reboot it. Press and hold Option + Command + R keys to enter the Internet Recovery Mode. And Select Disk Utility. You will see a drive, and reformat it as “Mac OS Extended” and name it “Macintosh HD”. If you are not seeing the drive, create one and format it as “Mac OS Extended”. And then, you can exit the Disk Utility and click Reinstall macOS. Erase Disk
Deleting this drive will cause removing the APFS system which is the problem and causing the error and you can reinstall macOS.
Method #2. Enter Internet Recovery Mode.
Reboot your Mac.
When your device is rebooting, press the Command + R + Alt/Option in order to put your Mac into Internet Recovery Mode. Internet Recovery Mode
You should select the WiFi and enter the Utilities
Click Reinstall OS and it should install the original operating system on your computer.
If you want to install High Sierra you can install or update from the App Store when the process is finished.
Several users report getting the “Could not complete your request because it is not a valid Photoshop document” error when trying to open PSD and PDF files with Photoshop. The issue is reported to occur on both Windows and Mac computers.
Could not complete your request because it is not a valid Photoshop document
What is causing the “Could not complete your request because it is not a valid Photoshop document” error?
We investigated this particular issue by looking at various user reports and the repair strategies that they ended up using successfully. Based on what we gathered, there are a couple of common scenarios that will lead to the apparition of this particular error message.
Here’s a shortlist with potential culprits that might be triggering the issue:
The file is saved with a different extension – The most common reason why this error occurs is when the file is saved with the .PSD extension even if it’s, in fact, a different file type (TIFF, JPG, GIF, PNG). This ends up confusing Photoshop, which will trigger the issue.
The .PSD file is corrupted – Corruption is another potential cause that is known to trigger this particular issue. Some affected users have been able to circumvent the issue by opening the file with a different editor.
If you’re struggling to resolve this particular issue, this article will provide you with a list of verified troubleshooting steps. Below you have a collection of methods that other users in a similar situation have used to get the issue resolved.
For the best results, follow the methods below in order until you encounter a fix that is effective in resolving the issue in your particular scenario.
Method 1: Changing the file to a different extension
One of the most common scenarios for this error on both Mac and Windows is when the file’s extension is incorrect. This can happen quite easily if you use other complementary Adobe products such as Lightroom to edit them directly into Photoshop.
There’s a high chance that the PSD file is not actually corrupted, but it’s actually another file type. If you used the Save as feature, the default extension might get saved to PSD, even if the file is of a different file type. This ends up producing the “Could not complete your request because it is not a valid Photoshop document” error.
Luckily, you can rectify this issue quite easily by changing the extension to the correct one.
How to find the correct extension type
You can pinpoint the correct extension type by opening the file in a Hex editor. Keep in mind that type of graphics file will always begin with the same set of characters when you open them in a Hex editor. You can use Hex Fiend for Mac and HXD for Windows.
Once you open the file in the Hex editor, compare it with the list below and see if you get a match among the most common file types:
Verifying the first characters with the Hex Editor
Once you discovered the correct extension, it’s time to make the required modifications. But keep in mind that the steps of changing the file to the correct extension will be different according to your operating system, so please follow the appropriate guide, according to your OS.
Changing the Extension type on Windows
Open the file with File Explorer and go to View (using the ribbon) at the top. Then, make sure that the box associated with File name extensions is checked.
Enabling File Name Extensions from File Explorer
Next, right-click on the PSD file that is showing the error and choose Rename. Then, change the extension to the correct one.
Renaming to the correct extension
Note: If you haven’t used a Hex editor to determine the correct extension type, change the extension to each of the following extensions until you get a match: jpeg, tif, tiff, png, bmp, gif, pdf.
When prompted that the file might become unusable, click Yes to confirm the changing of the extension.
Confirm the change of the extension type
You should eventually stumble upon an extension that will allow you to open the file in Photoshop without encountering the “Could not complete your request because it is not a valid Photoshop document” error.
Changing the extension type on Mac
Navigate to the location of the file and select it. With the file selected, press Command + I to open up the Information window of the file.
In the Info window, simply change the extension to the correct one (under Name &Extension). Changing the extension on Mac
Note: If you haven’t used a Hex editor to determine the correct extension type, change the extension to each of the following extensions until you get a match: jpeg, tif, tiff, png, bmp, gif, pdf.
You will then be asked for confirmation via a dialog box. Press Use *extension type * to change the extension.
Changing the extension type on Mac
Open the file with Photoshop again and see if the issue has been resolved.
Method 2: Re-saving the PSD file with GIMP
GIMP is an open source image manipulation program that some affected users have used to open PSD files that were displaying the “Could not complete your request because it is not a valid Photoshop document” error due to corruption.
GIMP is commonly used to save PSD files that are not fully compatible with Photoshop. But some affected users have also used it to open and re-save PSD files that Photoshop was unable to handle.
Note: If the file is badly corrupted, you might notice some missing pixels and an overall quality loss.
Here’s a quick guide on installing and using GIMP to resolve the “Could not complete your request because it is not a valid Photoshop document” error:
Visit this link (here) and download the GIMP installation executable according to your preferred download method.
Downloading the GIMP installation executable
Note: Keep in mind that GIMP is also available for OS X and Linux, in case you’re encountering the issue on a different platform.
Once the download is complete, open the installation executable and follow the on-screen prompts to install GIMP on your computer.
Installing GIMP
Once the installation is complete, right-click on the PSD file that is showing the error and choose Edit with GIMP.
Right-click on PSD file and choose Edit with GIMP
Once the PSD file is opened with the GIMP editor, go to File > Export As.
Go to File > Export As
Select the location in which you want to resave the file, then click the plus icon associated with Select File Type (By Extension). Next, scroll down through the list of file types and select Photoshop image and click Export. Re-saving the file with GIMP
Once the file has been re-saved, open it with Photoshop again and see if the “Could not complete your request because it is not a valid Photoshop document” error has been resolved.