Quantcast
Channel: How To's | Everything Tech - Appuals.com
Viewing all 4542 articles
Browse latest View live

Fix: An app default was reset notification

$
0
0

If you are a Windows 10 user and you have recently updated your Windows then you are most likely to encounter this error. You’ll notice that you will keep getting the “an app default was reset” notification whenever you use a certain app. You might also see the extended version of the notification which is

An app default was reset notifications
An app default was reset notification

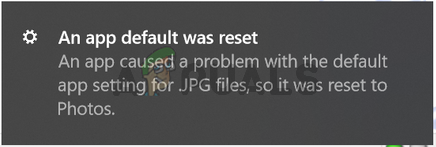
“An app default was reset – An app caused a problem with the default app setting for (extension) files, so it was reset to (some other app).”

This will most likely start happening after you select a third-party app as the new default. In some cases, the notification will keep appearing during the whole session of that app usage. Some users have also complained about the app default getting reset after seeing this notification. However, that is not always the case, you might keep seeing the notification but the app default won’t change. This can obviously create a lot of annoyance.

What causes an app default to reset?

This issue is caused by a bug in the Windows 10 update that either resets or tries to reset the default app back to what it originally was (usually to the metro apps). The reason why Windows 10 does this is because it thinks that the 3rd party application changed the file associations by incorrect methods. So Windows resets the file associations/default apps. That’s why you’ll start seeing the “An app default was reset” notification as soon as you try to use the newly default app.

Method 1: Sign in with a Microsoft Account

If you are signed in with a local account then try to switch to the Microsoft account first. Switching to the Microsoft account has been fruitful for a lot of users. If you don’t know how to switch to the Microsoft account then follow the steps given below

  1. Press and hold Windows key and press I
  2. Select Accounts
Click Accounts Settings
Accounts Settings
  1. Click Your Info from the left pane
  2. Select Sign in with a Microsoft Account option and follow any additional on-screen instructions
Click Sign in with Microsoft account
Sign in with Microsoft account

Method 2: Change Registry

The easiest and the most common solution for this issue is to make some changes in the registry. Since the problem is caused whenever you replace a metro app with a 3rd party app as the default app, making some changes in the registry will prevent the metro apps from this kind of behavior. Usually, we would give you the steps for making these changes via the registry editor but the issue is with the majority of the metro apps and it will take a lot of time. So, we are providing a registry changer file. All you have to do is download the file and double-click it. It will automatically make the changes in the registry and you will be good to go. It’s simple and quick.

  1. Download the registry fix from (here).
  2. Double click the file named Fix_An_app_default_was_reset to run the registry.
  3. Click Yes if the computer shows any prompts and proceed.

Note: If you are worried about the contents of the downloaded file, you can simply right-click the .reg file and open it with Notepad.

Once you download and double-click the file you will be good to go. You can run the “undo” file if you want to revert the changes.

The post Fix: An app default was reset notification appeared first on Appuals.com.


Fix: ADB Devices Not Found

$
0
0

With smartphones being present everywhere, the need for transferring files from your personal computer to your smartphone and vice versa arises. Not only that, you might need to debug certain apps or install new ones etc. for which a command-line utility called ADB or Android Debug Bridge is often used.

Occasionally, people end up with the issue of not being able to connect to their smartphones, even though, according to them, they’ve done everything right. Well, don’t worry, this is what we’re here for. This guide will let you in on how to solve the ‘Error: device not found’ problem — so sit back, relax and follow the instructions.

ADB Device not found

What Causes the ADB Device not found Error?

Before we jump into the solutions, you might want to know what really causes this problem. Well, there are a number of things that can result in this issue —

  • The drivers are not updated. The drivers are the actors responsible for communicating with the interface and your OS. If it is not updated, you might encounter this error.
  • USB debugging is not enabled. This mode is necessary for ADB to work on your Android device.
  • Selection of wrong connection mode. A correct connection mode should be selected for the type of transfer you want to initiate.

Note: If you haven’t installed adb yet, you can follow our guide to do so.

Method 1: Enabling Developer Options and USB Debugging

To start off, make sure you’ve enabled USB Debugging on your device since ADB doesn’t work otherwise. To do that:

  1. Go to your phone Settings and select About.
  2. In About menu, tap on ‘Builder number’ seven times which enables Developer Options.
  3. After that, go back and select Developer options.
    Enable Developer Options
  4. Scroll down and tap ‘USB Debugging’.

Method 2: Changing Connection Mode

Android has different connection modes which is sometimes the cause of this problem. In case of adb, we need MTP (Media Transfer Protocol). One thing to note is that your smartphone might have Transfer files instead of MTP which is the same. For this, what you have to do is:

  1. Make sure your device is plugged in correctly.
  2. Pull down the notification window and select the USB connection notification.
  3. There, select MTP as the connection mode.
    Select MTP as the connection mode

    Note: Some people have reported that selecting the PTP mode worked for them, make sure to try that as well.

Method 3: Updating ADB Interface

Sometimes, the issue is due to an outdated ADB interface driver. To update the driver, what you have to do is:

  1. On your computer, right click on ‘My Computer’ and select Device Manager.
  2. Under Other Devices, you’ll see ‘Android ADB Interface’ or ‘Android Phone’. Right-click it and select ‘Update Driver Software’.
    ADB Interface Driver Update
  3. After that, select ‘Browse my computer for driver software’.
  4. Then, select ‘Let me pick from a list of device drivers on my computer’.
  5. A window will pop up, make sure ‘Show all devices’ is highlighted and click Next.
    Highlight Show All Devices
  6. Click the ‘Have Disk’ option.
  7. Go to where you’ve installed your SDK which is usually C:\Program Files\Android\android-sdk\extras\\google\usb_driver\ where you’ll have to double click android_winusb.inf
  8. Select ‘Android ADB Interface’ from the list.
    Select Android ADB Interface
  9. Click ‘Yes’ and then click ‘Install’.
  10. Wait for the installation to complete and then close the window.

You can try reconnecting your device if it doesn’t recognize it already.

Method 4: Installing Universal ADB Windows Driver

If you are sure that the above mentioned solutions are not going to work for you or didn’t work for you, installing Universal ADB Windows Driver might be the solution for you. It is pretty simple, download the driver from their official website and install it.

You can download the driver from here.

Method 5: Resetting the Process

It sometimes happens that everything else is working but you still can’t list your smartphone – meaning you have installed the USB driver, enabled USB debugging etc. In such cases, killing the server and starting it again might help you out. To do that, type the following commands in the command line

adb kill-server

adb start-server
ADB Kill/Start Server

Method 6: Changing the Cable

Finally, if nothing works out for you, getting a new cable might be the way for you. The chances of your cable being faulty are high which means no matter what you do, your problem will remain as the problem is not with your driver but rather with the hardware. To check whether your cable is faulty or not, try the following:

  1. Connect your cable to a port on a charger.
  2. Try charging your smartphone with that cable.

If it doesn’t start charging, this means your cable is at fault and you’ll have to get another.

The post Fix: ADB Devices Not Found appeared first on Appuals.com.

Fix: PUBG Failed to Initialize Steam

$
0
0

PlayerUnknown’s Battlegrounds or PUBG is one of the biggest and best battle royale games that are currently out there. With regular updates and unique gameplay, this game has been truly a success. More and more games readily try to mimic PUBG but none have yet achieved the level of PUBG. The sort of addiction the game offers, it really gets annoying when you face an issue that’s pretty common yet cannot figure out a way to get around it. Well, worry no more as we’ll be showing you how to get back in the action!

PUBG Failed to Initialize STEAM

What Causes the PUBG Failed to Initialize Error?

Well, according to PUBG support, this error occurs when you haven’t installed your game properly but, apparently, that’s not all of it. This issue occurs due to permitted permissions to the game files, bugged steam i.e very rare, incomplete installation as mentioned above, outdated graphics drivers etc.

With that being said, let’s jump into the gist of most of the solutions out there:

Solution 1: Disabling Administrative Power

This is the most common and effective solution for your issue. Most of the people have reported that revoking the administrative power of the game files has resolved their issue. To do this:

  1. Go to where your Steam is installed which, by default, is C:\Program Files (x86)\Steam\ or C:\Program Files\Steam\.
  2. Once you are in your Steam directory, make your way to steamapps\common\TslGame\Binaries\Win64\.
  3. There, locate the Tslgame.exe file.
  4. Right click on it and click Properties.
  5. Go to the Compatibility tab and uncheck ‘Run as an Administrator’.
Uncheck ‘Run as an administrator’

Solution 2: Restarting Steam

The issue sometimes randomly arises due to Steam which is pretty to solve. All you have to do is:

  1. Exit your game.
  2. Right-click the taskbar and open Task Manager.
  3. On Task Manager, go to Processes Tab.
  4. Look for any Steam and TslGame process and end it.
    End Steam Processes
  5. Boot up Steam again and open your game.

Note: If this doesn’t work, try restarting your PC.

Solution 3: Updating Your Drivers

Another cause of the problem is outdated drivers. You should always look out for new updates for your graphics card from your manufacturer may it be AMD or Nvidia. To update your drivers:

  1. On your Desktop, right click ‘My Computer’ and click ‘Device Manager’.
  2. Click on Display Adapters, right click on your Graphics Card and select ‘Update Driver Software’.
    Update Graphics Driver by right clicking it.
  3. Afterward, click on ‘Search automatically for updated driver software’.

If your computer doesn’t automatically update your driver, you can easily do it manually by downloading the update from your manufacturer’s website and installing it which is pretty straightforward.

Solution 4: Verifying Game Integrity

The problem could very well be due to broken or corrupted game files. Fortunately, whenever your game files are broken, you can easily verify them via steam. For this, what you have to do is:

  1. Open up Steam and go to the Library section.
  2. Locate PUBG and right click on it which will drop down a menu. Click on Properties.
  3. To verify your files, click the Local Files tab and click ‘Verify integrity of game files’.
    Verify integrity of game files
  4.  Wait for it to complete your game files verification. After it is done, try running your game.

Solution 5: Reinstalling Steam

If nothing of the above-mentioned fixes work for you, reinstalling Steam is your last resort. This will most likely solve your problem and you’ll be good to go. Just go to the Steam’s website, download the software and install.

  1. Press Windows + R, type “appwiz.cpl” in the dialogue box and press Enter.
  2. Once in the application manager, search for the entry of Steam. Right-click it and select Uninstall.  (You can also execute the uninstaller from Steam’s directory).
    Uninstalling Steam
    Uninstalling Steam
  3. Restart your computer and after downloading a fresh version of Steam, install it again on your computer.

Note: Please do note that, contrary to the instructions mentioned in the first fix, PUBG support tells you to run TlsGame.exe as an administrator. Doing that doesn’t fix your problem – overlooking the fact that the file (TlsGame.exe) runs as an administrator by default.

The post Fix: PUBG Failed to Initialize Steam appeared first on Appuals.com.

Fix: ‘A Required CD/DVD Drive Device Driver is Missing’ Error Message When Installing Windows 7 from a USB

$
0
0

CDs and DVDs are very quickly becoming obsolete mediums and are being overtaken by USB drives. This is true even in the case of Windows installation media. While it is true that Windows 7 came out during a time where using CDs and DVDs to install Windows was still the norm, the most common Windows 7 installation medium today are USB drives. Almost every person who wants to install Windows 7 on a computer in this day and age uses a Windows 7 installation USB to do so, but being the most commonly traveled road does not mean that it’s not bumpy. When using Windows 7 installation USBs to install Windows 7 on computers, many people have reported seeing an error message at the very beginning of the installation process, an error message that reads:

A required CD/DVD drive device driver is missing. If you have a driver floppy disk, CD, DVD, or USB flash drive, please insert it now.

A required CD/DVD drive device driver is missing error message
A required CD/DVD drive device driver is missing

What causes the “A required CD/DVD drive device driver is missing” error message?

Upon seeing this error message, the first thing any affected user would wonder will most certainly be why they’re seeing it in the first place. The error message points at a missing CD/DVD drive device driver, while they’re not using the CD/DVD drive to install Windows 7 in the first place – they’re using a USB drive. Well, that’s just a difference in terminology – the semantics remain the same. This error, in cases other than when it is caused by happenstance or something incredibly generic, is brought on by the use of a USB 3.0 drive to install Windows 7. You see, the Windows 7 installation environment does not have native support for USB 3.0 because the format simply wasn’t all that common back when Windows 7 first came out. That being the case, using a USB 3.0 Windows 7 installation USB or plugging a Windows 7 installation USB into a USB 3.0 port on your computer will result in you seeing the “A required CD/DVD drive device driver is missing” error message when you try to install Windows 7.

What causes this issue is not the only thing that’s known, however – its remedies are quite well known too. The following are the absolute most effective solutions you can use to try and resolve this problem, get rid of the “A required CD/DVD drive device driver is missing” error message and successfully install Windows 7 using your Windows 7 installation USB:

Solution 1: Unplug the USB drive and plug it back in

First and foremost, you need to rule out happenstance or some kind of a one-time only issue with your installation USB or the USB port it is plugged into or some other incredibly generic issue is the reason why you’re seeing the “A required CD/DVD drive device driver is missing” error message when you try to install Windows 7. In order to do so, all you need to do is unplug your Windows 7 installation USB, wait for a little while and plug it back into the USB port. Once done, try booting from the installation USB and installing Windows 7 to see if the error message still persists.

Solution 2: Unplug the USB drive and plug it into a different USB port

You might be seeing the “A required CD/DVD drive device driver is missing” error message when installing Windows 7 from a Windows 7 installation USB because there’s some kind of a problem with the USB port the USB drive is plugged into. If there’s no problem with the USB port, the USB port you’re using might just be a USB 3.0 port, and as stated before, the Windows 7 installation environment simply doesn’t have USB 3.0 support, meaning that it might simply be unable to read the installation files that are on the installation USB. If that’s the case, you can get rid of the error message by simply unplugging the USB drive from the USB port it is plugged into and plug it into a different USB port on your computer. It would help your case a great deal if the USB port you plug the installation USB into is a port you definitely know to be a USB 2.0 port.

Once you have the installation USB plugged into a different USB port, try booting from the installation USB and installing Windows 7 to see if the issue has been fixed.

Solution 3: Disable USB 3.0 Configuration in Pre-OS

On many computers, especially computers that only have USB 3.0 ports, the BIOS has a setting named USB 3.0 Configuration in Pre-OS. This nifty little setting defines whether the USB ports on the computer, before the computer boots into its Operating System, function as USB 3.0 ports or USB 2.0 ports. If you’re seeing the “A required CD/DVD drive device driver is missing” error message while trying to install Windows 7 from a Windows 7 installation USB, you might be able to get rid of the error message by disabling the USB 3.0 Configuration in Pre-OS setting in your computer’s BIOS (or by setting it to Auto, which essentially achieves the same thing we were trying to by disabling it). If you would like to use this solution, you need to:

  1. Remove the Windows 7 installation USB from the computer and restart it.
  2. On the very first screen, you see when the computer boots up, press the key specified on the screen to get into your computer’s BIOS or Setup. The key you need to press will be clearly specified on the first screen you see when the computer boots up and varies from one computer manufacturer to the next. 
    press a key to enter setup or bios
    Press [key] to enter setup
  3. Once you’re inside your computer’s BIOS, make your way to System Configuration.
  4. Locate and navigate to the USB 3.0 Configuration in Pre-OS setting.
    USB 3.0 Configuration in Pre-OS setting in bios
    Locate the USB 3.0 Configuration in Pre-OS setting
  5. Change this setting from Enabled to either Disabled or Auto, respectively resulting in all USB 3.0 ports on the computer being treated as USB 2.0 ports until the OS is loaded or USB ports, until the OS is loaded, being treated as USB 3.0 or USB 2.0 ports depending on the kind of USB drives that are plugged into them.
    set the option to auto or disabled
    Set USB 3.0 Configuration in Pre-OS to Auto or Disabled
  6. Save the changes you have made and exit your computer’s BIOS.

When you’re done, plug your Windows 7 installation USB back into the computer, boot from it and try to install Windows 7. You should now be able to successfully install Windows 7 without running into the “A required CD/DVD drive device driver is missing” error message. Be sure to set USB 3.0 Configuration in Pre-OS back to Enabled after Windows 7 has been installed.

The post Fix: ‘A Required CD/DVD Drive Device Driver is Missing’ Error Message When Installing Windows 7 from a USB appeared first on Appuals.com.

How to Recover Deleted Photos from iPhone

$
0
0

One of the best features on iPhone is the Camera. The iPhone users are taking photos every day in order to capture their moments in high pixels. Take pictures of a beautiful nature and landscapes around you on your trip, capture precious moments with your friends and family, record the best weekend of your life and more, these are the moments that we want to save on a picture and we do that using the iPhone Camera. And all these memories are stored in our iPhone, but sometimes you can accidentally delete them or lost during some process that you are doing on your iPhone. This situation is a great disaster and maybe the worst thing that can happen to your pictures. No worries there is a few ways to restore your deleted photos on iPhone and in this article, we will show you how you can get back your precious memories.

Method #1. Manually Recover Your Deleted Photos on iPhone.

In this method, the main thing that you must know is that with the iOS software later than iOS 8, your deleted photos are stored in your iPhone in the next 30 days in case you want to restore them on your device. But these photos are now visible when you open the Photos app in order to see your captured photos.

  1. Open Photos App.
  2. Open Albums.
  3. Find and Open Recently Deleted Folder.
  4. Select the photos you want to recover.
    Recover Selected Photos
    Recover Selected Photos
  5. Click the Recover button. On the bottom right corner.

If you don’t select ant photo you can recover all of them. You just need to click on the Recover All button.

Method #2. Recover Your Deleted Photos from iCloud.

If you lost or deleted your photos from your iPhone and you want them desperately back and you managed to make a backup to the photos to your iCloud before deleting them, there is a way to get them back. You just need to follow the steps from this method.

  1. Restore the iCloud backup.
  2. Progress through the setup process until you reach the Apps and Data Settings.
  3. Click Restore from iCloud Backup.
  4. Sign into the iCloud.
  5. Choose the relevant backup. Usually, this is the last made backup, but you should remember this.
  6. Connect to the Wi-Fi.
  7. Wait for a Time remaining bar to appear and complete the setup.
  8. When the setup is complete you will be able to access everything from the backup.
    Restore From iCloud
    Restore From iCloud

Method #3. Recover Your Deleted Photos via iTunes.

With iTunes, there are two ways to recover your deleted photos and we will show you how to do it.

Recover Deleted Photos by Syncing them Back from Computer.

This will be very if you are the person that syncs their photos regularly on the computer. And this is how.

  1. Open iTunes on your computer.
  2. Check for updates. It is essential that you have the latest version of the software. Open Help tab from the upper menu and then choose the Check for updates option, and wait for the process to finish.
  3. Connect your iPhone to the computer. Use your USB cable. Before starting, make sure that the cable is working correctly.
  4. Wait for your Device to appear on the left panel of iTunes.
  5. Click on your Device.
  6. On the left side menu, you will see Photos option – click on that.
    Restore From iTunes Photos
    Restore From iTunes Photos
  7. Sync photos will appear on the screen. At the bottom, on your screen, you will see a Sync button that you will need to click.
  8. Select what you want to Sync.
  9. Click Apply.

Restore iTunes Backup to Recover Your Deleted Photos.

  1. Open iTunes.
  2. Check for updates. It is essential that you have the latest version of the software. Open Help tab from the upper menu and then choose the Check for updates option, and wait for the process to finish.
  3. Connect your iPhone to the computer. Use your USB cable. Before starting, make sure that the cable is working correctly.
  4. Click Restore iPhone. Choose the most recent backup.
    Restore From iTunes Backup
    Restore From iTunes Backup
  5. Click Restore Backup.
  6. Click Done.

The post How to Recover Deleted Photos from iPhone appeared first on Appuals.com.

Fix: Could Not Create the Java Virtual Machine

$
0
0

Some users are encountering the Could Not Create the Java Virtual Machine error when trying to launch an application that is using Java. This particular issue is reported to occur with Minecraft and several other applications that are built around Java.

Could not create the Java Virtual Machine. Error: A fatal exception has occured. Program will exit.
Could not create the Java Virtual Machine.
Error: A fatal exception has occurred. Program will exit.

What is causing the Could Not Create the Java Virtual Machine error?

We investigated this particular issue by looking at various user reports and the troubleshooting strategies that they used to resolve the same error message. Based on their conclusions, there are a couple of scenarios that will trigger this particular issue:

  • Java is invoked by the wrong arguments or options – This can occur if you’re running a home brewed application or you’re trying to open an open-source application that is known to cause system instability.
  • Java global maximum heap memory is not high enough – One of the most common causes why you can encounter this particular error is if you try to start a Java application with a maximum heap memory size larger than the one set as the System Variable.
  • Java executable and/or application require administrative privileges – This might happen with applications that need admin access in order to function properly.

If you’re currently looking for a way to resolve the, Could Not Create the Java Virtual Machine error, this article will provide you with several verified troubleshooting strategies. Below you have a collection of methods that other users in a similar situation have used to get the issue resolved.

To ensure the best results, follow the methods below in the order that they are presented until you discover a method that is effective in resolving the error for your particular scenario.

Method 1: Adding the _JAVA_OPTIONS to System Variables

Most affected users have managed to get the issue resolved by creating a System Variable for Java called _JAVA_OPTIONS and setting it’s value to Xmx512M. What this essentially does is it sets the global maximum heap memory size for Java.

This will resolve any error message that occurs because the started Java application’s maximum heap memory size is larger than the one set as the System Variable. Several users encountering the same issue have reported that the issue was resolved entirely after they performed the steps below.

Here’s what you need to do to add a _JAVA_OPTIONS entry in System Variables to enlarge the global maximum heap memory size:

  1. Press Windows key + R to open up a Run dialog box. Then, type “sysdm.cpl” and press Enter to open up the System Properties screen.
  2. Inside the System Properties screen, go to the Advanced tab and click on Environment Variables.
  3. In the Environment Variables window, click on New (under System Variables).
  4. Inside the New System Variable window, set the Variable name to _JAVA_OPTIONS and the Variable value to –Xmx512M and click Ok to save the changes.
  5. Close the previously opened windows and restart your machine to enforce the changes.
  6. At the next startup, open the application that was previously showing you the Could Not Create the Java Virtual Machine error and see if is now functioning properly.
Creating a System Variable called _JAVA_OPTIONS and assigning it the value Xmx512M

If you’re still seeing the same error message at the start of the application, move down to the next method below.

Method 2: Opening java.exe with admin rights 

Several users struggling to resolve the same issue have managed to get the issue resolved after forcing the main Java executable (java.exe) to open with administrative privileges.

Some users reported that they were able to resolve the issue after applying this fix on both the main java executable and the executable of the application that is showing the error message.

Here’s a quick guide through the whole thing:

  1. Open File Explorer and navigate to the location of your java installation. We’ll need to arrive at the location of the main Java executable (java.exe). By default, you should find it in Program Files/Java/*JRE build version*/bin. The exact location will differ depending on which Java Runtime Environment you’re using.
    Navigate to the location of java.exe
    Navigate to the location of java.exe

    Note: If you installed Java in a custom location, navigate the custom location instead.

  2. Right-click on java.exe and choose Properties. Then, go to the Compatibility tab and check the box associated with Run this program as an administrator (under Settings). Click Apply to save the changes.
    go to Compatibility tab and enable Run this program as an administrator
    go to the Compatibility tab and enable Run this program as an administrator
  3. Right-click on the application executable (the one that is triggering the error) and repeat the same procedure: Compatibility > Run this program as an administrator > Apply.
  4. Run the application and see if the error message is resolved.

The post Fix: Could Not Create the Java Virtual Machine appeared first on Appuals.com.

Fix: An Error Occurred During the Installation of Assembly Microsoft.VC80.CRT

$
0
0

Several Windows users report getting the “An error occurred during the installation of assembly Microsoft.VC80.CRT” error during the installation of a software. Affected users have confirmed that this issue occurs on Windows 7, Windows 8.1 and Windows 10. This particular error is reported to occur with iTunes, inLab, WIDCOMM Bluetooth and during the initial installation of Microsoft SQL Server.

An error occurred during the installation of assembly "Microsoft.VC80.CRT
An error occurred during the installation of assembly “Microsoft.VC80.CRT

What is causing the error occurred during the installation of assembly Microsoft.VC80.CRT issue?

We investigated this particular issue by looking at various user reports and their repair strategies. From what we were able to gather, there are several fairly common scenarios that are known to trigger this particular issue:

  • Microsoft Visual C++ Redistributable package is missing or is damaged – This is the most popular reason why this error occurs. Several installers including the on iTunes require some dependencies present in the Visual  C++ 2010 package in order to complete the installation.
  • There are pending Windows Updates – With some application installers, the issue might occur if the machine has any pending Windows Updates. Several affected users have reported that the issue has been resolved after they installed every pending security update. This is typically reported to be effective when trying to install network monitoring applications.
  • Sound drivers are not installed –  Some users have reported that they were able to resolve the error message by installing the missing sound drivers. This can either be done using the provided installation media or by using WU (through Device Manager).
  • The video card is too old to support the latest version of iTunes – As it turns out, older dedicated GPU models will not support the installation of the latest iTunes version. There is a workaround that involves installing an older version and then updating to the latest once the application is installed.

If you’re currently struggling to resolve this particular issue, this article will provide you with a list of verified troubleshooting steps. Below you have a collection of methods that other users in a similar situation have used to get the issue resolved.

To maximize efficiency, follow the methods in the order that they are presented until you discover a fix that resolves the problem in your particular scenario.

Method 1: Installing/Reinstalling Microsoft Visual C++ Redistributable package

As most affected users have suggested, there’s a high chance that the issue occurs because a required Visual C++ Redistributable Package is missing from your machine. The same symptoms can also occur if the Visual C++ is damaged or not installed properly.

In most cases, the application installer will throw the error because it can’t find MSVCR110.dll  – a common DLL file frequently needed for projects built with Visual Studio.

Some affected users have managed to get the issue resolved after noticing that the required Visual C++ Redistributable package is missing from their machine. Others have determined that their Visual C++ installation was incomplete or corrupted. In both this cases, installing or reinstalling the Visual C++ Redistributable package has resolved the issue entirely.

Here’s what you need to do to:

  1. Press Windows key + R to open up a Run dialog box. Then, type “appwiz.cpl” and press Enter to open up Programs and Features.
    Run dialog: appwiz.cpl
    Run dialog: appwiz.cpl
  2. Inside Programs and Features, look through the list of applications and locate all Microsoft Visual C++ Redistributable installations. You can see them all easier if you click on Publisher to group them together.
    Locating all Microsoft Visual C++ Redistributable packages
    Locating all Microsoft Visual C++ Redistributable packages

    Note: If you don’t have any Visual C++ 2005/2010 Redistributable packages installed, jump straight to step 5.

  3. Right-click on each Visual C++ 2005 Redistributable & Visual C++ 2010 Redistributable and choose Uninstall. Then follow the on-screen prompts to remove it from your system. Repeat this procedure with every 2005 ad 2010 redistributable package until you have none left.
    Uninstalling Microsoft Visual C++ redist packages
    Uninstalling Microsoft Visual C++ redist packages
  4. Restart your machine.
  5. At the next startup, access the links below one by one to download & install the following installation executables:
    Visual C++ 2005 Service Pack 1 Redistributable Package
    Visual C++ 2005 Service Pack 1 Redistributable Package MFC Security Update

    Visual C++ Redistributable Package 2013 – This also contains DLL libraries included in previous distributions (2010 and 2012)
    Downloading the missing Visual C++ Redistributable packages
    Downloading the missing Visual C++ Redistributable packages

    Note: You can also use the Major Geeks All-In-On installer (here) to automatically install all missing Visual C++ packages with a single click.

  6. Once every Visual C++ Redistributable package is reinstalled, restart your computer again and see if the installation completes without error at the next startup.

If you’re still encountering the “An error occurred during the installation of assembly Microsoft.VC80.CRT” error, move down to the next method below.

Method 2: Install pending Windows Updates

Some users have reported back that the issue was resolved and they were able to complete the application installation procedure without errors after applying every pending Windows Update.

There is some user speculation pointing towards a dependency of the flash player that might trigger the error. Apparently, Microsoft released a security update that takes care of the issue and allows the installation to go through.

Several users encountering the An error occurred during the installation of assembly Microsoft.VC80.CRT error when trying to install Orion Network Performance have reported that the issue was resolved after they installed every pending Windows update.

Follow the steps down below to install every Windows update that is currently pending:

  1. Press Windows key + R to open up a Run dialog box. Then, type “ms-settings:windowsupdate” and press Enter to open the Windows Update tab of the Settings app.
    Run dialog: ms-settings:windowsupdate
    Run dialog: ms-settings:windowsupdate

    Note: If you’re not on Windows 10, type wuapp in the Open box instead.

  2. Inside the Windows Update screen, click on Check for updates. Then, follow the on-screen prompts to install every pending update.
    Checking for any pending Windows Updates
    Checking for any pending Windows Updates

    Note: If WU prompts you to restart between update installations, do so. Also, make sure to install every pending security update (even if it’s optional).

  3. Once every pending Windows update has been installed, restart your machine once again and attempt to install the application once again. If you’re still encountering the An error occurred during the installation of assembly Microsoft.VC80.CRT” error when trying to install iTunes, inLab or another application, move down to the next method below.

Method 3: Update the sound drivers manually

Some users struggling to resolve the “An error occurred during the installation of assembly Microsoft.VC80.CRT” error have reported that they managed to fix it by installing/updating their sound drivers.

Based on user reports, missing sound drivers might crash the iTunes installations. If you’re thinking the same scenario might be applicable to your current situation, follow the steps below to inspect weither you’re missing the sound drivers and take the appropriate steps to resolve the issue.

Here’s what you need to do:

  1. Press Windows key + R to open up a Run dialog box. Then, type “devmgmt.msc” and press Enter to open Device Manager.
    Run dialog: devmgmt.msc
    Run dialog: devmgmt.msc
  2. Inside Device Manager, expand the Sound, video and game controllers drop-down menu and see if you spot any exclamation mark icon on any entry listed.
    Example of a missing or incorrectly installed sound driver
    Example of a missing or incorrectly installed sound driver
  3. If you see any evidence of a missing incorrect sound driver, right-click on the faulty driver entry and click Update driver.
    Updating the driver
    Updating the driver
  4. Then, click on Search automatically for updated driver software to instruct WU (Windows Update) to search for a newer driver version. If a new version is found, follow the on-screen prompts to install it on your computer. Once the new driver is installed, restart your computer and see if the issue is resolved at the next startup.
    Click on Search automatically for update driver software
    Click on Search automatically for updated driver software
  5. If WU doesn’t manage to find a newer driver version, right-click on the faulty driver and choose Uninstall device instead.
    Uninstalling faulty device driver
    Uninstalling faulty device driver
  6. Click Uninstall at the confirmation prompt and wait for the procedure to complete. Once the procedure is complete, restart your computer in order to allow Windows to automatically download and install the missing sound drivers.
    Confirming the uninstall of the sound driver
    Confirming the uninstall of the sound driver
  7. Attempt to install the application again and see if the An error occurred during the installation of assembly Microsoft.VC80.CRT error is resolved.

If you’re still encountering the issue, move down to the final method below.

Method 4: Installing an older iTunes version before updating to latest (iTunes glitch)

If you’re having trouble installing or syncing to the latest version of iTunes, you might be prevented to do so by your GPU card. Several users encountering the same issue suspected that the issue might have something to do with old GPU cards.

Apple has made available an older iTunes version specifically for older video cards. You should be able to install this build just fine without encountering the An error occurred during the installation of assembly Microsoft.VC80.CRT error. Even more, you might then be able to update to the latest version anyways (once the application is installed).

Here’s a quick guide with what you need to do:

  1. Visit this link (here) and download the iTunes version 12.4.3 by clicking the Download link at the top of the page.
    Download iTunes 12.4.3 build (for older video cards)
    Download iTunes 12.4.3 build (for older video cards)
  2. Once the download is complete, open the installation executable and follow the on-screen prompts to complete the installation. You should be able to complete it without encountering the An error occurred during the installation of assembly Microsoft.VC80.CRT error.
    Installing iTunes on your computer
    Installing iTunes on your computer
  3. Restart your computer and open iTunes at the next startup. If the update prompt doesn’t appear right away, trigger it by playing any song. You will eventually see a pop-up prompting you to update to the latest version available. Click on Download iTunes and follow the on-screen prompts to download to the latest version.
    Downloading latest version of iTunes
    Downloading the latest version of iTunes

The post Fix: An Error Occurred During the Installation of Assembly Microsoft.VC80.CRT appeared first on Appuals.com.

How to Root the Samsung Galaxy Tab S4

$
0
0

The Galaxy Tab S4 is one of the best tablet computer devices of 2018, but some users have had difficulty in rooting it. The most common complaint is that Magisk root doesn’t ‘stick’ after flashing in TWRP. In this Appuals guide, we will show you how to permanently root the Samsung Galaxy Tab S4.

Requirements

Before we begin, you should know that rooting this device will require a total wipe of all of your data. You should create a backup of all personal data before proceeding with this guide – you can create a backup in TWRP after flashing it, before you proceed to root.

  1. First download and install the Samsung USB drivers on your PC.
  2. Download and extract the Samsung Odin .zip onto your desktop.
  3. On your Galaxy Tab S4, go to Settings > About > tap Build Number 7 times, until Developer Mode is activated.
  4. Now go to Settings > Developer Options > enable OEM Unlock.
  5. Power off your Galaxy Tab S4 completely, and launch it into Download Mode. To boot into Download Mode, hold Volume Down and Power together until the device vibrates, then quickly release Volume Down and hold Volume Up + Power button. The device should boot into recovery mode, from there you can choose ‘Reboot to Bootloader’.
  6. Now connect your Galaxy Tab S4 to your PC via USB cable, and launch Odin software on your desktop.
  7. In the Odin window, you should see the box for “ID:COM” light up blue, to confirm it has established connection with your Galaxy Tab S4. If it does not light up blue, you may need to troubleshoot your USB connection or USB driver installation.
  8. Now in Odin, click on the ‘AP’ button and choose the ‘T830XXU1ARH8_dmverity_patched_boot_permissive.tar‘ file. After that press ‘Start’.
  9. Odin should flash the file, then reboot the Galaxy Tab S4 into the Android OS. Power it off again and reboot into Download Mode.
  10. In Odin, click the AP button again, and this time choose the ‘twrp_3.2.3-2_sm-t830_26918.tar‘ file. Press Start to flash it, and Odin will proceed to flash TWRP on your Galaxy Tab S4.
  11. You need to be quick about this – after TWRP is flashed, you must boot directly into TWRP. Do not allow it to boot to the Android OS! Hold Volume Down + Power until the device turns off, then hold Volume Up + Power to boot into TWRP.
  12. Once you are in TWRP, swipe to allow modifications (a prompt will display ‘Keep System Read Only’).
  13. You should now transfer the forced-encryption disabler .zip file to your SD storage.
  14. In TWRP main menu, tap Install > SD Card > ‘TabS4_oreo_forced_encryption_disabler.zip‘, and swipe to flash it.
  15. After it has successfully flashed, go back to TWRP main menu (do not reboot!), and go to Wipe > Format Data > YES.
  16. This is going to completely wipe the Galaxy Tab S4! Including the internal storage! This is an important step, because it will completely disable the device’s encryption, and allow access to the internal storage in TWRP.
  17. Once the formatting has finished, you can now Reboot to System. Your Galaxy Tab S4 will reboot to the Android OS.
  18. Now transfer the Magisk 17.2 zip file to your external storage, and reboot the device back into TWRP.
  19. Go to the Install button again, and this time flash the Magisk .zip you just transferred.
  20. After Magisk has been flashed, you can now reboot to system. You will see the Magisk Manager app has been installed on your device, and you can launch it to confirm if the device was successfully rooted (it should be).

The post How to Root the Samsung Galaxy Tab S4 appeared first on Appuals.com.


How to Debloat the Samsung Galaxy Tab S4

$
0
0

The Samsung Galaxy Tab S4 is a phenomenal tablet for 2018, but like most Samsung devices, it does come with a bit of unwanted bloatware. In this Appuals guide, we will show you how to debloat this tablet, as well as give you a list of all the bloatware that can safely be removed from the device, without harming its status.

Please note that root is required for this procedure – if your Galaxy Tab S4 is not rooted, see Appuals guide How to Root the Samsung Galaxy Tab S4.

Requirements

  1. The first step is to launch Magisk, and search for the ‘Debloater’ module. Install it, and reboot your Galaxy Tab S4.
  2. Now launch your terminal app, and grant it root access with the su command.
  3. In the terminal, type: debloat
  4. Now you can press “1” to debloat normal apps, or “2” to debloat priv-apps. Normal users should go with option 1, advanced users can go with option 2.
  5. The terminal will now display a huge list of apps installed on your device, in numbered sequence. To remove them, you simply type debloat # – for example, to remove a whole bunch of apps at once, you would type debloat 1 18 25 24 56, to remove all of those apps together.
  6. After debloating your Galaxy Tab S4, reboot it, and run a tool like SD Maid Cleaner to remove any residual files that were not removed during the debloat process.

Alternative method: We are providing a script that will debloat the majority of Samsung’s bloatware from your Galaxy Tab S4. You can copy the entire script into a text file, then transfer it to your Galaxy Tab S4, and place it in the /cache folder using a root file explorer. Then you will launch the terminal, type ‘debloat’, and then type ‘I’ to import the script. Caution: You should read through the script carefully and delete any lines containing apps you might want to keep.

/sbin/.core/img/terminal_debloater/system/app/EasterEgg

/sbin/.core/img/terminal_debloater/system/app/HiyaService

/sbin/.core/img/terminal_debloater/system/app/ANTPlusTest

/sbin/.core/img/terminal_debloater/system/app/ANTPlusPlugins

/sbin/.core/img/terminal_debloater/system/app/atfwd

/sbin/.core/img/terminal_debloater/system/app/BasicDreams

/sbin/.core/img/terminal_debloater/system/app/BBCAgent

/sbin/.core/img/terminal_debloater/system/app/BCService

/sbin/.core/img/terminal_debloater/system/app/VisionIntelligence2

/sbin/.core/img/terminal_debloater/system/app/BluetoothMidiService

/sbin/.core/img/terminal_debloater/system/app/BluetoothTest

/sbin/.core/img/terminal_debloater/system/app/bootagent

/sbin/.core/img/terminal_debloater/system/app/FlipboardBriefing

/sbin/.core/img/terminal_debloater/system/app/FactoryCameraFB

/sbin/.core/img/terminal_debloater/system/app/CarrierDefaultApp

/sbin/.core/img/terminal_debloater/system/app/ChocoEUKor

/sbin/.core/img/terminal_debloater/system/app/Chrome

/sbin/.core/img/terminal_debloater/system/app/ChromeCustomizations

/sbin/.core/img/terminal_debloater/system/app/CompanionDeviceManager

/sbin/.core/img/terminal_debloater/system/app/ConfURIDialer

/sbin/.core/img/terminal_debloater/system/app/CoolEUKor

/sbin/.core/img/terminal_debloater/system/app/CtsShimPrebuilt

/sbin/.core/img/terminal_debloater/system/app/BuiltInPrintService

/sbin/.core/img/terminal_debloater/system/app/DRParser

/sbin/.core/img/terminal_debloater/system/app/EmergencyModeService

/sbin/.core/img/terminal_debloater/system/app/EmergencyProvider

/sbin/.core/img/terminal_debloater/system/app/CoreApps_EOP

/sbin/.core/img/terminal_debloater/system/app/EdmSimPinService

/sbin/.core/img/terminal_debloater/system/app/EdmVpnServices

/sbin/.core/img/terminal_debloater/system/app/FilterInstaller

/sbin/.core/img/terminal_debloater/system/app/FilterProvider

/sbin/.core/img/terminal_debloater/system/app/Foundation

/sbin/.core/img/terminal_debloater/system/app/GameOptimizer

/sbin/.core/img/terminal_debloater/system/app/ImsSettings

/sbin/.core/img/terminal_debloater/system/app/UniversalMDMClient

/sbin/.core/img/terminal_debloater/system/app/KnoxAttestationAgent

/sbin/.core/img/terminal_debloater/system/app/EmergencyLauncher

/sbin/.core/img/terminal_debloater/system/app/LiveDrawing

/sbin/.core/img/terminal_debloater/system/app/MDMApp

/sbin/.core/img/terminal_debloater/system/app/MhdrService

/sbin/.core/img/terminal_debloater/system/app/MotionPanoramaViewer

/sbin/.core/img/terminal_debloater/system/app/SelfMotionPanoramaViewer

/sbin/.core/img/terminal_debloater/system/app/AllshareMediaShare

/sbin/.core/img/terminal_debloater/system/app/OCRServiceLite_1.3

/sbin/.core/img/terminal_debloater/system/app/PartnerBookmarksProvider

/sbin/.core/img/terminal_debloater/system/app/Personalization

/sbin/.core/img/terminal_debloater/system/app/PhotoTable

/sbin/.core/img/terminal_debloater/system/app/PlayAutoInstallConfig

/sbin/.core/img/terminal_debloater/system/app/GooglePrintRecommendationService

/sbin/.core/img/terminal_debloater/system/app/SPrintSpooler

/sbin/.core/img/terminal_debloater/system/app/SapaMonitor

/sbin/.core/img/terminal_debloater/system/app/RcsSettings

/sbin/.core/img/terminal_debloater/system/app/SmartReminder

/sbin/.core/img/terminal_debloater/system/app/RootPA

/sbin/.core/img/terminal_debloater/system/app/ApexService

/sbin/.core/img/terminal_debloater/system/app/SmartCapture

/sbin/.core/img/terminal_debloater/system/app/SamsungIMEv3.2

/sbin/.core/img/terminal_debloater/system/app/SamsungTTS

/sbin/.core/img/terminal_debloater/system/app/SamsungDLPService

/sbin/.core/img/terminal_debloater/system/app/SCPMClient_N

/sbin/.core/img/terminal_debloater/system/app/SecFactoryPhoneTest

/sbin/.core/img/terminal_debloater/system/app/com.qualcomm.qti.services.secureui

/sbin/.core/img/terminal_debloater/system/app/SecureFolderSetupPage

/sbin/.core/img/terminal_debloater/system/app/SecurityProviderSEC

/sbin/.core/img/terminal_debloater/system/app/SecurityLogAgent

/sbin/.core/img/terminal_debloater/system/app/ShortcutBackupService

/sbin/.core/img/terminal_debloater/system/app/SilentLog

/sbin/.core/img/terminal_debloater/system/app/Stk

/sbin/.core/img/terminal_debloater/system/app/MSSkype_stub

/sbin/.core/img/terminal_debloater/system/app/SLocation

/sbin/.core/img/terminal_debloater/system/app/SmartSwitchAgent

/sbin/.core/img/terminal_debloater/system/app/SmartcardService

/sbin/.core/img/terminal_debloater/system/app/AdvSoundDetector2015

/sbin/.core/img/terminal_debloater/system/app/SplitSoundService

/sbin/.core/img/terminal_debloater/system/app/StoryEditor_Dream_N

/sbin/.core/img/terminal_debloater/system/app/SysScope

/sbin/.core/img/terminal_debloater/system/app/SecHTMLViewer

/sbin/.core/img/terminal_debloater/system/app/WebManual

/sbin/.core/img/terminal_debloater/system/app/VideoTrimmer_SEP90

/sbin/.core/img/terminal_debloater/system/app/InteractivePanoramaViewer_WQHD

/sbin/.core/img/terminal_debloater/system/app/STalkback

/sbin/.core/img/terminal_debloater/system/app/vsimservice

/sbin/.core/img/terminal_debloater/system/app/WallpaperBackup

/sbin/.core/img/terminal_debloater/system/app/Weather_SEP9.1

/sbin/.core/img/terminal_debloater/system/app/WlanTest

/sbin/.core/img/terminal_debloater/system/app/SamsungPassAutofill_v1

/sbin/.core/img/terminal_debloater/system/app/Gmail2

/sbin/.core/img/terminal_debloater/system/app/Panorama360Viewer

/sbin/.core/img/terminal_debloater/system/app/VideoEditorLite_Dream_N

/sbin/.core/img/terminal_debloater/system/app/RoseEUKor

/sbin/.core/img/terminal_debloater/system/app/SapaAudioConnectionService

/sbin/.core/img/terminal_debloater/system/app/AppLinker

/sbin/.core/img/terminal_debloater/system/app/AutomationTest_FB

/sbin/.core/img/terminal_debloater/system/app/BookmarkProvider

/sbin/.core/img/terminal_debloater/system/app/DictDiotekForSec

/sbin/.core/img/terminal_debloater/system/app/PacProcessor

/sbin/.core/img/terminal_debloater/system/app/SafetyInformation

/sbin/.core/img/terminal_debloater/system/app/UniversalSwitch

/sbin/.core/img/terminal_debloater/system/app/SmartMirroring

/sbin/.core/img/terminal_debloater/system/app/TetheringAutomation

/sbin/.core/img/terminal_debloater/system/app/AllshareFileShare

/sbin/.core/img/terminal_debloater/system/app/sveservice

/sbin/.core/img/terminal_debloater/system/app/FidoCryptoService

/sbin/.core/img/terminal_debloater/system/priv-app/Hearingdro_Tablet_V4_N

/sbin/.core/img/terminal_debloater/system/priv-app/SetupWizard

/sbin/.core/img/terminal_debloater/system/priv-app/ANTRadioService

/sbin/.core/img/terminal_debloater/system/priv-app/PreloadInstaller

/sbin/.core/img/terminal_debloater/system/priv-app/AssistantMenu_N

/sbin/.core/img/terminal_debloater/system/priv-app/AuthFramework

/sbin/.core/img/terminal_debloater/system/priv-app/BadgeProvider_N

/sbin/.core/img/terminal_debloater/system/priv-app/BixbyHome

/sbin/.core/img/terminal_debloater/system/priv-app/BixbyVisionFramework

/sbin/.core/img/terminal_debloater/system/priv-app/CallLogBackup

/sbin/.core/img/terminal_debloater/system/priv-app/IrisUserTest

/sbin/.core/img/terminal_debloater/system/priv-app/OmaCP

/sbin/.core/img/terminal_debloater/system/priv-app/OMCAgent5

/sbin/.core/img/terminal_debloater/system/priv-app/RubinVersion22

/sbin/.core/img/terminal_debloater/system/priv-app/DailyBoard

/sbin/.core/img/terminal_debloater/system/priv-app/StickerFaceAR

/sbin/.core/img/terminal_debloater/system/priv-app/StickerStamp

/sbin/.core/img/terminal_debloater/system/priv-app/SmartManager_v5

/sbin/.core/img/terminal_debloater/system/priv-app/SmartManager_v6_DeviceSecurity

/sbin/.core/img/terminal_debloater/system/priv-app/DeviceTest

/sbin/.core/img/terminal_debloater/system/priv-app/DiagMonAgent

/sbin/.core/img/terminal_debloater/system/priv-app/DeviceQualityAgent

/sbin/.core/img/terminal_debloater/system/priv-app/EpdgService

/sbin/.core/img/terminal_debloater/system/priv-app/Finder_v8

/sbin/.core/img/terminal_debloater/system/priv-app/FusedLocation

/sbin/.core/img/terminal_debloater/system/priv-app/GalaxyApps_Tablet

/sbin/.core/img/terminal_debloater/system/priv-app/GalaxyAppsWidget_Tablet_TabS3

/sbin/.core/img/terminal_debloater/system/priv-app/GameHome

/sbin/.core/img/terminal_debloater/system/priv-app/GameTools_TabletSWKey

/sbin/.core/img/terminal_debloater/system/priv-app/Velvet

/sbin/.core/img/terminal_debloater/system/priv-app/HiddenNetworkSetting

/sbin/.core/img/terminal_debloater/system/priv-app/HwModuleTest

/sbin/.core/img/terminal_debloater/system/priv-app/ImsLogger

/sbin/.core/img/terminal_debloater/system/priv-app/ImsTelephonyService

/sbin/.core/img/terminal_debloater/system/priv-app/KeyguardWallpaperUpdator

/sbin/.core/img/terminal_debloater/system/priv-app/KLMSAgent

/sbin/.core/img/terminal_debloater/system/priv-app/knoxanalyticsagent

/sbin/.core/img/terminal_debloater/system/priv-app/KnoxCore

/sbin/.core/img/terminal_debloater/system/priv-app/knoxvpnproxyhandler

/sbin/.core/img/terminal_debloater/system/priv-app/GoogleFeedback

/sbin/.core/img/terminal_debloater/system/priv-app/NetworkDiagnostic

/sbin/.core/img/terminal_debloater/system/priv-app/SecMyFiles2017

/sbin/.core/img/terminal_debloater/system/priv-app/PhotoStudio_WQHD_Star

/sbin/.core/img/terminal_debloater/system/priv-app/Rlc

/sbin/.core/img/terminal_debloater/system/priv-app/PhoneErrService

/sbin/.core/img/terminal_debloater/system/priv-app/ringtoneBR

/sbin/.core/img/terminal_debloater/system/priv-app/SamsungAccount_Star

/sbin/.core/img/terminal_debloater/system/priv-app/SamsungBilling

/sbin/.core/img/terminal_debloater/system/priv-app/SamsungCloudGreat

/sbin/.core/img/terminal_debloater/system/priv-app/TouchWizHome_2017

/sbin/.core/img/terminal_debloater/system/priv-app/SamsungExperienceService

/sbin/.core/img/terminal_debloater/system/priv-app/MateAgent

/sbin/.core/img/terminal_debloater/system/priv-app/NSFusedLocation_v3.3

/sbin/.core/img/terminal_debloater/system/priv-app/SamsungPass

/sbin/.core/img/terminal_debloater/system/priv-app/SPPPushClient

/sbin/.core/img/terminal_debloater/system/priv-app/SecSetupWizard_Global

/sbin/.core/img/terminal_debloater/system/priv-app/SecureFolder

/sbin/.core/img/terminal_debloater/system/priv-app/SPDClient

/sbin/.core/img/terminal_debloater/system/priv-app/ShootingModeProvider2

/sbin/.core/img/terminal_debloater/system/priv-app/SKMSAgent

/sbin/.core/img/terminal_debloater/system/priv-app/BeaconManager

/sbin/.core/img/terminal_debloater/system/priv-app/FotaAgent

/sbin/.core/img/terminal_debloater/system/priv-app/SMusicPicker

/sbin/.core/img/terminal_debloater/system/priv-app/StickerCenter

/sbin/.core/img/terminal_debloater/system/priv-app/Messaging_sticker_plugin

/sbin/.core/img/terminal_debloater/system/priv-app/StickerProvider

/sbin/.core/img/terminal_debloater/system/priv-app/StoryService

/sbin/.core/img/terminal_debloater/system/priv-app/SVCAgent

/sbin/.core/img/terminal_debloater/system/priv-app/SamsungTimeZoneUpdater

/sbin/.core/img/terminal_debloater/system/priv-app/UIBCVirtualSoftkey

/sbin/.core/img/terminal_debloater/system/priv-app/Upday

/sbin/.core/img/terminal_debloater/system/priv-app/SamsungVideoPlayer2016

/sbin/.core/img/terminal_debloater/system/priv-app/VisionProvider

/sbin/.core/img/terminal_debloater/system/priv-app/VoiceServiceFramework

/sbin/.core/img/terminal_debloater/system/priv-app/ManagedProvisioning

/sbin/.core/img/terminal_debloater/system/priv-app/ContainerAgent3

/sbin/.core/img/terminal_debloater/system/priv-app/Fmm

/sbin/.core/img/terminal_debloater/system/priv-app/SecGallery2015

/sbin/.core/img/terminal_debloater/system/priv-app/imsservice

/sbin/.core/img/terminal_debloater/system/priv-app/EasySetup

/sbin/.core/img/terminal_debloater/system/priv-app/AutoPreconfig

/sbin/.core/img/terminal_debloater/system/priv-app/wssyncmlnps2

/sbin/.core/img/terminal_debloater/system/priv-app/BackupRestoreConfirmation

/sbin/.core/img/terminal_debloater/system/priv-app/ConfigUpdater

/sbin/.core/img/terminal_debloater/system/priv-app/CSC

/sbin/.core/img/terminal_debloater/system/priv-app/DeviceKeystring

/sbin/.core/img/terminal_debloater/system/priv-app/EmergencyInfo

/sbin/.core/img/terminal_debloater/system/priv-app/SmartEpdgTestApp

/sbin/.core/img/terminal_debloater/system/priv-app/Excel_SamsungStub

/sbin/.core/img/terminal_debloater/system/priv-app/GoogleBackupTransport

/sbin/.core/img/terminal_debloater/system/priv-app/StatementService

/sbin/.core/img/terminal_debloater/system/priv-app/AccessControl_N

/sbin/.core/img/terminal_debloater/system/priv-app/IPService

/sbin/.core/img/terminal_debloater/system/priv-app/MediaLearningPlatform

/sbin/.core/img/terminal_debloater/system/priv-app/OneDrive_Samsung_v3

/sbin/.core/img/terminal_debloater/system/priv-app/PowerPoint_SamsungStub

/sbin/.core/img/terminal_debloater/system/priv-app/ProxyHandler

/sbin/.core/img/terminal_debloater/system/priv-app/SharedStorageBackup

/sbin/.core/img/terminal_debloater/system/priv-app/SOAgent

/sbin/.core/img/terminal_debloater/system/priv-app/Word_SamsungStub

/sbin/.core/img/terminal_debloater/system/app/EasterEgg

/sbin/.core/img/terminal_debloater/system/app/HiyaService

/sbin/.core/img/terminal_debloater/system/app/ANTPlusTest

/sbin/.core/img/terminal_debloater/system/app/ANTPlusPlugins

/sbin/.core/img/terminal_debloater/system/app/atfwd

/sbin/.core/img/terminal_debloater/system/app/BasicDreams

/sbin/.core/img/terminal_debloater/system/app/BBCAgent

/sbin/.core/img/terminal_debloater/system/app/BCService

/sbin/.core/img/terminal_debloater/system/app/VisionIntelligence2

/sbin/.core/img/terminal_debloater/system/app/BluetoothMidiService

/sbin/.core/img/terminal_debloater/system/app/BluetoothTest

/sbin/.core/img/terminal_debloater/system/app/bootagent

/sbin/.core/img/terminal_debloater/system/app/FlipboardBriefing

/sbin/.core/img/terminal_debloater/system/app/FactoryCameraFB

/sbin/.core/img/terminal_debloater/system/app/CarrierDefaultApp

/sbin/.core/img/terminal_debloater/system/app/ChocoEUKor

/sbin/.core/img/terminal_debloater/system/app/Chrome

/sbin/.core/img/terminal_debloater/system/app/ChromeCustomizations

/sbin/.core/img/terminal_debloater/system/app/CompanionDeviceManager

/sbin/.core/img/terminal_debloater/system/app/ConfURIDialer

/sbin/.core/img/terminal_debloater/system/app/CoolEUKor

/sbin/.core/img/terminal_debloater/system/app/CtsShimPrebuilt

/sbin/.core/img/terminal_debloater/system/app/BuiltInPrintService

/sbin/.core/img/terminal_debloater/system/app/DRParser

/sbin/.core/img/terminal_debloater/system/app/EmergencyModeService

/sbin/.core/img/terminal_debloater/system/app/EmergencyProvider

/sbin/.core/img/terminal_debloater/system/app/CoreApps_EOP

/sbin/.core/img/terminal_debloater/system/app/EdmSimPinService

/sbin/.core/img/terminal_debloater/system/app/EdmVpnServices

/sbin/.core/img/terminal_debloater/system/app/FilterInstaller

/sbin/.core/img/terminal_debloater/system/app/FilterProvider

/sbin/.core/img/terminal_debloater/system/app/Foundation

/sbin/.core/img/terminal_debloater/system/app/GameOptimizer

/sbin/.core/img/terminal_debloater/system/app/ImsSettings

/sbin/.core/img/terminal_debloater/system/app/UniversalMDMClient

/sbin/.core/img/terminal_debloater/system/app/KnoxAttestationAgent

/sbin/.core/img/terminal_debloater/system/app/EmergencyLauncher

/sbin/.core/img/terminal_debloater/system/app/LiveDrawing

/sbin/.core/img/terminal_debloater/system/app/MDMApp

/sbin/.core/img/terminal_debloater/system/app/MhdrService

/sbin/.core/img/terminal_debloater/system/app/MotionPanoramaViewer

/sbin/.core/img/terminal_debloater/system/app/SelfMotionPanoramaViewer

/sbin/.core/img/terminal_debloater/system/app/AllshareMediaShare

/sbin/.core/img/terminal_debloater/system/app/OCRServiceLite_1.3

/sbin/.core/img/terminal_debloater/system/app/PartnerBookmarksProvider

/sbin/.core/img/terminal_debloater/system/app/Personalization

/sbin/.core/img/terminal_debloater/system/app/PhotoTable

/sbin/.core/img/terminal_debloater/system/app/PlayAutoInstallConfig

/sbin/.core/img/terminal_debloater/system/app/GooglePrintRecommendationService

/sbin/.core/img/terminal_debloater/system/app/SPrintSpooler

/sbin/.core/img/terminal_debloater/system/app/SapaMonitor

/sbin/.core/img/terminal_debloater/system/app/RcsSettings

/sbin/.core/img/terminal_debloater/system/app/SmartReminder

/sbin/.core/img/terminal_debloater/system/app/RootPA

/sbin/.core/img/terminal_debloater/system/app/ApexService

/sbin/.core/img/terminal_debloater/system/app/SmartCapture

/sbin/.core/img/terminal_debloater/system/app/SamsungIMEv3.2

/sbin/.core/img/terminal_debloater/system/app/SamsungTTS

/sbin/.core/img/terminal_debloater/system/app/SamsungDLPService

/sbin/.core/img/terminal_debloater/system/app/SCPMClient_N

/sbin/.core/img/terminal_debloater/system/app/SecFactoryPhoneTest

/sbin/.core/img/terminal_debloater/system/app/com.qualcomm.qti.services.secureui

/sbin/.core/img/terminal_debloater/system/app/SecureFolderSetupPage

/sbin/.core/img/terminal_debloater/system/app/SecurityProviderSEC

/sbin/.core/img/terminal_debloater/system/app/SecurityLogAgent

/sbin/.core/img/terminal_debloater/system/app/ShortcutBackupService

/sbin/.core/img/terminal_debloater/system/app/SilentLog

/sbin/.core/img/terminal_debloater/system/app/Stk

/sbin/.core/img/terminal_debloater/system/app/MSSkype_stub

/sbin/.core/img/terminal_debloater/system/app/SLocation

/sbin/.core/img/terminal_debloater/system/app/SmartSwitchAgent

/sbin/.core/img/terminal_debloater/system/app/SmartcardService

/sbin/.core/img/terminal_debloater/system/app/AdvSoundDetector2015

/sbin/.core/img/terminal_debloater/system/app/SplitSoundService

/sbin/.core/img/terminal_debloater/system/app/StoryEditor_Dream_N

/sbin/.core/img/terminal_debloater/system/app/SysScope

/sbin/.core/img/terminal_debloater/system/app/SecHTMLViewer

/sbin/.core/img/terminal_debloater/system/app/WebManual

/sbin/.core/img/terminal_debloater/system/app/VideoTrimmer_SEP90

/sbin/.core/img/terminal_debloater/system/app/InteractivePanoramaViewer_WQHD

/sbin/.core/img/terminal_debloater/system/app/STalkback

/sbin/.core/img/terminal_debloater/system/app/vsimservice

/sbin/.core/img/terminal_debloater/system/app/WallpaperBackup

/sbin/.core/img/terminal_debloater/system/app/Weather_SEP9.1

/sbin/.core/img/terminal_debloater/system/app/WlanTest

/sbin/.core/img/terminal_debloater/system/app/SamsungPassAutofill_v1

/sbin/.core/img/terminal_debloater/system/app/Gmail2

/sbin/.core/img/terminal_debloater/system/app/Panorama360Viewer

/sbin/.core/img/terminal_debloater/system/app/VideoEditorLite_Dream_N

/sbin/.core/img/terminal_debloater/system/app/RoseEUKor

/sbin/.core/img/terminal_debloater/system/app/SapaAudioConnectionService

/sbin/.core/img/terminal_debloater/system/app/AppLinker

/sbin/.core/img/terminal_debloater/system/app/AutomationTest_FB

/sbin/.core/img/terminal_debloater/system/app/BookmarkProvider

/sbin/.core/img/terminal_debloater/system/app/DictDiotekForSec

/sbin/.core/img/terminal_debloater/system/app/PacProcessor

/sbin/.core/img/terminal_debloater/system/app/SafetyInformation

/sbin/.core/img/terminal_debloater/system/app/UniversalSwitch

/sbin/.core/img/terminal_debloater/system/app/SmartMirroring

/sbin/.core/img/terminal_debloater/system/app/TetheringAutomation

/sbin/.core/img/terminal_debloater/system/app/AllshareFileShare

/sbin/.core/img/terminal_debloater/system/app/sveservice

/sbin/.core/img/terminal_debloater/system/app/FidoCryptoService

/sbin/.core/img/terminal_debloater/system/priv-app/Hearingdro_Tablet_V4_N

/sbin/.core/img/terminal_debloater/system/priv-app/SetupWizard

/sbin/.core/img/terminal_debloater/system/priv-app/ANTRadioService

/sbin/.core/img/terminal_debloater/system/priv-app/PreloadInstaller

/sbin/.core/img/terminal_debloater/system/priv-app/AssistantMenu_N

/sbin/.core/img/terminal_debloater/system/priv-app/AuthFramework

/sbin/.core/img/terminal_debloater/system/priv-app/BadgeProvider_N

/sbin/.core/img/terminal_debloater/system/priv-app/BixbyHome

/sbin/.core/img/terminal_debloater/system/priv-app/BixbyVisionFramework

/sbin/.core/img/terminal_debloater/system/priv-app/CallLogBackup

/sbin/.core/img/terminal_debloater/system/priv-app/IrisUserTest

/sbin/.core/img/terminal_debloater/system/priv-app/OmaCP

/sbin/.core/img/terminal_debloater/system/priv-app/OMCAgent5

/sbin/.core/img/terminal_debloater/system/priv-app/RubinVersion22

/sbin/.core/img/terminal_debloater/system/priv-app/DailyBoard

/sbin/.core/img/terminal_debloater/system/priv-app/StickerFaceAR

/sbin/.core/img/terminal_debloater/system/priv-app/StickerStamp

/sbin/.core/img/terminal_debloater/system/priv-app/SmartManager_v5

/sbin/.core/img/terminal_debloater/system/priv-app/SmartManager_v6_DeviceSecurity

/sbin/.core/img/terminal_debloater/system/priv-app/DeviceTest

/sbin/.core/img/terminal_debloater/system/priv-app/DexCommunity

/sbin/.core/img/terminal_debloater/system/priv-app/DiagMonAgent

/sbin/.core/img/terminal_debloater/system/priv-app/DeviceQualityAgent

/sbin/.core/img/terminal_debloater/system/priv-app/EpdgService

/sbin/.core/img/terminal_debloater/system/priv-app/Finder_v8

/sbin/.core/img/terminal_debloater/system/priv-app/FusedLocation

/sbin/.core/img/terminal_debloater/system/priv-app/GalaxyApps_Tablet

/sbin/.core/img/terminal_debloater/system/priv-app/GalaxyAppsWidget_Tablet_TabS3

/sbin/.core/img/terminal_debloater/system/priv-app/GameHome

/sbin/.core/img/terminal_debloater/system/priv-app/GameTools_TabletSWKey

/sbin/.core/img/terminal_debloater/system/priv-app/Velvet

/sbin/.core/img/terminal_debloater/system/priv-app/HiddenNetworkSetting

/sbin/.core/img/terminal_debloater/system/priv-app/HwModuleTest

/sbin/.core/img/terminal_debloater/system/priv-app/ImsLogger

/sbin/.core/img/terminal_debloater/system/priv-app/ImsTelephonyService

/sbin/.core/img/terminal_debloater/system/priv-app/KeyguardWallpaperUpdator

/sbin/.core/img/terminal_debloater/system/priv-app/KLMSAgent

/sbin/.core/img/terminal_debloater/system/priv-app/knoxanalyticsagent

/sbin/.core/img/terminal_debloater/system/priv-app/KnoxCore

/sbin/.core/img/terminal_debloater/system/priv-app/knoxvpnproxyhandler

/sbin/.core/img/terminal_debloater/system/priv-app/GoogleFeedback

/sbin/.core/img/terminal_debloater/system/priv-app/NetworkDiagnostic

/sbin/.core/img/terminal_debloater/system/priv-app/SecMyFiles2017

/sbin/.core/img/terminal_debloater/system/priv-app/PhotoStudio_WQHD_Star

/sbin/.core/img/terminal_debloater/system/priv-app/Rlc

/sbin/.core/img/terminal_debloater/system/priv-app/PhoneErrService

/sbin/.core/img/terminal_debloater/system/priv-app/ringtoneBR

/sbin/.core/img/terminal_debloater/system/priv-app/SamsungAccount_Star

/sbin/.core/img/terminal_debloater/system/priv-app/SamsungBilling

/sbin/.core/img/terminal_debloater/system/priv-app/SamsungCloudGreat

/sbin/.core/img/terminal_debloater/system/priv-app/TouchWizHome_2017

/sbin/.core/img/terminal_debloater/system/priv-app/SamsungExperienceService

/sbin/.core/img/terminal_debloater/system/priv-app/MateAgent

/sbin/.core/img/terminal_debloater/system/priv-app/NSFusedLocation_v3.3

/sbin/.core/img/terminal_debloater/system/priv-app/SamsungPass

/sbin/.core/img/terminal_debloater/system/priv-app/SPPPushClient

/sbin/.core/img/terminal_debloater/system/priv-app/SecSetupWizard_Global

/sbin/.core/img/terminal_debloater/system/priv-app/SecureFolder

/sbin/.core/img/terminal_debloater/system/priv-app/SPDClient

/sbin/.core/img/terminal_debloater/system/priv-app/ShootingModeProvider2

/sbin/.core/img/terminal_debloater/system/priv-app/SKMSAgent

/sbin/.core/img/terminal_debloater/system/priv-app/BeaconManager

/sbin/.core/img/terminal_debloater/system/priv-app/FotaAgent

/sbin/.core/img/terminal_debloater/system/priv-app/SMusicPicker

/sbin/.core/img/terminal_debloater/system/priv-app/StickerCenter

/sbin/.core/img/terminal_debloater/system/priv-app/Messaging_sticker_plugin

/sbin/.core/img/terminal_debloater/system/priv-app/StickerProvider

/sbin/.core/img/terminal_debloater/system/priv-app/StoryService

/sbin/.core/img/terminal_debloater/system/priv-app/SVCAgent

/sbin/.core/img/terminal_debloater/system/priv-app/SamsungTimeZoneUpdater

/sbin/.core/img/terminal_debloater/system/priv-app/UIBCVirtualSoftkey

/sbin/.core/img/terminal_debloater/system/priv-app/Upday

/sbin/.core/img/terminal_debloater/system/priv-app/SamsungVideoPlayer2016

/sbin/.core/img/terminal_debloater/system/priv-app/VisionProvider

/sbin/.core/img/terminal_debloater/system/priv-app/VoiceServiceFramework

/sbin/.core/img/terminal_debloater/system/priv-app/ManagedProvisioning

/sbin/.core/img/terminal_debloater/system/priv-app/ContainerAgent3

/sbin/.core/img/terminal_debloater/system/priv-app/Fmm

/sbin/.core/img/terminal_debloater/system/priv-app/SecGallery2015

/sbin/.core/img/terminal_debloater/system/priv-app/imsservice

/sbin/.core/img/terminal_debloater/system/priv-app/EasySetup

/sbin/.core/img/terminal_debloater/system/priv-app/AutoPreconfig

/sbin/.core/img/terminal_debloater/system/priv-app/wssyncmlnps2

/sbin/.core/img/terminal_debloater/system/priv-app/BackupRestoreConfirmation

/sbin/.core/img/terminal_debloater/system/priv-app/ColorAdjustment

/sbin/.core/img/terminal_debloater/system/priv-app/ConfigUpdater

/sbin/.core/img/terminal_debloater/system/priv-app/CSC

/sbin/.core/img/terminal_debloater/system/priv-app/DeviceKeystring

/sbin/.core/img/terminal_debloater/system/priv-app/EmergencyInfo

/sbin/.core/img/terminal_debloater/system/priv-app/SmartEpdgTestApp

/sbin/.core/img/terminal_debloater/system/priv-app/Excel_SamsungStub

/sbin/.core/img/terminal_debloater/system/priv-app/GoogleBackupTransport

/sbin/.core/img/terminal_debloater/system/priv-app/StatementService

/sbin/.core/img/terminal_debloater/system/priv-app/AccessControl_N

/sbin/.core/img/terminal_debloater/system/priv-app/IPService

/sbin/.core/img/terminal_debloater/system/priv-app/MediaLearningPlatform

/sbin/.core/img/terminal_debloater/system/priv-app/OneDrive_Samsung_v3

/sbin/.core/img/terminal_debloater/system/priv-app/GoogleOneTimeInitializer

/sbin/.core/img/terminal_debloater/system/priv-app/PowerPoint_SamsungStub

/sbin/.core/img/terminal_debloater/system/priv-app/ProxyHandler

/sbin/.core/img/terminal_debloater/system/priv-app/SharedStorageBackup

/sbin/.core/img/terminal_debloater/system/priv-app/SOAgent

/sbin/.core/img/terminal_debloater/system/priv-app/Word_SamsungStub

/sbin/.core/img/terminal_debloater/system/priv-app/WallpaperCropper2

The post How to Debloat the Samsung Galaxy Tab S4 appeared first on Appuals.com.

Fix: Nier Automata Crashing

$
0
0

Nier Automata is a game based in a world where invaders have driven mankind off from the Earth. The humans occasionally organize a resistance of android soldiers and dispatch them to take back their homeland. This game gained immense popularity since its release and is now available on multiple platforms.

Nier Automata
Nier Automata

Since the game is officially a paid game, people have been installing crack copies which are unstable and cause crashes of the game while playing. This issue has been in the Windows release of the game for quite some time and some possible workarounds are present to solve it.

What causes Nier Automata to Crash?

Every game has its share of crashing issues and Nier Automata isn’t an exception. There are several causes for why your game might crash especially if you are using a cracked version. Some of the reasons are but not limited to:

  • Issue with processor cores: There is an issue with the processor cores used in running the game. The workaround is reducing the number of cores (listed below).
  • Bad installation files: There are also some cases where the installation files for Nier Automata are either corrupt or incomplete which causes it to crash.
  • Bad graphics drivers: Graphics drivers are the main components used in running and executing graphics commands by the game. If they are outdated, you might experience the crashing.

Before we jump into the solutions, make sure that you are logged in as an administrator and have an active open internet connection.

Solution 1: Limiting CPU Cores

According to several users and experiments by our team, we saw that by changing the processor affinity, the crashing went away. This is a bizarre solution and shouldn’t be the case. This comes down to the programming of the game; it seems it isn’t optimized enough for smooth operations regardless of the number of CPU cores active.

We will limit specific CPU cores when launching Nier Automata and see if this fixes the issue.

  1. Launch Nier Automata and don’t get past the loading screen. Press Windows + R, type “taskmgr” in the dialogue box and press Enter.
  2. Once in the task manager, click on Details tab and search for the process of Nier Automata. Right-click it and select Set Affinity
Set Affinity of Nier Automata
  1. Now disable every second CPU. In the example below, we have 6 CPU cores. Hence the ones to disable are 1, 3, and 5. Press OK to save changes and exit.
Changing CPU cores in Nier Automata
  1. Now try playing the game and see if the crashes persist.

Solution 2: Disabling FAR (Fix Automata Resolution) Mod

FAR Mod is one of the mods developed for Nier Automata which helps users with lower specs play the game by manipulating the graphics requirements of the game. It increases the FPS by a ton and decreases global illumination as a result.

This mod is usually added to help get a rock solid 60 FPS instead of varying lower FPS rates in case of weak graphics hardware. Since this mod is developed by third-party software developers, it contains several problems and is directly linked to the crashing of the game. You should disable FAR Mod (if you have it enabled) and try to restore the game settings to default. Restart your computer properly before launching it again.

Solution 3: Reinstalling the Game

If both the above methods don’t work, you can try reinstalling the game. There are numerous cases where the game files are either corrupt or incomplete. This causes the game to exhibit irregular behavior and in our case, crash when playing. Do keep in mind that your progress might get erased in this solution. You can back up your user profiles.

  1. Press Windows + R, type “appwiz.cpl” in the dialogue box and press Enter.
  2. Once in the application manager, search for Nier Automata, right-click it and select Uninstall
    Uninstalling Nier Automata
    Uninstalling Nier Automata
  3. Now download the game files from the website and install it. Make sure that you restart your computer before proceeding.

If you are using Steam and using an official version of the game, you can verify the integrity of game files instead.

In addition to the solutions above, you can also try the following:

  • Updating your graphics drivers to the latest build. If updating doesn’t help, you can try rolling back the drivers.
  • You can try lowering the graphics options in-game. The less load on your PC the better.
  • You can disable any type of overlay present in your game.
  • Instead of disabling or removing FAR, you can try adding the mod and see if it makes a difference.

The post Fix: Nier Automata Crashing appeared first on Appuals.com.

Fix: Windows 10 Can’t type in search

$
0
0

It is a pretty basic task for an operating system to allow its users to search for a specific file or application. However, some users are experiencing trouble with Windows 10 start search (or Cortana search). This issue prevents users from typing into the search bar of the start search. Some users cannot interact with the search box, they can’t click on it or type in it or paste anything in it whereas some users can use CTRL + V command to paste in the search but they can’t actually type in the search bar. This is obviously not an issue with the keyboard since the issue appears only with the Windows 10 start search. As you can imagine, this can cause a lot of problems for users.

Windows Search
Windows Search

What causes the Search to not respond?

There are a few things that can cause this issue.

  • ctfmon.exe: This file is located in the system32 folder on your Windows. Ctfmon is the Microsoft process that controls Alternative User Input and the Office Language bar. The issue can appear if this file/service isn’t running. Running this file brings back the Language bar which fixes the issue.
  • Unresponsive Cortana: Sometimes the issue might be caused by unresponsive Cortana service. Cortana runs in the background and you can see it running in the Task Manager. Sometimes, for no apparent reason, these services can stop working and simply rebooting them fixes the issue.
  • MsCtfMonitor: This service is responsible for monitoring TextServicesFramework system service. Since TextServicesFramework system service is related to the text input, a problem with this service can cause this issue. A problem with the Text Service Framework will prevent you from typing in any of the Windows Modern Apps as well. So, if you are facing the same issue on the Modern Apps like the new Windows calculator then the most likely issue is with the Text Service Framework and not the Windows search.

Method 1: Run ctfmon.exe

Usually, the issue is caused because your Language bar is turned off. Ctfmon.exe is the file responsible for controlling this feature. So, running the ctfmon.exe file resolves the issue.

  1. Hold Windows key and press R
  2. Type C:\Windows\system32\ctfmon.exe and press Enter
type ctfmon.exe in run
run ctfmon.exe via run

Running this file will fix the issue. You should be able to type in the Windows search.

Note: You might have to repeat these steps on every reboot (or every once in a while). So if you notice the problem is back then simply repeat these steps and you should be good to go. You can also follow the steps given below to make some changes in the registry so you don’t have to repeat this task on every reboot. However, we will suggest you wait a little bit to see if the problem comes back or not. If it does, then apply the solution given below

  1. Press Windows key once
  2. Type command prompt in the search bar
  3. Right click command prompt from the start search and select Run as administrator
Run command prompt as administrator
Open command prompt
  1. Type the following and press Enter. Restart your computer and check if the error is resolved.
REG ADD HKLM\SOFTWARE\Microsoft\Windows\CurrentVersion\Run /v ctfmon /t REG_SZ /d CTFMON.EXE
Type REG ADD HKLM\SOFTWARE\Microsoft\Windows\CurrentVersion\Run /v ctfmon /t REG_SZ /d CTFMON.EXE in cmd
Run ctfmon.exe via cmd

Method 2: Reinstall All Default Apps

Sometimes this problem can be caused by an issue/corruption with the default apps of the system and simply reinstalling your default apps will fix the issue. Follow the steps given below to run a simple command that will reinstall the default apps for you.

  1. Press Windows key once
  2. Type command prompt in the search bar
  3. Right click command prompt from the start search and select Run as administrator
Run command prompt as administrator
Open command prompt
  1. Type PowerShell -ExecutionPolicy Unrestricted and press Enter
type PowerShell -ExecutionPolicy Unrestricted in cmd
powershell with unrestricted access
  1. You should be able to see the PowerShell –ExecutionPolicy Unrestricted appear on the top of command prompt now.
  2. Type the following command and press Enter:
Get-AppXPackage -AllUsers |Where-Object {$_.InstallLocation -like "*SystemApps*"} | Foreach {Add-AppxPackage -DisableDevelopmentMode -Register "$($_.InstallLocation)\AppXManifest.xml"}
Reinstall default apps from command prompt
Reinstall default apps via cmd in unrestricted PowerShell

This should resolve the issue for you. Note: If this doesn’t work then restart your computer and check again.

If the problem still isn’t solved the follow the steps given below.

  1. Press and hold CTRL, SHIFT, Esc keys simultaneously (CTRL + SHIFT + ESC). This should open the Task Manager
  2. Click File and select Run new task
Select file then select run new task
task manager: run a new task
  1. Check the option Create this task with administrative privileges
  2. Type Powershell and click Ok
Type powershell
Run powershell via task manager
  1. Type the following and press Enter:
$manifest = (Get-AppxPackage Microsoft.WindowsStore).InstallLocation + '\AppxManifest.xml' ; Add-AppxPackage -DisableDevelopmentMode -Register $manifest
Reinstall Windows Store via powershell

Once the command is run, reboot and check if the issue is rectified or not. Note: If this doesn’t work then restart your computer and check again.

Method 3: End Task Cortana

Since Cortana runs in the background and it keeps running in the background, the issue can be caused by the Cortana itself especially if it stops responding. A lot of users fixed the issue by simply stopping the Cortana via Task Manager. You don’t have to worry about restarting Cortana, it automatically starts itself after a while. So, follow the steps given below to End Task Cortana.

  1. Press and hold CTRL, SHIFT, Esc keys simultaneously (CTRL + SHIFT + ESC). This should open the Task Manager
  2. Locate the Cortana service from the Processes list. If you can’t find Cortana in this list then select the Services tab and check there
  3. Locate and right-click Cortana
  4. Select End Task
right click cortana and select end task
End Task Cortana via task maanger

This should rectify the issue. The search should be working fine now.

Method 4: Import MsCtfMonitor.xml from another Windows 10

MsCtfMonitor is a Microsoft’s own task with the sole purpose of monitoring the TextServicesFramework system service. The TextServicesFramework system service provides a simple and scalable framework for the delivery of advanced text input and natural language technologies. In some cases, the MsCtfMonitor scheduled task might not be started or it might have gotten corrupted which leads to this issue. Simply running the MsCtfMonitor task or importing the MsCtfMonitor.xml file from another Windows 10 machine with its search working properly.

  1. Log in to another Window 10 PC
  2. Hold Windows key and press R
  3. Type taskschd.msc and press Enter
Type taskschd.msc in run
Run task scheduler
  1. Double-click Task Scheduler Library from the left pane
  2. Double-click Microsoft from the left pane
  3. Double click Windows from the left pane
Open TextServicesFramework via task scheduler
Open TextServicesFramework
  1. Select TextServicesFramework from the left pane
  2. Right-click MsCtfMonitor from the mid pane and select Export…
Right click MsCtfMonitor and select Export
Export MsCtfMonitor task
  1. Select a location that you can remember and click Save
  2. Copy this exported file to a USB and paste it to the problematic pc
  3. Repeat steps from 1-7
  4. Right click on an empty space in the mid pane and select Import…
Right click in task scheduler and select Import
Import MsCtfMonitor task in task scheduler
  1. Navigate to the location where you pasted the MsCrfMonitor.xml file from the other machine and select it
  2. One imported, right click the file from the mid pane and select Run
Run MsCtfMonitor task

The problem should go away once the task is up and running.

The post Fix: Windows 10 Can’t type in search appeared first on Appuals.com.

Fix: No Camera Available on MacOS

$
0
0

When you own a Mac, you know how great features it has and it is definitely marveling regarding the technology of the 21st century. The Mac is offering the users a great range of services that are available for every user. But the more range of services can lead to annoying problems and bugs like every hardware in today’s technology. One of them is the build in camera. Even though is a great feature, sometimes during a video call or when you are using the camera with the different app you may get a message like “No Camera available” or “No Camera is Connected”. The Camera issues on the Mac are minor and you don’t need to worry about them because the solutions are very simple. In this article, we will show you how to fix when your camera is not working.

Method 1: Force Stop VDC Assistant and AppleCameraAssistant.

If you don’t have enough time and want to sort this problem fast or you need the camera right away this is the best method for you. VDCAssistant and AppleCameraAssistant are programs that are running in the background. So, if you want to terminate these two processes you will need your Terminal.

  1. Close any apps that are using your Camera.
  2. Open your Terminal. Click the Spotlight Search icon, type Terminal and press Enter to open it.
  3. Type:sudo killall VDCAssistant” And hit Enter. If the Terminal asks for your password and hit Enter.
  4. Type: ‘’sudo killall AppleCameraAssistant ‘’ command. In order to terminate the AppleCameraAssistant.
  5. Launch the camera applications that you were using. This will restart the processes and your camera will launch once more.
    Terminal Commands
    Terminal Commands

Method 2: Adjust Your Camera Settings

The Mac users probably already know that there is no camera section in System Preferences on your device. But, in the applications that are using your camera, there are camera settings that you can adjust within the application itself. With Skype and FaceTime, you can specify whether you want to use your build in camera or an external one. Make sure that you have selected the build in camera.

Method 3″ Reboot Your Mac

Another fast and effective way to fix this camera errors is to restart your Mac. But there are two things you should try when you are using this method. One of them is to restart and the other is to shut down completely. We recommend choosing the shut down because when restarting, will close your session and just for a moment will turn off your Mac but the RAM will be untouched. And when you shut down your Mac will clear everything including clear the RAM and end all processes.

  1. Go to the Apple menu.
  2. Choose Restart.
  3. Then you can either click Restart or Shut Down.
    Shut Down Mac
    Shut Down Mac

Method 4: Update Your Software.

The problem with your camera may be the result of old software or may be incompatible with the applications that you are using. So, there are two solutions for this either to update your applications that are using the camera or to update your iOS on your Mac.

  1. Open System Preferences from the Apple menu.
  2. Click on the Software Update.
  3. Select Check for Updates check box. Here you can choose the time interval of the updates.
  4. Click the Check Now button.
  5. If there is a software update a window will prompt. In the show details option, you can choose what you want to update.
    Prompt Window
    Prompt Window
  6. Click Continue. And wait for the process to finish.
    Install Updates
    Install Updates

The post Fix: No Camera Available on MacOS appeared first on Appuals.com.

Fix: One of your Disks Needs to be Checked for Consistency

$
0
0

CHKDSK is windows feature built in and designed by Microsoft to check and ensure disk integrity for bad sectors and fragment spaces to optimise disk performance and improve overall efficiency. When a disk is detected to have errors by windows, it run’s a chkdsk or requests the user to run chkdsk.

One of your disks needs to be checked for consistency

Note: On Windows 8, the error message is a little different: “We found errors on a drive. To repair these errors and prevent loss of data, restart your PC now. The repair could take a while to complete.”

What is causing the “one of your disks needs to be checked for consistency” error

We investigated this particular issue by looking at how other users have dealt with the problem and the solutions that they reported back. From what we gathered, there are several common causes that will trigger the error message. One of the scenarios below should apply to your current situation:

  • A storage file was removed from the computer after hibernation – Keep in mind that whenever a Windows-Based computer enters hibernation (regardless of the Windows version), all necessary information (memory content, system state, etc.) is stored in a file referred to as Hiberfile. If the contents of the storage device are changed when the system exits hibernation, you can expect data corruption and other inconsistencies.
  • Windows 8 is installed in an unsupported configuration – This typically happens if you installed Windows 8 with other operating systems. The issue occurs when you try multibooting Windows 8 with an unsupported configuration.
  • The hard disk contains NTFS file system errors – The issue might also occur if your computer’s hard disk contains file system errors. In this case, the solution is simply to scan and fix the errors on the drive.
  • Check disk entry is not being cleared from the Registry – This is known to happen under certain circumstances. In this case, the solution is to clear the CHKDSK registry entries manually using Registry Editor.

If you’re currently looking or a resolution to this particular error message, this article will provide you with some troubleshooting steps. Below you have a collection of methods that other users in a similar situation have successfully used to get the issue resolved.

For the best results, follow the methods below in the order that they are presented until you discover a fix that is effective in resolving the error in your particular scenario.

Method 1: Allowing  the CHKDSK scan to complete

Before suspecting foul play, it’s important to consider the possibility that Windows does have a legitimate reason for displaying the “One of your disks needs to be checked for consistency” error at every startup.

Most likely, it’s trying to deal with a system file error that is interfering with a startup process. If you didn’t try it before, allow the CHKDSK scan to complete by not pressing any key in order to avoid disk checking.

You can also trigger a manual CHKDSK scan by following the instructions below:

  1. Press Windows key + R to open up a Run dialog box. Then, type “cmd” and press Ctrl + Shift + Enter to open up an elevated Command Prompt window. When prompted by the UAC (User Account Control), click Yes to grant administrative privileges.
    Run dialog: cmd , then press Ctrl + Shift + Enter
    Run dialog: cmd , then press Ctrl + Shift + Enter
  2. Inside the Elevated Command Prompt window, type the following command and press Enter to trigger a CHKDSK scan:
    chkdsk /r

When the procedure completes, allow your computer to complete the startup procedure (if necessary), then trigger another restart.

If you’re no longer encountering the error, you’re good to go. In the event that you’re still seeing the “One of your disks needs to be checked for consistency” error at every startup, continue down with the next method below.

Method 2: Clearing the check disk entries manually using Registry Editor

If you are able to start your computer after the CHKDSK procedure completes (but you’re still getting the “One of your disks needs to be checked for consistency” error at every startup, you might be dealing with an entry clearing error inside the Registry.

Several users encountering the same issue have reported that for them the issue was resolved after they used Registry Editor to clear any scheduled CHKDSK scans from the registry editor. It’s possible that you’re getting this error because the scheduled Check Disk scan is not being cleared from the Registry after the procedure is complete.

Here’s a quick guide on how to resolve this issue by using Registry Editor to clear the scheduled CHKDSK scans:

  1. Press Windows key + R to open up a Run dialog box. Then type “regedit” and press Enter to open up Registry Editor. At the UAC (User Account Control) prompt, click Yes to grant administrative privileges.
    Run dialog: regedit then click Yes to open as Admin
    Run dialog: regedit then click Yes to open as Admin
  2. Inside Registry Editor, navigate to the following location using the left-hand pane:
    HKEY_LOCAL_MACHINE\SYSTEM\CurrentControlSet\Control\Session Manager
    
  3. Once you get to the above-mentioned location, move over to the right pane and double-click on BootExecute.
  4. If the value data of Boot execute is set to autocheck autochk * /r\DosDevice\C: to autocheck autochk * and press Ok to save the changes.
    Making sure that the BootExecute value is set to autocheck autochk *
    Making sure that the BootExecute value is set to autocheck autochk *

    Note: If the value data is already set to autocheck autochk *, do not change anything and move directly to the next method below.

  5. Restart your machine and see if the error returns at the next startup.

If you’re still seeing the One of your disks needs to be checked for consistency error, move down to the next method below.

Method 3: Verifying the status of the bit that is supposedly dirty

One reason why you’re consistently seeing CHKDSK scans without scheduling anything is if the disk’s “dirty bit” is set. This state will be enforced if Windows was not shut down correctly, some file changes have not completed or if the disk is corrupted.

In some case, it might also be an indicator that the disk is about to fail. Or, if you’re experiencing this with an external drive, it’s probably because you removed it without using the Safely Remove Hardware function.

In any of the cases presented above, you can use the fsutil command to check the status of the dirty bit. But you’ll need to do it in an elevated command prompt with administrative rights.

Here’s what you need to do:

  1. Press Windows key + R to open up a Run dialog box. Then, type “cmd” and press Ctrl + Shift + Enter to open an elevated Command Prompt. When prompted by the UAC (User Account Control), click Yes to grant admin rights.
    Run dialog: cmd , then press Ctrl + Shift + Enter
    Run dialog: cmd , then press Ctrl + Shift + Enter
  2. Inside the elevated Command Prompt window, run the following command and press Enter to check the status of the dirty bit.
    fsutil dirty query X:

    Note: Keep in mind that X is merely a placeholder. Replace it with the letter of the drive you’re having issues with.

  3. If you get returned a message saying that the targeted volume is not dirty, you can exclude the possibility that you’re dealing with a dirty drive. In this case, move directly to the next method below.
    Example of a targeted volume that is not dirty
    Example of a targeted volume that is not dirty
  4. If the volume is identified as dirty, run the command below to deal with the issue:
    chkdsk D: /f /x
  5. Once the process is complete, repeat step 3 again to ensure that the dirty bit has been removed. If the answer is yes, restart your machine and see if the “One of your disks needs to be checked for consistency” error returns.

The post Fix: One of your Disks Needs to be Checked for Consistency appeared first on Appuals.com.

Fix: Unable to Activate Touch ID on this iPhone

$
0
0

The touch sensor that every Android device has on the iPhone models is known as Touch ID. The touch ID is used for lock and unlocks your iOS device. There are cases that users faced problems with their touch ID like there were unable to activate their touch ID and, in this article, we will show you how to fix this problem. These methods work with every model of Apple device.

Method 1: Activate Touch ID from Settings on iPhone.

This is the most direct fix to the matter that users cannot activate their touch ID.

  1. Open Settings App on your iPhone.
  2. Find and Open Touch ID and Passcode.
  3. Enter your password.
  4. Disable the iTunes app and restart your iPhone.
  5. After the restart, open settings app once more.
  6. Turn off iTunes and App Store.
  7. Here you can add a new fingerprint. You must delete the existing fingerprint. Just tap on the Delete button.
  8. Add a new Do this by placing your finger at the given area and follow the instructions in order to set it up correctly.
  9. Restart your After this, your new fingerprint will be activated.
    Add Fingerprint
    Add Fingerprint

Method 2: Reboot Your Device.

Force restart your iPhone maybe won’t get past the Apple logo but if something is stuck the simplest and yet good solution can be restarting your iPhone. Restarting your device also can be helpful in other minor problems.

How to reboot iPhone 6 and earlier models.

  1. Press and hold the Power button and in the same time Home button. Hold for about 10 seconds until you start seeing Apple logo on the screen once more, and then release the buttons.

How to reboot iPhone 7 and 7 Plus.

  1. Press and hold the Power button and Volume button in the same time. Hold for about 10 seconds until you start seeing Apple logo on the screen once more, and then release the buttons.
    Restart iPhone
    Restart iPhone

How to reboot iPhone 8, 8 Plus, X, XS, XS Max, XR.

  1. Press Volume Up button and release quickly.
  2. Immediately after releasing the Volume Up button, press and hold Volume Down button and in the same time the Power button. Hold for about 10 seconds until you start seeing Apple logo on the screen once more, and then release the buttons.

Method 3: Factory Restore Your iPhone.

  1. Open iTunes on your computer.
  2. Make sure that you have the latest version of the software. Open the Help tab and click on Check for updates, if there is newer version click Install.
  3. Connect your iPhone to your Pc or Mac. Use the USB cable for charging your iPhone.
  4. When connected if a message asks you to enter a passcode or to Trust this computer, follow the steps that are required.
  5. Select your device.
  6. In the summary panel, click Restore iPhone button.
    Restore iPhone
    Restore iPhone
  7. Click Restore again to confirm. iTunes will erase everything from your device and it will install the latest iOS software.
    Confirm Restore
    Confirm Restore
  8. After the process is finished set it up again.

The post Fix: Unable to Activate Touch ID on this iPhone appeared first on Appuals.com.

Fix: Windows Cannot Initialize the Device Driver for this Hardware (Code 37)

$
0
0

Some Windows users have been reporting a weird problem where certain devices become inaccessible. Upon inspecting them in Device Manager, the Windows cannot initialize the device driver for this hardware. (Code 37) error is displayed as the Device status. Several affected users report that the device is functioning properly (after the initial installation) until the system is restarted.

Windows cannot initialize the device driver for this hardware

What is causing the Windows cannot initialize the device driver for this hardware (Code 37) error?

  • Race condition in the User-Mode Driver Framework (UMDF) driver – This is a well-known condition with Windows 7. if you’re encountering this issue with a smart card reader and the device is showing a yellow exclamation mark next it (in Device Manager), you’re affected by a known glitch that Microsoft has already patched.
  • Device driver registry entry is corrupted – This might happen due to a recent install or due to a bad or incomplete uninstallation.
  • The device driver is corrupted or incorrectly installed – There where several cases where the culprit was confirmed to be a bad driver installation. For some users, the fix was as easy as uninstalling the faulty driver to allow Windows to install it again properly.
  • User-Mode Driver Framework or Kernel Mode Driver Framework (or both) are missing from the computer – This is typically known to occur with users that are trying to connect an Xbox One controller on Windows 7.

If you’re currently struggling to resolve this particular issue, this article will provide you with several verified troubleshooting strategies. In the next section below, you’ll find a collection of methods that other users in a similar situation have used to get the issue resolved.

To make the whole process as productive as possible, we encourage you to follow the methods below in the order that they are presented. You should eventually find a fix that is effective in resolving the issue for your particular scenario.

Method 1: Running the hardware troubleshooter

Before trying anything else, let’s see if Windows is equipped to resolve this problem automatically. Windows 8 and Windows 10 both have decent repair mechanisms that might resolve the issue if the fix is as simple as reinstalling the device driver.

By running the Windows hardware troubleshooter, you’ll subject the faulty driver to an extensive analysis. If the troubleshooter manages to identify any issues, it will automatically run a series of repair strategies in order to get the issue resolved.

Here’s a quick guide on running the Windows hardware troubleshooter to resolve the Windows cannot initialize the device driver for this hardware. (Code 37) error:

  1. Press Windows key + R to open up a Run dialog box. Then, type “ms-settings:troubleshoot” and press Enter to open the Troubleshooting tab of the Settings application.
    Accessing the Troubleshooting tab
    Accessing the Troubleshooting tab
  2. Inside the Troubleshoot tab, scroll down to Find and fix other problems, then click on Hardware and Devices and click on Run the troubleshooter.
    Click on Hardware and Devices and click on Run the troubleshooter
    Click on Hardware and Devices and click on Run the troubleshooter
  3. Wait until the initial analysis is complete. Then, if a viable repair strategy is found, click on Apply this fix and follow the on-screen prompts to complete the process.
    Click on Apply this fix
    Click on Apply this fix
  4. Restart your computer and see if the issue is resolved at the next startup.

If the Windows cannot initialize the device driver for this hardware error is still being displayed in Device Manager, move down to the next method below.

Method 2: Install all your pending Windows Update (Windows 7 only)

If you’re encountering this issue with a smart card reader driver that stops functioning at the first restart after the initial installation, you’re suffering from a well-known glitch that has been occurring on Windows 7 and Windows Server 2008 R2.

Microsoft is well aware of this issue and explains that the error occurs due to a race condition in the User-Mode Diver Framework. A few years back, Microsoft released a hot-fix to resolve this issue. But since then, the hotfix is included in the critical updates made available for Windows 7 and can no longer be downloaded from Microsoft’s servers.

The issue is typically encountered by users who are trying to connect an Xbox one controller to a Windows 7 PC. Most likely, you’re seeing the error because your system is missing two key drivers:

Note: If you’re picky about the installs that you let through, use the procedure below to only install these two updates.

If this scenario is applicable to your situation and you’re looking for a way to resolve the issue, the fix is as simple as installing every pending Windows update. Here’s a quick guide on how to do so on Windows 7:

  1. Press Windows key + R to open up a Run dialog box. Then, type “wuapp” and press Enter to open the Windows Update screen.
    Run dialog: wuapp
    Run dialog: wuapp


  2. Inside the Windows Update screen, click on the Check for updates button and wait for the scan to complete. Then, follow the on-screen prompts to install every pending update.Checking for Updates Checking for Updates
  3. Once every update has been installed, restart your computer and see if the error has been resolved at the next startup.

Method 3: Reinstalling the Device Driver

Several users encountering the same issue have managed to resolve the Windows cannot initialize the device driver for this hardware (Code 37) error by uninstalling the device driver and allowing Windows to reinstall it properly.

This fix will most likely be effective in resolving the issue if you’ve only started encountering it after an incomplete driver installation. Here’s a quick guide on uninstalling the faulty device driver and allowing Windows to uninstall it.

Note: This fix is reported to be successful on Windows 7, Windows 8 and Windows 10.

  1. Press Windows key + R to open up a Run dialog box. Then, type “devmgmt.msc” and press Enter to open up Device Manager.
    Run dialog: devmgmt.msc
    Run dialog: devmgmt.msc
  2. Inside Device Manager, double-click on the device that is showing the error message. If it has an exclamation mark you can typically find it under Other devices.
  3. In the Properties menu of the faulty device, go to the Driver tab and click on Uninstall (Uninstall Device).
    Go to Driver and click on Uninstall driver (Uninstall)
    Go to Driver and click on Uninstall driver (Uninstall)
  4. When asked to confirm the device uninstall, make sure to check the box associated with Delete the driver software for this device before clicking OK.
    Uninstalling device driver
    Uninstalling device driver
  5. Once the driver has been successfully uninstalled, disconnect (or unplug) the device physically from your computer.
  6. Wait a couple of seconds, then plug it back in. After a few moments, you should see how Windows starts rolling the installation in the bottom-right corner.
    Windows is installing the device
    Windows is installing the device
  7. Once the installation is complete, restart your computer and see if the issue is resolved.

The post Fix: Windows Cannot Initialize the Device Driver for this Hardware (Code 37) appeared first on Appuals.com.


Fix: Kodi Unable to Retrieve Directory Information

$
0
0

Entertainment is good; everyone likes and enjoys it. There are many online media services providers today, take the example of Amazon Prime, Netflix and not to forget Hulu. For some people, the drawback is that they naturally want you to pay for their services. What could be a way around it? Well, that’s where Kodi comes in handy. It is an open source, non-profiting media services provider that lets you enjoy TV shows, music, movies etc. without costing you a penny. Albeit, all of it comes at a price i.e you are watching the content without the copyright owner’s approval which can get you in trouble.

Getting back to the topic, there are a number of errors that can ruin your fun-time while using Kodi. One of them is the ‘Couldn’t Retrieve Directory Information’ error. It is not really common but it does spoil someone’s entertainment once in a while and since you are reading this, you’ve probably encountered it as well.

Kodi couldn’t retrieve directory information

What causes the issue?

Well, it is pretty simple. Since you are, mostly, using third-party add-ons on Kodi; this can occur due to —

  • Bad internet connection. Usually, when your internet connection is not working properly, you’ll end up with this issue as your device is not able to send/receive information from the source.
  • Wrong source URL. If the source URL that you’ve entered has spelling mistakes or incorrect, you won’t be able to access the content.
  • The repository has expired. As we mentioned earlier, you are likely to be using third-party addons in Kodi and due to that, it can be a possibility that the repository has expired or been done in.
  • You are not able to connect to the source. If you cannot connect to the repository, you do not get to enjoy the stuff.

Now, to get to the real part, let us jump into the possible solutions for your problem:

Solution 1: Check Your Internet Connection

First and foremost, start off with the easiest and common thing. Check whether your internet connection is working properly. Use your PC or smartphone, that bit doesn’t matter, just make sure your internet connection is fine and running. After you’ve done that, if you are using an Android TV box or any other, check if it is properly connected to your wifi. If your connection is fine, jump to the next solution.

Solution 2: Check the Source URL

It is a possibility that the error is emerging due to incorrect source URL. To check the repository, what you’ve to do is:

  1. Go to the Settings of Kodi.
  2. There, look for File Manager and tap into it.
  3. Right-click the respective repository and click/tap Edit Source.
    Select Edit source
  4. Tap/click on the URL of the repository.
    Check the source URL for errors
  5. Double check the URL for any errors.
  6. Make sure that the URL is all in lower-case letters.
  7. Once done, just click OK and save.

Once you’ve followed the steps and there’s no uncertainty in the source URL, hop on your computer and try to access the URL. If it is running properly, you should see something like this:

Repository URL

Solution 3: Use a VPN

Sometimes, it happens that something is blocking your access to the repository URL. It could be restrictions imposed by your ISP or anything. To dodge that, you’ll have to use a VPN. In today’s world, nobody really needs an introduction to VPNs, but for those who do, VPNs are Virtual Private Networks that enables you to access blocked or restricted websites by cloning your IP address.

There are tons of VPNs out there, you could use any that you feel good about and get going. When you are not to access a certain repository, it’s going to look something like this:

Unable to access the repository

Solution 4: Finding the New Address

Like we mentioned above, you are using third-party add-ons that usually change their address whenever a domain is put down. To get the new address, you’ll probably have to give it a go on Google. With a bit of luck, you probably will find the new URL but if you cannot, give our last solution a go.

Solution 5: Using an Alternative Repository

Finally, if nothing really works out for you, there is but one road for you. Search for an alternative repository. The reason why you can’t get the repository to working is it has surely been done in. In such an event, look for an alternative repository as the third-party add-ons are mostly run in various sources.

To check whether the repository has been done in or not, just visit the source URL, if it has been shut down, you’ll see something like this:

Repository shut down


Note: Please note that we do not support illicit content and since Kodi lets you use third-party add-ons, most of them are probably illegal. Use Kodi and its add-ons legally.

The post Fix: Kodi Unable to Retrieve Directory Information appeared first on Appuals.com.

What is smooth scrolling and how to enable/disable it?

$
0
0

You might have heard the term smooth scrolling on the internet and wondered what exactly is this? If you aren’t sure, smooth scrolling, as its name indicates, is a feature that allows you to scroll smoothly. The usual/normal scrolling is a bit choppier and might stop suddenly.

That’s why major applications like Google Chrome have introduced a new feature named smooth scrolling. When smooth scrolling is turned on, you’ll notice that the scrolling is a lot smoother and it won’t stop suddenly when you stop scrolling but rather scroll a bit past your scrolling point that will make the scroll a lot smoother.

The best way to describe the smooth scroll is to compare the regular mouse scroll with the scroll when the scroll wheel is pressed. If you press the mouse scroll wheel, you can move your mouse up/down and the scroll will be very smooth. Enabling smooth scroll allows you to scroll like that with your regular wheel scroll. Smooth scrolling is also useful with keyboard shortcuts.

When this feature is enabled, pressing the Page Down button won’t just jump directly down one page. With smooth scrolling, it slides down smoothly, so you can see how much it scrolls.

This might not be a huge deal for you but it is a big deal for users who read a lot of long pages. The choppy scroll might be annoying for a lot of users and that’s why people are moving towards the smooth scroll option.

smooth scrolling vs usual scrolling
What is smooth scrolling and how to enable/disable it?

How to enable smooth scroll?

The most common use of scroll (in general) is on the internet while reading the contents of a webpage. That’s why the browsers are at the forefront when it comes to smooth scrolling. There are various different ways of enabling smooth scrolling depending on the browser you are using.

Enable Smooth Scroll in Google Chrome

Note: Smooth Scrolling is an experimental feature in Google Chrome. This means that it isn’t stable and might cause unwanted effects to your system or Google Chrome. So, turn this feature on at your own risk.

Here are the steps for enabling smooth scrolling in Google Chrome.

  1. Open Google Chrome
  2. Type chrome://flags/#smooth-scrolling and press Enter
2.Type chrome://flags/#smooth-scrolling in google chrome
smooth scrolling flag google chrome
  1. You should be able to see the smooth scrolling flag on the top of the page
  2. Select Enabled from the drop down menu
Select enabled in Google Chrome
smooth scroll enabled
  1. Click Relaunch Now

This should enable the smooth scrolling on Google Chrome. If you don’t like this feature or you simply want to disable it then just follow the steps given above and select Disabled from the drop-down menu in step 4.

Enable Smooth Scrolling in Firefox

Here are the steps for enabling smooth scrolling in Firefox.

  1. Open Firefox browser
  2. Type about:preferences in the address bar and press Enter
  3. Scroll down to the browsing section
  4. Check the box Use smooth scrolling
check Use scroll smoothing
How to enable smooth scroll in firefox

That’s it. This should enable the smooth scrolling for Firefox.

Note: If you feel like that the smooth scrolling on Firefox isn’t smooth then you might have to tweak a few settings to make it a lot smoother. Follow the instructions carefully and do not change any other value.

  1. Open Firefox
  2. Type about:config in the address bar and press Enter
about:config smooth scroll firefox
fix smooth scroll smoothness in Firefox
  1. Now you should be able to see a list of various flags and settings. Type smoothScroll.currentVelocityWeighting in the search bar
change general.smoothScroll.currentVelocityWeighting value
  1. You should be able to see only one entry from the list. Double click it and change the value to 0.
  2. Click Ok
change general.smoothScroll.currentVelocityWeighting value to 0
  1. Type smoothScroll.mouseWheel.durationMaxMS in the search bar
Select general.smoothScroll.mouseWheel.durationMaxMS flag value
select general.smoothScroll.mouseWheel.durationMaxMS flag
  1. Double click the entry and change the value to 250
  2. Click Ok
Change general.smoothScroll.mouseWheel.durationMaxMS value to 250
  1. Type smoothScroll.stopDecelerationWeighting in the search bar
Select general.smoothScroll.stopDecelerationWeighting flag
  1. Double click the entry and change the value to 82
  2. Click Ok
Change general.smoothScroll.stopDecelerationWeighting value to 0.82
  1. Type min_line_scroll_amount in the search bar
Type mousewheel.min_line_scroll_amount and select it
Select mousewheel.min_line_scroll_amount flag


  1. Double click the entry and change the value to 25
  2. Click Ok
Change mousewheel.min_line_scroll_amount value to 25

That’s it. Check if this makes the scroll smoother or not. You can try changing the values a little bit to see if it makes the scroll better but do it only if you are sure about what you are doing.

Enable Smooth Scrolling in Edge

Follow the steps given below to enable smooth scrolling in Edge

  1. Hold Windows key and press R
  2. Type systempropertiesadvanced and press Enter
Type systempropertiesadvanced in run
Advanced System Properties
  1. Click Settings from the Performance section
Select Settings
Advanced Performance Settings
  1. Check the box smooth-scroll list boxes
Check smooth scrolling list boxes option
Turn on smooth scrolling list boxes
  1. Click Apply then select Ok
  2. Click Ok again

This should enable smooth scrolling for the Edge browser.

The post What is smooth scrolling and how to enable/disable it? appeared first on Appuals.com.

Fix: Windows Update Error 0x80092004

$
0
0

The updates released by Microsoft for Windows are an essential component. All the people out there using Windows operating system are always grateful for new updates and releases. Packed with security fixes, a lot more stability, bug fixes and new drivers for your hardware, most of the users tend to install the new updates without giving it a second thought or without seeing the contents of the update. However, for some of them, updating their system becomes quite the task as they face issues that are completely unknown to them.

When the Windows updates don’t go the way they’re supposed to, they usually revert and uninstall the update, having the potential of messing up your system files and show an error code. The ‘Error 0x80092004’ is no exception to this.

Error 0x80092004

What causes the Update to Fail with Error 0x80092004?

Whenever you encounter this error, your system or hardware is not to blame but rather the update pushed by Microsoft itself. Therefore, the causes are —

  • Turmoil update from Microsoft. You might confront this error whenever you try to install an update that has been just released (which usually contains bugs and errors) without waiting for a reply from the community.
  • Corrupted system files. If you are trying to update your device while your system files are corrupted, the error might show up and you won’t be able to proceed.

Now that we know about the error and its cause, what could one possible do to solve it? Well, we’ve picked the most effective solutions off the internet to help you get rid of this issue.

Solution 1: Downloading Servicing Stack Update

A Servicing Stack Update is used to update the Component Based Servicing that is responsible for installing updates on the operating system.

To start off, you should download the latest Servicing Stack Update (SSU) for your Windows version and install it. Beware that before you run SSU, make sure to turn off automatic updates. To do that:

  1. Hit the Winkey and open Settings.
  2. Select Windows Update.
  3. Click on ‘Advanced Options’.
    Click on Advanced Options
  4. Select ‘Never’ to hit OK.
    Choose Never from the drop-down list.
  5. Restart your device.

Once your device has restarted, install SSU and then try to update your windows by turning on the automatic updates. Follow the same procedure as above but select ‘Automatic’ while changing the update settings to turn on automatic updates.

Solution 2: Fix Corrupted System Files

If installing SSU doesn’t work out for you, don’t worry you can still resolve the problem. Before you update your device, let us make sure there are no corrupted system files in your PC that are stopping your device from updating. For this:

  1. Open Start Menu and enter cmd.
  2. Right click on cmd and select ‘Run as an Administrator’.
    Select Run as an administrator
  3. When cmd loads, type in the following command and hit enter:
DISM.exe /Online /Cleanup-image /Restorehealth
Paste the command hit enter.

This is gonna take a while so make sure to wait for it.

  1. Once that has finished, type in:
sfc /scannow
Scans for corrupted files.

After it has completed, exit cmd and try to update your device.

Solution 3: Removing the Faulty Update

It could a possibility that your update hadn’t installed properly and now you are stuck with this issue. In such an event, you have to remove the update and try again. Here’s how to remove the packages:

    1. Open Start Menu and run cmd as an administrator.
    2. Enter the following commands one by one:
dism.exe /online /remove-package /packagename:Package_for_RollupFix_Wrapper~31bf3856ad364e35~amd64~~16299.248.1.17

dism.exe /online /remove-package /packagename:Package_for_RollupFix_Wrapper~31bf3856ad364e35~amd64~~16299.192.1.9

dism.exe /online /remove-package /packagename:Package_for_RollupFix~31bf3856ad364e35~amd64~~16299.192.1.9
DISM Removes Packages

Your device is going to need a reboot after this.

3. When your device reboots, open cmd as an administrator again and enter the following command:

Dism.exe /online /Cleanup-Image /StartComponentCleanup
Paste the command and press enter.

Upon completion, try to update your PC again.

Solution 4: Installing the Update Manually

If your problem still persists, your only resort is installing the update manually. For this, you’ll have to download the update you’ve been trying to install all this way from Microsoft’s website. To download the update, do the following:

  1. Go to Microsoft Update Catalog.
  2. Search in your update, for the sake of this article, we are going to use KB4291495.
    Microsoft Update Catalog Homepage
  3. Look out for the Product (Windows version) it has been allotted to.
    Watch out for your Windows version

When your download completes, here’s how to install the update:

  1. Open cmd as an Administrator.
  2. Type in the following and hit enter:
wusa C:\PATH-TO-UPDATE\NAME-OF-UPDATE.msu /quiet /norestart
Installing the update

Note:

/quiet and /norestart tells your device not to restart once the update has been installed. Do make sure to restart your device manually afterwards.

The post Fix: Windows Update Error 0x80092004 appeared first on Appuals.com.

How to Backup iPhone to External Hard Drive

$
0
0

Usually, when you sync your iPhone, iPad or another iOS device with your computer via iTunes you have backup folders stored on your internal drive. But if you are using iPhone for years and making backups all the time you can run out of space to store your backups on your internal drive or in case you want to have to save backup and store it on another place and not on your computer. The best solution is to make backups to external hard drive even though Apple does not recommend it. In this article, we will show you how to make backup your iPhone files to external hard.

Step #1: Find your iPhone backups.

This is the easy part of our solution. Your iPhone backups are stored in a Mobile Sync folder on your computer. In order to find them just open Spotlight and type ~/Library/Application Support/MobileSync/Backup. Or there is another way to find them with iTunes.

  1. Open iTunes.
  2. Click on the iTunes tab in the upper menu.
  3. Choose Preferences.
  4. Choose Device tab.
  5. Select your iPhone. In the Devices tab can have more devices not just your iPhone.
  6. Press and hold the Control key and click on your iPhone.
  7. Choose the Show in Finder option.
    Show in Finder
    Show in Finder

Step #2: Move your backups to an external hard drive.

In this step, you should be careful with the name of your hard drive and the names of the folders that you are going to create. This info is going to be used when you create a Terminal pathway.

  1. Connect your external hard drive to your computer.
  2. Open the external hard drive.
  3. Go to the place where you have stored your backups and select the device backup folder. Most likely is to be called “Backup”.
  4. Copy and paste (or drag and drop) into your external hard drive.
    Copy Backup to External Drive
    Copy Backup to External Drive
  5. Enter your admin password in order to authenticate your action.
  6. Rename the Backup folder (the copy that is on your external hard drive) to iOS_backup.
  7. Rename the Backup that is on your computer to old_backup. Do not delete this backup.

Step #3: Create Symlink to tell iTunes the new location of the backups.

This step is the tricky one. You should be very careful because this is the most important step in our method. If you don’t execute this method you cannot back up your iPhone anymore. You will have to manually transfer the folders back to your computer.

First, we should explain what is a symbolic link or symlink. When you are creating this symbolic link, you are creating a new path for iTunes in order to take and get to the folder where your backups are saved. Or in simple words, you establish a connection between iTunes and the new place where your backups will be saved and retrieved.

  1. Find and open Terminal on your computer.
    Terminal Comand
    Terminal Comand
  2. Copy and paste the following: -s /Volumes/External/iOS_backup ~/Library/Application/Support/MobileSync/Backup/4f1234a05e6e7ccbaddfd12345678f1234b123f. Change the hard drive name and the backup folder name in order to be same as your hard drive and backup folder.
  3. Click Return.
  4. Exit the Terminal.

In your MobileSync folder, you will see a new folder that is called Backup. You can immediately tell that is a symlink because it has an arrow in the bottom left corner. Before continuing you need to check and confirm that everything is working before deleting your old_backup file.

Symlink Folder
Symlink Folder
  1. Open iTunes.
  2. Connect your iPhone to the computer and back it up.
    Backup to This Computer
    Backup to This Computer
  3. Open the iOS_backup folder that is on your external hard drive.
  4. Check the date and time in order to see if that folder contains the latest backup. If this process finished completely and you can confirm that everything worked fine and the backups are working on your external hard drive, you can delete your old_backup folder on your computer.

Step #4: Disable automatic backups when connected to iTunes.

Probably you will not always have your external drive connected to your Mac and this is the main reason why you need to disable the automatic backups from your iPhone. Otherwise, every time you connect your iPhone to the computer you will get the same error message.

  1. Open iTunes.
  2. Open the Preferences tab from the upper menu.
  3. Open the Device tab.
  4. Check the checkbox that says Prevent iPods, iPhones, and iPads from syncing automatically.
    Prevent Auto Sync
    Prevent Auto Sync

And also, you need to remember to automatically backup your iPhone every time or when you think is necessary and also have your external hard drive connected to your computer. Also, we highly recommend to switch over to synchronization in iCloud and deleting the backups on your computer, because it is the better practice in saving your files and relocating them is just piling space no matter where you are saving them.

The post How to Backup iPhone to External Hard Drive appeared first on Appuals.com.

Fix: Origin won’t open or respond after launch

$
0
0

Origin is an online gaming platform that allows users to play online multiplayer games such as FIFA 19 and Battlefield V, it also has a digital distribution platform known as the Origin Store, so you could just use your credit card to purchase games for PC and mobile devices from this store. Social networking features such as profile management, chat with friends and game joining is also available. EA also added an in-game overlay, cloud saving and, live gameplay streaming into the origin client.

Origin
Origin

What happens when origin doesn’t open or doesn’t respond after launch?

A lot of users are reporting that when they run the Origin client to play their favorite game, the client either doesn’t respond or doesn’t launches at all. Sometimes the program runs in the background and can be seen in the task manager, while other times, it just minimizes into the system tray.

What causes Origin to act like this?

Before we go into details on how these issues could be fixed, we need to determine the possible causes. These can range from a fault in the origin cache to a buggy update. Here are the most frequent scenarios.

  • Issues with origin updater: Origin updater sometimes update the origin client. The client sometime stops responding while it is being updated on the background.
  • Corrupted cache files: There are chances that the error where the origin client doesn’t respond is directly related to the stored cache files. Somehow the cache can get effected and this will cause the issue to occur.
  • Distorted temporary files: With the passage of time origin client creates temporary files that help it function smoothly, but these files could get corrupted and cause the client to not respond. Deleting these files might make origin run properly again.
  • Problems with the core origin files: Some problems could occur with the core working files of the client itself and the only way to fix them is by reinstalling the whole client.

Method 1: Letting the Origin client update

You will need to check whether the origin updater is updating the origin client on the back-end, if it is, then trying to run origin while it is updating causes the client to not respond. You can do that by following these steps

  1. Open the task manager by right clicking on the task-bar and then selecting the task manager.
  2. Now once the task manager is opened you need to look for the Origin application.
  3. Once you have found it you must check the if it is taking all of your internet bandwidth in the network column. If it is taking bandwidth then the client is updating and will need some time to finish the update, once it has finished, you will be able to run the client again. If the client is not taking any bandwidth, then move down to the next method.

Method 2: Deleting the origin cache files

In order to load faster, Origin creates cache files and stores the most frequently used data in them. It checks on each startup if whether it need those files and if so, it loads them from the cache instead of downloading them again. If the files are not stored, then they are created. Over time these files could pile up and get corrupted. Deleting these files might fix the issue. Here’s how you could do that.

  1. First close the origin client if it is running, using the Task manager window.
  2. On the keyboard, press the Windows + R key and then type “%ProgramData%” into the dialog box and press Enter.
  3. In the ProgramData folder open the Origin folder.
  4. In the Origin folder delete all the files and folders except the LocalContent folder.
  5. Now try to run the Origin client again to see if the error is gone.

Method 3: Deleting the Origin’s temporary files

Origin keeps creating temporary files in the AppData folder, these files could sometime cause the origin to not respond. Deleting these files would cause the origin client to create fresh files which might solve the issue. These files are hidden by default, so we will have to unhide them first.

  1. In the search box on your task-bar type “folder”, now select Show hidden files and folders from the results.
  2. Under Advanced settings, select Show hidden files, folders and drives, then select OK.
  3. Now press Windows + R keys and write “%AppData%” and press Enter.
  4. Once the AppData folder opens up, delete the Origin folders located in both the Local and the Roaming folder.
  5. Now restart Origin to see if the issue is resolved or not.

Method 4: Reinstalling the Origin client

If all the above methods have failed, then the last option is to first uninstall the old Origin client and then install it again using the latest setup. This will only delete your Origin client and not your games, but you will have to re-add them.

  1. On your keyboard, press Windows + R keys, write “control panel” and then press Enter to open.
  2. Click on “Uninstall a program” under the Programs section.
  3. Find the Origin client in the list and right click on it and then click Uninstall.
  4. Now download the latest version of Origin from here. Once downloaded run the setup by double-clicking on it and then clicking “install origin”.
  5. Now run it to see if the issue is resolved.

The post Fix: Origin won’t open or respond after launch appeared first on Appuals.com.

Viewing all 4542 articles
Browse latest View live