Quantcast
Channel: How To's | Everything Tech - Appuals.com
Viewing all 4542 articles
Browse latest View live

BEST FIX: Microsoft Edge Hijacked “Contact for Virus Removal”

$
0
0

Hackers always comes up with news ways of making money. When you do call the number or follow the instructions the end result is “money” to the scammers. Even though; you do have the anti virus software installed but it won’t protect you against malwares and adwares. You can get a stand alone utility called “adware” to clean up once (as suggested in the method below) or you can get Premium Malwarebytes AntiMalware to protect you from such threats in real time. It can run with your existing Anti Virus Software.

This doesn’t mean that you don’t need antivirus; you need it because it protects you from viruses. To quickly remove “Contact for Virus Removal” proceed with the steps below.

Removing “Contact for Virus Removal” from Microsoft Edge Browser

Close Microsoft Edge and hold the Windows Key then Press R. In the run dialog that opens up; type the following command.

%appdata%

appdata

By default; it takes you to the roaming folder. We need to get to the AppData folder from where we need to browse to the following path.

Local\Packages\Microsoft.MicrosoftEdge_xxxxxx\AC\MicrosoftEdge\User\Default\Recovery\Active

appdata-local

Then browse to

Local\Packages\Microsoft.MicrosoftEdge_xxxxxx\AC\MicrosoftEdge\User\Default\Recovery\Active

And delete everything from within this directory. Re-open Edge and the “Virus Removal Hijack” screen will be gone. We’ve removed the “Virus Removal Hijacker” but it is recommended that you run AdwCleaner to further scan & clean up any Adware left overs; extensions or traces to avoid it from coming back.

Run AdwCleaner to remove DNS Unlocker’s (Registry Values, Traces and Browser Infections)

Now assuming that the program you’ve identified is uninstalled go to this site and download AdwCleaner. Once it has been downloaded; run and open it. You will see it’s control panel (as seen in the image below)

remove babylon toolbar - 1

Now click the Scan button; wait for a few minutes, until the “Clean” button becomes clickable; when it does become clickable, click on it and wait for it to clean up the files it has found. Then, proceed with AdwCleaner instructions on screen to do the reboot. After the reboot finishes; you’re good to go.

The post BEST FIX: Microsoft Edge Hijacked “Contact for Virus Removal” appeared first on Appuals.com.


BEST FIX: Upgrade To Windows 10 Fails With Error C1900101-4000D

$
0
0

Error C1900101-4000D comes up when trying to install Windows 10. This i must say; is a dreaded error and several fixes available online do not work for the majority of people having this issue. There are quiet a few work arounds such as “Doing a clean install of Windows 10” but that will invalidate the free activation / upgrade offered. In short, you get the free windows 10 when you upgrade, and if you do a reinstall after the upgrade, Windows 10 will continue to stay free. Sort of a hassle when it’s free, then it should be free either way but this is not the case.

Before you begin; please disable your Firewall/Antivirus Software if it is not the default Microsoft’s Firewall/Defender since they are also known to interrupt the upgrade process by blocking the processes needed to initiate the upgrade.

Delete Registry for Mounted Images

Hold Windows Key and Press R. In the run dialog that opens up type regedit and click OK. In the registry editor; navigate to the following path and delete the strings data. Exit Registry Editor and re-try upgrade to Windows 10.

HKEY_LOCAL_MACHINE\SOFTWARE\Microsoft\WIMMount\Mounted Images

C1900101-4000D

Disable Your Wi-Fi Adapter & CD/DVD Drive

Hold the Windows Key and Press R. Type hdwwiz.cpl and Click OK. expand Network Adapters and right-click your wifi adapter; then choose Disable, do the same for CD/DVD Drive from the Device Manager. If it works and Windows 10 installs; then uninstall the wi-fi driver and re-install the latest one from the manufacturer’s website and just enable the DVD/CD.

C1900101-4000D-2

Uninstall Cyberlink Programs from Control Panel

Hold the Windows Key and Press R. Type appwiz.cpl and Click OK. Locate Cyberlink Products and uninstall them one by one. After they have all been uninstalled; reboot PC and test upgrade.

In addition to the steps listed below; there are a few similar steps here which may help for upgrade from Windows 8/8.1 by disabling the driver signatures.

The post BEST FIX: Upgrade To Windows 10 Fails With Error C1900101-4000D appeared first on Appuals.com.

BEST GUIDE: Replace 5 GHz WiFi Antenna for iPhone 6 Plus

$
0
0

This guide can be used to remove (and replace) the 5 GHz WiFi antenna of an iPhone 6 Plus. The instructions are easy to follow and anyone can do it. You don’t have to be an expert in this. I highly recommend people doing it by themselves since it creates an extra SKILL in you and will allow you to help others as well. The parts listed here can easily be purchased from Amazon. If you don’t have the required parts; then bookmark this page and get back to it once you’re ready to go.

The total cost of parts should be less then $60 including the replacement Antenna; Parts Needed are, a pair of tweezers, pry opening tools, A P2 Pentalobe screwdriver designed for the Pentalobe screws on an iPhone, A small suction cup, A Phillips #00 screwdriver

And, if you intend on replacing the 5 GHz WiFi antenna in the iPhone 6 plus with a new one, a replacement 5 GHz WiFi antenna for $6.89 (Click Here to View on Amazon)

You can buy the parts separately or you can get this kit from Amazon which comes with all the parts for $26 (CLICK TO VIEW/BUY)

To begin, Power the device off. Use the P2 Pentalobe screwdriver to remove the two 3.6 mm Pentalobe screws located on either side of the Lightning connector.

iphone6plus-1

Press the small suction cup onto the screen, secure it and form a tight seal, preferably a little above the Home button.

iphone6plus-2

Hold the iPhone down with one hand, and use the suction cup with the other hand to slightly separate the device’s rear case from the front assembly. Once you achieve a little separation between the two halves, hold onto the rear case with a plastic opening tool and then continue to pry the display assembly and rear case apart by detaching the several clips that hold the two halves together. Remember to use a combination of both the plastic opening tool and the suction cup to separate the two halves of the device and to apply firm and constant force.

iphone6plus-3

Remove the suction cup from the display assembly by pulling on the cup’s nub to release the vacuum seal.

iphone 6 plus wifi antenna replacement-4

iphone 6 plus wifi antenna replacement-5

Pull the Home button end of the display assembly away from the iPhone’s rear case using the numerous clips along the top edge of the device as a hinge.

iphone 6 plus wifi antenna replacement-6 iphone 6 plus wifi antenna replacement-7

Support the display assembly at a 90° angle in relation to the rear case, and make sure the two halves of the device stay this way until you completely separate the front assembly from the rear case.

While holding the device’s front at a 90° angle, remove the three 1.2 mm Phillips #00 screws, one 1.5 mm Phillips #00 screw and one 2.9 mm Phillips #00 screw that secure the display panel assembly cable bracket.

iphone 6 plus wifi antenna replacement-8

Remove the display panel assembly cable bracket from the iPhone’s logic board.

In the next four steps (and the step where you disconnect the battery connector from the logic board), make sure that you pry up on the cable connectors only and not on their sockets on the iPhone’s logic board.

iphone 6 plus wifi antenna replacement-9

While continuing to support the display assembly at a 90° angle with one hand, use a plastic opening tool to gently pry up and disconnect the front-facing camera and earpiece speaker cable connector from its socket on the logic board.


iphone 6 plus wifi antenna replacement-11

Pry up and disconnect the Home button cable connector from the logic board.

iphone 6 plus wifi antenna replacement-12

Carefully pry up and disconnect the display data cable connector form the logic board. Lastly, pry up and disconnect the digitizer cable connector from the logic board.

iphone 6 plus wifi antenna replacement-17

You can now safely remove the display assembly of the iPhone from the rear case.

iphone 6 plus wifi antenna replacement-18

Remove one 2.3 mm Phillips #00 screw and one 3.1 mm Phillips #00 screw from the battery connector bracket located in the rear case a bit below the device’s SIM jack.

iphone 6 plus wifi antenna replacement-8

Carefully remove the metal battery connector bracket from the rear case.

iphone 6 plus wifi antenna replacement-20

Gently pry up and disconnect the battery connector underneath the bracket from its socket on the logic board using a plastic opening tool.

iphone 6 plus wifi antenna replacement-21

Remove the 5 mm Phillips #00 screw and the 2.8 mm Phillips #00 screw that secure the 5 GHz WiFi antenna bracket to its location on the rear case directly above the battery.

iphone 6 plus wifi antenna replacement-22

Use a pair of tweezers to lift the 5 GHz WiFi antenna bracket up and off the rear case.

iphone 6 plus wifi antenna replacement-23

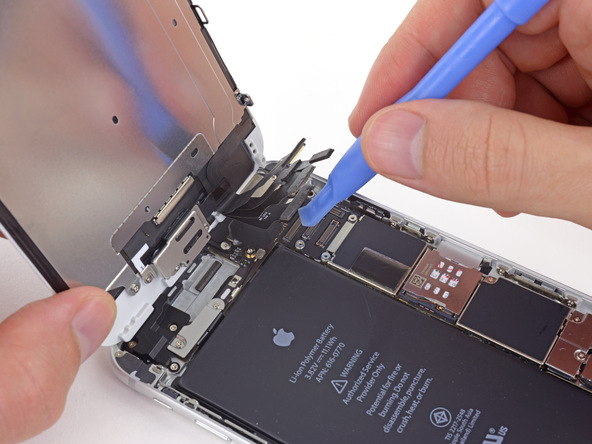
Use a plastic opening tool to gently pry the 5 GHz WiFi antenna connector up off the logic board.

iphone 6 plus wifi antenna replacement-24

Use a pair of tweezers to carefully lift the 5 GHz WiFi antenna connector out of its retaining clip on the logic board.

iphone 6 plus wifi antenna replacement-25

iphone 6 plus wifi antenna replacement-26

Use a plastic opening tool to disconnect the Power button cable and audio control cable connectors from their respective sockets on the logic board. If the two connectors are bound to one another by a single adhesive tab, they will detach from their sockets as a pair.

iphone 6 plus wifi antenna replacement-27

Remove the 8 mm Phillips #00 screw and the two 1.6 mm Phillips #00 screws that secure the 5 GHz WiFi antenna to the rear case of the iPhone.

iphone 6 plus wifi antenna replacement-29

Lift the 5 GHz WiFi antenna up and then remove it from the iPhone using a pair of tweezers.

iphone 6 plus wifi antenna replacement-30

Replace the 5 GHz WiFi antenna, make sure that you place the small washer in the top left corner of the antenna, and then reassemble the iPhone by following the steps listed above in reverse.

iphone 6 plus wifi antenna replacement-31

The post BEST GUIDE: Replace 5 GHz WiFi Antenna for iPhone 6 Plus appeared first on Appuals.com.

BEST FIX: Steps to fix Parsing Error 0xC00CE556

$
0
0

Among the many errors and issues that plague the Windows Operating System is parsing error 0xC00CE556. Parsing error 0xC00CE556 may present itself when you try to install a program or open a program or even when you simply boot your computer up and open the Desktop. Parsing error 0xC00CE556 is not only intrusive but can also inhibit you from carrying out various functions on your computer, which is why it needs to be dealt with. The following are the two solutions that you can use to get rid of parsing error 0xC00CE556: Parsing error 0xC00CE556, to elaborate, is an error message that states something along the lines of:

Error parsing C:\\Windows\Microsoft.Net\Framework\v2.0.50727\Config\machine.config Parser returned error 0xC00CE556

Solution 1: Replace the corrupt machine.config file with the default one

In almost all cases, Windows starts spewing out parsing error 0xC00CE556 when it tries to parse the machine.config file in the directory “C:\\Windows\Microsoft.Net\Framework\v2.0.50727\Config\” but fails because machine.config is corrupt. Since that is the case, simply replacing the corrupt machine.config file with a fresh, default one should get rid of the problem.

Hold the Windows Key and Press R. In the run dialog; type

C:\Windows\Microsoft.Net\Framework\v2.0.50727\Config\

OR

%windir%\Microsoft.NET\Framework\v2.0.50727\CONFIG\

0xC00CE556-1

Look for a file named machine.config.default. Move/Copy machine.config.default to a new location – the Desktop, for example.

machineconfigjpg

Back in the C:\\Windows\Microsoft.Net\Framework\v2.0.50727\Config\ directory, delete the corrupt machine.config file.

Go back to the machine.config.default file, and rename it to machine.config. If asked by your computer whether or not you really want to mess with the file extension, confirm the action.

Move the new machine.config file to C:\\Windows\Microsoft.Net\Framework\v2.0.50727\Config\.

Close File Explorer and restart your computer.

Once your computer boots up, you should no longer receive parsing error 0xC00CE556.

Solution 2: Perform a clean reinstall of your Operating System

In the event that you are experiencing from parsing error 0xC00CE556 and Solution 1 does not work, which is highly unlikely, the only option you have left is to perform a clean reinstall of your Operating System.

Regardless of what problem the Microsoft .NET Framework on your computer is plagued with, reinstalling Windows will definitely solve it and get your computer working as it should be.

The post BEST FIX: Steps to fix Parsing Error 0xC00CE556 appeared first on Appuals.com.

BEST GUIDE: Removing a Sim Card from iPhone 6 Plus

$
0
0

The iPhone 6 Plus is definitely not your average Smartphone – and this fact is true in a wide variety of different ways. For starters, the iPhone 6 Plus has some of the most innovative and Smartphone technology known to man (such as fingerprint scanning), is significantly larger than most Smartphones and is also in a completely different level as compared to other Smartphones on the software side of things. Another fact that sets the iPhone 6 Plus apart from most Smartphones is the fact that in the iPhone 6 Plus, the SIM card goes into a dedicated SIM card jack located on the right side of the device instead of under the device’s back cover.

The iPhone 6 Plus’s SIM card jack contains a SIM card tray, and in order to place a SIM card into or take a SIM card out of an iPhone 6 Plus, this tray needs to be freed from the jack. To do so, you will need the SIM card ejection tool that came with the iPhone. The following are the steps you need to follow in order to remove a SIM card from an iPhone 6 Plus:

Insert the SIM card ejection tool that came with the iPhone into the small hole located inside the SIM card jack.

iphone 6 plus sim card - 1

Press the ejection tool into the hole with a significant amount of force to eject the SIM card tray out of the jack.

iphone 6 plus sim card - 2

Remove the SIM card tray assembly from the iPhone.

iphone 6 plus sim card - 2

Take the SIM card out of the SIM card tray. Once you have done what you needed to do, simply place the SIM card you want to insert into the iPhone onto the tray, making sure that the orientation of the SIM card in relation to the tray is correct, and then place the tray into the jack, securing it into its place.

The post BEST GUIDE: Removing a Sim Card from iPhone 6 Plus appeared first on Appuals.com.

BEST FIX: Steps to Fix Essentials Error 0x80070426 in Windows 10

$
0
0

As of Windows 10, Microsoft Security Essentials is no more and the onboard defender for Windows users is a program called “Windows Defender”. When you upgrade from a previous version of Windows to Windows 10, Windows Defender takes over and replaces Microsoft Security Essentials. However, in approximately 10% of all Windows 10 upgrades, something goes wrong and Windows Defender fails to replace Microsoft Security Essentials, resulting in the OS that is installed having both Microsoft Security Essentials and Windows Defender.

In such cases, Windows Defender fails to start, which basically means that it does not offer any protection whatsoever to the computer, and even though Microsoft Security Essentials is always up and running, its Spyware & Unwanted Software Protection and Virus Protection are both turned off. When the user tries to turn the disabled protection options on, a Microsoft Security Client dialog pops up displaying the following error message:

An error has occurred in program initialization. If this problem continues, contact your System Administrator. Error Code: 0x80070426.”

While error code 0x80070426 usually refers to a non-genuine copy of Windows, in this case, the error refers to MSE not working correctly. When error 0x80070426 appears, it leaves your computer completely vulnerable as Windows Defender doesn’t even start up and MSE doesn’t work properly.

The solution to this problem is to simply uninstall Microsoft Security Essentials, allowing Windows Defender to do its job and protect your computer.

The following are all of the steps you need to follow in order to fix error 0x80070426.

Hold the Windows Key and Press R. Type taskmgr in the run dialog. Locate the Windows Defender Service (WinDefend), right click on it and choose Stop, click Apply/OK.

0x80070426-1

This should stop the Service, but it will start automatically after the computer reboots. While it is stopped; you can uninstall Essentials. Normally in such cases, you cannot uninstall Microsoft Security Essentials because Windows Defender is programmed to block the installation AND un-installation of Microsoft Security Essentials.

However, you should be able to uninstall Microsoft Security Essentials as though it were any other program now since the Windows Defender has been temporarily disabled.

To uninstall it; go to Control Panel -> Programs & Features -> Uninstall a Program or Hold the Windows Key and Press R; type appwiz.cpl and Click OK, locate  Microsoft Essentials and Uninstall it. Then, Restart your computer.

After the reboot and removal of Essentials; Go to Settings -> Update & Security, Choose “Windows Defender” and make sure Real-time protection is on.

Now go back to Task Manager -> Services tab and make sure that the Defender service is running.

The post BEST FIX: Steps to Fix Essentials Error 0x80070426 in Windows 10 appeared first on Appuals.com.

BEST GUIDE: Steps to Disable Password After Sleep/Wake

$
0
0

Numerous users of Windows (7/8/8.1 and 10) have complained of their respective systems not accepting their passwords upon waking up from Sleep mode or Hibernation mode, this is usually caused by wifi connectivity issues. The aim of this guide is to resolve their issues with logging in by disabling the password requirement after sleep/wake. In such cases, the system manages to recognize the user’s password and grant them access once it has been rebooted, but you can definitely see how not being able to login to your windows after putting it to sleep or on hibernation mode can be a massive problem. Apparently, this issue is caused by a glitch in Windows. Although this problem is not extremely widespread, it is quite significant nonetheless.

In this guide we will see how to disable the password after sleep/wake/hibernation to get rid of the password issue altogether and to disable it for those who don’t want to have to type in password every time the system wakes up from sleep.

Disable Password After Wake-Up from Power Options

Click the Start button located on the lower left corner, type Power Options in the search bar and then choose Power Options from the results displayed. (The image is created on Windows 10, but the steps are same for Windows 8/8.1 and 7 as well)

windows 10 password issues

Then tap/click on Change Plan Settings; for your chosen Power Plan.

change plan settings

Then, Tap/Click on Change advanced power settings at the bottom.

In the Power Options dialog that opens, tap on Change settings that are currently unavailable to activate administrative privileges. Set the setting for Require a password on wakeup to No.

require a password on wakeup

Tap on Apply. Tap on OK. This should now disable the Password Requirement after the system has woken up from sleep or hibernation. However, if you change your Power Plan; then you will need to re-do this setting, since they are profile based and each Power Plan is different. On my system, it is Balanced, if i change it to High Performance; i will need to re-do the same steps to disable it.

The post BEST GUIDE: Steps to Disable Password After Sleep/Wake appeared first on Appuals.com.

BEST FIX: Music Stops Playing When Screen Turns Off On Surface

$
0
0

One flaw that every single generation of the Microsoft Surface tablet has had and continues to have, a flaw that Surface users have constantly complained about, is the fact that the tablet pauses the playback of any media (music or video) when the screen turns off after being idle or when the user presses the Power button and turns its screen off, which puts it into sleep mode, pausing the media and other activities. Meaning, the activities will resume when it’s out of sleep.

Microsoft has not addressed this pressing issue ever since the first Microsoft Surface tablet was put on store shelves, but this problem can, fortunately, be fixed on the user’s end. If you want to make sure that your Surface does not stop playing music (or video) when its screen turns off, the following are the two most effective methods that you can use to do so:

Method 1: Turn Sleep off

Since music playback stops when the Surface goes to sleep, turning sleep off entirely and making it so that the tablet does not go to sleep in any case will definitely solve the problem for you. To turn sleep off:

Press the Windows Logo key + X to bring up the Contextual menu. In the Power User menu, tap on Power Options.

poptions1

Tap on the Change plan settings option located to the right of the power plan your surface is using.

change plan settings

Open both the drop down menus in front of the Put the computer to sleep feature (for on battery and Plugged in, respectively, and set both of them to Never.

The steps listed above will make it so your Surface never goes to sleep, and the following steps will make it so the screen of your Surface turns off but the device does not sleep after a certain amount of time so as not to compromise your device’s battery life:

Repeat steps 1-3 from above.

Tap on Change advanced power settings. Expand the Display section in the Power Options

2015-11-06_085121

Set the screen turn off time to the preferred amount (the recommended amount of time is 1 minute).

So the next time you want to make sure that the Surface does not stop playing your music when its screen turns off, simply wait for the amount of time you have set for its screen to turn off instead of hitting the tablet’s Power button. Thanks to the steps listed above, doing so will cause the Surface’s screen to turn off but the tablet will not go into Sleep mode.

Method 2: Lock your tablet instead of putting it to sleep

Locking your Microsoft Surface is an excellent alternative to putting it to sleep. While music and video playback are programmed to stop when a Surface goes to sleep, they are not programmed to go to sleep when the tablet is locked. To lock your Microsoft Surface, you need to:

Open the Start Menu.

Tap on your account picture in the top left corner of the Start Menu.

Select Lock.

The post BEST FIX: Music Stops Playing When Screen Turns Off On Surface appeared first on Appuals.com.


BEST GUIDE: Steps To Uninstall Groove Music in Windows 10

$
0
0

Groove Music is the onboard audio player that accompanies all builds of the latest version of the Windows Operating System – Windows 10. Groove Music, in a nutshell, is a redesigned, revamped and slightly improved iteration of Xbox Music with an entirely new name. Groove Music has a substantial amount of positives, but according to countless Windows 10 users, Groove Music’s positives are pale in comparison to the many negatives, errors and random crashes that the application brings to the table.

Groove Music is highly unpopular among Windows 10 users, especially those Windows 10 users who aren’t new to the world of music playback and like their music players to have a little more zing and a few more features and functionalities. Some Windows 10 users want to get rid of Groove Music because it doesn’t have as many features as they want it to have, some want to get rid of it because it has all the wrong features, and some want to get rid of it because it messes around with other music players. Groove Music has a tendency to mess around with third-party music players that have been set as default music players instead of Groove Music and inhibit them from doing their jobs right, which is the reason why many Windows 10 users want to know how they can uninstall it.

Unlike most other Windows applications, Groove Music cannot be uninstalled by simply opening the Start Menu in “All Apps” mode, locating and right-clicking on Groove Music and clicking on Uninstall. Since Groove Music is a built-in Windows 10 application, you will have to jump through a few (pretty easy) hoops to get rid of it. To uninstall Groove Music, you need to:

Open the Start Menu.

Type powershell into the Search bar.

powershell as administrator1

Right-click on the program named Windows PowerShell that appears and choose Run as Administrator.

Type the following code into the Windows PowerShell dialog:

Get-AppxPackage *zunemusic* | Remove-AppxPackage

uninstall groove1

Press the Enter. Wait for Groove Music to be uninstalled. Once the command has been fully executed, all traces of Groove Music will have been eliminated from your computer and the application will no longer interfere with any other music players.

The post BEST GUIDE: Steps To Uninstall Groove Music in Windows 10 appeared first on Appuals.com.

BEST FIX: END_OF_NT_EVALUATION_PERIOD Error on the Lumia 1320

$
0
0

The Lumia 1320 is, by all means, an amazing Smartphone. With a huge 6” screen that is dressed to impress and above average technical specifications, the Lumia 1320 is a crowd-pleasing Windows Phone. Earlier this year, the Lumia 1320 was updated from Lumia Cyan to Lumia Denim. Microsoft is quite infamous for even the most minor of its system updates being far from stable and, in some cases, not even being successfully installed on some devices. This was also the case with the Lumia Denim update as the update failed to install on countless Lumia 1320s across the globe.

Many Lumia 1320 users faced a problem that was as dreadful as it could possibly be – they would be offered an update to Lumia Denim by their device, the update would get stuck anywhere in between (at 0%, in most cases), the error message END_OF_NT_EVALUATION_PERIOD would be displayed and the device would no longer boot. The Lumia Denim update was turning a significant number of Lumia 1320s around the world into nothing more than highly expensive paperweights.

The only way for affected users to get their Lumia 1320 to even boot up was for them to use the Lumia Software Recovery Tool to restore their device to Lumia Cyan. From here, another attempt to update an affected Lumia 1320 to Lumia Denim would once again result in the END_OF_NT_EVALUATION_PERIOD error, putting the device into an endless loop of going back to Lumia Cyan, receiving a Lumia Denim update and displaying the END_OF_NT_EVALUATION_PERIOD error during the update.

Fortunately for you, if you are suffering from the END_OF_NT_EVALUATION_PERIOD system update error, there is a way for you to get your Lumia 1320 out of the seemingly endless loop and successfully upgrade it to Lumia Denim. To fix the END_OF_NT_EVALUATION_PERIOD system update error, all you have to do is:

Switch off the Lumia 1320.

Remove the SIM card and MicroSD card from the device.

If you haven’t already restored the device to Lumia Cyan than do so using the Lumia Software Recovery Tool.

Switch on the Lumia 1320.

If you restored the phone to Lumia Cyan in Step 3, then set your Lumia 1320 up but remember to only connect it to a WiFi network and not add your Microsoft account.

Download and install the update Over the Air.

The update will be downloaded and installed successfully, and once it has, you can switch your Lumia 1320 off and reinsert the SIM card and MicroSD card.

The post BEST FIX: END_OF_NT_EVALUATION_PERIOD Error on the Lumia 1320 appeared first on Appuals.com.

BEST FIX: Steps to Fix Groove Music from Crashing in Windows 10

$
0
0

Groove Music, at best, is a wobbly music player. While it is true that Groove Music has a lot of decent features and positives, the built-in Windows 10 music playback program has a ways to go before it can even compete with the best applications in the music playback scene. One of the most common Groove Music-related problems is the application crashing immediately after the user signs in. Many users have complained of the Groove Music app crashing immediately after they sign in. In such cases, the application works as it should and does not crash if the user disconnects their computer from the internet or does not sign in at all. However, as soon as the user signs in to Groove Music, the program crashes.

All Windows 10 users are familiar with the Groove Music application, which is why they know how irritating the program crashing whenever they attempt to sign into it can be. However, if you are suffering from this problem and want to know how you can prevent Groove Music from crashing after you sign in, rejoice as there are quite a few different methods that you can try in order to achieve this goal. The following are some of the most effective methods that you can use to make sure the Groove Music application does not crash after you sign in:

Method 1: Check to make sure the time and date on your computer is right

One of the most common reasons why built-in Windows applications sometimes crash is because the time and date on the computer is not set right. If that is the case, making sure that the right time and date is set on your computer will prevent Groove Music from crashing after the sign-in stage.

Click on the Clock in the lower right corner of your screen in the taskbar.

Click on Date and time settings.

Make sure that Set time automatically is turned off.

Click on Change directly under Change date and time.

Set the right date and time and click on Change.

Also make sure that your computer is set on the right Time Zone.

Exit and check to see if the problem persists.

Method 2: Repair any and all damaged system files

In some cases, Groove Music can crash because of corrupted or damaged system files. If that is the case, running an SFC scan will identify and repair any damaged files, getting rid of the issue.

See how to run SFC SCAN in Windows 10

Method 3: Demolish and then rebuild your computer’s default libraries

The most surefire method that can be used to fix a Groove Music app that keeps crashing after the sign-in stage is to demolish and then rebuild your computer’s default libraries.

Open Windows Explorer.

Locate and click on Libraries in the left pane. If you fail to locate Libraries, click on the View menu at the very top of your screen, open the dropdown menu in the Navigation panel and enable the Show libraries

In Libraries, press Ctrl + A to select all of the libraries on your computer, right-click on any one of them and click on Delete. This will delete (or demolish) all of the libraries stored on your computer. It should be noted that doing so will only delete libraries and not any data whatsoever that is stored on your computer.

To restore all of your computer’s default libraries, right-click on Libraries in the left pane of Windows Explorer and click on Restore default libraries.

Once the libraries you deleted earlier are restored, try signing into Groove Music and it should no longer crash upon signing in.

Method 4: Uninstall and then reinstall Groove Music

Starting with a clean slate by uninstalling and then reinstalling Groove Music is also a pretty safe bet if what you want to do if Groove Music crashes after you sign in and you want to fix the issue.

Open the Start Menu.

Type powershell into the Search bar.

Right-click on the program named Windows PowerShell that appears.

Click on Run as Administrator.

Type the following code into the Windows PowerShell dialog:

Get-AppxPackage *zunemusic* | Remove-AppxPackage

Press the Enter

Wait for Groove Music to be uninstalled.

Open another Windows PowerShell dialog with administrative privileges and type in the following code and press the Enter key to reinstall Groove Music:

Get-AppxPackage -AllUsers| Foreach {Add-AppxPackage -DisableDevelopmentMode -Register “$($_.InstallLocation)\AppXManifest.xml”}

Wait for the command to be fully executed, and once the command has been fully processed, Groove Music will have been reinstalled and placed back in the Start Menu, even if Windows PowerShell ended up displaying some kind of error.

The post BEST FIX: Steps to Fix Groove Music from Crashing in Windows 10 appeared first on Appuals.com.

BEST FIX: Steps to Fix DRIVER_POWER_STATE_FAILURE (9f)

$
0
0

DRIVER_POWER_STATE_FAILURE is a BSOD (Blue Screen of Death) Error which points to a corrupt or an incompatible driver. Unfortunately, without debugging or diagnosing you will not be able to find out which driver  or what exactly is causing it. In my opinion it is useless to try generic steps to fix this, therefore i will show you how to debug it, diagnose it and fix it. The good thing is that all BSOD crashes are stored in a dump file for analysis which pretty much explains every thing about the error. My intention with this guide is to educate users and have them fix issues by themselves; so i will try to make it as easy as possible.

First you need to get to your dump files, and they are located at

%systemroot%\minidump

2015-11-07_135322

You can hold the Windows Key and Press R to open run dialog and type it in the dialog followed by OK to get to the folder that has the dump files in it. There may be more then one file; you need to look at the dates (created) and start debugging from the latest; usually debugging latest and fixing the issues pointed from the latest dump fixes the issue.

Now once you have identified the dump you’d like to analyse; Click Here and Upload the DUMP. After it has been uploaded, the file with the debugging info will be available to you for reading/analyzing. However, the best debugging is via the WinDbg which you can get from here

Now we’ll take a look at a few example dumps to see what caused the BSOD (DRIVER_POWER_STATE_FAILURE (9f))

Example 1

[ 16, 2] 0 e1 8607f028 00000000 82f3ad5d-857accc0 Success Error Cancel pending
Unable to load image \SystemRoot\system32\DRIVERS\Rtnicxp.sys, Win32 error 0n2 *** WARNING: Unable to verify timestamp for Rtnicxp.sys
What i looked for here is the .sys file, which is a system file for the driver. As the dump indicates that there’s an issue with this file; i would do a quick Google Search to see what this file is which reveals that it is Realtek 10/100/1000 NDIS 5.1 Driver. So i would now re-install the latest driver for My Realtek card.
*** ERROR: Module load completed but symbols could not be loaded for Rtnicxp.sys \Driver\RTL8023xp nt!PopSystemIrpCompletion
Args: 00012200 00000000 00000002 0000000

Example 2

!DevObj !DrvObj !DevExt ObjectName
fffffa8007c1e980 \Driver\partmgr fffffa8007c1ead0 InfoMask field not found for _OBJECT_HEADER at fffffa8007c1e950

fffffa8007d28060 \Driver\disk fffffa8007d281b0 InfoMask field not found for _OBJECT_HEADER at fffffa8007d28030

> fffffa8006ef39b0 *** WARNING: Unable to verify timestamp for ACPI.sys
*** ERROR: Module load completed but symbols could not be loaded for ACPI.sys
\Driver\ACPI fffffa8006b54910 InfoMask field not found for _OBJECT_HEADER at fffffa8006ef3980

fffffa8006ef5060 \Driver\atapi fffffa8006ef51b0 Cannot read info offset from nt!ObpInfoMaskToOffset

!DevNode fffffa8006ef6010 :
DeviceInst is “IDE\DiskKINGSTON_SVP200S37A90G__________________502ABBF0\5&62469c3&0&0.0.0″ ServiceName is “disk

The second example shows that the Kingston SSD V+200 is running as IDE so we should change it to AHCI from the BIOS/UEFI to troubleshoot it. It may also be possible that the SSD has been corrupted.

If you cannot figure out your dump file; feel free to upload the dump on www.wikisend.com and post a question on http://equestions.net/ask and i will do it for you.

The post BEST FIX: Steps to Fix DRIVER_POWER_STATE_FAILURE (9f) appeared first on Appuals.com.

BEST FIX: Lumia 625 Reboots Automatically

$
0
0

The Lumia 625 is quite the crowd-pleaser for a mid-range Windows Phone, but that does not mean that the device is without flaw. One of the most common problems that Lumia 625 users face and have complained about is the device randomly and automatically rebooting regardless of what they were doing on it in the moments before the reboot. Not being able to rely on your phone when you need it can turn out to be quite a problem, making this issue an extremely emergent one. Microsoft is aware of this issue and is working on bringing stability updates to the Lumia 625, but they might not make it in time, so the following are some of the most effective methods that you can use to fix a Lumia 625 that keeps rebooting automatically on your own:

Method 1: Get a new SIM card

An old, worn out SIM card or a Micro SIM card that has been cut from a regular Mini SIM card can also cause a Lumia 625 to spontaneously reboot. If you are using an old SIM card or a Micro SIM card that has been cut from a Mini SIM card, you should definitely replace it with a new Micro SIM card as doing so could quite possibly fix the device.

Method 2: Uninstall the App Folder application

Ever since the first Windows Phone was released, users have been longing for a feature that is available on every other mobile platform out there – creating application folders. The Lumia Black update finally brought this feature to Windows Phone and also brought the App Folder application to the Windows Store for devices that have not been updated to Lumia Black. The App Folder application is all a Windows Phone user needs to be able to create application folders on the Start screen, but it would seem that the app is more trouble than it is worth as it causes some Lumia 625s to randomly and automatically restart. If that is the case with your Lumia 625, all you need to do is:

At the Start screen, swipe left to access the Apps

In the Apps menu, look for the App Folder

Long press on the App Folder

Tap on Uninstall.

Once the App Folder app has been uninstalled, your Lumia 625 should no longer restart randomly.

Method 3: Perform a Soft Reset

Performing a Soft Reset on a Lumia device is one of the best ways that can be used to get rid of anomalies, issues and errors. If nothing else works, performing a Soft Reset on your Lumia 625 is a pretty safe bet if you want to make it so that it stops spontaneously and automatically rebooting. To perform a Soft Reset on your Lumia 625, simply press and hold down the Power and Volume Down buttons until the device reboots. Once the device boots up, it should no longer reboot automatically.

The post BEST FIX: Lumia 625 Reboots Automatically appeared first on Appuals.com.

BEST FIX: Steps to fix Error 80860010 on a Lumia

$
0
0

Error 80860010 is just one of the errors that Lumia 630 users are vulnerable to being faced with. Error 80860010 is a Store-related error that hampers the user’s ability to download or update applications from the Store. Whenever the user queues an application to be downloaded, the download fails and the Lumia 630 greets them with error 80860010. Not being able to download any new applications or update the applications that you already have on your Lumia 630 can prove to be a highly troublesome ordeal. Fortunately, there is a lot you can do about error 80860010 on your own end. The following are the most effective methods that you can use to fix error 80860010 on a Lumia 630:

Method 1: Make sure that your phone has the right date and time

More often than not, having the wrong time and date on your Lumia 630 can mess things up and give birth to error 80860010. To fix error 80860010 on a Lumia 630 by setting the right date and time:

Go to Settings.

Tap on time + date.

Make sure that the Set automatically option is turned off.

Set the right time and date.

Also make sure that the Lumia 630 has the right language and region set.

Restart the device, and you should be able to successfully download apps from the Store once the device boots up.

Method 2: Try re-logging in to your Microsoft account

The Lumia 630 may sometimes boot the user out of their Microsoft account, and this can lead to them not being able to download any apps from the Store and being greeted with error 80860010. If that is the case, simply re-logging in to your Microsoft account and then restarting your phone will fix the issue and you will then be able to seamlessly and successfully download applications from the Store.

Method 3: Perform a Soft Reset

Performing a Soft Reset on a Lumia device is an excellent way of getting rid of any and all errors and issues. There are only a few Lumia-related problems that a Soft Reset can’t fix, which is why performing a Soft Reset is another method that you can use to fix error 80860010 on a Lumia 630. To perform a Soft Reset on a Lumia 630, simply press and hold the Power and Volume Down buttons until the device reboots. Once the device boots up, it should be free of error 80860010.

Method 4: Perform a Hard Reset

If all of the methods above (including the Soft Reset) don’t work, your only remaining option is to perform a Hard Reset on your Lumia 630 and then set your Microsoft account up all over again. Performing a Hard Reset may be a bit extreme, but this solution’s chances of fixing error 80860010 are impressively high. A Hard Reset will wipe all data off your Lumia 630, so be sure to back any and all valuable data up before you proceed.

Go to Settings.

Tap on About.

Tap on Reset your phone.

Follow the onscreen instructions and confirm the action whenever you are prompted to do so.

Wait for the Lumia 630 to be reset and rebooted, and once it boots up, set it up from scratch. The Lumia 630 should now also be free of error 80860010.

The post BEST FIX: Steps to fix Error 80860010 on a Lumia appeared first on Appuals.com.

BEST FIX: Lumia 640 Keeps Rebooting Randomly

$
0
0

Random reboots are a problem with almost every single Windows Phone out there, and that includes the Lumia 640. Microsoft has not only acknowledged that random reboots, as a problem, exist but has also created patches and rolled out updates designed to fix the issue. Even though that is the case, some Lumia 640 users are still facing random reboot issues. If you are one of the Lumia 640 issues who are sick of their Windows Phone rebooting at random times, the following are some of the most effective things that you can do on your end to try and fix your Lumia 640:

Method 1: Install the latest updates on the device

Simply installing the latest updates on your Lumia 640 can improve its stability and also introduce patches designed to get rid of the random reboot bug to the device. To check for updates on your Lumia 640:

Go to Settings.

Tap on Phone Update.

Tap on Check for Updates and allow the device to check for the latest updates and inform you of any that exist.

Alternatively:

Download and install the Lumia Software Recovery Tool.

Open the Recovery Tool.

Connect your Lumia 640 to the computer.

Wait for the Recovery Tool to recognize your Lumia 640.

If there are any new updates available for your Lumia 640, the Recovery Tool will inform you of them and ask you for permission to download them.

Method 2: Use the Stop Restart App

For Windows Phones that did receive updates that fixed the random reboot bug or could not be updated, Microsoft created the Stop Restart App and published it on the Store. The Stop Restart App, once installed, examines a Windows Phone, determines whether or not it is affected by the random reboot bug and whether or not it needs to be fixed and then tries to fix it. Installing and using the Stop Restart App is another method that you can use to fix a Lumia 640 that keeps rebooting randomly.

Method 3: Perform a Soft Reset

Performing a Soft Reset is another excellent candidate for the method that is capable of fixing a Lumia 640 that keeps rebooting randomly. To perform a Soft Reset, simply press and hold your Lumia 640’s Power and Volume Down buttons until the device reboots. Once the device boots up, it should no longer reboot at random times.

Method 4: Perform a Hard Reset

If nothing else works, your last resort is none other than a good ole’ Hard Reset. Performing a Hard Reset has pretty decent chances of fixing your Lumia 640, but it will also wipe all of the data stored on it, so make sure that you back up all of the data that you want to keep before you proceed.

Go to Settings.

Tap on About.

Tap on Reset your phone.

Follow the onscreen instructions and confirm the action whenever you are prompted to do so.

Once the Lumia 640 resets and reboots, set it up all over again and it should no longer reboot randomly.

The post BEST FIX: Lumia 640 Keeps Rebooting Randomly appeared first on Appuals.com.


BEST FIX: Steps to Fix Green Screen on YouTube

$
0
0

This issue is usually caused by GPU Rendering which is to do with the noise presence in the image leading to the image quality. GPU Rendering is more powerful then Software Rending but some times a mismatch and incompatibility with the GPU and Hardware results in Green Screen. One other cause of this could also be the outdated Graphics Driver or an outdated flash player. Therefore, to fix it we will first attempt to switch GPU Rendering to Software based rendering and if that doesn’t help then proceed with updating Graphic Drivers and Flash Player. Please know that Google Chrome comes with built-in flash player so installing/updating won’t affect.

2015-11-07_215758

Change Hardware/GPU Rendering to Software

  • Internet Explorer 
  • Firefox 
  • Google Chrome

Hold the Windows Key and Press R. In the Run Dialog, type inetcpl.cpl and Click OK. 

inetcpl-1

This will open Internet Options,  from here click on the Advanced Tab, and browse to the Accelerated graphics section, and make sure that “Use Software Rendering instead of GPU Rending” is checked. Then Click Apply/OK and Exit.

2015-11-07_220638

Open Firefox and type about:preferences#advanced in the address bar and uncheck the box that says “Use Hardware Acceleration when Available

2015-11-07_221208

Open Google Chrome. Type chrome://settings/ in the address bar. Scroll down to the section that says Show Advanced Settings and Click on it. Scroll down further to a sub section called  System and uncheck Use hardware acceleration when available

2015-11-07_221828

Update Your Display/Graphics Adapter Driver

Hold the Windows Key and Press R. Type hdwwiz.cpl and Click OK. This should open Device Manager from here, expand Display Adapters and note down the name of your graphics/display card. Now go to the manufacturer’s site (the graphics manufacturer or the system manufacturer) and locate/download the latest driver and install it. Upon installing it successfully, it should automatically replace the old driver with the new one. Once this is done, test and see if the issue has been resolved.

Update Flash Player

This should apply where applicable. You can download and install the latest version of Flash Player from http://get.adobe.com/flashplayer . Once it has been installed, test and see if that fixes the issue.

The post BEST FIX: Steps to Fix Green Screen on YouTube appeared first on Appuals.com.

Cortana Is Bringing its Full Might To Android

$
0
0

Earlier this year, Microsoft announced its plans to bring Cortana to the Android Operating System. Cortana is the resident digital assistant of the Windows and Windows Mobile Operating Systems, which, suffice it to say, is where the charming digital PA truly shines with all her abilities. Microsoft wanted to make Cortana the best digital assistant for not only computer but tablets and phones as well, and recognizing the fact that there is a vast array of Smartphones – and Smartphone Operating Systems – out there, Microsoft started work on an Android version of Cortana.

In July of this year, Microsoft provided a select group of members of the Windows Insider Program with an early version of Cortana for Android, and a couple of months later, the Cortana public Beta began and the very first iteration of Cortana for Android was published on the Google Play Store. If you have used Cortana on both Windows Phone and Android, you already know that Cortana is not nearly as powerful and as effective a digital assistant on Android as it is on Windows Phone, and Microsoft wants heartily to bridge that gap.

Some key features and functionalities of Cortana – the “Hey Cortana” hot phrase that wakes her up on Windows Phone, for example – are missing from the digital assistant’s Android counterpart. In an effort to make Cortana for Android the perfect companion to your Windows experience, Microsoft is constantly updating the Android app and bringing together the mighty Cortana we all know and love one piece at a time. Microsoft has now created a completely new version of Cortana for Android – a version that is as powerful as the digital assistant should be – and is offering it up to anyone willing to become a tester. The new testing version of Cortana for Android, although impressively powerful, is still unpublished as it need a few improvements and has a few bugs.

Microsoft aims to finally introduce the greatest iteration of Cortana for Android to date to the general populous, but before the folks at Microsoft can do so, they need to collaborate with a horde of willing testers to perfect the app. To gain access to the testing version of Cortana, all a person has to do is become a tester, download the Cortana app from the Google Play Store and they will receive an update for the app’s testing version which they can then download and install. Once the testing phase of this new build of the Cortana for Android app is over and it has been perfected, Microsoft will allow Cortana to bring its full might and entire arsenal to the Android OS.

The post Cortana Is Bringing its Full Might To Android appeared first on Appuals.com.

Storage Settings and SD Card Info Problems in Build 10581

$
0
0

A few days ago, Microsoft started rolling out build 10581 of the Windows 10 Mobile Insider Preview. All builds of the Windows 10 Mobile Insider Preview are infamous for being extremely buggy and remarkably unstable, at least upon initial launch, and build 10581 was no different. Build 10581 brought with it a ton of problems and issues, and Microsoft has copped to the majority of them and even published fixes and workarounds for some of them. Among the build 10581 issues that don’t have a fix or a workaround, at least not yet, are a bunch of default storage settings and SD card information problems.

Let’s talk about the default storage settings problems first. Build 10581 of the Windows 10 Mobile Insider Preview takes away your ability to set default save locations on your Windows Phone by simply navigating to Settings > System > Storage and allocating default save locations for aspects such as applications. In fact, Settings > System > Storage will not even display the correct current default storage settings to you.

However, on the bright side, whatever default save locations you had configured on the previous build that you were using will migrate to build 10581 and will be used as the default save locations. This means that if you had your SD card set as the default save location for applications on your previous build, it will stay the same on build 10581.

If you reset your Windows Phone while on build 10581, though, your default save locations will be reverted to the system default, which is on phone. The majority of this problem only impacts your ability to change the default save locations on your Windows Phone, which is why any and all applications and data stored on both your phone storage and SD card from the previous build will not only be accessible but will also be functional on build 10581.

The other half of these problems affects the SD card info that can be accessed through the Operating System of a Windows Phone – the name of your SD card, for example. If you are using an SD card in your phone, its name will be displayed in a distorted and mangled fashion in Settings > System > Storage in build 10581. Although this bug clearly contributes to the instability of build 10581 and the fact that it still needs work, it is not actually something that renders a Windows Phone unusable and is certainly not as big as the default storage settings problem.

As of right now, even though Microsoft has admitted to the existence of these problems on build 10581 in a blog post, there are no available fixes for them. This means that all Windows 10 Mobile Insider Preview Build 10581 users can do right now is wait for patches and updates designed to fix these issues.

The post Storage Settings and SD Card Info Problems in Build 10581 appeared first on Appuals.com.

BEST FIX: Fix a Corrupted Start Screen on a Windows Phone

$
0
0

Microsoft rolled out the latest build of the Windows 10 Mobile Insider Preview – build 10581 – to Windows Insiders on the 29th of October, 2015. While build 10581 does not bring a lot of significant changes or new features to the Windows 10 Mobile Insider Preview, it does bring with it a horde of decent bug fixes and performance improvements. However, it seems that tagging along with these bug fixes and performance improvements are an entirely new realm of bug, issues and problems, one of the most common of which is a jumbled, distorted or corrupted Start screen that looks like the picture below.

As awesome and artsy as this Start screen experience may seem to be, it hinders crucial functionality and is far from an actual Windows 10 feature. While a corrupted Start screen experience is not a problem found on all Windows Phones that upgrade to build 10581, it is an issue found on the majority of them. Fortunately, there are a couple of methods that you can use to successfully fix a corrupted Start screen experience on any Windows Phone after upgrading to build 10581 of the Windows 10 Mobile Insider Preview:

Method 1: Change your background picture or set it to none

Fixing a corrupted Start screen experience in Windows 10 Mobile Insider Preview Build 10581 is pretty simple – all you need to do is either change your background picture to a different one or disable the background picture entirely. To change your background picture or set it to none:

Go to Settings.

Tap on Personalization.

Tap on Start.

Browse to and select a different background picture. To increase the chances of this fix working, make sure that you actually choose a different background picture and don’t just select My Pictures or Sample Images.

If changing the background picture does not work for your Windows Phone, simply set your Start screen background to No background picture.

Method 2: Switch your preferred background style to Tile Picture

For those who do not want to change their background picture or have no background picture entirely, there is, fortunately, another method that can be used to fix a corrupted Start screen experience in build 10581. If you do not want to change or lose your background picture and still fix your Start screen experience, all you need to do is:

Go to Settings.

Tap on Personalization.

Tap on Start.

Set Tile Picture as your preferred style under Choose Style instead of Full Screen Picture.

The post BEST FIX: Fix a Corrupted Start Screen on a Windows Phone appeared first on Appuals.com.

192.168.1.1 – Router Login

$
0
0

192.168.1.1 is a Class C – Private IP Address  assigned to most routers by default from the manufacturer for administration purposes. When you type the address in your browser’s address bar; and if you’ve got this as your default gateway then you should be able to login to the administration console; if not then most browsers automatically re-direct you to search engine, this may be the case if your settings have changed from the factory settings. Apart from 192.168.1.1 you can also have a different private ip address as your default gateway so if you were looking to access the router’s administration via 192.168.1.1 and were not able to get into it then you can use the command below to find out your default gateway first and then type the address in the address bar to access it.

Hold the Windows Key and Press R. In the run dialog, type cmd and Click OK.

2015-11-08_105608

Then, in the black command prompt type

ipconfig | findstr /i “Gateway”

2015-11-08_105901

Followed by explorer “http://YOURDEFAULTGATEWAYIPADDRESS”. When you do that, the command prompt will open the Default Gateway Address via Internet Explorer.

The next part would be to login to your Router; and for this you would need a username and a password. For most routers; if not changed the default login works which should be written in the manual or on the back of the router but if you don’t have then there are two approaches to this.

(i) Google your router’s model # in this way “Router Model # default password”, usually the ones that come up on the top are correct.

2015-11-08_111117

(ii) If they don’t work, most likely the password has changed so you should need to reset. To do this; do another Google search “How to reset Router Model #”, this is usually done by holding the reset button using an unfolded pin for a 5 to 8 seconds but i highly recommend reading the manufacturer’s stated procedure to avoid corruption with the firmware.

The post 192.168.1.1 – Router Login appeared first on Appuals.com.

Viewing all 4542 articles
Browse latest View live