Quantcast
Channel: How To's | Everything Tech - Appuals.com
Viewing all 4542 articles
Browse latest View live

BEST GUIDE: Snipping Tool in Windows 10

$
0
0

Snipping Tool is a free small utility developed by Microsoft that is used to capture screen shots in a free form snip, rectangular snip, window snip and can also be used to capture full screen snip. You can take almost any type of screen shot with it, my favorite is the rectangular snip which allows me snip custom area that i need for my work, and it’s the one tool that i use heavily on this site to add images to my guides. These snips can be annotated using your mouse, and can be saved in many formats that includes (PNG, GIF and JPEGs). Once the snip is taken it is automatically copied to the clipboard.

In this guide; i will walk you through the steps to create a snipping tool shortcut on the Windows 10 desktop.

Snipping Tool in Windows 10

There are many ways to run Snipping Tool in Windows 10 but the easiest of all is to create a short cut on the desktop so you can access it anytime you want.

Hold the Windows Key and Press R. In the run dialog, type the following file location.

C:\windows\system32\

2015-11-09_202606

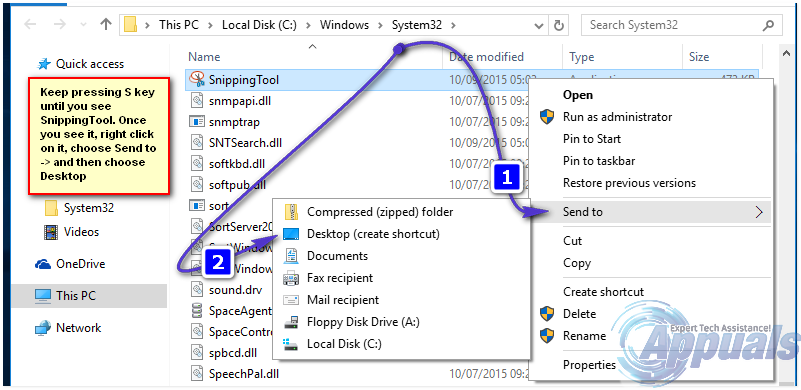
Then Click or Press OK. Once done, it will take you to the Window Explorer listing all the files in c:\windows\system32\ – From here, Click on any file once to highlight it and then repeatedly press the S key until you see the file called SnippingTool.exe

Snipping Tool

You should now have the snipping tool visible on your Desktop. You can use it by double clicking on it.

The post BEST GUIDE: Snipping Tool in Windows 10 appeared first on Appuals.com.


BEST FIX: Network Adapter Not Detected in Windows 10

$
0
0

Windows 10 is the latest and greatest version of the Windows Operating System, but it is far, far from perfection. Among the many issues that Windows 10 users from all over the globe have faced is their networks adapters and their drivers not working in Windows 10. Some of the Windows 10 users affected by this issue simply don’t see their network adapters being listed in Device Manager, some of these users’ computers fail to recognize their network adapters and, in some cases, the network adapters don’t work even though they are recognized and are listed in Device Manager.

While this problem is most commonly known to affect Realtek network adapters, no network adapters are invulnerable to it. No matter what the case may be, a network adapter is not something you can live without because not having a functional network adapter means that you cannot connect to the internet either via WiFi or via an Ethernet connection. Well, fortunately for you, the following are the three most effective methods that you can use to try and fix network adapter and/or network adapter driver failure in Windows 10:

Method 1: Uninstall any and all third-party security programs

Many of the Windows users who were affected by this problem upon upgrading to Windows 10 found that the third-party security programs they had on their computer were the culprit behind their network adapters and their drivers not working. If that is the case with you, simply uninstalling any and all third-party security programs installed on your computer will get your network adapter and all of its drivers to start functioning again. It should be noted that you will have to uninstall all third-party security programs – from antivirus and anti-malware programs to firewall programs – in order for this solution to work.

Once you figure out that it works, you can reinstall the anti virus software from another known vendor such as AVG.

Method 2: Refresh your Windows 10 Computer

Among the many computer reset and recovery settings and features that come with Windows 10 is the refresh feature. Performing a refresh allows you to keep all of your valuable files and data and all of the built-in apps that came with Windows 10 but deletes any and all third-party apps that you downloaded onto your computer since upgrading it to Windows 10 and also resets all of your settings and preferences to their factory defaults. Refreshing your computer might quite possibly be the solution to your computer’s network adapter not working in Windows 10. To refresh a Windows 10 computer, you need to:

Open the Start Menu. Click on Settings.

network adapter windows 10

Click on Update & Security.

Click on Recovery.

Click on the Get started button located under the Reset this PC

Click on Keep my files and allow your computer to be refreshed, and once it has, your network adapter and all of its drivers should start functioning the way they are meant to be.

Method 3: Remove and Reinstall Your Network Adapter

First of all take a note of the name of your network adapter if it is listed in the Device Manager. To see if it is listed, Hold the Windows Key and Press R. Type hdwwiz.cpl and click OK. Get to the Network Adapters tab and note down the name.

2015-11-10_121604

If it is not here, then check your system specifications using it’s serial # on the manufacturer’s website to see what it came with. see here (some examples) to identify it. Once you have the serial number; then check the manufacturer’s site. Easiest way to do this is to do a search query “model number driver download”. Once you’ve found the driver, you will need to somehow get it on the computer which is having the issue; you can either download it to a USB on another computer or write it to a disc so it can be copied to the computer in question. Once done, you would just need to double click the setup file to launch and install it but before you do that, uninstall the previous one installed.

You can right click on it and choose “Uninstall“. You may also be prompted to remove the driver package, it would be good to remove it so you can do a clean/fresh install of the new driver. DO THIS ONLY IF YOU WERE SUCCESSFUL IN LOCATING YOUR DRIVER.

2015-11-10_122433

You can also locate the driver on the same computer, if you can get connected to internet via Ethernet.

The post BEST FIX: Network Adapter Not Detected in Windows 10 appeared first on Appuals.com.

BEST FIX: Glance Screen Not Working

$
0
0

One of the most dreadful known issues that Windows 10 Mobile Insider Preview brings to the table is the Glance Screen not working issue. Numerous Windows 10 Insiders have experience their Glance Screens not working following an upgrade, and even Microsoft has admitted that this is a known issue. Users affected by this problem can see the link to Glance Screen settings in Settings > Extras, but tapping on this link does nothing. This means that Glance Screen not only doesn’t work for users affected by this problem but they can also not access or tinker around with Glance Screen settings.

In addition, an update for Glance Screen is available in the Store for users affected by this issue, but any attempts to install this update result in error 0x803F8006. Fortunately for users experiencing the Glance Screen not working issue, the following are the two most effective methods that they can use to try and fix this problem while Microsoft works on an official and permanent solution:

glance screen

Solution 1: Uninstall and then Reinstall the Windows Insider App

Uninstalling and then reinstalling the Windows Insider application is one of the most effective ways you can deal with the Glance Screen not working issue.

Uninstall the Windows Insider app.

Reinstall the Windows Insider app.

Reconfigure build for the Fast Ring in the app.

Check for updates.

An update titled Fast Ring Configuration Update will install. Once this update has been installed, Glance Screen should start working.

Solution 2: Upgrade to build 10581 or later

Microsoft copped to the Glance Screen problem existing in build 10572, which is why the tech giant promised users an extremely quick fix for the issue. With build 10581 of the Windows 10 Mobile Insider Preview, Microsoft delivered on its promise and got rid of the Glance Screen not working issue. All Windows Phone devices that were updated to build 10572 are bound to receive updates to build 10581, and upgrading to build 10581 will fix the Glance Screen issue. If, however, upgrading to build 10581 does not fix the Glance Screen problem, what you need to do is roll back to Windows 8.1 and then upgrade to build 10581. To roll back to Windows 8.1:

Download the Windows Phone Recovery Tool and install it on a computer.

Connect your device to the computer via USB.

If WPRT fails to detect and recognize the Windows Phone and does not start downloading and installing the right drivers automatically, click on Phone Not Detected and follow the onscreen instructions that follow.

Once WPRT detects your phone, it will start downloading the latest update for it. Let WPRT do so.

Once the Windows Phone Recovery Tool has downloaded the latest update, simply follow the onscreen instructions and the program will start recovering your device, turning back the clock and taking it back to Windows 8.1 Mobile.

Once your device has been reverted to Windows 8.1, download and install the Windows Insider app and upgrade to build 10581 of the Windows 10 Mobile Insider Preview on the Fast Ring.

The post BEST FIX: Glance Screen Not Working appeared first on Appuals.com.

BEST FIX: Windows 10 Phone Is Stuck in a Reboot Loop

$
0
0

Build 10080 of Windows 10 Mobile, like most of the other builds of the Operating System, was far from stable and caused a number of different problems on the Windows Phones that were updated to it. The most significant of the many issues that came with build 10080, however, was undoubtedly the fact that many Windows Phones got stuck in a reboot loop shortly after they were updated to build 10080. Fortunately though, if your Windows Phone is stuck in a reboot loop after being upgraded to build 10080, you can use the following methods to try to get the device out of the reboot loop or (if that doesn’t work) restore it back to the version of Windows Mobile that was previously running on your device:

Method 1: Perform a Hard Reset Using the Hardware Keys

When a Windows Phone is in a reboot loop and keeps on rebooting constantly, you (obviously) can’t access the software menus that can be used to reset it. However, what you can do is perform a hard reset on the device using its hardware keys. First and foremost, you need to get the device to power down completely; removing and reinserting its battery should do fine. Once you have powered the device off, you need to:

Press and release the Power This will make the device vibrate.

As soon as the device vibrates, press and hold down the Volume Down

Release the Volume Down button when an exclamation mark appears on the screen.

Press the following buttons one at a time in the exact same order:

Volume Up > Volume Down > Power > Volume Down

The device will then vibrate, reboot, show the Nokia flash screen and then go to the spinning gears install screen. Once the spinning gears process completes, the device will be reset and taken out of the reboot loop.

Method 2: Recover Your Device using the Windows Phone Recovery Tool

If Method 1 does not work for you, the only other solution you can try to fix a Windows Phone that is stuck in a reboot loop after installing build 10080 of Windows 10 Mobile is to recover the device using the Windows Phone Recovery Tool (WPRT) and revert it to the version of Windows Mobile it was running on before the update to build 10080. WPRT is a revolutionary software tool that Windows Phone users can use to recover their devices after something goes wrong following an update or a clean install. To recover a Windows Phone using WPRT, you need to:

Download the Windows Phone Recovery Tool and install it on a computer.

Connect the affected Windows Phone to the computer via USB.

If WPRT fails to detect and recognize the Windows Phone and does not start downloading and installing the right drivers automatically, click on Phone Not Detected and follow the onscreen instructions that follow.

Once the required drivers are downloaded and installed, WPRT should successfully detect and recognize the device. When the program does detect your device, follow the onscreen instructions that follow.

WPRT will then start downloading the latest update for the device connected to the computer. Let WPRT do so.

Once the Windows Phone Recovery Tool has downloaded the latest update, simply follow the onscreen instructions and the program will start recovering your device.

WPRT will recover the device, reset it and then boot it up, after which you can start setting it up.

The post BEST FIX: Windows 10 Phone Is Stuck in a Reboot Loop appeared first on Appuals.com.

BEST GUIDE: Uninstall Security Essentials in Windows 10

$
0
0

When a Windows user upgrades their computer from Windows 7, 8 or 8.1 to Windows 10, the Microsoft Security Essentials (MSE) program that is designed to act as the onboard security program for these versions of the Operating System is meant to be replaced by Windows Defender. Windows Defender is the resident security program for Windows 10 and is designed to take over all of Microsoft Security Essentials’ duties and responsibilities.

However, in some cases, when a Windows user upgrades from a previous version of Windows to Windows 10, something goes wrong and Windows Defender does not replace MSE. Instead, both MSE and Windows Defender start to exist on the same computer. Most people would not see this as a problem, but this is an extremely big problem because, since MSE was not designed to work on Windows 10, it doesn’t work on the newly upgraded computer, and because Windows Defender did not successfully replace MSE, it does not work either. Instead, whenever the user opens the computer up, they get a popup message from Windows Defender saying it is disabled.

The problem becomes further intensified when the user tries to uninstall MSE in order to allow Windows Defender to do its job but fails and gets an error message stating MSE cannot be INSTALLED instead regardless of what method they use to try and uninstall MSE. The root of this problem is the fact that Windows Defender was programmed to prohibit the installation of MSE, but in doing so was also programmed to prohibit the un-installation of MSE. This makes uninstalling Microsoft Security Essentials on Windows 10 a bit more complicated, but as long as you go through the following steps, you should be able to successfully get rid of Microsoft Security Essentials on a Windows 10 computer:

Press Windows Logo key + R. Type taskmgr into the Run dialog and click OK

2015-11-10_120613

Locate and right-click on the Windows Defender Service (WinDefend) in the Services tab and click on Stop. Once the Windows Defender Service has been stopped, it will no longer prohibit you from installing (or un-installing) MSE, and you should be able to uninstall the program as though it were any other application.

2015-11-10_120828

Go to Control Panel > Programs & Features > Uninstall a Program.

Look for Microsoft Security Essentials in the list and uninstall It should now uninstall successfully.

Restart your computer.

Once your computer boots up, make sure that Microsoft Security Essentials was indeed uninstalled and that the Windows Defender Service (WinDefend) is up and running again in Task Manager > Services.

The post BEST GUIDE: Uninstall Security Essentials in Windows 10 appeared first on Appuals.com.

BEST FIX: Desktop Icons are Missing in Windows 10

$
0
0

Windows 10 was launched months ago and it was a major change in UI over the time. In Windows 10, Microsoft eliminated a numbers of GUI bugs present in Windows 8. Start menu was a major change that was desperately requested by the users. Keeping the start menu aside, there were also a bunch of modifications in GUI as well as performance. This major change in GUI confused a lot of users as it took a while for them to understand what was going on.

Some of the users have experienced a problem i.e. Desktop icons are missing in Windows 10. It is pretty annoying for the users who have a lot of stuff on their desktop and suddenly, they find it disappeared. Keeping that frustration in mind, I am going to try in order to fix this issue.

Reasons Behind the “Desktop Icons are Missing in Windows 10” Problem:

A majority of people are considering it a bug inside Windows 10 but it is not. It can happen accidently and you may have modified some settings unknowingly. Windows 10 has two types of Modes built-in for the users facilitation i.e. Desktop and Tablet. Somehow, you might have enabled the Tablet mode leading towards disappearing of Desktop icons.

Solutions to Fix the “Desktop Icons are Missing in Windows 10” Problem:

There are a number of solutions based on the type of issue you are experiencing with your Desktop icons. You can try these methods to check which one works for you.

Method # 1: Checking for Visibility of Desktop Icons

If all of your Desktop icons are missing, then you might have triggered an option to hide desktop icons. You can enable this option to get your Desktop icons back. Follow the steps below.

Right click inside an empty space on your desktop and navigate to View tab at the top.

desktop icons missing 1

Inside the View tab, check for the Show desktop icons at the bottom. In your case, it might be unmarked. So, mark it as checked by clicking over it. See the image below for illustration.

desktop icons missing 2

Method # 2: Enabling the Desktop icons Visibility

If your default desktop icons are missing, you can make them visible inside the Settings. Follow the steps below.

Search for Settings window using Cortana and open it from the search results.

desktop icons missing 3

Inside Settings, click on Personalization. From the next window, select the Themes tab from the left pane.

desktop icons missing 4

On the right pane of the Themes tab, click on Desktop icon settings to open the settings in order to enable the Desktop icons visibility.

Select the icons you want to show on the desktop and click on Apply and OK buttons afterwards.

desktop icons missing 5

Method # 3: Disabling the Tablet Mode

As tablet mode is integrated inside Windows 10 to have a better touch experience for the Windows Tablet users, you might have accidently enabled that mode resulting in disappearing of icons.

Open the Settings again and click on System to open the system settings. On the left pane, click on Tablet mode and turn-off the tablet mode (if it is turned on) from the right pane.

desktop icons missing 6

Close the Settings window and check if your desktop icons are visible or not.

The post BEST FIX: Desktop Icons are Missing in Windows 10 appeared first on Appuals.com.

BEST FIX: Steps to Fix MSVCP100.dll is missing

$
0
0

DLL files are an important part of the programs developed in Microsoft Visual C++. It is also an important component of the Microsoft Visual C++ itself. So, these files are required to run the softwares or games developed in Visual C++. MSVCP100.dll is one of the most important files as it is required to be available at the time of running certain softwares. When, this file is missing from the system, softwares that require this DLL file stop working and display an error i.e. MSVCP100.dll is missing. It also prompts the users to try reinstalling the program that doesn’t work in a majority of cases. So, this guide is all about fixing this problem in a better way.

This error might also appear in different forms mentioned below. If, you come across any of these, then, follow the instructions below to fix it.

dll Not Found.

This application failed to start because msvcp100.dll was not found. Re-installing the application may fix this problem.

Cannot find [PATH]\msvcp100.dll

Cannot start [APPLICATION]. A required component is missing: msvcp100.dll. Please install [APPLICATION] again.

MSVCP100.dll is missing-1

Reasons Behind the “MSVCP100.dll is Missing” Error:

There are various reasons that cause this error to frustrate the users. On a number of occasions, this error message appears when MSVCP100.dll is accidently deleted from the system causing the applications to crash.

Viruses can also influence the MSVCP100.dll files by causing registry problems leading towards failure of the application running properly.

Solutions to Fix the “MSVCP100.dll is Missing” Error:

This error can be resolved in a number of ways. Follow the methods below to fix it.

Method # 1: Downloading Microsoft Visual C++ Redistributable Package

Microsoft’s redistributable packages install essential components required to run an application or game built-in Microsoft Visual Studio (Development Software). So, downloading and installing the latest package help to fix the problems related to MSVCP100.dll file. Follow the steps below to get it done.

Download Microsoft Visual C++ Redistributable Package from the Microsoft Website. After visiting the link, click on Download button at the top and select the files based on your version of Windows i.e. 32-bit or 64-bit. If it is 32-bit, select the file with x86 in the file name and if your version of Windows is 64-bit, select the file with x64 in the name. Click on Next to start downloading the file.

MSVCP100.dll is missing-2

You can check your version of Windows by right clicking on the My PC or My Computer icon on your desktop and selecting the Properties option.

After the package is downloaded, open it up. If you have already installed latest version of Visual C++ Redistributable, you will be prompted to Repair or Uninstall the package. Just click on Repair to fix the problem with the dll file.

MSVCP100.dll is missing-3

Method # 2: Downloading the “MSVCP.dll” File From External Resources

Downloading the DLL files from external resources is not recommended unless they are verified over the internet. I will mention only those resources that are trusted. So, follow the steps below to download this file.

Note: Before proceeding, check for your version of Windows (32-bit /64-bit).  

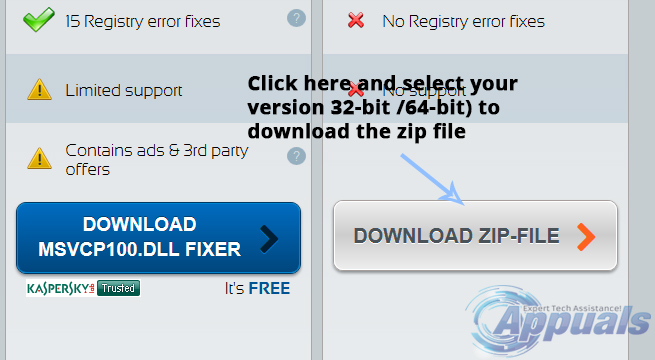
Open this legit DLL website and navigate to the third column labeled as Manual Fix. Scroll down the page and click on a big grey Download Zip-File It would ask you to choose a specific version of DLL file for your operating system. Select your specific version and download the zip file.

MSVCP100.dll is missing-4

After it is downloaded, extract the files using file extractor tools like WinRAR or 7-Zip.

Inside the folder where you extracted the files, copy the dll file. Navigate to C:\Windows\System32 directory and paste the file you copied.

MSVCP100.dll is missing-5

Method # 3: Running SFC Scan:

If any of the above methods doesn’t work, then use this method to run a complete scan of your system using a built-in Windows tool called System File Checker Tool. This tool will fix all the corrupted or missing files from your PC.

You can follow along with this post How to run sfc scan. I hope these methods will help you out in fixing this problem.

The post BEST FIX: Steps to Fix MSVCP100.dll is missing appeared first on Appuals.com.

BEST FIX: Remove Start Up Password in Windows 7/8 and 10

$
0
0

In the last few months a number of users reportedly received called from scammers impersonating Microsoft and/or other big names in the IT Industry. They call the user by looking up their names from the internet and tell them a story in relation to their computers sending out viruses, or are hacked or some other reason to trigger interest, when this happens user’s who aren’t aware of this allow the scammer access to their PC and they then trick the user into either buying something from them for a couple of hundred dollars and when the user won’t pay them they setup a start-up password, which locks down the computer and encrypts the files. Technically defined as “the encryption of the SAM hive in the registry”.

Now in simple terms, to restore your computer and remove the password “you need the original registry” which is what we’ll try and do with the help of this guide.

Using Registry Edit Utility to Restore Registry Hive from RegBack

To perform this method you would need to know how to get to BIOS to change boot order to either CD or USB and you will also need to the RegistryEditor ISO and write it to the disc/usb using MagicISO or another ISO Burning Program. If you don’t know how to boot to bios, see the manufacturer’s manual for your system.

2015-11-14_001851

Once you’ve booted from the registry and correctly using the ISO image, you will see a black screen of this type.

2015-11-14_002050

Wait a few minutes, until it takes you to the prompt showing: Select: [1]

Type and hit enter in the prompt to see your Windows Partitions.

2015-11-14_002315

Then choose your Windows Partition from the list. In my case on VMWare it is [2] so i chose 2 and then pressed Y to confirm if i wish to force it.

2015-11-14_002559

The next prompt will be [Windows/system32/config] : _

Type Windows/system32/config and Hit Enter.

2015-11-14_002843

Then type 1 and press Enter. It will then prompt you with the following options:

2015-11-14_003142

Choose option 2 here. “syskey status & change”. Then the next prompt will ask you if you really want to disable syskey, type Y and hit enter. Then go back to BIOS, change boot order and choose the hard disk as your first boot device, save changes, restart and exit. This should fix the start-up password.

Removing Start Up Password after logging in

This method is only for those who were successfully able to login using the guess passwords.

After logging in with the default passwords Hold the Windows Key and Press R. In the run dialog type syskey and Click OK.

syskey 1

Then click the Update option.

start up password 2

Then choose “System Generated Password“. And then choose the second option which says “Store Startup Key Locally”. Once done, re-enter the default password you used to log in and choose OK.

start up password 3

A confirmation on screen will appear to say “The account database Start-up key was changed”. Click OK on it. This will remove the password. Remember, to never allow any one access to your system claiming to be from Microsoft or elsewhere.

The post BEST FIX: Remove Start Up Password in Windows 7/8 and 10 appeared first on Appuals.com.


BEST FIX: Windows Defender Not Updating in Windows 10

$
0
0

Many Windows 10 users have complained of Windows Defender – the Operating System’s resident antivirus programs – not updating regardless of whether the update being downloaded and installed is a small Definitions update or a large, chunky update. In such cases, all of the user’s attempts to update Windows Defender fail and Windows Defender states that the reason behind the failures are “connectivity problems”, even though the computer has a completely healthy internet connection.

Fortunately, there are a multitude of different viable solutions for this problem, and the following are the three most effective solutions that you can use to get rid of this issue:

Solution 1: Update Windows Defender using Windows Update

If you have been trying to update Windows Defender from the program itself and failing because of “connectivity problems”, the most logical solution for the issue would certainly be trying to update Windows Defender using Windows Update.

Open the Start Menu.

windows defender not updating-1

Click on Settings.

windows defender not updating-2

Click on Update & Security.

windows defender not updating-4

Click on Windows Update in the left pane.

windows defender not updating-5

Click on Check for Updates in the right pane.

windows defender not updating-6

Your computer will now check for any and all available updates.

As soon as the available updates for Windows Defender are detected, they will automatically start being downloaded. Once the updates are downloaded, they will be installed – successfully, this time.

windows defender not updating-7

Solution 2: Update Windows Defender using an elevated Command Prompt

You can also try updating Windows Defender using an elevated Command Prompt.

Right-click on the Start Menu button to open the WinX Menu.

In the WinX Menu, click on Command Prompt (Admin) to open an elevated Command Prompt.

windows defender not updating-8

Type cd /d “\Program Files\Windows Defender” into the Command Prompt and press the Enter key.

windows defender not updating-9

Type exe -signatureupdate into the Command Prompt and press the Enter key. This will initiate a Windows Defender update which, hopefully, will be successful.

windows defender not updating-10

Solution 3: Manually download the latest update package for Defender

If all else fails, you can try downloading the latest update package for Windows Defender manually as a last resort.

Go here.

Wait for the update package to be fully downloaded.

Once the update package has been downloaded, open it to begin updating Windows Defender to its latest iteration.

The post BEST FIX: Windows Defender Not Updating in Windows 10 appeared first on Appuals.com.

BEST FIX: PUA_BROWSEFOX flagged as a Spyware

$
0
0

A number of Windows users have complained of their respective antivirus programs detecting, flagging and blocking a spyware file named “PUA_BROWSEFOX” immediately after they downloaded a copy of the Windows 10 ISO file to their computer. The Windows 10 ISO file is basically the setup for Windows 10 – the medium that can be used to install Windows 10 on any computer.

The PUA_BROWSEFOX file is the farthest thing from a part of the standard Windows 10 ISO file as it could possibly be. This file is, in fact, a known virus – a form of spyware. Since more than a few users have complained of this issue, the PUA_BROWSEFOX file showing up right after a Windows 10 ISO file download cannot be ruled out as a coincidence. The cause of this problem can either be a corrupted or damaged system file, an actual virus infection or an anomaly with the Windows 10 ISO file download. Thankfully, if you are facing this problem, the following are some of the most effective methods that you can use to try and fix it:

Method 1: Perform an SFC Scan

An SFC scan will check for any damaged or corrupted system files and repair any that are found.

Right-click on the Start Menu button to open the WinX Menu.

In the WinX Menu, click on Command Prompt (Admin) to open an elevated Command Prompt.

Type sfc /scannow into the Command Prompt and press the Enter

Wait for the SFC scan to be completed. This may take some time.

Once the SFC scan has been completed, the names of any and all corrupted or damaged system files will be displayed and you will be informed that they have been fixed.

Method 2: Run a full system scan for viruses with the Microsoft Safety Scanner

The Microsoft Safety Scanner is a tool designed specifically to scan systems for any safety breaches and virus infections and eliminate any and all threats that are found.

Download the Microsoft Safety Scanner from here.

Open the Microsoft Safety Scanner.

Follow the onscreen instructions to scan your entire computer for viruses and threats.

If any viruses, malware or spyware are found, eliminate them with the help of the Microsoft Safety Scanner.

Method 3: Delete and then re-download the Windows 10 ISO file

If none of the methods above seem to work for you, the only option you have left is to delete all traces of the Windows 10 ISO file from your computer, thus getting rid of the PUA_BROWSEFOX file, and then re-download it through the Windows 10 Media Creation Tool. A fresh re-download of the ISO file has more than significant chances of not bringing the PUA_BROWSEFOX spyware file with it.

Navigate to the Windows 10 ISO file on your computer, right-click on it and click on Delete.

Empty the Recycle Bin to make sure that all traces of the Windows 10 ISO file are eliminated.

Download the Windows 10 Media Creation Tool from here.

Run the Media Creation Tool.

Click on Create installation media for another PC.

Select the language, edition and CPU architecture (32-bit or 64-bit) that you desire.

Choose to save the media to an ISO file.

Download the ISO file to your computer. Hopefully, this time it will not bring the PUA_BROWSEFOX spyware file with it.

The post BEST FIX: PUA_BROWSEFOX flagged as a Spyware appeared first on Appuals.com.

BEST FIX: Disable Display Scaling on High DPI Devices in Windows 10

$
0
0

Windows 10 is not without its own unique set of kinks and quirks, and one of these kinks and quirks is the “display scaling on high DPI devices” “feature” that the latest and greatest version of Windows comes with. This feature, also referred to as “compatibility scaling mode”, replaces the “XP style display scaling” that was available in Windows 7 and causes any and all programs and applications that don’t specify their compatibility since the very beginning to appear extremely blurry. Text in such programs can be very hard to read, which is what makes this issue so pertinent.

Unfortunately, this “compatibility scaling mode” is turned on for all programs and applications by default. The only way that Microsoft has provided users with to turn this feature off is to disable it by right-clicking on the shortcut of any one of the programs in question, selecting Compatibility and turning display scaling on high DPI devices off, one program at a time. This can be quite a tedious task and there is absolutely no way a person can disable this feature for all programs on a Windows 10 computer, at least not a Microsoft-provided way.

Realizing how big of a problem this really was for Windows 10 users, a Good Samaritan has created a program known as DPI Awareness Enabler which takes care of this problem MUCH quicker. To disable display scaling on high DPI devices for all programs on a Windows 10 computer using DPI Awareness Enabler, you need to:

Go here.

Download DPI Awareness Enabler by clicking on DpiAwarenessEnabler 1.0.3.zip in the Licenses and download section of the website.

Install DPI Awareness Enabler.

Run DPI Awareness Enabler.

display scaling-1

Drag every single program that is displaying blurry texts and images from the All detect programs list to the Windows compatibility list. Doing so will make each of the programs that you drag and drop DPI aware, turning the display scaling for high DPI devices feature off for each and every single one of them and ultimately getting rid of your problem.

display scaling-2

The post BEST FIX: Disable Display Scaling on High DPI Devices in Windows 10 appeared first on Appuals.com.

BEST FIX: Cannot Access WD My Cloud Account on Windows 10

$
0
0

WD My Cloud is one of the best cloud storage services out there, and since the service has so many users, there have been countless Windows 10 users complaining of not being able to access their WD My Cloud accounts ever since their upgrade to Windows 10. The problem has become so severe that some Windows 10 users have even resorted to rolling back to Windows 7 and Windows 8.

If you are unable to access your WD My Cloud account on a Windows 10 computer, fear not, as this issue can indeed be fixed. In almost all cases, the culprit behind a user not being able to access their WD My Cloud account on a Windows 10 computer is the fact that Windows 10 does not allow users to access certain accounts unless credentials for these accounts are added to the credentials list. The following are the two most effective methods that you can use to successfully fix the issue that is inhibiting you from accessing your WD My Cloud account on Windows 10:

Method 1: Add a Windows Credential for your WD My Cloud account

The simplest and most widely effective fix for this issue is to simply add a Windows Credential for your WD My Cloud account to the credentials list on your Windows 10 computer. To do so, you need to:

Right-click on the Start Menu to open the WinX Menu.

Click on Control Panel in the WinX Menu to open it.

wd - 1

In the Control Panel, locate and click on Credential Manager.

wd - 2

Click on Windows Credentials.

wd - 3

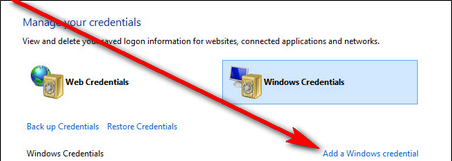
Click on the Add a Windows credential link in the top right corner of the list of Windows Credentials.

wd - 4

Type the name you gave your WD My Cloud device into the Internet or network address bar, the username of your WD My Cloud account in the Username bar and the password to your WD My Cloud account in the Password. Click on Save.

wd - 5

Close the Control Panel.

Restart your computer, and when it boots up, you will be able to seamlessly access your WD My Cloud account.

Method 2: Fix the issue using Registry Editor

If Method 1 does not work for you, which is highly unlikely, this issue can also be fixed by editing your computer’s registry and adding a certain DWORD (32-bit) value to a specific key. To successfully gain access to your WD My Cloud account on a Windows 10 computer using this method, you need to:

Press Windows Logo key + R to bring up a Run

Type regedit into the Run dialog and press the Enter key to open the Registry Editor.

wd - 6

Navigate to HKEY_LOCAL_MACHINE\SYSTEM\CurrentControlSet\Services\LanmanWorkstation in the left pane.

wd - 7

Click on the LanmanWorkstation key to display its contents in the right pane.

Right-click on an empty space in the right pane, hover over New and click on DWORD (32-bit) value.

wd - 8

Name the new DWORD value AllowInsecureGuestAuth.

wd - 9

Double-click on the new value and, in the dialog that opens up, change its value to 1 and then click on OK.

wd - 10

Close the Registry Editor and restart your computer, and when your computer boots up, you will be able to successfully access your WD My Cloud account without any issues.

The post BEST FIX: Cannot Access WD My Cloud Account on Windows 10 appeared first on Appuals.com.

BEST FIX: Broadcom Adapter issues in Windows 10

$
0
0

Windows users across the globe have experienced countless instances where one or more of their computer’s devices or drivers failed to work after upgrading to Windows 10. One of the most common devices that sometimes fail to work after a Windows 10 upgrade is the average wireless adapter. In such instances, even though the Windows 10 upgrade is flawless and seamless, the drivers for the wireless adapter seem to have been installed successfully and the device is even listed in the Device Manager. However, the wireless adapter fails to detect any available wireless networks whatsoever.

While this problem is known to affect all kinds of different makes and models of wireless adapters, it appears to be infecting devices with Broadcom wireless adapters quite frequently. As with most other wireless adapter-related problems, the cause of this issue is the affected computers having the wrong drivers for the wireless adapter. If you own a computer that has a Broadcom wireless adapter and fails to detect any wireless networks after being updated to Windows 10, the following is what you need to do in order to easily fix the problem:

Go to the drivers download page for your computer on your manufacturer’s official website. For example, if you own an ASUS Transformer Book T100TAL, go to http://www.asus.com/2-in-1-PCs/ASUS_Transformer_Book_T100TAL/HelpDesk_Download/.

broadcom wireless adapter - 1

Select your Operating System (Windows 10 32-bit or Windows 10 64-bit).

broadcom wireless adapter - 2

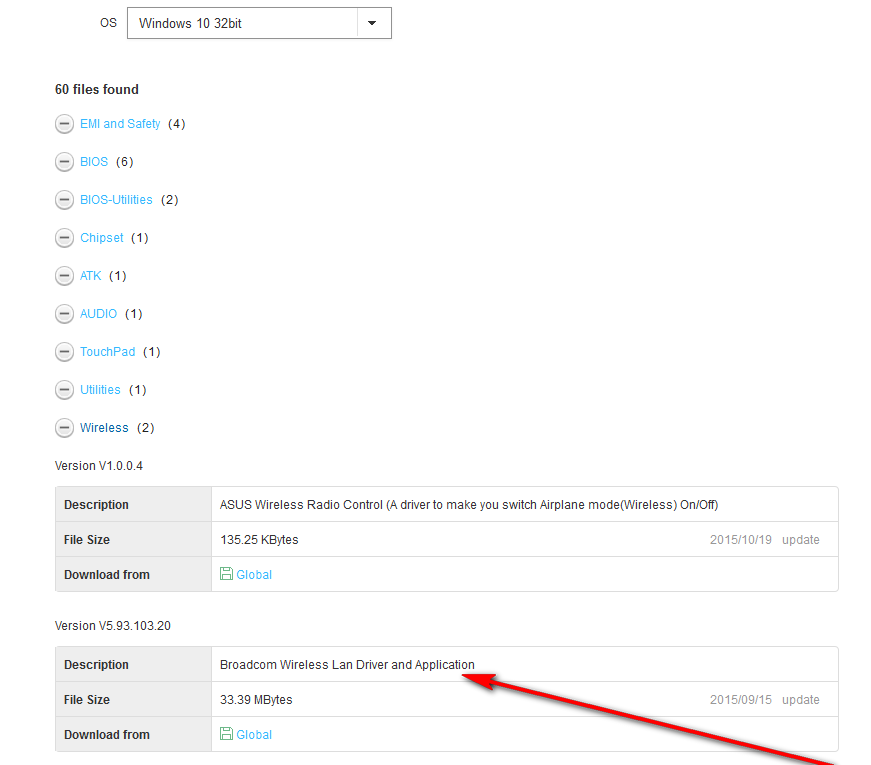
Locate the latest driver for your Broadcom wireless adapter under the Wireless category and download it.

broadcom wireless adapter - 3

Install the latest driver for your Broadcom wireless adapter.

Once the latest driver for your Broadcom wireless adapter has been installed, your computer should start detecting wireless networks around you like it should be. It should be noted that it is entirely normal for your Broadcom wireless adapter to either stop detecting wireless networks around it or display the “This device cannot start. (Code 10)” error a couple of days after you fix this issue. If something like this happens, you should simply:

Right-click on the Start Manu button to open the WinX Menu.

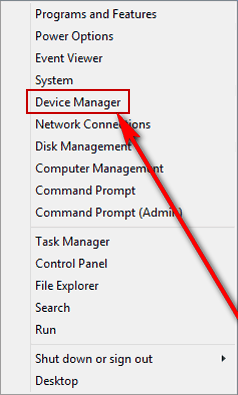
In the WinX Menu, click on Device Manager to open it.

broadcom wireless adapter - 4

In the Device Manager, double-click on Network adapters to expand that section.

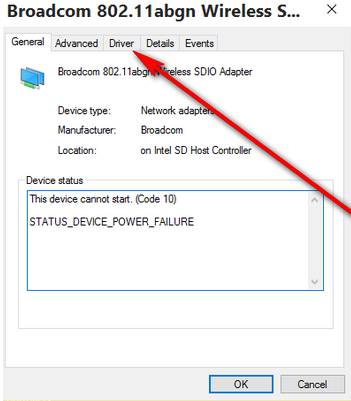
Double-click on your Broadcom wireless adapter. It will be named something along the lines of “Broadcom 802.11abgn Wireless SDIO Adapter”.

Navigate to the Driver tab

broadcom wireless adapter - 5

Click on Uninstall. Continue with the onscreen instructions and go through with the un-installation of the driver.

Once the driver has been uninstalled, restart your computer, and once it boots up, the driver will be automatically reinstalled.

If the driver is not reinstalled automatically, which is quite rare, simply reinstall it manually from the drivers download page for your computer on your manufacturer’s official website.

The un-installation and reinstallation of the Broadcom wireless adapter’s driver is bound to fix any issues you might face after installing the latest drivers for your wireless adapter in order to get it to start successfully detecting wireless networks after a Windows 10 upgrade.

The post BEST FIX: Broadcom Adapter issues in Windows 10 appeared first on Appuals.com.

BEST FIX: Disable Sticky Corners/Edges in Windows 10

$
0
0

Windows 10 brought a lot of changes to the world of Windows Most of these went over quite well with Windows users, but some did not. One of the changes that users REALLY didn’t appreciate is the fact that Microsoft decided to take the option to turn sticky corners off when using more than one monitor off away from Windows 10 users. The option was previous present in Windows 7, Windows 8 and Windows 8.1, and almost every single Windows user who used more than one monitor loved this feature as sticky corners can be quite annoying and frustrating. I mean, who won’t be infuriated when their pointer simply sticks to one corner for a couple of seconds that feel like eternity when they are trying to move it from one monitor to another.

To the dismay of many Windows users who upgraded to Windows 10, the option to disable sticky corners no longer exists. While this issue is not being raised as much as it should be, it is so severe a problem that many Windows users have opted to roll back to older versions of the OS. Fortunately, if you are a Windows 10 user who wants to get rid of sticky corners and is willing to put in some work to do so, you actually can disable those pesky sticky corners. The first half of disabling sticky corners is actually disabling the Snap feature that every version of Windows after Windows XP comes with. Disabling the Snap feature will allow you to freely move application windows between monitors without them sticking (or snapping, to be more precise) to any one of the four corners of the monitor. To disable Snap, you need to:

Hold the Windows Key and Press I. Click on System.

edge-1

Click on Multitasking in the left pane. Under the Snap category in the right pane, turn the slider directly below the Arrange windows automatically by dragging them to the sides or corners of the screen option off. Doing so will disable the Snap.

edge 3

Once Snap has been disabled, you can move on to the second half of disabling sticky corners in Windows 10, the half that involves some fiddling around with your computer’s registry. To completely disable sticky corners in Windows 10, you need to:

Press Windows Logo key + R to open a Run

Type Regedit into the Run dialog and press the Enter key to open the Registry Editor.

In the Registry Editor, navigate to HKEY_CURRENT_USER\Software\Microsoft\Windows\CurrentVersion\ImmersiveShell\EdgeUi.

Click on the EdgeUi key in the left pane to display its contents in the right pane.

Right-click on an empty space in the right pane, hover over New and click on DWORD (32-bit) Value.

Name the new DWORD value MouseMonitorEscapeSpeed.

Double-click on MouseMonitorEscapeSpeed, change its value data to 1 and click on OK.

Restart your computer, and as soon as it boots up, you will notice that there is very, very little to no stickiness in your monitors’ corners.

The post BEST FIX: Disable Sticky Corners/Edges in Windows 10 appeared first on Appuals.com.

BEST FIX: Steps to Fix Security Essentials Error 0x80072efd

$
0
0

Microsoft Security Essentials plays an integral role in keeping your computer safe and secure, which is why you would naturally want to keep the program completely up to date. However, when trying to update Microsoft Security Essentials either through the program itself or by checking for updates in Windows Update, some Windows users receive error 0x80072efd. In addition to Microsoft Security Essentials, error 0x80072efd is also known to appear when trying to update Windows Defender.

Error 0x80072efd basically inhibits a person from updating Microsoft Security Essentials to latest version. The culprit behind error 0x80072efd when trying to update Microsoft Security Essentials is mostly one of four things – an application or process interfering with your internet connection, resource issues on your computer, high internet activity or recoverable data base errors. Regardless of what might be causing error 0x80072efd, the following are the two most effective methods that you can use to fix it:

Method 1: Fix the issue using an elevated Command Prompt

Open the Start Menu.

0x80072efd - 1

Type cmd into the Search

0x80072efd - 2

Right-click on Command Prompt or cmd and click on Run as administrator.

0x80072efd - 3

If you are prompted for confirmation of the action or an administrator password, go through with the prompt.

Type netsh winhttp reset proxy into the Command Prompt and press the Enter key

0x80072efd - 4

Now try to update Microsoft Security Essentials, and it will be updated successfully.

Method 2: Uninstall any and all third-party antivirus programs

In some cases, third-party antivirus programs, especially McAfee Security, can interfere with either your internet connection or Windows Update altogether, causing all of your attempts to update Microsoft Security Essentials to fail. If that is the case, simply navigating to Control Panel > Uninstall a program and uninstalling/removing all of the third-party antivirus programs that you have on your computer.

Once you have uninstalled all third-party antivirus programs, restart your computer. As soon as your computer boots up, you should be able to update Microsoft Security Essentials successfully. Not having an antivirus program on your computer can leave it vulnerable, so as soon as you manage to successfully update Microsoft Security Essentials, download and install a third-party antivirus program other than the one(s) you were previous using.

The post BEST FIX: Steps to Fix Security Essentials Error 0x80072efd appeared first on Appuals.com.


BEST FIX: Fatal Error “Available Memory Less Than 15 MB”

$
0
0

Counter-Strike 1.6 is, without even the shadow of a doubt, one of the most successful and most beloved games to have ever been introduced to the world of PC gaming. However, like all other games, Counter-Strike is not without its faults, especially since the game was released even before the 21st century began. A specific class of problems and issues that Counter-Strike 1.6 users have faced over the years is known as “fatal errors” – errors that almost always show themselves as soon as you open the game and subsequently cause the game to close.

One of the most common, and also one of the most irritating, fatal errors out there that are associated with Counter Strike 1.6 is the “available memory less than 15 MB” error. This fatal error greets the user upon the launch of the game, informs them that their computer has less than 15 Megabytes of free space regardless of how much free space their computer actually has, and then closes the game. The following is an image of what this fatal error looks like:

cs-1

In reality, this error is caused by compatibility issues between the Operating Systems that the world is using today (Windows 7, 8, 8.1 and 10) and the Operating System that the game was actually designed for (Windows XP) and not by an absence of free space on the user’s computer. Fortunately for all Counter Strike 1.6 users suffering from this problem, fixing this error is fairly simple and straightforward. To fix the “available memory less than 15 MB” fatal error, all you need to do is:

Right-click on either a shortcut to Counter-Strike 1.6 or the game’s Start Menu icon.

cs-2

Or

cs-3

Click on Properties.

cs-4

Navigate to the Compatibility tab

cs-5

Check the box beside the Run this program in compatibility mode for option by clicking on it.

cs-6

Open the dropdown menu located directly beneath the option and select Windows XP (Service Pack 2).

Click on Apply.

Click on OK.

Restart your computer.

As soon as your computer boots up, you will no longer be greeted with the “available memory less than 15 MB” fatal error when you launch Counter Strike 1.6.

The post BEST FIX: Fatal Error “Available Memory Less Than 15 MB” appeared first on Appuals.com.

BEST FIX: OneDrive Script Error on Windows 10

$
0
0

Windows 10 – the latest and greatest iteration of the Windows Operating System – comes with an onboard OneDrive application which users can use to access their OneDrive storage spaces and OneDrive accounts. However, like many other aspects of Windows 10, the OneDrive app is far from perfect. One of the most common errors found on the OneDrive app is the script error which looks something like the image below.

The script error basically renders the onboard OneDrive application that comes with Windows 10 useless, and that can not only be a waste of resources but can also be pretty irritating as the average Windows 10 user quickly gets used to the onboard OneDrive app. A script error can be caused in the OneDrive app on Windows 10 mostly because of a problem with the OneDrive app’s JavaScript or VBScript code. Problems with the JavaScript or VBScript code of an application can either be caused by actual code-related problems or internet connection problems.

one drive

Fortunately, if you are suffering from a script error in the OneDrive app on Windows 10, the following are the two most effective solutions that you can use to fix the issue:

Solution 1: Make sure that Active Scripting is enabled

For the JavaScript and VBScript code of the OneDrive app to function properly, you must have Active Scripting enabled on your computer. Having Active Scripting disabled can give birth to a script error in the OneDrive app.

Press the Windows Logo key + R to open a Run

Type cpl into the Run dialog and press the Enter key.

When the Internet Options dialog appears, navigate to the Security

Click on Custom level…

Locate the Scripting section in the window that appears and make sure that the Active Scripting option in this section is enabled. If Active Scripting is disabled, enable it and click on Yes when asked whether you really want to change settings for this zone.

Click on OK.

Restart your PC.

You should no longer receive a script error in the OneDrive app and the app should launch successfully after your computer boots up.

Solution 2: Reset your Internet Explorer settings

The onboard Windows 10 OneDrive application uses the same internet connection settings as the Internet Explorer app on your computer, which means that any corrupted or incorrectly configured Internet Explorer settings will cause OneDrive to malfunction. If that is the case, resetting your Internet Explorer settings will make the OneDrive script error go away. It should be noted that by resetting the Internet Explorer settings on your computer, you revert the program to the state it was in when you first installed it. Also, a reset of Internet Explorer’s settings is completely irreversible. To reset Internet Explorer settings, you need to:

Close all open Internet Explorer

Open a new Internet Explorer

Click on the Tools icon with a gear on it.

Click on Internet options.

Navigate to the tab titled Advanced and click on Reset.

In the Reset Internet Explorer settings dialog box that pops up, click on Reset.

Once your Internet Explorer settings have been restored to their default values, click on Close and then click on OK.

Restart your computer so that the changes that you have made successfully take effect. The OneDrive script problem will be solved as soon as your computer boots up.

If resetting Internet Explorer’s settings to their factory defaults did not work (which is highly unlikely), you need to:

Close all open Internet Explorer

Open a new Internet Explorer

Click on the Tools icon with a gear on it.

Click on Internet options.

Navigate to the tab titled Advanced and click on Restore advanced settings.

Follow the onscreen instructions to restore Internet Explorer’s advanced settings, checking the boxes to delete ALL settings along the way. Once you are done restoring Internet Explorer’s advanced settings, your OneDrive script error problem will definitely have been fixed.

The post BEST FIX: OneDrive Script Error on Windows 10 appeared first on Appuals.com.

Tech Support Scam and How to Steer Clear of It

$
0
0

As most internet users already know, the World Wide Web is simply jam-packed with scammers simply waiting to be able to pounce on gullible and vulnerable users in order to scam them out of money and/or information. One of the most well-known scams to have ever been invented and deployed in the computer world is the tech support scam. The tech support scam entails a virus, malware or spyware that generates pop-up advertisements on your computer and even goes as far as to lock you out of your internet browser or inhibit you from closing your internet browser being downloaded onto your computer when you visit a malicious website.

The pop-up advertisements that are generated mostly inform the user that it is in their best interest to contact tech support professionals and provides a couple of numbers that the user should call. On the other end of these numbers are phony tech support “professionals” –mostly located overseas – who try their best to scam you out of money or, if that is not possible, critical information such as your billing address or your credit card information. Thankfully, there are ways you can steer clear of the tech support scam and even annihilate all traces of it in the event that your computer has been infected.

If you have already been infected with the virus, malware or spyware that is the medium for this scam, fear not as all you have to do in order to escape the clutches of this scam is remove the virus, malware or spyware your computer has been infected with. However, first things first, if your computer has been infected recently and you have either been locked out of your internet browser completely or cannot seem to close it (which happens in many cases), you need to:

Press Ctrl + Shift + Esc to open the Task Manager.

In the Task Manager, right-click on each of your running internet browsers one by one and click on End task. Doing so will successfully close the internet browser(s).

tech support scam - 1

The next time you open the internet browser that downloaded the virus, malware or spyware onto your computer, make sure that you close the malicious website before it loads in case you have your internet browser configured to reopen the last internet browsing session upon launch.

Once you have closed your internet browser, you need to get rid of the virus, malware or spyware that your computer has been infected with. Just to be on the safe side, close all running programs and save all of your progress on the computer in case removing all traces of the tech support scam from your computer requires a reboot. To eliminate the virus, malware or spyware that has infected your computer, you will need to:

Download AdwCleaner by going here and clicking on the Download Now button on the left side.

tech support scam - 2

Install AdwCleaner. Open AdwCleaner. Click on the Scan button once the program boots up.

Wait for the program to successfully search for and detect any and all malicious or harmful files and threats to your computer.

Once AdwCleaner is done searching, click on the Cleaning button to get rid of all of the invaders and threats that the program found.

Since you have already saved all your progress on the computer and closed all running programs before starting this process, go ahead and click on OK in the prompt that appears.

tech support scam - 5

Scanning and cleaning your computer using AdwCleaner will definitely get rid of the virus, malware or spyware responsible for the tech support scam, but there is still a chance that the scam managed to hijack your browser. To make sure that any browser hijackers that were downloaded onto your computer with the intention of hijacking the internet browser(s) you use are deleted, you need to:

Download the Junkware Removal Tool program by going here. This program can successfully detect and remove browser hijackers designed to attack all browsers from Google Chrome to Microsoft Edge and everything in between.

Install the Junkware Removal Tool

Open JRT.

If Windows asks you if you are sure you want to open JRT, confirm the action.

Once a Command Prompt window opens, press absolutely any key to initiate a complete junkware and browser hijacker scan of your computer.

tech support scam - 6

Wait for JRT to do its thing. The scanning process may take up to 10 minutes.

Once JRT has successfully done what it is supposed to do, it will provide you with a log that contains all of the malicious files, registry keys and browser hijackers that the Junkware Removal Tool program removed from your computer.

tech support scam - 7

Once all is said and done, restart your computer for good measure. Once your computer boots up, you will have successfully escaped the clutches of the infamous tech support scam.

The post Tech Support Scam and How to Steer Clear of It appeared first on Appuals.com.

BEST GUIDE: What is Winlogon?

$
0
0

Any Windows user who has ever opened their computer’s Task Manager and navigated to the Processes tab will quite possibly have seen an ongoing process named winlogon.exe.

At first glance, even highly inexperienced Windows users will be able to deduce that, since the name of the process contains the term “win” in it, winlogon.exe is a Windows process and, since the name of the process also contains the term “logon”, it pertains to Windows logon procedures. However, that is not all there is to winlogon.exe. In actuality, the winlogon.exe process can be one of two things – a completely trustworthy Windows process that is crucial for optimum performance, or a virus, Trojan, worm or spyware that has the exact same name as the legitimate winlogon.exe.

The harmless winlogon.exe that is actually crucial to Windows

The winlogon.exe process is a process that starts as soon as Windows powers up and is present on ALL versions of the Windows Operating System – be it Windows XP or Windows 10. The winlogon.exe process that has been manufactured by Microsoft is actually of great use to the Windows Operating System and has quite a few different duties and responsibilities. The legitimate winlogon.exe process is responsible for window station and desktop protection, multiple network provider support, screensaver control, loading of user profiles, assignment of security to user shell, SAS routine dispatching and standard SAS recognition, verification of copies of Windows and user login and logout procedures, among a few other things.

The executable file for the legitimate winlogon.exe process can be found in the C:\Windows\System32 directory and is extremely essential to the Windows Operating System, which is why it is not something to fiddle around with.

The winlogon.exe that almost certainly is a threat

The other winlogon.exe comes in the form of a virus, a Trojan, a worm or spyware and is officially recognized as a threat to the Windows OS under the name W32.Netsky.D@mm. The winlogon.exe that is almost certainly a threat and has more than significant chances of causing harm to your computer is almost always distributed via email. This harmful element infects your computer when you open a hostile attachment attached to one of the emails you receive. This winlogon.exe, in most cases, has its own SMTP engine which it uses to gather your emails after it has infected you and creates and sends copies of itself to your entire address book.

Replicating itself and sending its copies to your address book is not all this malicious winlogon.exe is capable of. This winlogon.exe can also allow attackers to access your computer, record your keystrokes and get their hands on your personal information. This winlogon.exe is a known threat to the Windows Operating System, which is why you need to get rid of it as soon as you detect and identify it. One of the most effective ways to differentiate between the legitimate winlogon.exe file and the winlogon.exe file that is a threat is the fact that the legitimate winlogon.exe is always located in the C:\Windows\System32 directory. If there is a winlogon.exe file located in any directory other than C:\Windows\System32, you need to get rid of it. In addition, you should also treat any winlogon.exe files with no file information as threats. You can use this simple tool by Symantec to get rid of a harmful winlogon.exe file.

If you believe that your computer has been infected by a malicious winlogon.exe file, you can also download Security Task Manager by going here and clicking on the Download Now button and then use it to scan your computer for an illegitimate and potentially harmful winlogon.exe file and remove it.

The post BEST GUIDE: What is Winlogon? appeared first on Appuals.com.

BEST GUIDE: How to Monitor Your Bandwidth

$
0
0

In today’s day and age, most of the “Unlimited” plans provided by Internet Service Providers don’t actually allow unlimited data usage. Instead, these plans have “data caps” – limits to how much data is allocated to the user’s internet connection. Once the user’s data usage reaches the data cap, their connection is shut down and their connection to the internet is cut off. Since that is the case, it has basically become imperative for most internet users to monitor both their bandwidth and the amount of data they use in order to be updated in real-time as to how much of their data usage limit they have used and how much is left.

As simple as tracking the amount of data that has come into and out of your internet connection may sound, with as many bandwidth and data usage monitoring options out there as there are, most people have no clue what route they should take to monitor their bandwidth and data usage. Well, the following are some of the best and most effective methods (and mediums) that you can use to monitor both your bandwidth and data usage:

Method 1: Use GlassWire

GlassWire is one of the best third-party firewall applications out there for the Windows Operating System, but GlassWire can do a lot more than just give your Windows computer an extra layer of security from external threats. GlassWire is a great tool that you can also use to monitor your bandwidth and data usage. GlassWire can be downloaded for free by going here and clicking on the Download GlassWire Free button. Once you have downloaded GlassWire, go ahead and install it, and then run the application.

When you open GlassWire, the first thing you are greeted with is a graph of all of your computer’s network activity in real time – meaning that the information on the graph is updated every single second so you always have the freshest network activity information. However, the application’s Usage tab is where it truly shines. In the Usage tab, you will be able to find a summary of the amount of data that has came into your computer and gone out of your computer in the past month. You can also view your computer’s bandwidth and data usage by the week or even by the day.

Apart from displaying the amount of data that both incoming connections and outgoing connections have used, the Usage tab also provides users with the opportunity to drill down into individual apps and programs, have a look at the amount of bandwidth and data they are using, check out what hosts and servers they are connecting to and even go as far as to find out what kind of traffic it is.

gwire

Method 2: Use your Internet Service Provider’s web interface

Almost every single Internet Service Provider has a web interface of web portal for the convenience of their customers, and that is especially the case with Internet Service Providers whose “Unlimited” internet plans actually have data caps and are limited. Most Internet Service Provider web interfaces and portals have an area dedicated specifically to the amount of data the user has used. One of the best and simplest ways you can use to monitor how much data you have used is to simply access your ISP’s web interface and look for this area as this area will contain your monthly data usage statistics. The name of this area will either involve the term data, the word usage or both.

The only drawback to using this method to monitor your bandwidth is the fact that most ISPs only update their web interface with new data usage statistics once or twice a day, making it impossible for you to get real-time statistics.

Method 3: Use DD-WRT

The most highly recommended method of monitoring your bandwidth on this list is definitely this one as it allows you to monitor the bandwidth used by ALL of the devices connected to a specific internet network and not just your own computer. This method achieves this by monitoring the packets of data sent via the internet not by a single computer or phone but by the router itself. Since all of the devices on your personal internet network have to be connected to your router in order to be able to access the internet, this gives you a complete idea of how much internet is being used on your internet network. This is accomplished using a program – or a third-party router firmware, to be more specific – known as DD-WRT. To monitor the bandwidth and data usage of your entire network using DD-WRT, you need to:

Go here, look for your router and download DD-WRT for it.

Install DD-WRT.

Access the DD-WRT web interface.

Navigate to the Status

Click on Bandwidth. Here you will be able to see numbers pertaining to the amount of data that has been brought into and sent out of your internet network through your router.

2015-11-19_002903

The post BEST GUIDE: How to Monitor Your Bandwidth appeared first on Appuals.com.

Viewing all 4542 articles
Browse latest View live