Quantcast
Channel: How To's | Everything Tech - Appuals.com
Viewing all 4542 articles
Browse latest View live

BEST GUIDE: Create a Shortcut To A Website in Edge

$
0
0

Windows 10, the latest and greatest iteration of the Windows Operating System, comes with two different internet browsers – Internet Explorer, the default Windows browsers we all know but don’t really love, and Microsoft Edge, a fast, more secure and simpler internet browser that Microsoft has developed to rival the third-party internet browsers that almost all Windows users believe to be superior to Internet Explorer. Microsoft touts Microsoft Edge as an internet browser that is better than, or at least just as good as, its competition.

However, there are a lot of features and functionalities that Microsoft Edge’s competitors – such as Google Chrome – have that Microsoft Edge doesn’t. For example, Microsoft Edge users cannot simply pin a website that they have open in a Microsoft Edge tab to their computer’s taskbar for easy access – a feature that is extremely simple and highly useful and a feature that almost all internet browsers out there, including the likes of Internet Explorer, have. You cannot simply drag a website you have open in a Microsoft Edge tab down to your taskbar and drop it to pin it to your taskbar.

Fortunately for you, there is a way that you can pin a Microsoft Edge tab to your taskbar, but it is not nearly as easy and quick as simply dragging and dropping an open tab to the taskbar. Until Microsoft finally decides to update Microsoft Edge with a feature that allows users to simply drag and drop tabs to the taskbar to pin them there, if you want to pin a Microsoft Edge tab to your taskbar, you need to:

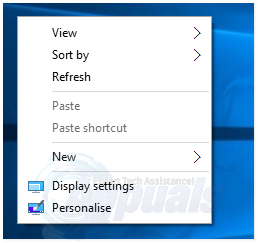
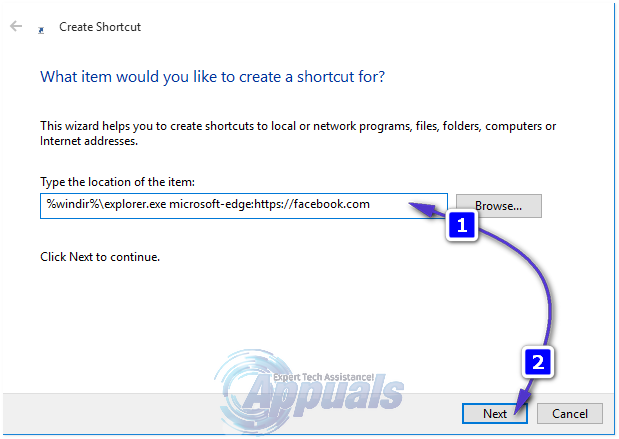
Right-click on an empty space on your Desktop, hover over New and click on Shortcut.

2015-11-25_064812

In the Type the location of the item field, paste the following, replacing facebook.com with the URL that you want the shortcut in your taskbar to open:

%windir%\explorer.exe microsoft-edge:https://www.facebook.com

Click on Next. Name your shortcut (Facebook – for example).

s212

Create the shortcut. Right-click on the shortcut and click on Pin to taskbar.

2015-11-25_065503

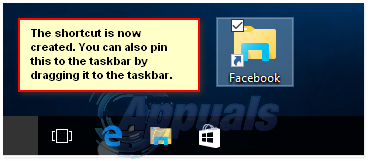
Voila! You’re done. Now, whenever you click on the shortcut in your taskbar, a Microsoft Edge tab will open and it will take you to the URL you created a shortcut for. If the shortcut does not work, create a new one, this time surrounding the URL in the location for the shortcut (https://www.facebook.com – for example) with quotation marks (“) on both sides. The finished location for the shortcut will look like the following:

%windir%\explorer.exe microsoft-edge:”https://www.facebook.com”

If you don’t like the bland icon that the shortcut has by default, download the .ico file for a more fitting shortcut icon for the shortcut from www.iconarchive.com and before you pin the shortcut to your taskbar, right-click on it, click on Properties > Change icon, navigate to the directory where the .ico file you downloaded is stored, select the .ico file you downloaded and click on OK in both windows. Doing so will spice your taskbar shortcut for a specific URL in Microsoft Edge up a bit.

The post BEST GUIDE: Create a Shortcut To A Website in Edge appeared first on Appuals.com.


BEST FIX: Fix Error 0x85002012 in Windows 10 Mail App

$
0
0

Windows 10 Mail has become quite popular ever since Windows 10 was released to the general populous – not only for being an extremely beautiful and pragmatic app but also for being quite possibly the most bug-ridden app that comes with Windows 10. Among the many bugs that users of Windows 10 Mail have suffered from up until now is error code 0x85002012. Error code 0x85002012 shows up when the user tries to sync Windows 10 Mail with the email account that they have registered on it and fails to do so. Error code 0x85002012 is accompanied by an error message that, in the gist of it, states that Windows 10 Mail cannot sync with the user’s email account for the time being.

The reason why error 0x85002012 is referred to as a “bug” is because, in almost all cases, it is caused by an apparent bug in Windows 10 Mail that causes the application to not be able to sync with the user’s email account if the email account’s Inbox has more than 99 emails in it. The number of emails in the other folders of the email account does not matter, but if the account’s Inbox has over 99 emails in it, the sync process fails and the app displays error 0x85002012. The following are the two methods that you can use to get rid of error 0x85002012 and be able to successfully sync with your email account:

Method 1: Run an SFC Scan

To eliminate damaged or corrupted system files as the cause of error 0x85002012 and simply for the fun of it, you should run an SFC scan that locates and repairs damaged system files before you actually move onto the fix for this problem that has managed to work for the majority of the people who have suffered from it. To run an SFC scan, you can follow the steps here. (sfc /scannow)

Method 2: Reduce the number of emails in your email account’s Inbox

If running an SFC scan does not work for you, the one solution that is bound to work for you is reducing the number of emails in the Inbox of the email account that Windows 10 Mail fails to sync with. In order to do so, you will need to access your email account through a means other than Windows 10 Mail – an internet browser, for example. It doesn’t matter if you delete emails from your account’s Inbox or move them to a different folder, as long as you can reduce the number of emails in the Inbox to any number less than 99, Windows 10 Mail will be able to sync with the account and successfully serve you your entire email account to you.

The post BEST FIX: Fix Error 0x85002012 in Windows 10 Mail App appeared first on Appuals.com.

BEST FIX: The Linked Image Cannot Be Displayed in Outlook 2010

$
0
0

Outlook 2010 is without even the shadow of a doubt one of the best desktop email clients out there, but it is definitely not as though Outlook 2010 does not have any flaws. Outlook 2010 users can be affected by a multitude of different problems, one of them being the “The linked image cannot be displayed” issue. This issue is basically an error message that reads “The linked image cannot be displayed. The file may have been moved, renamed, or deleted. Verify that the link points to the correct file and location.” This error message, along with a large red X, appears on all of the images that an Outlook user sends or receives with emails.

The “The linked image cannot be displayed” issue, in most cases, is either caused by an incorrect registry value that causes Outlook to send a link to the physical path of an image file instead of the image itself or a problem with the user’s Temporary Internet Files folder. Thankfully, you can fix this issue, and the following are the two methods that have proven to be successful at fixing the issue for Outlook users who have suffered from it in the past:

Method 1: Fix the “Send Pictures with Document” registry key

Open the Start Menu.

Type regedit into the Search bar and open the search result named regedit.

regedit - 1

In the Registry Editor, navigate to the following directory in the left pane:

HKEY_CURRENT_USER\Software\Microsoft\Office\14.0\Outlook\Options\Mail

(Note: The folder named 14.0 may be different in your case depending on the version of Microsoft Office that you are using, but the rest of the directory will be the same.)

Click on Mail to display its contents in the right pane.

Look for a key titled Send Pictures with Document and once you find it, double-click on it to open its specifications.

The Value data for the key will be set to 0. Set the Value data to 1 and click on OK.

Close the Registry Editor and restart your computer. The issue should no longer persist once your computer boots up.

Method 2: Relocate your Temporary Internet Files folder

If Method 1 does not work for you, there is a more than significant chance that relocating your Temporary Internet Files folder using Internet Explorer (Outlook uses IE to connect to the internet) to a new location will do the trick.

Close all open programs and applications and open Internet Explorer.

Go to Tools > Internet options and in the General tab, click on Settings under Browsing history. Click on Move folder.

2015-11-25_135258

Select a new location for your Temporary Internet Files folder and click on OK. A directory such as C:\Users\<username>\AppData\Local\ should suffice. The moving process will create a new subfolder in the Local folder and name it Temporary Internet Files.

Click on OK in the other two windows as well. Restart your computer, and Outlook should display actual images instead of the “The linked image cannot be displayed” error message once your computer boots up.

Method 3: Disable the Use Proxy option in IE’s LAN settings

Little do most people know, Outlook 2010 actually connects to the internet through Internet Explorer, which is why you may start seeing the “The linked image cannot be displayed” error where all of your email images should be if your IE is configured to use a proxy server for your LAN. If that is the case, all you need to do in order to fix the issue is stop IE from using a proxy server. To do so, you need to:

Open Internet Explorer.

Click on Tools in the upper right corner and then click on Internet options. Navigate to the Connections

Click on LAN settings at the bottom. Disable the Use a proxy server for your LAN option by un-checking it, and then click on OK. and Make sure that the Automatically Detect Settings option is checked

2015-11-25_135639

Click on Apply and then on OK in the Internet options. Close Internet Explorer.

Open Outlook 2010, and all your images will appear as they should.

Method 4: Disable any of your antivirus program’s features that protect cache

Outlook 2010 makes use of your computer’s cache to download the images that are attached to the emails that it sends and receives. This is why, if the antivirus program that you use has a feature that protects your computer’s cache from, say, email address and password stealers, it will also inhibit Outlook 2010 from downloading the images it receives. One example of such a feature is a feature titled Maximum Protection: Protect cached files from password and email address stealers that comes with the McAfee antivirus program. If a feature of your antivirus that protects your computer’s cache is what is causing the “The lined image cannot be displayed” issue on your computer, simply disable the specific feature of uninstall your antivirus program altogether and switch to a different one.

The post BEST FIX: The Linked Image Cannot Be Displayed in Outlook 2010 appeared first on Appuals.com.

BEST FIX: Windows Store and Apps Error Code 0x8e5e0408

$
0
0

Error code 0x8e5e0408 is one of the most notorious Windows 10 error codes out there, and it is an error code associated with the Windows Store – Windows 10’s resident application marketplace. Users are greeted with error code 0x8e5e0408 when the installation of an application from the Windows Store fails. In some cases, error 0x8e5e0408 causes the installation of all Windows Store apps to fail whereas in others, it only causes the installation of some apps to fail. For some users affected by error 0x8e5e0408, the app installation process is completed over half way (or in some cases all the way) and then fails, whereas in others, the installation fails and error 0x8e5e0408 is displayed before the installation ever actually starts.

No matter what the case may be, the bottom line is that error 0x8e5e0408 is a deadly problem. Error 0x8e5e0408 is almost always accompanied by an error message that basically states something went wrong and the user needs to try to install the app again. However, error 0x8e5e0408 is displayed no matter how many times the user tries to install the app. In almost all cases, error 0x8e5e0408 is born when a Windows 10 upgrade somehow changes or alters the name of the user’s local user account (located in the directory C:\Users). The following are the two methods that have proven to be successful at fixing error 0x8e5e0408 for users who have been affected by it in the past:

Before you proceed with the Registry Method, make sure you back it up. see here

Method 1: Install the app you want to through a new account

Create a new user account and sign into it.

Connect to the Windows Store using the same Microsoft account you use on your main account.

Install the app that wouldn’t install on your main account and display error 0x8e5e0408.

Switch to your main user account.

Copy the entire application data folder for the app you installed located in the C:\Users\{newaccount}\AppData\Local\Package\ directory and paste it in %AppData%\Local\Package.

Update the file permissions for the copied folder.

Once again, install the application that would normally fail to be installed and display error 0x8e5e0408 from the Windows Store, and it should now be installed successfully.

Method 2: Change the name of your user account back to the way it was

Press the Windows Logo key + R to open up a Run

Type regedit into the Run dialog and press Enter to open the Registry Editor.

regedit - 1

In the left pane of the Registry Editor, navigate to the following directory:

HKEY_LOCAL_MACHINE\SOFTWARE\Microsoft\Windows NT\CurrentVersion\ProfileList

0x8e5e0408-1

Scour the subfolders of the ProfileList folder (the folders that have S-1-5 in the beginning of their names) for a key titled ProfileImagePath that has the directory C:\Users\<your username> set as its data.

0x8e5e0408-2

Once you find that specific ProfileImagePath key, double-click on it to open its specifications.

In the Value data section, change the username in the C:\Users\<your username> directory to the way it is supposed to be.

Click on OK.

Close the Registry Editor.

Restart your computer, and once it boots up, the name of your account’s folder in Users will be what it used to be and you will be able to successfully download any and all apps from the Windows Store.

Method 3: Perform a factory reset

If Method 1 did not work for you, an instance which is quite unlikely, the only option you have left is to perform a factory reset. Performing a factory reset is bound to fix the issue for you, but you should back any valuable data up before you go through with the factory reset as it is bound to delete all of your personal files.

Open the Start Menu.

Click on Settings.

0x8e5e0408-3

Out of the array of different options provided, click on Update & Security.

0x8e5e0408-4

Click on Recovery in the left pane.

0x8e5e0408-5

In the right pane, click on the Get started button under the Reset this PC

0x8e5e0408-6

When provided with a choice to either keep your files or remove everything, click on Remove everything.

Follow the onscreen instructions and dialogs, and once you are done, your computer will have been reset to factory settings and you will no longer be faced with error 0x8e5e0408 when you try to install applications from the Windows Store.

The post BEST FIX: Windows Store and Apps Error Code 0x8e5e0408 appeared first on Appuals.com.

BEST FIX: Safari Crashes on StartUp

$
0
0

There is a pretty decent chance that at any given point during their use of the Safari browser on an Apple Mac, the average person may encounter an issue where Safari keeps crashing on them as soon as they start it up. As Safari is the resident internet browser for Mac computers, the program crashing every time it is opened can be a monstrosity of a problem. In almost all cases, Safari crashing on startup has something to do with the program’s files being corrupted, damaged or compromised in another way. The following are the three solutions that have proven to be extremely effective at fixing this issue for Mac users who have suffering from the Safari crashing on startup problem in the past:

Solution 1: Delete certain Safari files from your Library

Quit

Click on the Apple logo in the upper left corner and select Force quit.

In the window that opens, select Safari and click on Return.

Close the window.

Hold down the Option key, and while doing so, click on Go > Library.

Use the Finder menu bar to locate and delete all of the following items from the Library It is completely okay if some of these items don’t exist in your case.

Caches/com.apple.Safari

Caches/com.apple.Safari.SearchHelper

Caches/com.apple.SafariServices

Caches/com.apple.WebKit.PluginProcess

Caches/com.apple.WebProcess

Caches/Metadata/Safari

Preferences/com.apple.WebKit.PluginHost.plist

Preferences/com.apple.WebKit.PluginProcess.plist

Saved Application State/com.apple.Safari.savedState

Once the items listed above have been deleted, open Safari, and it should no longer crash on startup.

Solution 2: Move certain Safari files out of their default location

Quit Safari

Click on the Apple logo in the upper left corner and select Force quit.

In the window that opens, select Safari and click on Return.

Close the window.

Hold down the Option key, and while doing so, click on Go > Library.

Move the following items from the Library folder to an easily accessible destination (the Desktop – for example). It is completely alright if some of the following items don’t exist in your case.

Cookies/Cookies.binarycookies

Internet Plug-Ins

Preferences/ByHost/com.apple.Safari……..plist

Preferences/com.apple.Safari.Extensions.plist

Preferences/com.apple.Safari.LSSharedFileList.plist

Preferences/com.apple.Safari.plist

Preferences/com.apple.WebFoundation.plist

PubSub/Database

Safari (Not the application – a folder named Safari).

SyncedPreferences/com.apple.Safari.plist

Once you have moved the items listed above, all of your Safari extensions will be removed, your bookmarks will be deleted and your settings and preferences will be reset. However, Safari will no longer crash on startup.

If you decide to reinstall the Safari extensions that you lost, make sure that you reinstall them one by one as to make sure that you do not reinstall the extension that was causing your Safari to crash in the first place. Also, if you want to restore the bookmarks that you lost, simply open Safari, go to File > Import bookmarks, navigate to the file named Bookmarks.plist in the Safari folder that is now located on your Desktop (or wherever you moved it) and import your lost bookmarks. Once this is done, you can delete all of the items you previously moved.

Solution 3: Delete all the files in the Safari folder in the Library

Quit Safari.

Go to User > Library > Safari.

Delete all of the files in the Safari Don’t worry as deleting the files in this folder will not create any more Safari-related problems. However, deleting the file in the Safari folder will cause all your bookmarks to be deleted and Safari settings and preferences to be nullified and reverted to their factory defaults.

The post BEST FIX: Safari Crashes on StartUp appeared first on Appuals.com.

BEST FIX: Error 0x80070426 in Windows 10 Mail App

$
0
0

Error codes 0x80070426 is one of the many error codes associated with the Windows 10 Mail program. For most users, error 0x80070426 appears after they are informed by Windows 10 Mail that the settings for their email account are not up to date, and then every attempt they make to update their email account’s settings is met with error code 0x80070426 and a message stating the chances they want to make cannot be made. For other users, error 0x80070426 shows up when they try to sync Windows 10 Mail with their email account or even open Windows 10 Mail. Once error 0x80070426 showed up, some of the users who have been affected by it in the past also reported many of the other built-in Windows 10 applications (such as Weather and Calendar) not working at all, working slowly or also displaying error 0x80070426.

Error code 0x80070426 can be caused by anything from a corrupted or damaged system file to a pending update. Thankfully, error 0x80070426 can be fixed, and the following are some of the most effective methods that you can use to try and fix the problem on your own:

Method 1: Run an SFC scan

An SFC scan is basically designed to scan your computer for corrupted or damaged system files and then repair all of the damaged files that it manages to find. In addition, running an SFC scan is probably the most effective solution to error 0x80070426. To run as SFC scan, go here and follow the instructions provided.

Method 2: Reset the Windows Store’s cache

Press the Windows Logo key + R to open a Run

Type wsreset.exe into the Run dialog and press Enter. This will reset the Windows Store’s cache and quite possibly fix error 0x80070426 for you.

Method 3: Fix the problem using Windows PowerShell

Open the Start Menu.

Type powershell into the Search bar.

Right-click on the program named Windows PowerShell that appears. Click on Run as Administrator.

PowerShell

Type the following into Windows PowerShell and then press Enter:

Get-appxprovisionedpackage –online | where-object {$_.packagename –like “*windowscommunicationsapps*”} | remove-appxprovisionedpackage –online

Once the above command has been executed, re-download the Mail app from the Store and test.

2015-11-26_044248

Method 4: Switch to a different antivirus program

Some antivirus programs – McAfee antivirus, in particular – seem to somehow interfere with Windows 10 Mail and give birth to error 0x80070426. If your antivirus program is what is causing error 0x80070426 in your case, simply go to Start > Control Panel > Uninstall a program and uninstall your antivirus program. Error 0x80070426 should be no more as soon as you install your antivirus program. Leaving your computer unprotected is not a very good idea, so you should download and install a different antivirus program.

Method 5: Check for and install any and all available updates

In many cases, restarting their computer, opening Windows Update, checking for updates and installing all available updates fixed the issue for users suffering from error 0x80070426. If none of the methods listed above have worked for you, checking for and installing any and all available updates just might do the trick.

The post BEST FIX: Error 0x80070426 in Windows 10 Mail App appeared first on Appuals.com.

BEST FIX: Windows 10 Store Error “This App Can’t Open”

$
0
0

Many Windows 10 users have reported that either completely out of the blue or following a Windows 10 upgrade, they were no longer able to successfully open the Windows Store. The Windows Store would fail to open, and they would be met with an error message stating “This app can’t open.  There’s a problem with Store.  Please contact your system administrator about repair or re-installation.” For some users who have been affected by this problem, the Windows Store icon turned grey, whereas it stayed green for others. The “This App Can’t Open” problem can be caused by anything from non-functional DNS server addresses to an incorrect registration of the Windows Store or anything in between.

The “This App Can’t Open” error basically locks you out of the Windows Store, meaning that you can neither download any new apps nor update the ones that you already have, and this can be quite a boisterous problem. Fortunately, the Windows Store not opening and displaying the “This App Can’t Open” error can be fixed, and the following are the three most effective solutions that you can use to fix it:

Solution 1: Reset the Windows Store’s cache

For any and all Windows 10 problems pertaining even remotely to the Windows Store, it is wise move to reset the Windows Store’s cache as your very first attempt at trying to solve the issue. To reset the Windows Store’s cache, you need to:

Right-click on the Start Menu button to open the WinX Menu.

Click on Command Prompt (Admin) in the WinX Menu.

Type wsreset.exe into the Command Prompt and press Enter. Once this command is executed, the Windows Store’s cache will have been reset.

wsreset

Solution 2: Change your computer’s DNS addresses

A DNS server is the server that translates URLs into IP addresses for your computer, and if your computer is communicating with a DNS server that no longer works, your Windows Store may not open and display the “This App Can’t Open” error every time you try to open it. Fortunately, this can be fixed by simply changing the DNS servers your computer connects to and communicates with.

Right-click on the Network icon in your computer’s notification area and click on Open network and sharing center.

Click on Local Area Connection.

Click on Properties.

Click on Internet Protocol Version 4 (TCP/IPv4) to highlight it.

Click on Properties.

Enable the Use the following DNS server addresses option by clicking on the checkbox beside it.

If you want to use Google’s DNS servers as your new DNS servers, set 8.8.8 as your Preferred DNS server and 8.8.4.4 as your Alternate DNS server. If you want to use the DNS servers of OpenDNS – an open-source DNS service, on the other hand, set 208.67.222.222 as your Preferred DNS server and 208.67.220.220 as your Alternate DNS server. Both of these two selections are guaranteed to work. Once you are done changing your network connection’s DNS server preferences, make sure that you check the Validate settings upon exit option on your way out.

Click on OK. Also click on OK in the Local Area Connection Properties

Restart your computer, and when it boots up, you should be able to successfully open the Windows Store without being met with the “This app can’t open” error.

You can also see steps with images for instructions on changing DNS by Clicking Here

Solution 3: Re-register Windows Store through Windows PowerShell

Open the Start Menu.

Type powershell into the Search bar.

Right-click on the program named Windows PowerShell that appears. Click on Run as Administrator.

PowerShell

Type the following into Windows PowerShell and then press Enter:

Get-AppXPackage -AllUsers | Foreach {Add-AppxPackage -DisableDevelopmentMode -Register “$($_.InstallLocation)\AppXManifest.xml”}

2015-11-25_202748

Once this command has been executed, your Windows Store will have been re-registered and you should now be able to open it successfully without being faced with any errors or issues.

The post BEST FIX: Windows 10 Store Error “This App Can’t Open” appeared first on Appuals.com.

BEST FIX: Windows 10 Mail App Error 0x86000112

$
0
0

Windows 10 Mail, as amazing an email client as it may be, is simply riddled with all kinds of different issues, problems and errors, one of which is error code 0x86000112. Error code 0x86000112 is accompanied by an error message that states, “Something went wrong. We’re having problems syncing your email folders. Change your synchronization schedule, or reduce the number of email folders being synced”.

Error code comes into being either when there is something wrong with your synchronization schedule for Windows 10 Mail or the number of email folders that you are trying to sync is more than what the program can handle. In most cases, is it the latter rather than the former as, for some reason, Windows 10 Mail only seems to be able to sync with your email account as long as the email folders in your account don’t exceed a specific number. Error code 0x86000112 basically inhibits you from being able to sync Windows 10 Mail with your email account, which basically means that you will not be able to access your emails through Windows 10 Mail. Error 0x86000112 persists regardless of how much you tinker and play around with your synchronization schedule.

Fortunately, there is a way that you can use to get rid of error code 0x86000112 for good and regain the ability to sync Windows 10 Mail with your email account – perform a factory reset. A factory reset is bound to get your Windows 10 Mail working exactly as it should be, but all this will come at a cost. A factory reset will not only get rid of all the programs and applications you have installed on your computer but, because of the route that you will be taking, will also wipe all of your personal files and data. Since that is the case, be sure to back everything of value up before you continue. To perform a factory reset on a Windows 10 computer, you need to:

Open the Start Menu. Click on Settings.

2015-11-24_184246

Out of the array of different options provided, click on Update & Security. Click on Recovery in the left pane.

In the right pane, click on the Get started button under the Reset this PC

reset this pc windows 10


When provided with a choice to either keep your files or remove everything, click on Remove everything.

Follow the onscreen instructions and dialogs, and once you are done, your computer will have been reset to factory settings, all traces of error 0x86000112 will have been wiped and Windows 10 Mail will be able to sync with your email account exactly as it should be.

The post BEST FIX: Windows 10 Mail App Error 0x86000112 appeared first on Appuals.com.


BEST FIX: “Show Windows Store Apps on the Taskbar” Option is missing

$
0
0

Windows 8.1 was a pretty decent improvement over its much buggier and unstable predecessor – Windows 8. However, Windows 8.1 was not just about improvements; the update also brought with it quite a few new features. One of the new features that Windows 8.1 brought is the Show Windows Store apps on the taskbar option – an option that does exactly what its name suggests and can prove to be quite useful for the average Windows user.

However, some Windows 8.1 users have found that, when they right-click on the Taskbar and click on Properties they are not able to see the Show Windows Store apps on the taskbar option where it should be and that the option is missing altogether. The only explanation for this occurrence is that users experiencing this problem have not downloaded and installed the Windows update that brought the Show Windows Store apps on the taskbar to Windows 8.1 computers across the globe – update KB 2919355.

This issue can be fixed quite easily by simply checking for, downloading and installing update KB 2919355. To fix this issue and have the Show Windows Store apps on the taskbar option exactly where it should be, all you need to do is:

Move your pointer to the bottom right corner of your screen and then in the menu that pops up, click on Settings.

Click on Change PC settings.

Click on Update and Recovery.

Click on Windows Update.

Click on Check now.

Once all available updates for your computer have been detected, click on View details and look for the update that contains KB 2919355.

If an update containing KB 2919355 is not found, it is possible that you have not yet downloaded and installed an update – the KB 2919442 update, for example – that is crucial to the installation of KB 2919355. So, download and install all of the available updates that your computer has retrieved.

Once all of the updates have been installed, restart your computer and then check for updates again.

This time, an update containing KB 2919355 will definitely show up, and when you find this update, install it. Once the update has been downloaded and installed, you will have the Show Windows Store apps on the taskbar option exactly where it should be.

The post BEST FIX: “Show Windows Store Apps on the Taskbar” Option is missing appeared first on Appuals.com.

BEST FIX: Steps to Fix High CPU Usage By IAStorDataSvc

$
0
0

IAStorDataSvc is the name of the service translated as Intel Storage Data Service used by the Intel Rapid Storage Technology, which comes installed by default on most of the newer operating systems. This process, is not harmful and it is meant to provide you faster access to your frequently used programs and applications by automatically saving them to your SSD (if you have one), while retaining access to your Hard Disk Drive’s Capability. In short, it enables you to use both the SSD and the HDD. Intel’s Rapid Response Technology, which is a feature of Intel’s Rapid Storage Technology, works like a master-slave, database for faster access. This is mostly used in Enterprise and Server scenarios, therefore uninstalling it or not using it will be fine for a home-user. SSD’s themselves are pretty fast whether small in capacity or large.

ssd-chart-1

Now since we know what they do; and the choice is ours whether to keep it or lose it, the questions is why is IAStorDataSvc consuming CPU more then it should; this is because the technology will save to it’s cache your frequently used programs, and there’s a lot to it such as it may be building it’s cache index, clearing cache or upgrading cache, to save any new information. If you decided to keep it, then let this process run for a couple of hours and if it still won’t fix it, then uninstall it and re-install. If you decided to uninstall it or stop the process then that is easy to do.

I decided to keep it, so how do i fix the High CPU Usage?

Hold the Windows Key and Press R. Type appwiz.cpl and Click OK.

appwiz

In the list of installed programs, locate Intel Rapid Storage Technology, double click on it and choose Uninstall.

intel rapid storage 1

After it has been uninstalled, reboot your computer and come back to this page. (bookmark it). Now, Click Here to go to the download page for Intel Rapid Storage Technology, choose your operating system to have the downloads for your version of Windows listed, download it, run it and install it. That should fix the issue.

2015-11-28_084812

You can also hop over to the manufacturer’s site for your system to get the driver’s if you cannot figure out which one to use, the manufacturers download section for your product should list them specifically, since they know how the system is configured.

I decided to uninstall it, how do i do that?

Hold the Windows Key and Press R. Type appwiz.cpl and Click OK. In the list of installed programs, locate Intel Rapid Storage Technology, double click on it and choose Uninstall. This should uninstall it, and stop the process from running. You can also disable just the service, but it would be best to uninstall it since it can be re-installed when ever you want.

The post BEST FIX: Steps to Fix High CPU Usage By IAStorDataSvc appeared first on Appuals.com.

BEST FIX: High CPU Usage By Antimalware Service Executable (MsMpEng)

$
0
0

Antimalware Service Executable is the name of the process MsMpEng (MsMpEng.exe) used by the Windows Defender program. The service associated with this program is the Windows Defender Service. The two most common reason for it to be consuming high cpu usage are the real-time feature which is constantly scanning files, connections and other related applications in real time, which is what it is supposed to be doing (Protect In Real Time).

The second is the Full Scan feature which may be scanning all files, when the computer either wakes up from sleep or when it is connected to a network, or if it is scheduled to run daily. The bit to understand here, is that when it is doing a complete scan, your system will experience frequent lagging, hanging and delayed access/response from your input/interactions with the system, because the CPU is Hijacked by Defender. Don’t be afraid or lose patience here, instead let it run and scan, wait a few minutes and if there are lots of files etc, then it may even take a few hours, so let it run and finish what it is doing for the sake of your protection, once it has completed, it will release the CPU and the USAGE will drop down to its normal.

However, Full SCAN should only be done once in a while and not everyday, what I’ve seen with most users is that they have scheduled the scan feature to run when the computer wakes up from sleep, or when it’s connected to network, or if scan is scheduled to run daily.

So to fix this issue follow the methods below.

Reschedule Windows Defender Properly

Click the Start Menu on the left side, and type Administrative Tools. Click on it to open it.

Antimalware Service Executable-1

From the Administrative Tools, explorer Window, choose Task Scheduler. Double click on it to open it.

Antimalware Service Executable-2

From the left pane of Task Scheduler browse to the following path:

Library/Microsoft/Windows/Windows defender

Once you’re in the Windows Defender Folder, locate the Name called “Windows Defender Scheduled Scan”, click on it once to highlight it and then choose Properties.

Antimalware Service Executable-3

From the Properties Windows, Click on the Conditions Tab and Un-check the options under Idle, Power and Network and Click OK. Don’t Worry, we will schedule it properly in the steps to come.

Antimalware Service Executable-4

Once this is done, we will then reschedule it. Click the Properties from the right pane again, and this time choose the Triggers tab, and Click New. Here, choose the Weekly option or Monthly, as per your preference, and then choose the Day, Click OK and make sure it is enabled.

2015-11-28_094849

This will re-schedule the Defender to work as per your preference. Now, if the scan was previously running, wait for it to finish, you’ll see the results after the scan has finished, but when the scan does run as per your defined schedule, you will still get the High CPU Usage. Repeat the same for the three other schedules.

Windows Defender Cache Maintenance, Windows Defender Cleanup, Windows Defender Verification

Turn the conditions off, set the trigger to run once a week.

The post BEST FIX: High CPU Usage By Antimalware Service Executable (MsMpEng) appeared first on Appuals.com.

BEST FIX: Error 0x80073CF9 in Windows Store on Windows 10 Mobile

$
0
0

After upgrading their phones to the latest build of the Windows 10 Mobile Operating System available on the Fast Ring of the Windows 10 Mobile Insider Preview, many users reported being faced with error code 0x80073CF9 whenever they tried to install or update certain applications on the Windows Store. Some users even received the error when they tried to open certain installed apps. Error code 0x80073CF9 basically takes away the user’s ability to install and update applications using the Windows Store, and that can prove to be quite a significant problem.

Error code 0x80073CF9, in almost all cases, is caused by specific files pertaining to the Windows Store that tend to go missing when a phone is upgraded to the latest build of the Windows 10 Mobile Insider Preview. Thankfully, you can not only work around and bypass the issue but can also fix it for good. The following are both the available workaround and the fix for the error code 0x80073CF9 problem:

The Workaround:

The actual solution for error code 0x80073CF9 requires a significantly large amount of work and can also be described as being more extreme that its workaround. The workaround that you can use to bypass error code 0x80073CF9 and successfully update the applications that display error code 0x80073CF9 whenever you try to do so is the following:

Update the affected apps from the Windows Store

Wait for the update to fail and for error code 0x80073CF9 to be displayed.

Once error code 0x80073CF9 has been displayed, navigate to the Windows Store app page for the specific app that has failed to update, and update it from its page. For some reason, updating apps from the Windows Store using this workaround actually results in success and does not lead to the user being faced with error code 0x80073CF9.

The Solution:

Error code 0x80073CF9 can also be fixed for good, but doing so requires you to perform a hard reset on your device. It should be noted that a hard reset will not only delete any and all installed applications and personal data but will also reset the device to its factory condition software-wise. To hard reset a Windows phone, you need to:

Go to Settings.

Navigate to System.

Go to About.

Tap on Reset your phone.

Follow the onscreen instructions to perform a hard reset. Once your phone has been reset, you will no longer be met with error code 0x80073CF9 when you try to install or update any apps from the Windows Store.

If resetting your device results in the Messaging app disappearing, all you need to do in order to get it back is go to the following link using Microsoft Edge:

ms-windows-store:pdp?pfn=Microsoft.Messaging_8wekyb3d8bbwe

The link will open in the Windows Store, and you can then install the Messaging app from that Windows Store page.

The post BEST FIX: Error 0x80073CF9 in Windows Store on Windows 10 Mobile appeared first on Appuals.com.

BEST FIX: Steps to Fix Error ERR_FILE_NOT_FOUND

$
0
0

Google Chrome is considered to be at the very top of the internet browser food chain for almost every computer Operating System out there. However, just like all other internet browsers out there, Google Chrome is prone to having a few kinks, one of which is Error 6 (net::ERR_FILE_NOT_FOUND). Error 6 is a Google Chrome error that states “Error 6 (net::ERR_FILE_NOT_FOUND): The file or directory could not be found. Error 6 can present itself either when the user tries to open any website whatsoever or a specific website.

In almost every single case of Error 6 (net::ERR_FILE_NOT_FOUND) to date, a Chrome extension has been to blame. Since that is the case, simply getting rid of the extension that is causing users to be faced with Error 6 (net::ERR_FILE_NOT_FOUND) whenever they try to open any or a specific web page should fix the issue. The following are the two most effective known solutions to Error 6 (net::ERR_FILE_NOT_FOUND):

 Solution 1: Get rid of the Default Tab extension

In the case of many people who have been affected by Error 6 in the past, the culprit was a Google Chrome extension titled Default Tab that had somehow made its way onto their computer and was causing them to be met with Error 6. The Default Tab extension is not only a Chrome extension but is also a program in and of itself, which is why no matter how many times you remove it from the list of extensions in Google Chrome, it will come back. Fortunately, you can get rid of the Default Tab extension and consequently fix Error 6, and in order to do so, you need to:

Go to Control Panel > Uninstall a program.

err_file_not_found_1

Look for Default Tab in the list of installed programs. Once you have located Default Tab, uninstall it. Once the Default Tab program has been uninstalled, open Google Chrome. Click on the hamburger Menu button in the top right corner of the window. Click on Settings.

err_file_not_found_2

In the Settings tab, navigate to Extensions.

In the extensions tab, find and remove the Default Tab This time, the extension will not come back once you delete it as you have already installed its program counterpart.

Solution 2: Determine which extension is causing the problem and remove it

If you do not have a Default Tab extension in the list of your Chrome extensions, the only plausible explanation is that an extension other than the Default Tab extension is causing Error 6. If that is the case, you need to:

Open Google Chrome. Click on the hamburger Menu button in the top right corner of the window. Click on Settings.

err_file_not_found_4

Navigate to Extensions in the left pane. In the right pane, uncheck and disable all of the Chrome extensions that you have. Enable any one extension, and restart Chrome and see if Error 6 persists. If you do not see Error 6 like you did before, the extension you enabled is not the culprit. If that is the case, repeat these steps over and over again, each time enabling a different extension.

err_file_not_found_6

The culprit extension will be the one which causes you to experience Error 6 when only it is enabled. Once you have determined which extension is the culprit, go to Extensions once again and remove it by clicking on the dustbin icon next to the Enable checkbox and click on Remove to confirm the action.

err_file_not_found_7 err_file_not_found_8

The post BEST FIX: Steps to Fix Error ERR_FILE_NOT_FOUND appeared first on Appuals.com.

BEST GUIDE: How to set up a VPN Connection in Windows 10

$
0
0

A Virtual Private Network (VPN) is basically an add-on that is added to public networks such as WiFi hotspots and the internet to make communicating over them more secure and less vulnerable to third-party exploitation. Virtual Private Networks are brilliant tools for anyone who wants to make sure that the data they send and receive over a public network is not accessible to the entirety of the populous that has access to the network. To gain access to the information transmitted over a Virtual Private Network, a person needs the credentials required to first gain access to the Virtual Private Network itself. VPNs are mostly used by corporations and businesses and any other establishments that need to keep the information communicated inside them from being accessed by any third-party.

In a Virtual Private Network, the Point-to-Point Tunneling Protocol (PPTP) is used to make sure that the messages transmitted from one VPN node to another VPN node over the internet (which the entire populous has access to) are secure and invulnerable to being accessed by anyone who isn’t authorized to access them. The ability to set up and use Virtual Private Networks and VPN connections comes built into all active iterations of the Windows Operating System out there – and that includes the latest and greatest version of Windows, Windows 10. If you want to set up a VPN connection on a Windows 10 computer, you need to first acquire the credentials you will need to access the VPN server you want to connect to. The required credentials include the name or the IP address of the VPN server you want to connect to and the username and password that you have registered on the VPN server. Once you have this information, to set up a VPN connection on a Windows 10 computer, you need to:

Click on the Network connection icon in the computer’s System tray. If the computer is connected to a WiFi network, the icon will look like a WiFi signal. If the computer has an Ethernet connection, the icon will look like a computer with an Ethernet cable on its left side. In the menu that pops up, click on the blue Network settings link at the bottom.

windows 10 vpn - 1

This will open the Network & Internet settings Navigate to the VPN tab in the left pane of this window. In the right pane, click on Add a VPN connection.

windows 10 vpn - 2

Populate the Add a VPN connection window as follows:

vpn windows 10 - 3

VPN Provider: Windows (built-in)
Connection name: <Type in the name you want to give your VPN connection>
Server name or address: <The name or IP address of the VPN server you want to connect to>
VPN type: Point-to-Point Tunneling Protocol (PPTP)
Type of sign-in info: User name and password
User name (optional): <The user name you have registered on the VPN server>
Password (optional): <The password for your account on the VPN server>

Enable the Remember my sign-in info option by clicking on the empty checkbox beside it and checking it.

Click on Save.

As soon as you click on save, the VPN connection will have been created. All you need to do in order to connect enable the VPN connection and connect to the VPN server once the connection has been created is to simply navigate to the VPN tab in the Network & Internet settings window, click on the VPN connection that you created and click on the Connect button.

If you want to enable the VPN connection you have created and connect to the VPN server ever more quickly, simply click on the WiFi or Ethernet icon in your System tray and, from the list of all available connections, click on the VPN connection you would like to enable and click on Connect.

The post BEST GUIDE: How to set up a VPN Connection in Windows 10 appeared first on Appuals.com.

BEST FIX: File System Error (-1073741819) on Windows 10

$
0
0

An alarmingly large number of people who upgraded to Windows 10 from a version of Windows 7 reported that, after the upgrade, they were not able to install any programs on their computer or take advantage of any other administrative privileges as every time they tried to do so, UAC (User Access Control) displayed File System Error (-1073741819) every time they tried to prove to it that they had administrative privileges. This is most definitely an excruciatingly frustrating problem that moved onto the final version of Windows 10 even though its existence was discovered and reported when Windows 10 was in its beta testing phase.

The culprit behind this bizarre and anomalous problem is the variety of sound schemes that migrate to your copy of Windows 10 when you upgrade from Windows 7. As it turns out, Windows 10, for some reason, is incapable of playing specific sounds included in those sound schemes – specifically the “pop” sound that is played when a dialog box pops up – and this results in UAC denying the administrator access to their own computer. Fortunately, this problem can be fixed, and the most popular fix for this problem is just as weird as the problem itself. The following are the most effective fixes for UAC displaying File System Error (-1073741819) on Windows 10 in existence:

Solution 1: Set your Sound scheme to “No sounds” or “Windows Default”

As surprising as it may sound, the most popular – and most bizarre – fix for the File System Error (-1073741819) problem is to set your computer’s Sound scheme to either No sounds or Windows default.

Open the Start Menu. Search for Sound and click on the result of the same name that shows up. Navigate to the Sounds

file system error - 1

Set your Sound scheme to either No sounds or Windows default. As soon as you do so, File System Error (-1073741819) will be no more.

file system error - 2

Losing their custom sound scheme and having to bear no sounds at all or the sounds that are the Windows default can, for some Windows 10 users, be almost entirely unacceptable.

If that is the case and you want your custom sound scheme back without having to deal with File System Error (-1073741819) again, all you need to do is open the Start Menu >  search for UAC (User Access Control), click on Change User Access Control settings, move the slider in the window to the lowest setting (Never notify) and click on OK.

2015-11-29_003945

Solution 2: Set your theme to Windows 10

Another fix for the File System Error (-1073741819) problem is to simply set your computer’s theme to Windows 10. Doing so manages to fix the issue because changing your theme to Windows 10 will set your Sound scheme to Windows default, and that, in turn, will fix the problem.

Right-click on an empty space on your Desktop. Click on Personalize.

2015-11-29_004051

Navigate to Themes. Click on Theme settings. Set your theme to Windows 10.

Solution 3: Disable UAC by duping it

Some Windows 10 users who have been affected by the File System Error (-1073741819) in the past have reported that an affected user can turn the UAC slider off without messing with their sound scheme or theme, but doing so needs a significant amount of skill. To do so, you need to navigate to Start Menu > Control Panel, search for uac, click on Change User Access Control settings, move the slider in the window to the lowest setting (Never notify). Once you have done so, you need to press the Spacebar (this will serve as a substitute to clicking on OK and then spam the dialog box that opens up as soon as you press the Spacebar with clicks. This basically means that you will have to keep clicking on the dialog box at the speed of light until it no longer appears.

Solution 4: Create and use a new user account

Last, but certainly not the least, another method that can be used to fix the File System Error (-1073741819) issue is to simply create and use a new user account. As fate would have it, when an affected user creates a new user account on their computer, the problem does not replicate itself and send its twin to the new user account. Instead, the problem stays in the old user account and the new user account does not have any UAC related problems. Even though this solution requires significantly more effort as opposed to its counterparts listed above, if none of the solutions listed above work for you, creating and using a new user account is definitely the way to go.

The post BEST FIX: File System Error (-1073741819) on Windows 10 appeared first on Appuals.com.


BEST FIX: Ethernet doesn’t have a valid IP configuration

$
0
0

Ethernet doesn’t have a valid IP Configuration is caused when your NIC (Network Interface Card) hooked up to your Router or Modem via the Ethernet Cable is unable to get a VALID IP Address (Internet Protocol). This is needed for the computer to speak to the router, and function on the internet. There are three main causes for this issue to occur, the first one is a faulty router, the second one is a incorrectly assigned IP Address to the computer, and the third one is the faulty NIC. We will address the issue in three steps, and they must be followed in the sequence listed.

Check Your NIC (Network Adapter Settings)

The router usually assigns the IP Address Automatically and this should be the preferred setting unless you’ve manually chosen to specify IP Address. If that is the case, then you should still set it to automatic first, once it is connected, check the Internet Properties for the correct settings and re-configure it manually.

The instruction below will work on Windows Vista/XP/7/8 and 10.

To begin, Hold the Windows Key and Press R. Type ncpa.cpl and Click OK. In the Network Connections window, right click your Network Adapter and choose Properties.

Ethernet doesnt have a valid IP Configuration-1

From the Ethernet Properties window, click one to highlight Internet Protocol Version 4 (TCP/IPv4) and then click on Properties. The next window will open up the Internet Protocol Version 4 (TCP/IPv4) Properties, from here make sure that the following two settings are selected.

  • Obtain an IP Address Automatically
  • Obtain DNS Server Address Automatically

2015-11-29_074548

This should do for the Ethernet Card. Move to the next stage of rebooting the router.

Reboot Your Router / Modem and Check Ethernet Cable

Power of your router, and the modem or if it is just the router then power the router off else both. Wait for 5 minutes and then turn the router back on. After it has been turned on, check your PC if it now has the valid configuration, you may need to wait a few minutes. Once this is done, test to see if it now works and has the correct configuration. If it still won’t work, then try using a different Ethernet cable from your Router to the Computer. If it still won’t work, then try connecting your computer to a different router, if it still has the same issue with the other router the network card will need to be replaced, if it does connect then the router will need to be replaced. Before you replace it, try doing a factory restore (check manufacturer’s guide for factory reset instructions for your router).

The post BEST FIX: Ethernet doesn’t have a valid IP configuration appeared first on Appuals.com.

BEST FIX: Steps to Fix Canon Printer Error 5C20

$
0
0

Error 5C20 is an error associated with many Canon printers, especially those of the MX series. Error 5C20, like most printer-related errors, basically inhibits the user from printing anything using their device. Error 5C20 is often accompanied by weird rattling sounds when the user tries to print anything. Error 5C20 almost always points to a hardware issue, specifically an issue with the printer’s logic board that is preying on its ability to successfully move the rollers and cartridge carriage. Fortunately though, the following are the three most effective methods that you can try out on your own to give fixing your Canon printer yourself a shot:

Method 1: Reset the printer

Resetting the printer basically erases its flash memory and resets the device, often putting an end to printer-related problems such as error 5C20. However, it should be noted that, when you unplug a Canon printer from its power outlet, all of the faxes stored on it are deleted.

Press the Power button on the printer and wait for it to turn off completely.

error 5c20-1

Unplug the printer from its power outlet.

error 5c20-2

Wait for at least 30 seconds, and then reconnect the printer to its power outlet and turn it on. This will successfully reset the printer.

Method 2: Check the printer’s print head

If error 5C20 is accompanied by crackling and/or rattling noise when you try to print something, the cause may be a problem with the printer’s print head. To determine if that is indeed the cause so that you can move onto either cleaning or replacing the print head, you need to first unplug the printer from its power outlet and then take off the printer’s cover panel to gain access to its insides, lift the orange/grey lever to the lift of the ink cartridges, remove the ink cartridges and check on the print head to see if that is the problem.

Method 3: Make sure that the belt that moves the cartridge carriage is in place

If the print head turns out to be completely okay, the cause behind error 5C20 can be a problem with the belt that moves the cartridge carriage back and forward inside the printer to release ink onto paper. This belt is located directly behind the cartridge carriage, so remove the carriage and use a flashlight to check on the belt, make sure that the belt is in place and has not slipped off its wheels on either end of the printer and does not need any lubricant. If the belt feels dry, gently apply a very small amount of white grease to it using a Q-tip.

If none of the methods listed above manage to get rid of error 5C20 for you, your only choice may be to have your printer serviced as the cause of error 5C20 in your case is likely to be hardware-related. You should contact your nearest Canon service center (or a qualified printer serviceperson) and set up an appointment to have your printer looked at and fixed.

The post BEST FIX: Steps to Fix Canon Printer Error 5C20 appeared first on Appuals.com.

BEST FIX: Send and Attach Buttons Missing in Thunderbird

$
0
0

Some Mozilla Thunderbird users have reported their Send and Attach buttons simply disappearing from their Compose Message and Reply windows entirely out of the blue. Missing Send and Attach buttons means that the user will not be able to attach any items to their emails or even send any emails, making this quite a significant problem. Fortunately, this is a problem that can be fixed quite easily. Listed and described below are the two most effective solutions that you can use to No matter which of the following solution you decide to try, make sure that you try it in the Compose Message or Reply window (the window where you actually create the email that you want to send).

Solution 1: Press Alt or F10

In some cases, the Send and Attach buttons in Thunderbird may disappear if the toolbar they are located on is somehow hidden. If that is the case, simply pressing Alt or F10 when you are in a Compose Message or Reply window will unhide all hidden toolbars. If pressing Alt or F10 doesn’t work for you, don’t give up hope and simply move onto the next solution.

Solution 2: Enable the Composition Toolbar

Your Send and Attach buttons may not be where they always are because the entire Composition toolbar (known as the Mail toolbar in older versions of Thunderbird) has been disabled. If that is the case, simply enabling the toolbar that has been disabled will cause your Send and Attach buttons to be restored.

Click on View in the top left corner of the screen. Click on Toolbars.

2015-11-29_114820

Make sure that the Menu bar, the Composition toolbar, the Formatting bar and the Status bar are all enabled. If one of these toolbars isn’t enabled, enable it. Save the changes and check to see if the Send and Attach buttons have been restored to their original positions.

Solution 3: Restore the default button set on your Composition Toolbar

If all of the toolbars in View > Toolbars are visible but you still can’t see the Send and/or Attach buttons they may have somehow been moved out of their respective toolbar. To restore them, all you need to do is restore the default button set for the toolbar on which they are located – the Composition (or Mail) toolbar.

Click on View in the top left corner of the screen. Click on Toolbars. Click on Customize. Click on Restore default set. This will restore all toolbar layouts to their default configurations.

2015-11-29_115139

Solution 4: Reset Thunderbird

Resetting Thunderbird will not result in loss of e-mails, only the view and toolbars will be resetted. To do this, Hold the Shift Key and click on the Thunderbird icon. Then put a check in, Reset toolbars and controls, and choose Makes Changes and Restart.

2015-11-29_115842

The post BEST FIX: Send and Attach Buttons Missing in Thunderbird appeared first on Appuals.com.

BEST FIX: System.Runtime.InteropServices.COMException (0x80070422)

$
0
0

Many Windows users using computers running on Windows 10 reported being met with the System.Runtime.InteropServices.COMExceptions (0x80070422) error and a few other errors every single time they boot their computer up. Some of the many error messages that such users reported seeing along with the System.Runtime.InteropServices.COMExceptions (0x80070422) error were the following:

at System.Management.ThreadDispatch.Start()
at System.Management.ManagementScope.Initialize()
at System.Management.ManagementEventWatcher.Initialize()
at System.Management.ManagementEventWatcher.Start()
at SecureDeleteBackground.MainWindow_SourceInitialized(Objectsender, EventArgs e)
g-pAsWMI-NotOpen
getMode

In such cases, after dismissing all of the error messages that they received, users were unable to perform operations such as connect to WiFi networks or play any audio, among many others. Any individual who has ever used a computer would certainly be able to imagine how this can prove to be a truly dire problem. This issue is most likely to be caused by missing, corrupted or damaged system files. If you are suffering from this problem, fear not as this issue is quite fixable. The following are some of the most effective solutions to this issue:

Solution 1: Run a couple of DISM commands

Right-click on the Start Menu button to open the WinX Menu.

Click on Command Prompt (Admin) in the WinX Menu.

2015-11-29_120256

Type in the following command and then press Enter:

dism.exe /online /cleanup-image /scanhealth

Once the previous command has been executed, type in the following command and press Enter:

dism.exe /online /cleanup-image /restorehealth

2015-11-29_120808

Solution 2: Run an SFC scan

A System File Checker (SFC) scan is a utility that scans the computer for any corrupted or damaged system files and repairs whatever damaged system files it discovers. Running an SFC scan is another effective method that you can use to try and fix this problem. To run an SFC scan on a Windows 10 computer, go here and follow the instructions provided.

Solution 3: Repair your computer using installation or recovery media

If the two solutions listed and described above don’t work for you, you should try repairing your computer using Windows 10 installation or recovery media. The Windows 10 repair functionality is designed to repair any and all system-related problems in Windows 10.

Acquire a Windows 10 installation USB or DVD or a Windows 10 recovery media. If you don’t have such a medium handy, you may have to create one (see steps here). Once you have the Windows 10 installation or recovery media, insert it into your computer.

Restart your computer.

Access your computer’s BIOS settings (check your computer’s instructions manual for directions to do so).

Configure your computer to boot from the media that you have inserted.

Go through with the Windows 10 installation process as you usually would, and then on the Install Windows page, click on Repair your computer instead of Install now. If you are using Windows 10 recovery media and not Windows 10 installation media, skip this step.

Follow the onscreen instructions to repair your computer.

The post BEST FIX: System.Runtime.InteropServices.COMException (0x80070422) appeared first on Appuals.com.

BEST GUIDE: Enable / Disable Data Execution Protection in Windows 10

$
0
0

Data Execution Protection (DEP) is a security feature that comes with all versions of Windows starting from Windows 7. DEP is a security feature designed to help protect Windows computers from damage that can be inflicted by viruses and other security threats. While DEP is a pretty handy and useful feature, some Windows users often want to disable it. Well, it is certainly possible for you to enable and disable Data Execution Protection on any version of Windows (including Windows 10) at will. If you want to disable Data Execution Protection in Windows 10, you need to:

Right-click on the Start Menu button to open the WinX Menu. Click on Command Prompt (Admin) in the WinX Menu.

2015-11-29_120256

Type the following command into the elevated Command Prompt and then press Enter:

bcdedit.exe /set {current} nx AlwaysOff

Once the Command Prompt says that the operation was completed successfully, DEP will have been disabled on the computer.

On the other hand, if you want to enable Data Execution Protection on a computer running on Windows 10, you need to:

Right-click on the Start Menu button to open the WinX Menu.

Click on Command Prompt (Admin) in the WinX Menu.

Type the following command into the elevated Command Prompt and then press Enter:

bcdedit.exe /set {current} nx AlwaysOn

Once the Command Prompt says that the operation was completed successfully, DEP will have been enabled on the computer.

There is a chance that, if you are trying to turn DEP off on a UEFI-enabled computer (basically any computer that came with Windows 8 or 8.1 out of the box), you will receive an error message that says, “The boot configuration data store could not be opened. Access denied.” whenever you try to execute the commands used to enable and disable DEP in a Command Prompt. If that is the case, make sure that the Command Prompt you use to execute the commands is an elevated Command Prompt that has administrative privileges – titled Command Prompt (Admin) in the WinX Menu.

If making sure that you execute the commands in an elevated Command Prompt doesn’t work, you will have to reboot your computer, open its BIOS settings, disable the Secure Boot feature, save the changes and reboot to get the commands to be executed successfully. Once the command have been executed successfully and you have enabled/disabled Data Execution Protection, simply go into the computer’s BIOS settings again and enable Secure Boot as it actually is a useful feature.

The post BEST GUIDE: Enable / Disable Data Execution Protection in Windows 10 appeared first on Appuals.com.

Viewing all 4542 articles
Browse latest View live